

You have to admire the genius of early dressmakers and needleworkers. Trims were expensive in either time or money in the 19th century, and the feminine impulse to embellish even underclothing meant that a lady needed quite a few yards of lace, crochet or tatting. Or… tape.
Years ago I found a beautifully preserved petticoat, c1860, with a meticulously “pointed” edging on the hem – all 144 inches of it. I always meant to figure out how it was done and perhaps even make some myself. So when I came across an illustrated article with directions for “Tape-work Edging” I decided to tackle this embellishment.
Here is Mrs. Weaver’s tutorial from Peterson’s Magazine, 1864 (it appeared the same year in Godey’s Lady’s Book):

Very quickly made, she says? For four days I struggled to come to terms with a strip of paper and a vandyke point. I left little piles of crumpled scraps on every table in the house. Pointless, you say? Belaboring the point? Had I missed the point? (Awful puns and I’m worse in person.) Perhaps. But I was sure it could work because I could see the finished result! It got to the point where I was almost ready to unstitch the petticoat’s trim to see how it was done. The point of no return, as it were.

And that’s where I figured it out. No, I didn’t disfigure a relic. I took a straight pin and explored the folds under a bright light.
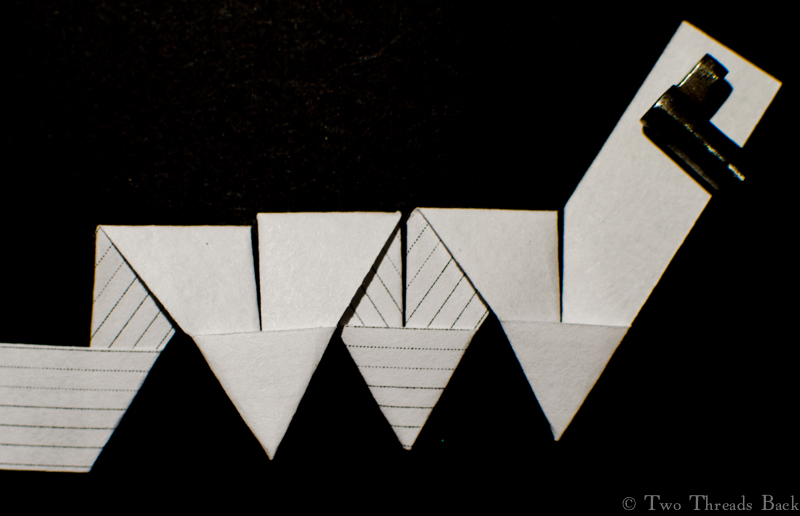
If you knit, crochet, or are otherwise gifted at following turns (Origami?), this next part will not be of interest since you have no trouble with Mrs. Weaver’s directions. But just in case there’s another soul out there who wants some extra help, here are photos!


As for what kind of tape Mrs. Weaver recommended, it was “Chinese tape No. 4.” I can’t help with the size, but I did find this on Chinese tape:
“…tape three-eighths of an inch wide, of that kind which, at some shops, is called “twilled tape,” “India tape,” “Chinese tape;” but it is of the kind that will not curl or get hard in the washing, and is rather coarse-looking than otherwise.”
That’s according to Godey’s, 1861, although it was repeated in other periodicals for the next 15 years. This tape must have been fairly inexpensive, because it takes a lot of it to make even a few inches.
These weren’t the only references to points and clothing (circa 1860s) that I’ve read recently. Fear in North Carolina: The Civil War Journals and Letters of the Henry Family is a fascinating look at daily life in the southern Appalachians during the war years. In it, Cornelia Henry mentions pointing several times, although I don’t know if she’s referring to the same technique.
“I have been sewing on a chemise for Zona today, it is pointed.” “I finished my pointed chemise about 3 o’clock this evening.” “I sewed some on my pantlets, pointed and tucked one.” “I sewed some on my pointed night cap.” “I cut out myself a chemise this morning, going to trim it with pointed tape trimming, some Dora gave me last summer.”
Of course there are many other ways to make pointed trim, and I’m hoping to write about one that I’ve seen on a Regency era dress. However, I was determined to figure out this particular tape version for myself, and the satisfaction of victory was worth the frustration. I’ve got a suspicion that somewhere, in a book or on the internet, is a brilliant explanation that would have saved me much anguish. If you know where to find it, please be kind and don’t point it out?


Necessity as the mother of invention and all that! I’m impressed – it must have been rather fiddly to do!
LikeLiked by 1 person
Painfully so. 🙂
LikeLiked by 1 person
I love how you used the lined paper to be sure your folds were consistent, and to mimic front and back sides. I’m sure I would have never figured the process out, but I can visualize using it in art quilts!
LikeLiked by 1 person
It worked a lot better than trying to pin ribbon to a pillow. I tried that for about a minute and a half!
LikeLike
Wow! That was a good bit of dedication! I know of things modernly called “prairie points” – but they tend to be individual points sewn all in a row. To figure out how to do it with continuous tape is amazing! A lot of work and a lot of tape! How wide was the tape you used?
LikeLike
I think the 19th women needlework authors like Mrs. Weaver, Matilda Pullan, Eliza Warren, etc. were quite amazing. I can’t imagine coming up with so many patterns and crafting ideas, and all without the technology aids we have now!
LikeLike
I want to make Vandyked petticoats now too (and nightcaps, chemises etc). Thanks for the super explanation!
LikeLike
I’d like to make a few inches of it – but not 144! 🙂
LikeLike
Must try for my sampler book! A couple of inches, maybe? I shouldn’t make promises I cannot keep, I have the attention span of a gnat! 3/8″, huh?!!! Hmm, methinks I should go back to sewing school. Great information though! I keep coming back as you constantly challenge me.
LikeLike
Gnat’s attention span = ok. Gnat’s memory = I have a suggestion. If you make a sample one, either write a little number on each step/fold, and/or keep the working end of the tape loose from the book. That’s so that you can lift it up and trace or unfold it backwards. I can forget one day how I made something the day before!
LikeLike
This is superb! Origami at it’s best 🙂
Thank you very much for sharing!
LikeLiked by 1 person
🙂
LikeLike