

MILLENER, or MILLINER, one who sells ribbands and dresses, particularly head dresses for women; and who makes up those dresses. Of this word different etymologies have been given. It is not derived from the French. The French cannot express the notion of milliner, otherwise than by the circumlocution marchand or marchande des modes….
Littleton, in his English and Latin Dictionary, published 1677, defines millener, “a jack of all trades;” q. d. millenarius, or mille mercium venditor; that is, “one who sells a thousand different sorts of things.” Encyclopaedia Britannica, 1823
It’s summer and I’m still here and still sewing a little (not quite a thousand things) although I haven’t posted for months now. Life has been really hard lately, but looking at Mélisande and dreaming of her wardrobe has brought a lot of cheer. Playing milliner (in the broader sense) for Mélisande has been more challenging, but that’s thanks to my penchant for tackling projects labeled “Do not try this at home!”
The exquisitely beautiful Mélisande was created by Kathy Patterson, a brilliant artist and doll maker (her historical dolls are perfection) who made my dream of an early 19th century wooden doll come true. She is a 19″ wooden lady, carved in the Grödnertal or Tuck Comb style of the early 1800s, and perfect for dressing in clothing from the Regency to Romantic eras. Let me qualify that: perfect for doll dressers who know what they’re doing.

As for the rest of us… well, it’s more of an adventure. I did know enough to start with a linen chemise – or shift, if you share Jane Austen’s scorn of “mock modesty.” Using a tattered and weary dresser cloth for fabric, I cut the arm gussets and sleeves in one piece, a little trick learned from looking at an original and which I think is also mentioned in The Workwoman’s Guide.

However, as I was smirking over saving a few stitches on the gussets, time was playing a sneaky trick on me. Hint: check old fabric for flaws BEFORE you sew. That tiny stain may be just a stain when you cut out the sleeve, but by the time it’s been washed and ironed it could deteriorate into a hole. Or two. Or three. And you might not find them until you’re dressing the doll for her final photo session. And you’ll have to unstitch and redo it all. Sigh.

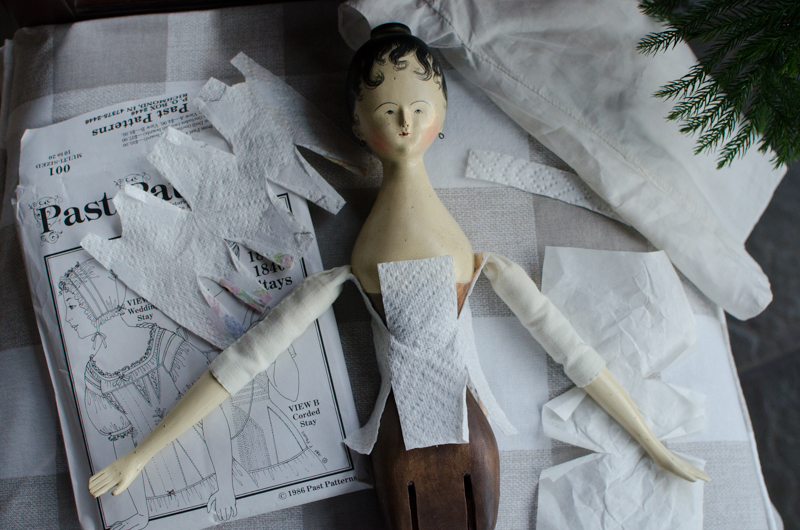
During the years when shifts were becoming chemises, stays were morphing into corsets. There were so many fashion changes over those decades that I didn’t really know which style to go with: long, short, cording, boning, busk? I just picked a look I liked (and had a grownup pattern to go by) and made it. Pink embroidery was a nice idea but mine looked messy so I picked it out. Instead, I limited the pink accents to extra stitching in the gores and was rather pleased with the result.


Next, Meli needed a petticoat and I needed one to copy. Unfortunately, there is a dearth of extant Regency “bodiced” petticoats. But sheer cotton dresses require petticoats, so I used a couple of tiny internet images of originals and my imagination.


Finally (2 years later) it was time for the gown! One cool thing about patterns in books is that while costumers fret over enlarging them, doll dressers find them just right! Kinda sorta. I still had to rely on my old standbys, paper towels and tape, to get the fit.

To make a pretty morning or afternoon gown (I’m not sure how to tell the difference – maybe look at what you’re wearing and then look at the clock?), I used some unusual sheer lilac cotton with a silky sheen on one side. The loose weave made it a bear to sew, though.


The bodice was the hard part. I lined it with glazed linen (I doubt I’ll do that again) and extended the lining so it could fold over to close in the front with tiny pins. The bib front is gathered and then the skirt is attached all around. The puffed sleeves are unlined. I intended to do something a little more creative than a ruffle, but I need some more practice first.
Last of all were the detachable long sleeves. They were sooo easy to make compared to the rest of the wardrobe. I should probably have made them a little longer for authenticity’s sake. Maybe another time.

Next on the list are some white muslin accessories, and then I plan to trim a bonnet, something truly millinerical. I have to say the last part of the definition quoted above really resonates with me, “Jack (or Jane?) of all trades.” And, I could add, mistress of none, but oh how much fun!


That lilac fabric does look a real trial, but you’ve done a beautiful job with it! Worth all the hassle!
LikeLike
Thank you!
LikeLiked by 1 person
Oh delight, oh wonder, oh lovely, lovely lovely!
LikeLike
Thank you! It will always be a challenge to make clothes worthy of the doll. But Meli has a kind and modest expression, so I’m not afraid to try. 🙂
LikeLike
Your sewing is exquisite, and I admire your patience in recreating all of the clothing layers. Mélisande must be a very happy doll!
I’ve seen photos of two extant garments with cut-on sleeve gusset in Swedish collections. One is a shirt believed to have been worn by princess/queen-to-be Katarina around 1628, when she was two years of age (http://emuseumplus.lsh.se/eMuseumPlus?service=ExternalInterface&module=collection&objectId=46017&viewType=detailView). The other is an 18th century doll shift (http://carl.kulturen.com/web/object/23308). (The gussets don’t show in the photos; the cut of shirt is described in the Swedish text, and the pattern for the shift is in a book.)
LikeLike
Oops, I just realized the queen should be Christina, not Katarina!
LikeLike
Thank you for your kind words! I’m intrigued by the other shift sleeves that are cut with the gussets. When you look at the pattern and see how obvious it is to fold the gusset into place, you wonder why more weren’t done that way. I mean for sleeves that are the same width as the gusset – I’m not sure how it would work with long sleeves. Wouldn’t it require cutting an odd-shaped pattern? I don’t suppose it matters when working with doll sizes since they’re so tiny.
LikeLike
Yes, my two examples have odd-shaped patterns (rectangle with a small square added to one side; the outline is curved near the inside corner where they meet, if you see what I mean). They were probably mostly for children’s and dolls’ sleeves, where there might be a bit of waste in cutting anyway.
LikeLike
That makes sense!
LikeLike