It occurred to me this morning that I left out something in my last post. I forgot to mention the delay between doll wiggery, and doll wardrobe.
My dear, long-suffering husband! I like to modestly claim that he owes his great patience to me. I not only set the example myself, but I make it a point to try his, regularly.
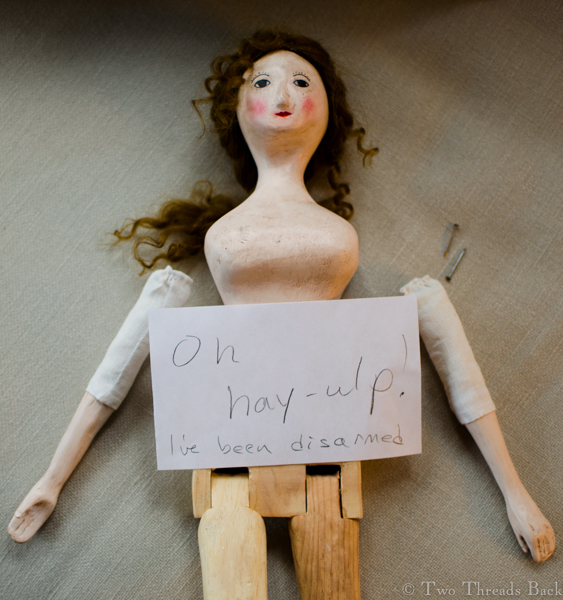
Pharaby was all ready to dress, except for attaching the arms. I knew if I made that simple little hammer tap through the layers of linen and reinforcing leather, I’d mess it up. So I wanted him to do it. I made the request, a time or two, and waited. And waited.
After a couple weeks I thought it was time for another delicate reminder. I know he is very fond of dangerous metal things that make loud noises. So I tried a new approach, thinking it would have particular appeal, especially if spoken with a charming southern drawl.
My mother always told me I had “a bad case of The Wants” whenever I found something that I just had to have – something usually beyond my means. Well, I’ve been grown up (sort of) for a long time now, but I can still get a bad case of The Wants. There are a few cures.
1. Get the means (mildly difficult to sometimes impossible)
2. Wait it out (The Wants are often fickle and fade away)
3. Make it myself (may provide many hours of hilarity at my own expense)
This time, my want was a Queen Anne wooden doll, and I decided on option #3. I researched dolls in books and on the internet. I saved pictures, read descriptions, watched YouTube videos, ILL’ed references. I didn’t want a cloth, clay, or resin version, I wanted real wood.
Want would’ve been my master, if it weren’t for my father. His hobby is woodcarving. He’s been retired for many years and mostly carves birds and decoys. But he was willing to try this for me. Hooray!
I revere authenticity in historical crafts, but for this doll I had my own vision, not to mention my own skill limitations. Therefore she would be more like what I wanted in a toy than a replica of an antique. And besides, when you award yourself a disclaimer like that, you’re free to mess with chronology, styles, materials, and measuring up to the experts! No guilt! Yay!
I was very excited when he finished, and ready to start my share of sanding, painting, and assembling. It’s taken a lot of time and trial and error. That’s where the hilarity has come in. Funny how the ends of paper clips make a perfect pattern for eyebrows. And if you dot the eyebrows really fast without thinking, they’re much more even. But … what to do about hair?
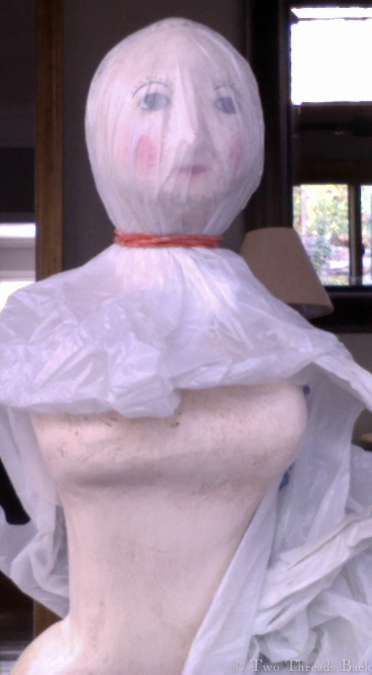
Pharaby attired in “Paper or plastic?”
Did you know there isn’t much (free) information available on how to make wigs for wooden dolls? No? Well, there isn’t. So I painted her hair, figured I’d hide it with a cap anyway. Unfortunately, that left her looking like she was recovering from a virulent fever.
A wig would have to be attempted, using the little info I could gather and my own ingenuity. I decided to make it removable in case it was a total disaster, so that meant a wig cap. I found a scrap of antique linen dress lining to use, but I could have saved the scrap, since after the cap was finished you couldn’t tell it was anything special. Oh, well. You can see, left, how I protected her paint job.
The linen would have to be slathered with glue, so more protection was in order. Keep in mind I was making this up as I went along. I still didn’t know how I’d make goat fur look like people hair, especially dressed for the 18th century.
Pharaby kidnapped and held for ransom? Hardly.
YouTube to the rescue! There are some generous dollmakers out there who are also very tech savvy. I found one who showed how to glue the little locks and then attach them.
So I ordered the wool. It came in a lovely loooong skein, woohoo! Plenty here to allow for mistakes! That set the stage for the first one, because I cut into the skein, a good 6 inches or so, and began to separate it into little clusters. Duh!
What was I thinking? Goats grow hair three feet long? Yeah, right. You see them tripping all over the pasture, tossing their heads like little Rapunzels as they graze.
Perhaps you can imagine my dismay as I combed the first tiny strands and watched over half the wool pull away. I realized then that 1) I’d better not donate my brain to science, and 2) I’d need every inch of that mohair.
Reminds me of Ben Franklin.Clothespins: the other duct tape.
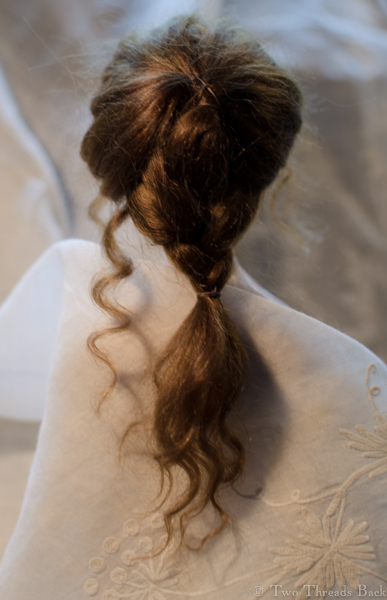
After two days of playing Psyche gathering wool and peeling hairy glue off my fingers, face, and furniture, I never wanted to see a goat again. But the fun really started when I got to the top of the wig cap and couldn’t decide how to style it. When I was a girl my dolls had awesome wardrobes, but their hair was pathetic. I relied heavily on rubberbands.
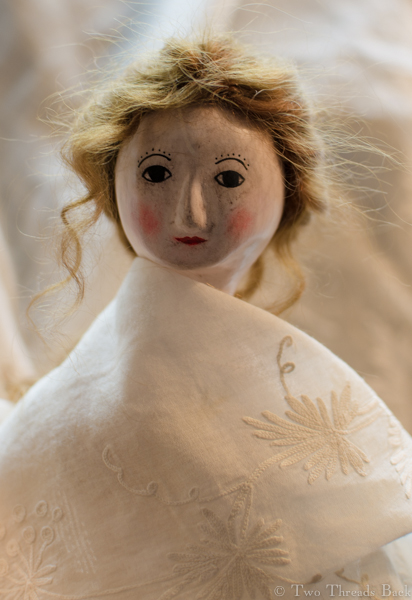
In the end, I decided to leave some long in back, and poof the rest up on top of her head. (What that will mean when I come to making a cap is yet to be seen.)
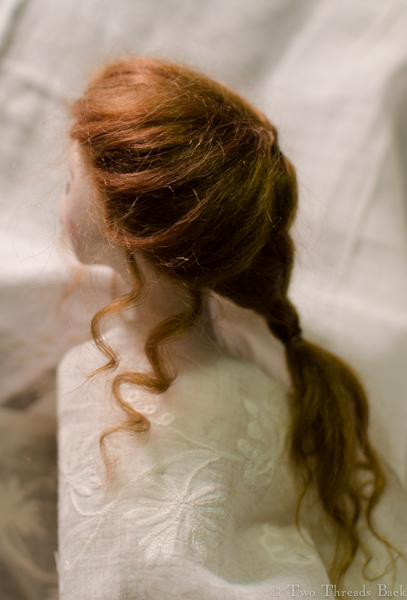
So. I got the wig finished and styled. A nice braid hanging down in the back and the crown piled high, with a few strands hanging loose – just to make sure she had that modern Hollywood version of an 18th century hairstyle. But I wasn’t completely satisfied. The strands were all straight and wispy, no curl. I’ve got curly hair myself that I’m always trying to straighten, but I love curls on everyone else. So how to curl wool in tiny ringlets?
Why, you make your own curling iron, of course. Take an ice pick, clamp it in your flat iron for a minute, then veeeery carefully wrap a wisp around it. Hold it till you think you smell something burning, and voilà! You’re done!
Ta da! After ten grueling years (ok, I don’t really know how long, but it has been years) I finally finished a 19th century gentleman’s square-cut shirt of fine linen. Complete with all twenty parts, including the frill. And Dorset knob buttons.
Where did the name come from? Well, a long time ago a friend and I (I miss you, Janet!) were studying one of these shirts, one that had a heart-bit (see that blog). We reached frantically for our vinaigrettes, trying not to swoon on the artifact, as visions of Mr. Darcy flitted around the room. Somehow we started calling that handsome relic The Love Shirt. So it has been to me, ever since. And I wanted to make one myself.
That type of linen is impossible to find nowadays. However, a dear friend (thanks, Dianne!) provided the closest thing possible, and with a pattern from an 1820 book, I commenced.
Darned little gussets, all the work I did backstitching was mostly hidden when assembled. Having since acquired some cobwebby 100-year-old linen lawn, I intend to replace the muslin ruffles, this time hemming them the right direction. If there’s a harder way to do anything, I’ll find it.
Unfortunately I have a memory like Dory, so every time I put away the project for a spell, I’d have to practically learn how to do the next step all over. A 19th century seamstress would have been appalled to see me.
Um, do I sew both ends of XYZ before I ABC? Do I cut or fold first? Did I sew the sleeve on backwards? Oops. Front and back are the same before the collar goes on, right? Not if you hemmed them first. Oh right, I was supposed to check that I was putting the slit in the front. Well… I’ll just cut the back shorter and make it be the front. And my g-g-g-g-great-grandmother could make one of these in a day or so? How embarrassing.
I did learn a lot. I learned how hard it is to backstitch over two threads without going blind. I learned that there is NO not-shiny sewing thread available today. I learned that linen thread breaks, other people’s buttonholes always look nicer than mine, knots are usually unnecessary, even poor work looks better when ironed, and a drawn thread is no guarantee you’ll sew a straight line. I learned that you had to love your man, or love survival to make one of these. And I learned how to make Dorset knob buttons, my own way! Maybe I’ll write about that next time.
You can see the backstitching that nearly blinded me. And you can see the gauging thread I used to hold the stroked gathers in place. I’m going to leave it there a loooong time.