Featherweight Champion

Featherweight

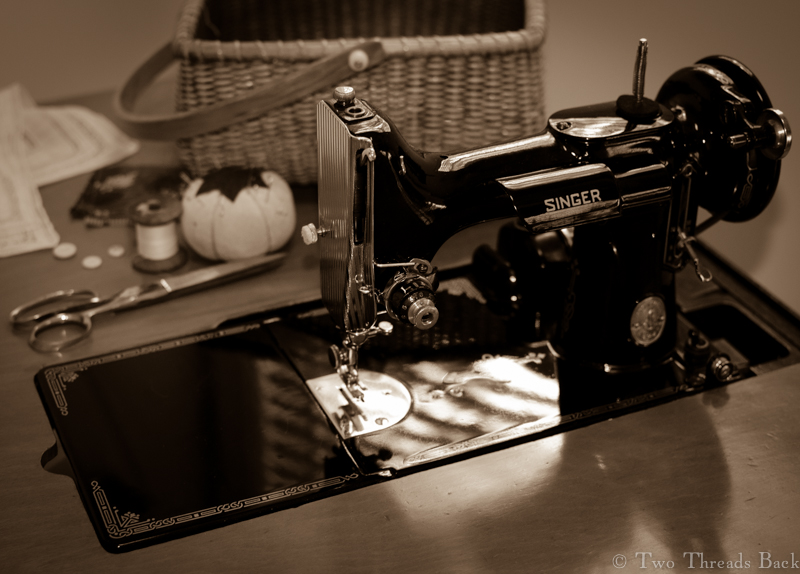
I suspect I’ve got just as many ancestors as anyone else, but mine weren’t notable for leaving closets and attics full of heirlooms. The oldest thing I’ve got is my DNA. However, that doesn’t mean I don’t have some treasures! One of my dearest is my grandmother’s old Singer sewing machine. Yes, me. The hand sewing monomaniac loves a machine.

My grandmother, an amazing seamstress!
My grandmother, an amazing seamstress.

She (the machine) was born Christmas of 1948. My grandfather bought it as a present for my grandmother that year. I don’t suppose anyone knew that the featherweights would become classics.

She (the machine) had already earned retirement by the time I welcomed her into my home, but nope, I kept her going. She only does straight stitch, can you imagine? Why would anyone, some quilters excepted, want a machine that doesn’t do fancy stitches? Not even zigzag?

Weeell, just ask a featherweight fanatic. Simple, small, light, reliable, long-lived. What more could you ask? I wish the same could be said about me – well, maybe not the simple. If you have time, take a look at Singer Instructions for Art Embroidery & Lace. The possibilities using an older machine, even treadle, are dazzling. It’s hard to believe anyone could do such elaborate work without today’s technology. It was published (1911) and republished, and can be downloaded free  in a variety of formats. So don’t underestimate their potential, between the attachments and techniques, a seamstress could really do just about anything with an old Singer.

Notice I said “a seamstress”in that vague and distant not-me sort of way. Because just about all I’ve done is use the basic set up and a couple of attachments. Even the buttonhole kit remains in its sarcophagus, waiting for the day I’m brave enough to resurrect it. Although I do have Grandma’s buttonhole samples resting under the presser foot, like they always did.

For my birthday last year, I had the machine restored to her original condition. I found an expert who did a superb job and a talented friend who did the table. My little champion sewed beautifully before, but now she’s a dream to use. Even if only for plain (machine) sewing!

Shiftless

Shift Full
Maybe Graceless, Pointless, Feckless, and Aimless – but not Shiftless!

Shiftless no more! Pharaby can compost the fig leaves now.

To make her shift, I used some fine old linen with a silky feel, and  I scaled a pattern in Costume Close-Up (is there anyone who doesn’t use that pattern?). Then I proceeded to sew up the gores, body, and neckline. Shift Hem When it came to the sleeves, though, I was perplexed. What was typical, plain or gathered? I reeeeally wanted to do gathered.

Not being an eighteenth-century-fashionista, I pulled out costume books and scoured the internet for guidance (see this awesome study). Most of the images of extant shifts I found – there were a few exceptions – had sleeves without gathers at the armscye, or shoulder. But period art seems to imply that  shifts did have them; otherwise, how so fluffy? That means that 1) I didn’t look in the right places,  2) I couldn’t see details and misinterpreted the pictures, 3) they didn’t survive as often, or 4) some dates were wrong. Maybe all four, plus some more reasons I haven’t thought of yet.  Oh well.

Shift Left ShoulderHowever! I found two or three images of exquisite little shifts on early wooden dolls in museums, and those had sleeves that were gathered at the armscye. I think. Anyway, I love setting in gathers and it’s my toy, so that’s what I did.

Now another dilemma. To stitch or not to stitch, that was the question. I was so accustomed to seeing the stitching (now called backstitching) on the wristbands of men’s shirts, that her little cuffs looked as bare as she did.   But, duh for me, I’d already set in the gathers. Could I do it, post hoc stitching?  Why not – if there’s a harder way, I’ll find it. You don’t see any close-up photos of the cuffs here, do you? Ha.

Shift RightNext came the binders, those reinforcing strips that are a standard feature in men’s shirts. I can only guess how common they were in women’s shifts, because they don’t usually show in photos, nor are they noted in descriptions. But I’ve long speculated that originally binders were there just for “setting in” gathers – support for a stress area was just a bonus. So in they went.

Now the question you’ve been too polite to ask: did it fit? Pharaby said it would do. She’s not fussy. Any doll destined to wear fashions spanning a century or so – at the same time – can’t afford to be.

Oh, but she does expect me to mark her shift and add ties for her cuffs. She hasn’t decided about frills.

Shift Pharaby

Shift Gathers

Shift Right Shoulder

Shift Neckline

Shift Gores

Shift Sleeve


A One Stitch Wonder

Calico Full

I’ve always loved order and simplicity. That sounds awfully smug, but I shouldn’t commend myself since it’s probably because my brain can’t handle very much at one time. This craving for minimalism is getting worse as I get older. Try googling the minimalist lifestyle and maybe you’ll see the attraction! Or not.

A conversation the other day started me thinking about simplicity in plain sewing. Hmm. What was the most basic stitch? Well, anyone who uses old sewing machines knows you can do just about anything with a straight stitch, which is closest to a backstitch in hand sewing.

But backstitching wasn’t the primary stitch in 19th century sewing manuals, nor was running, as I learned when I studied plain needlework instruction. It was hemming. That’s the little slanted stitch that you would use to (surprise!) hem something. Once your hemming was neat enough, you could learn to work other stitches.

Hemming
“Simple hemming is the first step on the road to proficiency in needlework.”

By the way, I’ve noticed that most costume historians, or at least ones I’ve heard and read, call this same stitch “whip” instead of “hem.” For example, “the edge is folded back and whip stitched in place.” But then, why shouldn’t they? I understand perfectly what they mean. If you’ve seen my post on muslin you’ll know I’ve come to terms with terms!

Getting back to simplicity. I decided to go closet diving for something that used only that one stitch, hemming, to construct a garment. And I found it! A Regency era calico baby dress. Granted, it didn’t have enough pattern pieces to warrant many stitches. But the whole gown was made by hemming!

Calico Baby Gown, c 1815.

Or was it? Well, in my eagerness to find what I was looking for, I didn’t look close enough, and I didn’t think it through.

The skirt was made of one piece and hemmed, check. The casings for the strings were hemmed, check. The tiny ruffles on the sleeves were hemmed, check.

Calico Hem
Hem.
Calico Sleeve
Casings for drawstrings.
Sleeve ruffles.
Sleeve ruffles.
Calico Back
Back opening.

The bodice was hemmed to the skirt – whoa! Wait a minute. That wasn’t right. Things were unraveling. I mean my clever discovery, not the little frock.

Yes, the stitches looked the same at first glance, but any experience (or a practical mind) would tell you that you have to hold those two pieces face to face and sew them together. That makes it seaming, as they would have said, or overcasting, as we’d say today. Same thing for the ruffles attached to the sleeves.

And there was more. The tiny bodice sides, all three-quarter inch of them, were running stitch. As were the sleeves to the body – and then overcast!

So much for that, no single stitch here. I confess it doesn’t really bother me too much that it’s not pure minimalist stitching. I’m learning to slow down and look closer. And it’s still a wonder of simplicity!