The Flower Patch

Flower Patch 01
An early cotton calico from English Paper Pieced Patchwork. (Say that really fast.) It measures 2×2 inches. The odd thing on the left is my embroidery scissors holding down the edge.

Welcome to the Flower Patch! Back in the olden days when I was a child, my sister and I would sometimes take our afternoon naps on “pallets.” These were great-grandma-made quilts, all soft and worn, laid on the floor in front of an electric box fan (we lived in The South). Compelled to be still and quiet, we’d make a game of picking out our favorite patterns. Of course it sometimes degenerated into squabbles: “You can’t have that first favorite, ’cause it’s my first favorite!” We’d usually fall asleep and wake up best friends again.

I’ve recently come across a few little quilt bits – can’t afford whole garments or quilts – from my favorite era, the early 19th century, and thought I’d post a picture of a patch now and then. I wanted to record all the patterns anyway, and this seems like a good way to share them at the same time. If you happen to recognize a print, or are blessed enough to have the whole garment (which might give me the vapours), I’d love it if you’d let me know!

These patches are from an “English Paper Piecing” set. I believe it dates to the early 1800s, not only because of the patterns but because some of the paper that’s used on the back is c1808-1812. There are a few pages from English newspapers (London National Register, Monthly Magazine, etc.), private letters, and a whole lot of pages from an old copybook. Of course that doesn’t make a certain date; some fabrics could be earlier or later and it all could have been pieced later. But I’ll leave that to the experts.

Mousy Mousy
Mousey Mousey: a survivor.

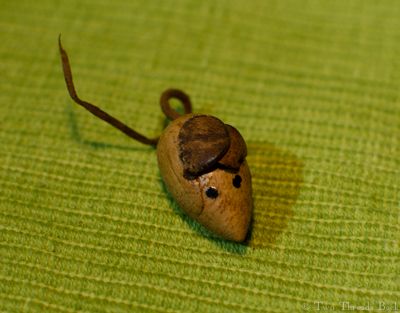
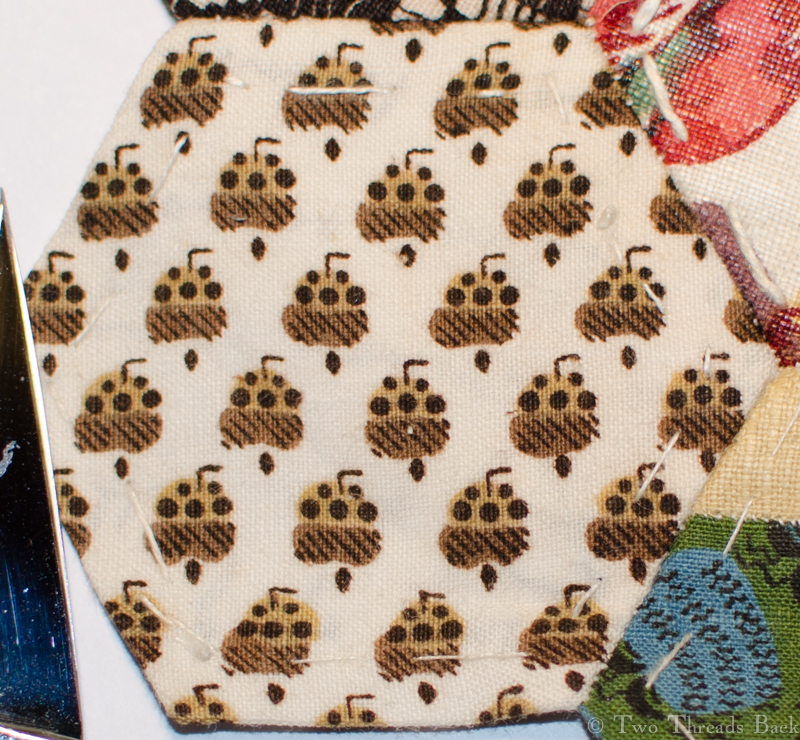
The first patch I selected has a peculiar pattern. It reminds me of poor old Mousey Mousey. Mousey Mousey was a beloved toy that I still treasure, though heaven knows how anything so small (less than an inch) could survive the many decades and almost two dozen moves he has (we have) been through.

Pictured above is Flower Patch #1. By the way, it’s not my first favorite.


All Dressed Up & Nowhere to Sew

Sewing in the Parlor
Sewing after dinner.

Except the parlor, perhaps? Well, it’s identified on the back as the boudoir, but the meaning of words changes according to time, place, and whim, so we’ll accept her terms. This is a charming stereoview image of two circa 1860s ladies in full dinner dress, sitting down to play with their new sewing machine.

I can’t identify the machine, but I see the seamstress has a music stand and harp close to hand, just in case she wearies of needlework. And a friend with a manual close by to instruct and advise. (Ok, it’s not a manual – what could it be?) A picture-perfect postprandial occupation while the gentlemen are smoking: a lamp, vases of flowers, elegant furnishings, and a congenial companion – what more could you ask?

Sewing in the Parlor Stereo
Full stereoview of the new sewing machine.

Little Biggin Two

18th C Cap 2a
Another 18th century baby’s cap – with frills.

This little cap is a favorite. Yes, the linen is coarser than the lovely smooth cambric in most of the other really old baby things I’ve found. The slubs are noticeable, and they show even more due to washing and wearing. But there’s just something about that little ruffle around the brim. And the extra gathers right in the center – can’t you just see them sticking up, stiff with starch? Rather like a little plume or crest!

18th C Cap 2b
A perfect frame for a baby’s face.

The measurement around the brim, including the ruffle, is about 12 inches; the center front to the back is about 9 inches.

18th C Cap 2f
Baby’s cap with the two-part brim folded open.

It seems like every time I examine a garment to write about it or list it for sale, I find something I’d overlooked before. And sometimes it’s unusual, a feature I haven’t seen before. That happened here, too.

The little crown was stroked and gathered and attached to the upper brim with backstitches, the same way cuffs or collars were attached to shirts. Then the under-layer-brim was hemmed to the crown from beneath. That does make the technique look like “setting in,” a construction process taught from (at least) the 18th to the early 20th centuries – if you’re one of the rare people who’ve seen my book Plain Needlework, you know what I’m talking about.

The strangest thing though, is how the upper layer is hemmed. It’s backstitched! But not securely on the folded hem itself; instead the stitching rests along the very edge. In fact, I really don’t see how it holds. I’ve looked at it with magnification because it’s so different from what I’m used to seeing. But that’s right. The hem is barely caught with the backstitches.

The under layer is normal – if you can call a 1/16 inch hem normal; it’s simply hemmed. Then the ruffle is whipped and gathered on both. The back of the cap is gathered and set in a narrow band, also with backstitching.

18th C Cap 2c
A closer view of the “plume” – and you can see the backstitched hem.

Like last cap I wrote about, this one is in remarkably fine condition and there are no vestiges of ties. Unlike many other fine linen bits, it’s lost its starch. I think the wearer would have approved. Floppy ruffles are more comfortable.

18th C Cap 2e
A back view of the cap.

18th C Cap 2d