Dressing dolls in a rich or showy manner, is among the earliest and most effective means of forming in little ones a taste for a similar style of dress in themselves or others. The toy baby or lady is arrayed in fine colors, gossamer fabrics, or rich silks, and loaded with all the trimmings and ornaments which fashion permits. This gaudy or splendid object is admired by everybody, and every part of the dress commented on by the wondering owner, in terms of enthusiasm, worthy of Victoria’s bridal paraphernalia. Who can wonder that the little girl receives the impression that the style of dress which calls forth such rapture is exceedingly beautiful, and all–important?
Give children dolls dressed in accordance with the taste which you would wish to form in them, and a style which you would like to have them imitate. And never allow a doll’s dress to be commented upon as though it were a matter of any importance, except in reference to tidiness.
A true taste and correct principles in regard to dress may be formed in young children under proper management. –The Mother’s Journal, 1843
Well, thank heaven my mother didn’t follow that advice! I loved every bit of glitter, color, sequins, or lace that I played with, wore, or admired from a distance. It certainly didn’t affect my dress taste as adult. Maybe it would have been better if it had, since now I’m more likely to ask “do I have to wear shoes?” when I’m invited anywhere!
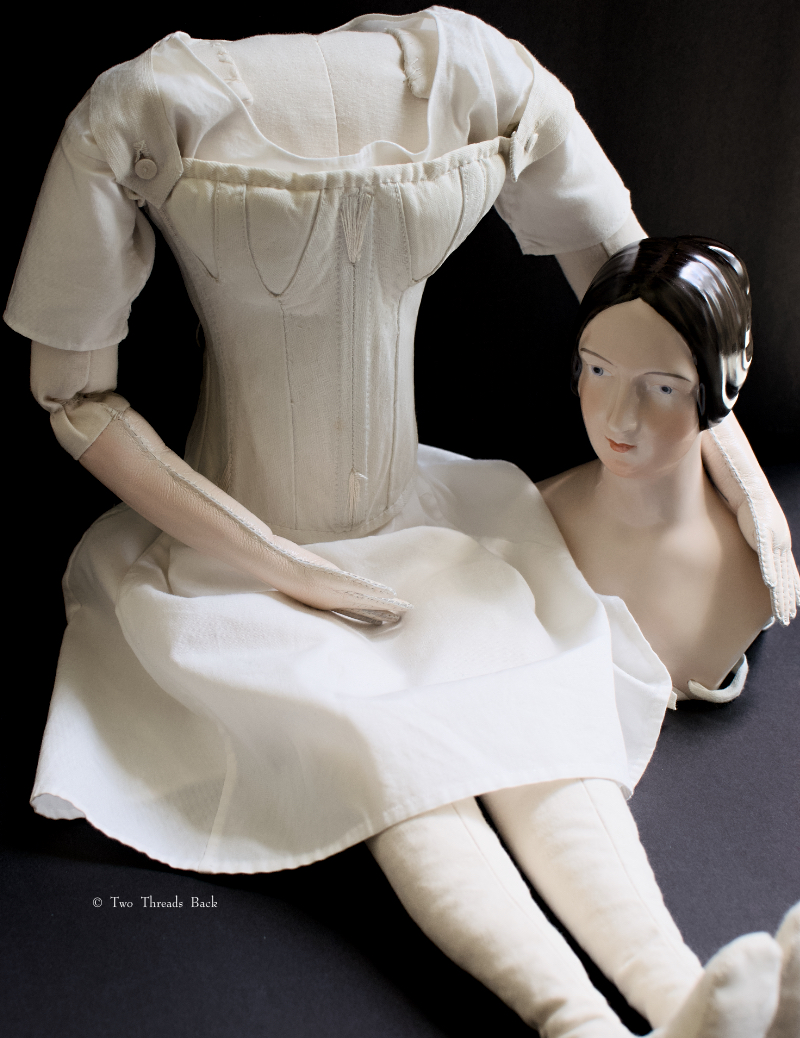
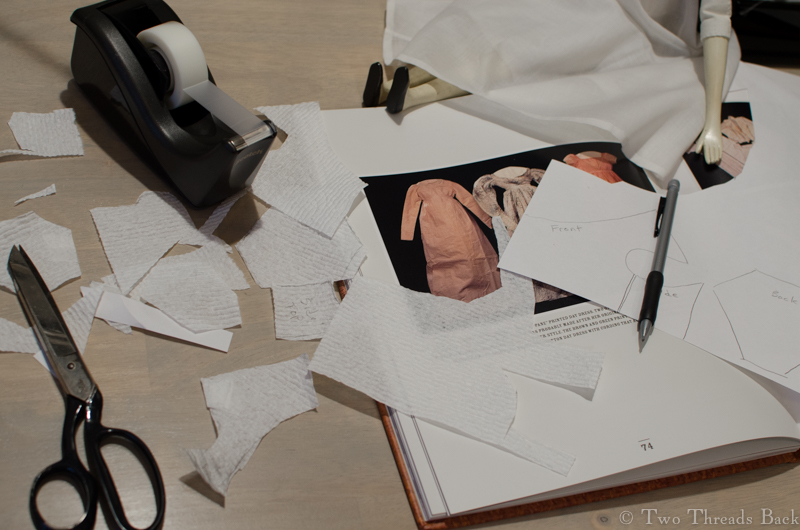
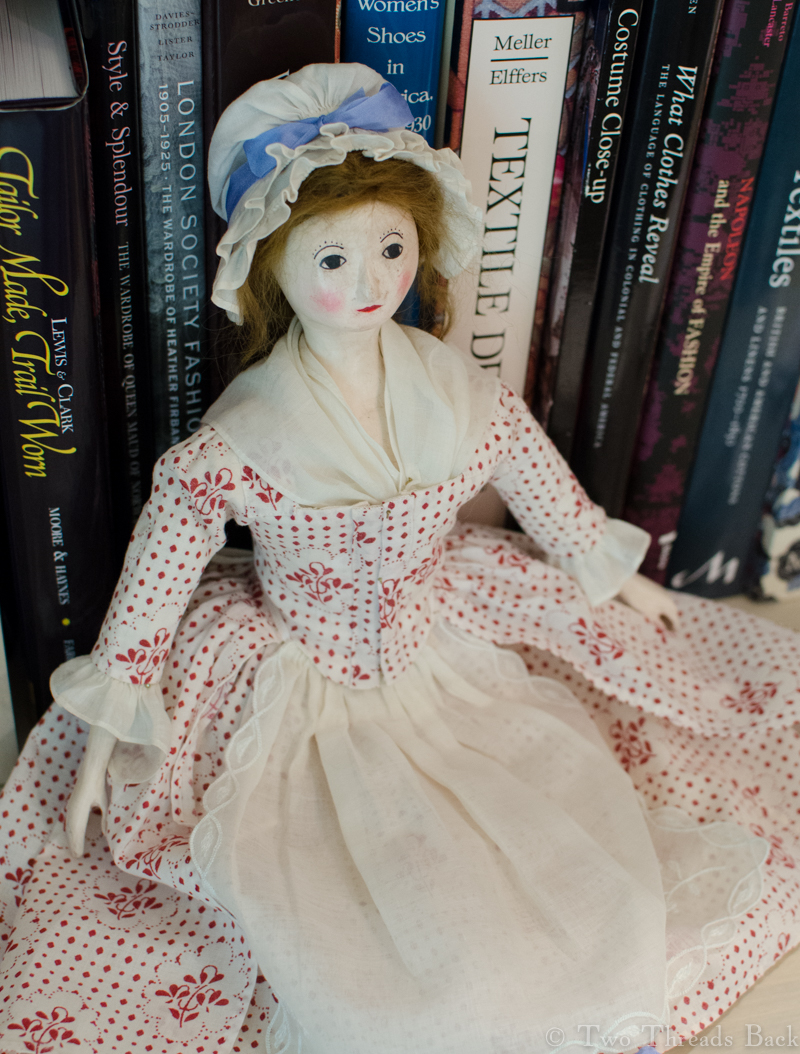
I still love extravagant doll clothes. In fact, this project didn’t start with a doll, it started with a doll corset. I bought it because it was hand sewn (and a bargain) even though 1– I didn’t have a doll to wear it, and 2– it was the wrong period for the Romantic and Gothic styles I wanted to sew. No problem, I thought, just make a doll body to fit it. And then find a doll head to fit the body and the fashions!
So what if I’d never made one before? So what if I knew (still know) nothing about 1830s-40s dolls? But just like making Pharaby, “faint heart never won fair lady,” let’s have some fun! So here’s a look at what turned out to be years of fun.
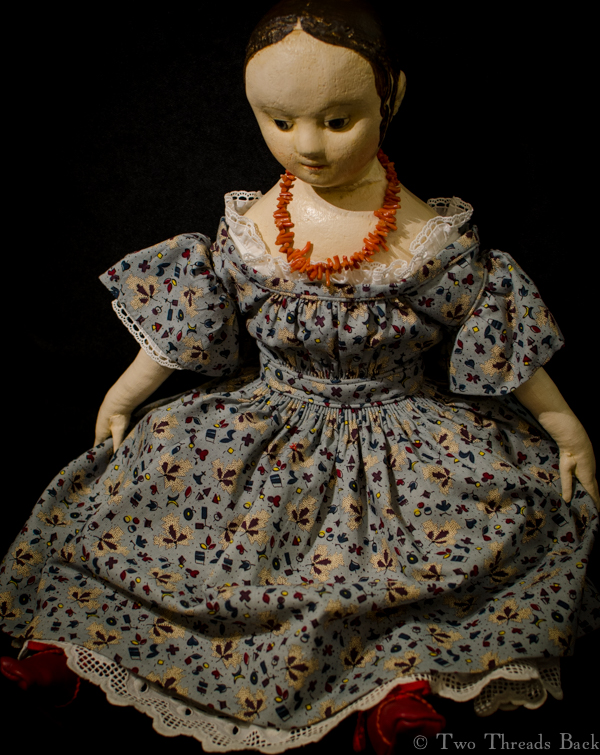
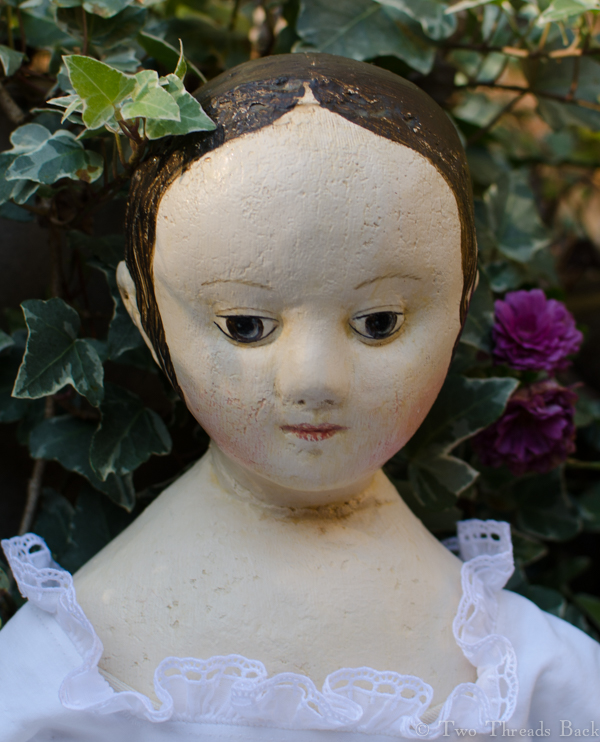
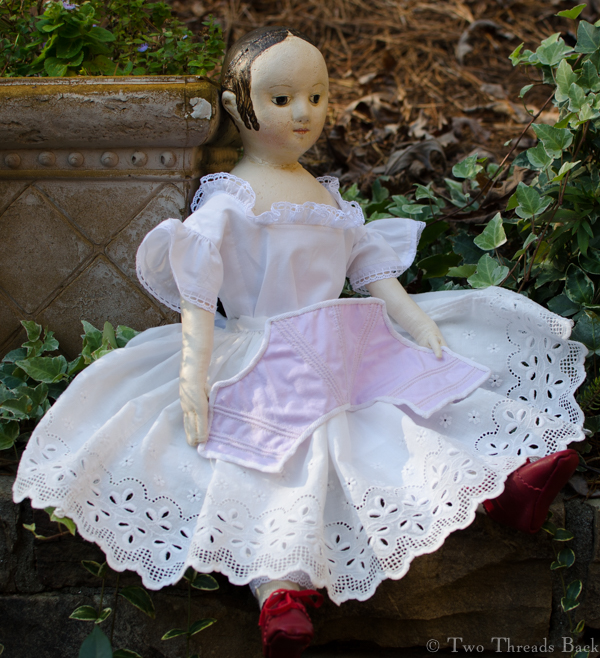
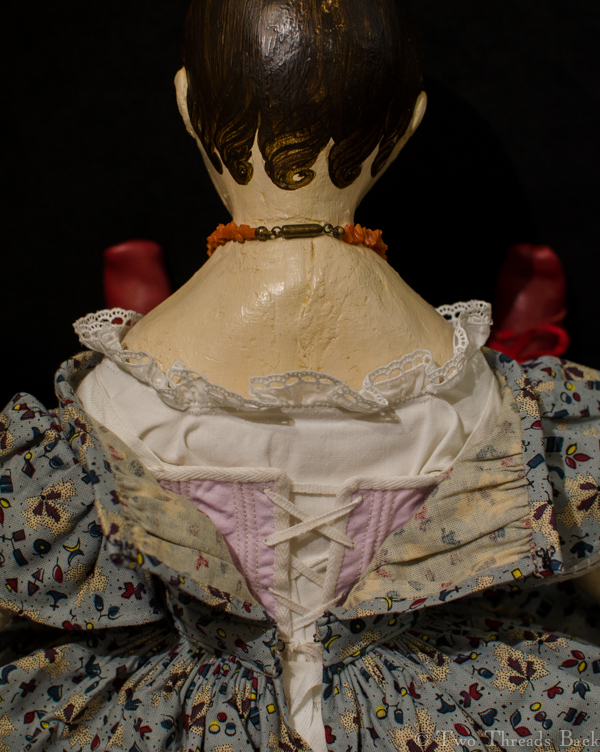
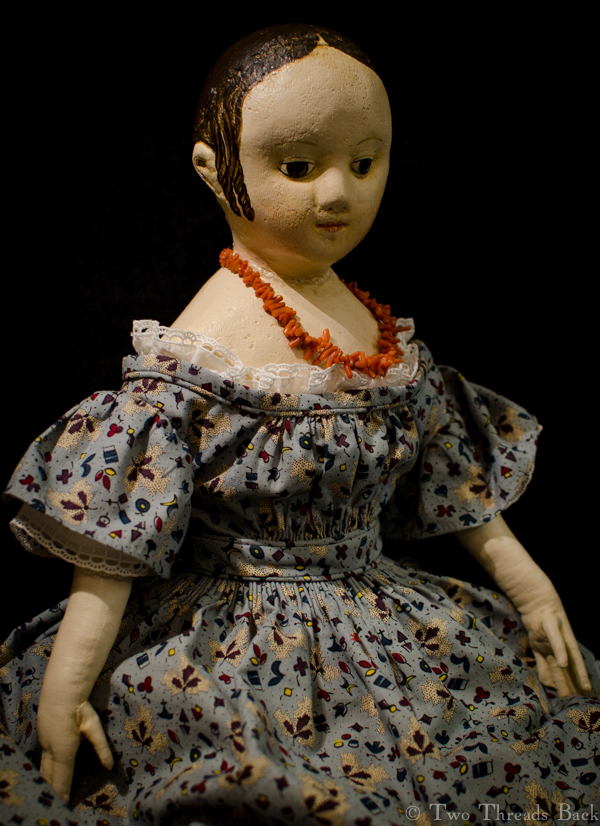
I made the body with 2 layers of fabric so the sawdust wouldn’t leak through. It’s dyed with tea to match the complexion of the head which was reproduced by Royal Copenhagen in the 1970s from the original molds. Warning: if you make skinny ankles out of muslin and sawdust they will flop. Solution: orthopedic surgery with wooden dowels. That wasn’t fun for either of us, although termites might have enjoyed it.
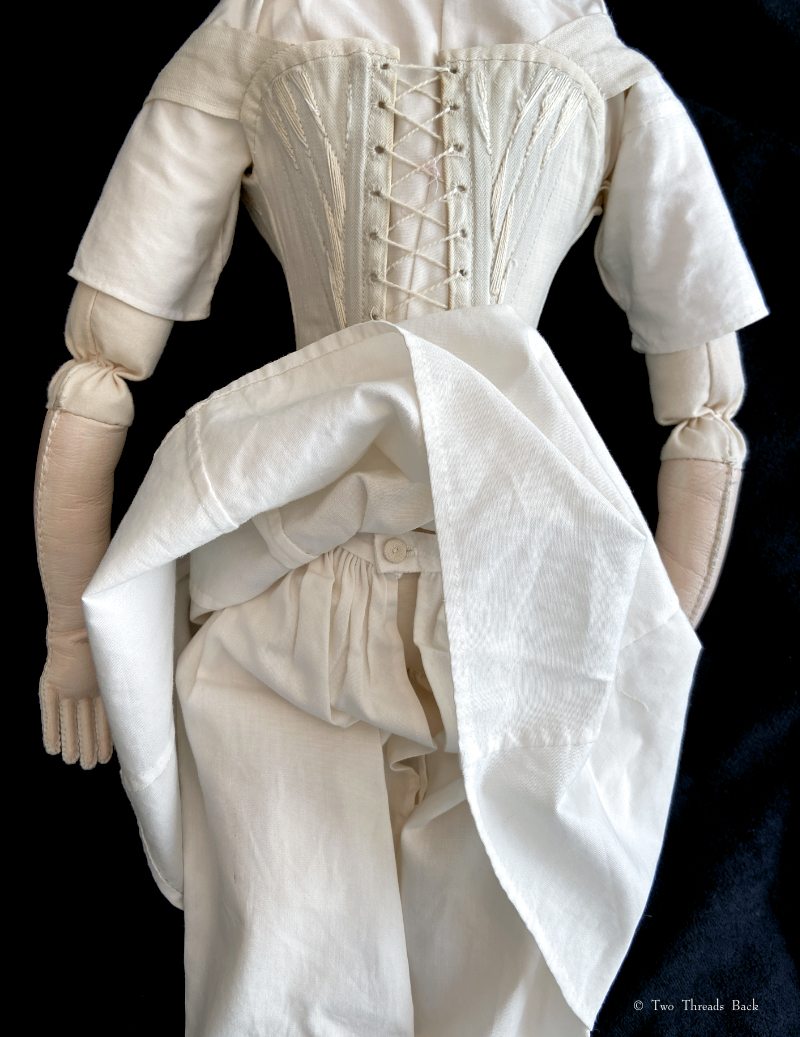
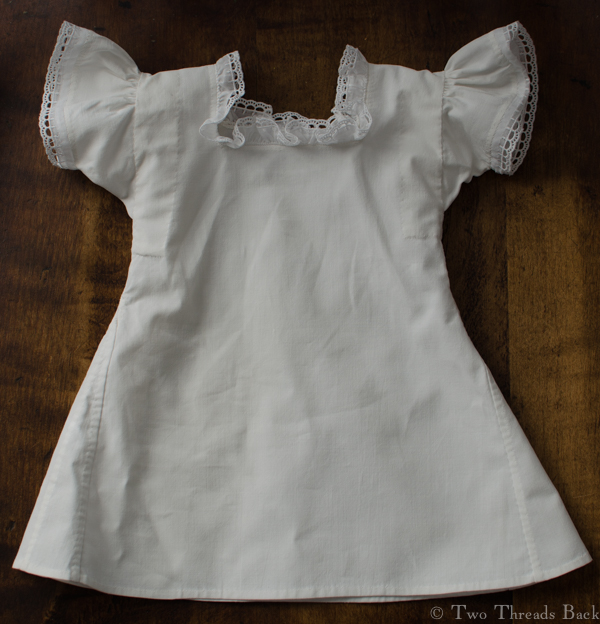
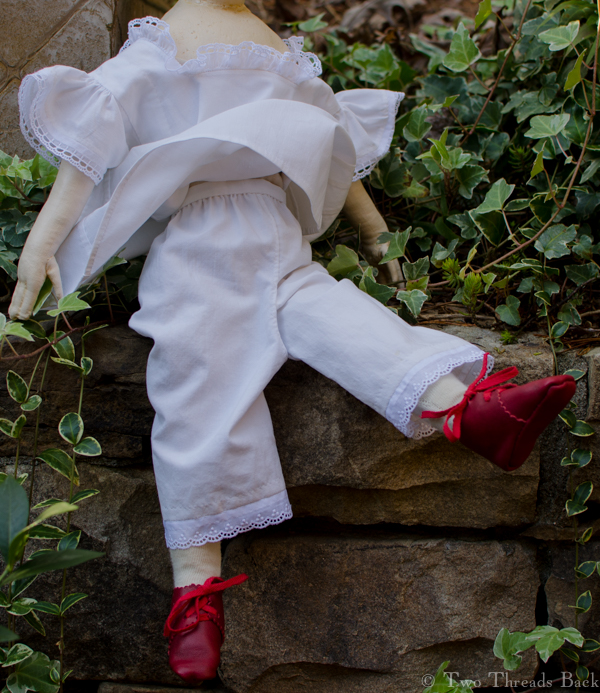
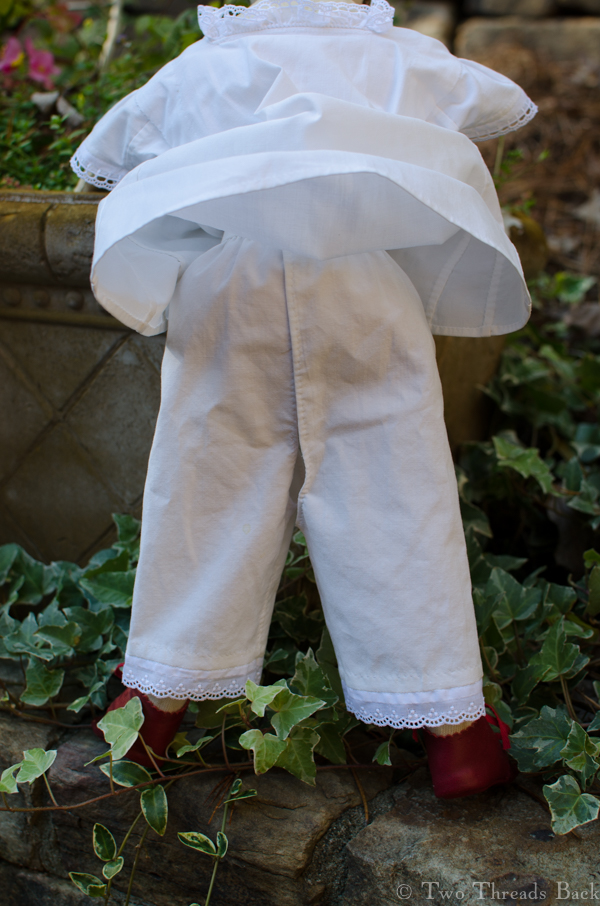
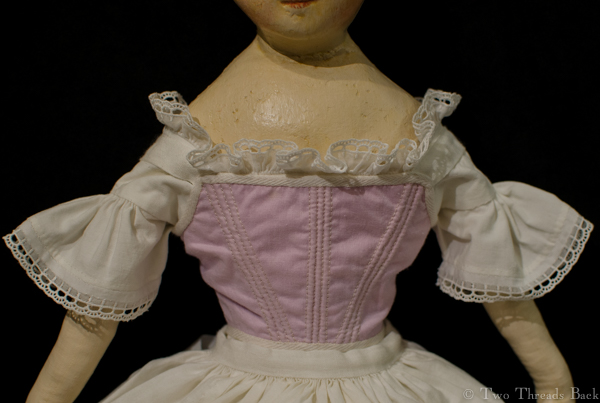
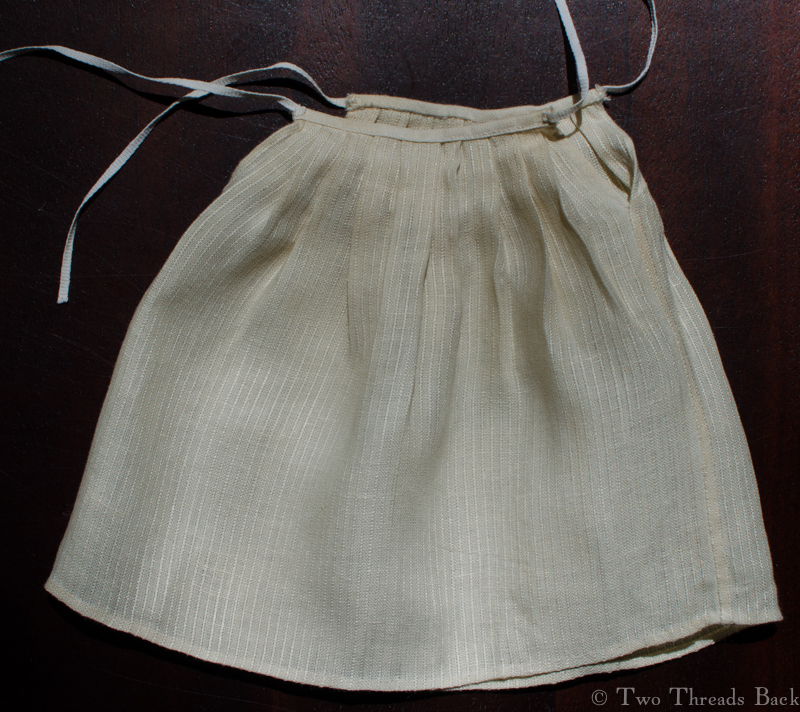
The arms were custom made of leather by a doll-making pro (it’s why they look so good) and then colored by me to match her complexion (it’s why the color doesn’t). Her chemise is pretty standard, similar to my other dolls’, which are gores, gussets, and rectangles pieced together. Her drawers are “open” style and they close with antique linen buttons – also used on the straps I added to her corset. You can see the outline of the whalebone busk down the corset’s center.
She also got plain tucked and corded petticoats. The corded one needs some alteration because I didn’t like how the cords showed through the muslin. Which is why it didn’t make the photo shoot.
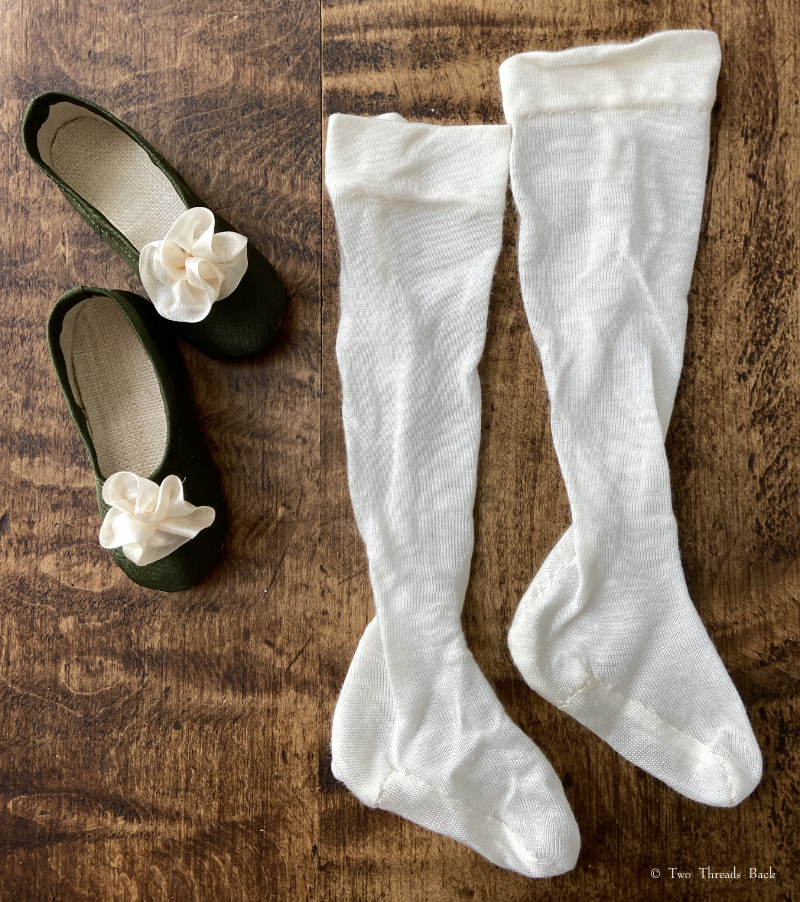
Her green silk shoes weren’t as hard to make as Pharaby’s because she has (dare I say it?) not-dainty-feet.
The shoes were lined with glazed linen which was excruciatingly difficult to do.The silk knit stockings were custom made by a pro. I knew there was no way on earth I could make them myself to fit the awkward combination of skinny ankles and not-dainty-feet.
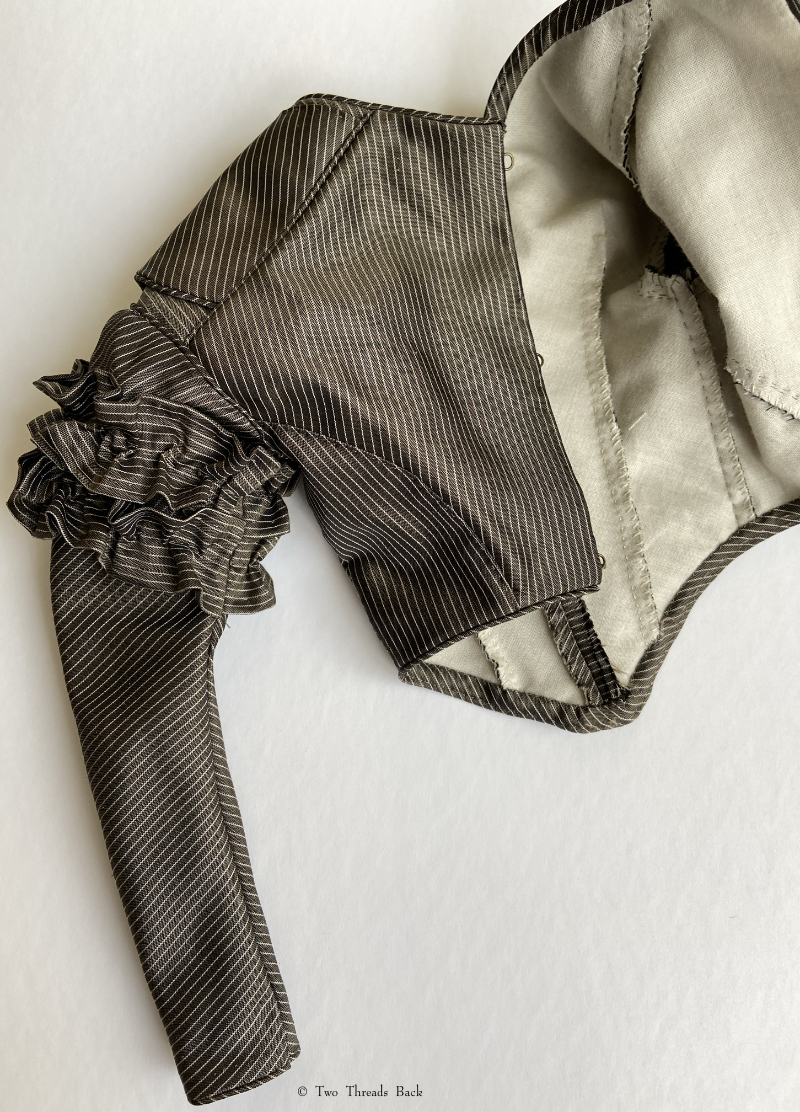
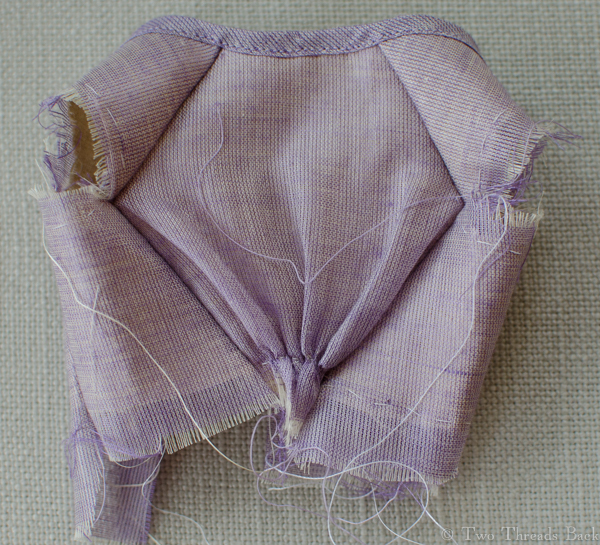
We had to have sleeve supports! Those ginormous gigot sleeves that were so fashionable couldn’t stand on their own. Ladies of the era contrived a way to save sleeves from collapsing by wearing supports resembling little pillows or cages. If you’re already wearing a dozen undergarments, a couple more can’t hurt. I stuffed them with wool instead of down. The sawdust was messy enough. Me with feathers? Unthinkable.
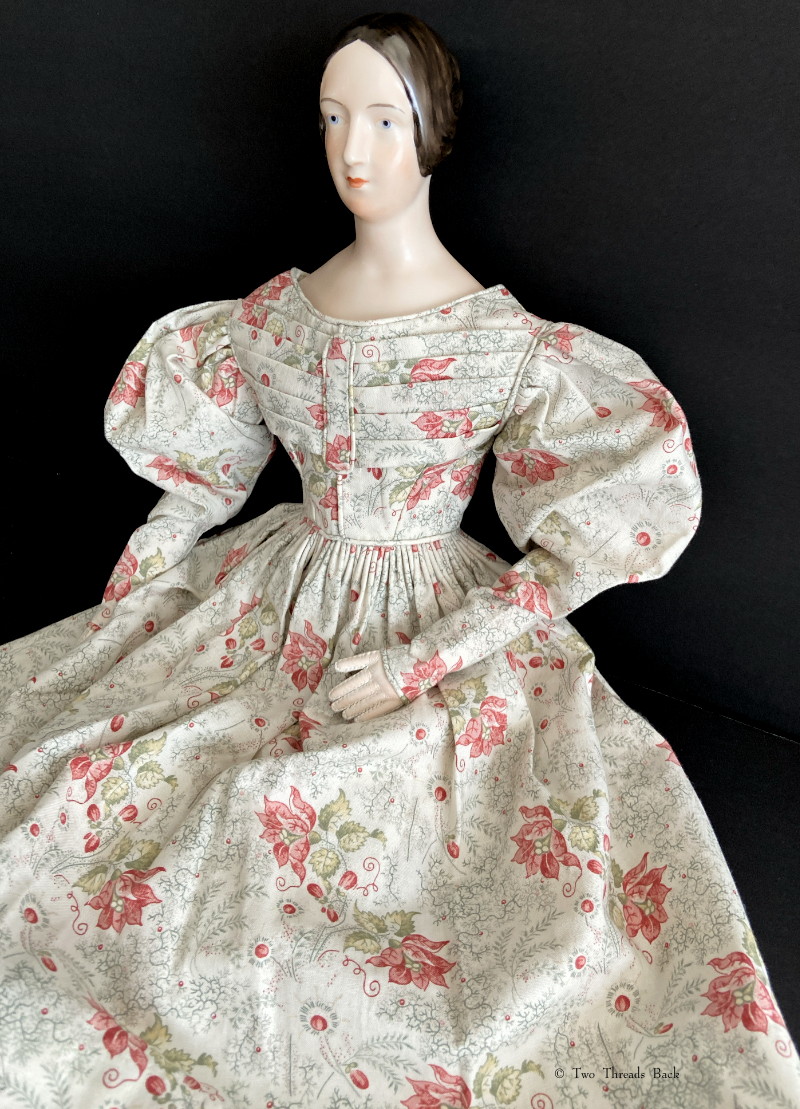
This was the first dress I made. I love the historical cotton prints available for quilting, but bemoan the weight. It won’t shape and drape like period calico did, and that’s especially evident in doll clothes.
The bodice is lined with vintage glazed linen and the waist is covered with vintage tape. I’ve forgotten how many tries it took to get the skirt gauging (gathering) to fit. Suffice it to say more than one.
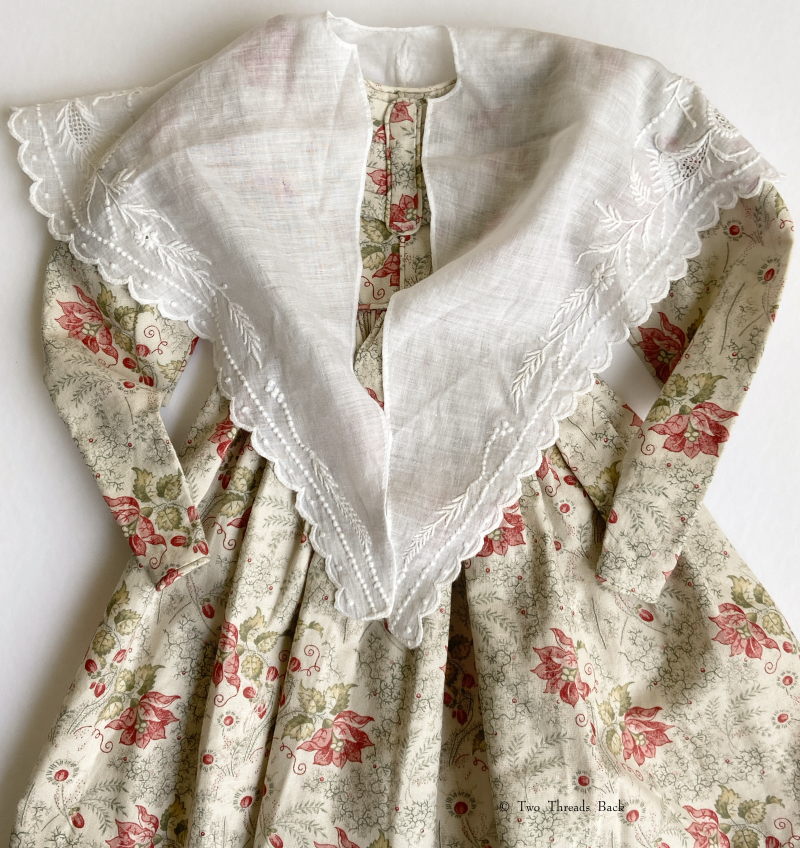
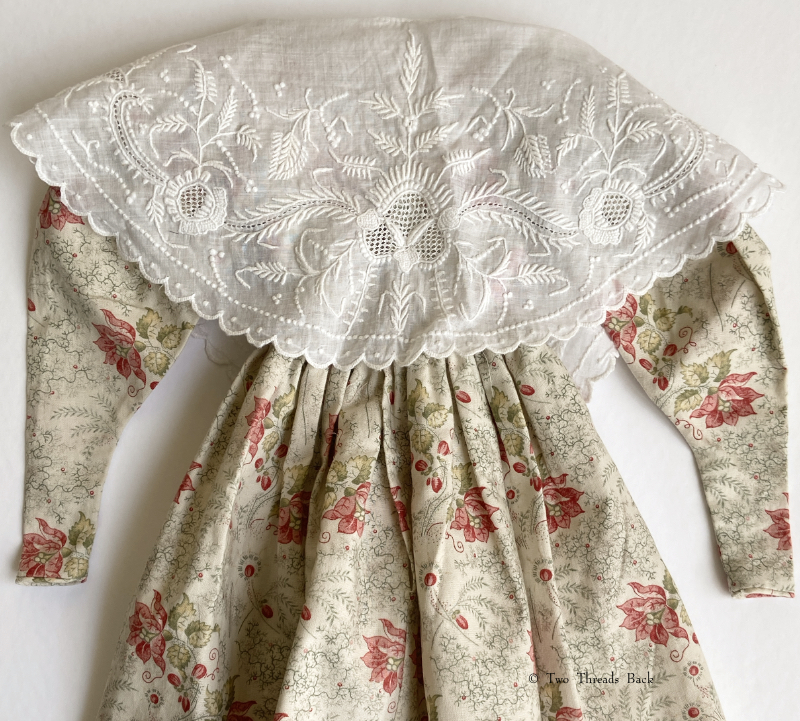
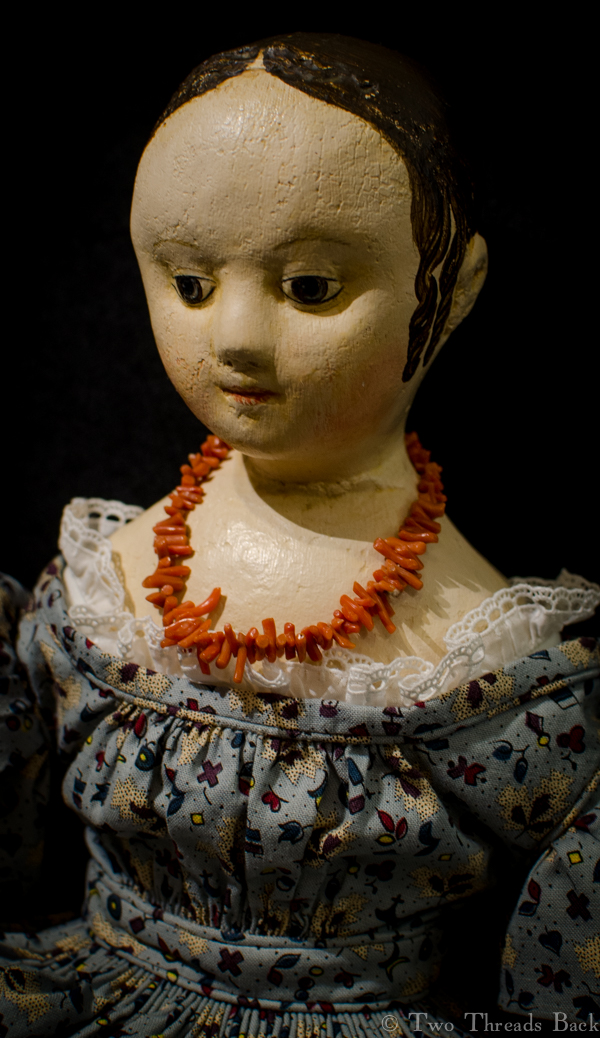
Of course every lady needed a pelerine or fichu or canezou or whatever name this ethereal embroidered kerchief was called. This one is refashioned from a rescued/repurposed vintage bit of whitework.
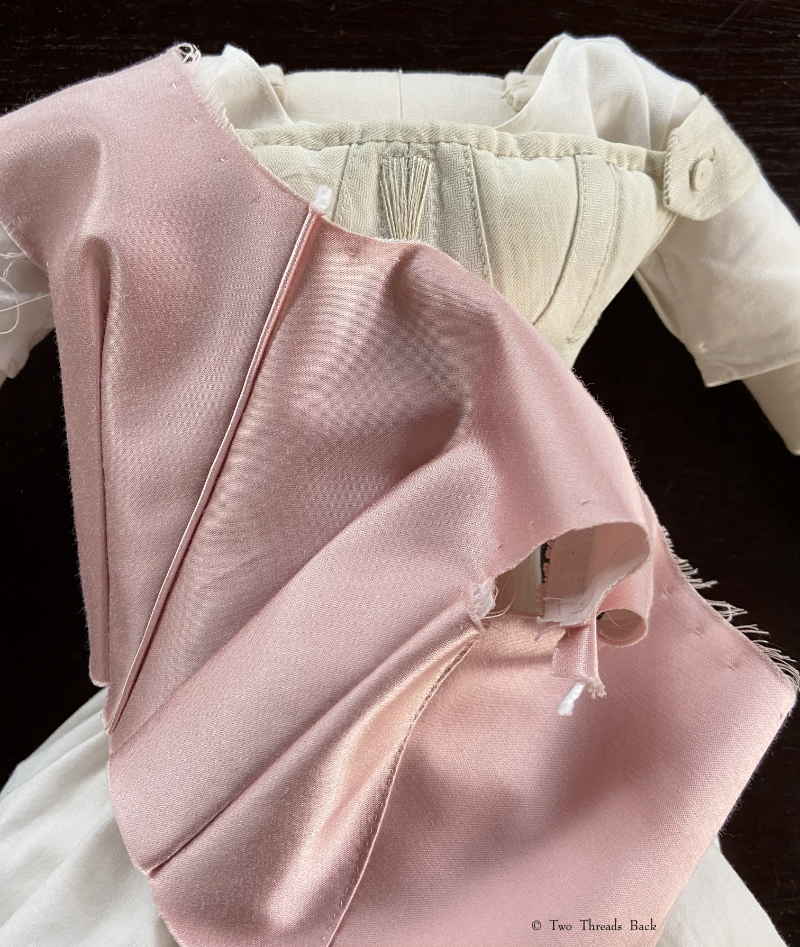
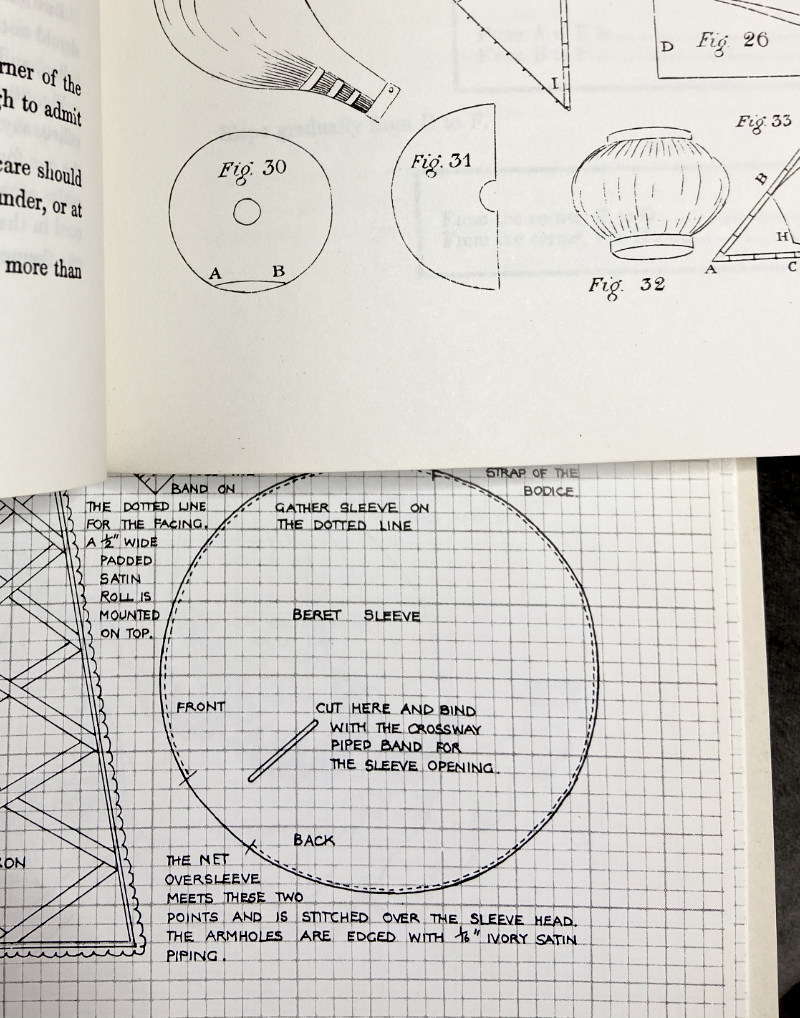
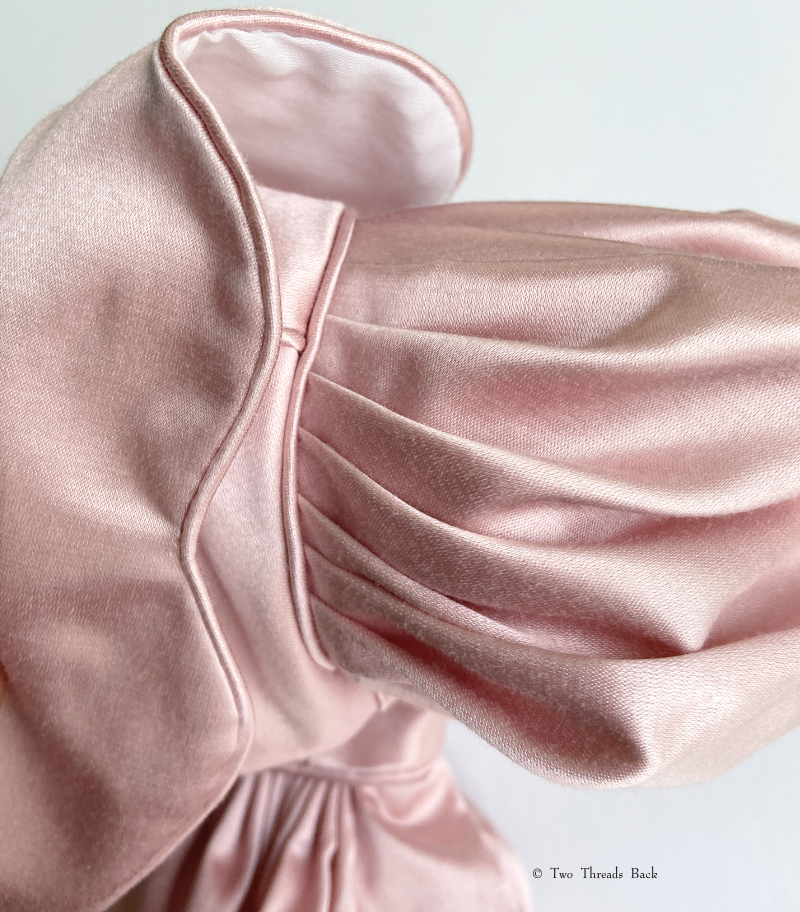
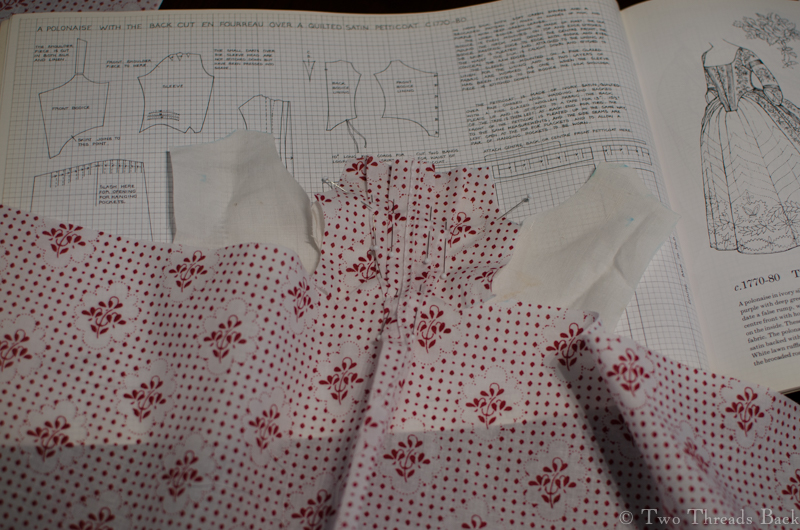
The next dress was an adventure in pattern making; I was aiming for an early ’30s ballgown that would work with sheer oversleeves and I had pink silk satin that was begging me to use it. The scalloped collar (see the first image) was an ordeal – making it fit and lie properly on the shoulders and then meet like it should in the back – arrghh!
However, that was nothing compared to figuring out the sleeves. Workwoman’s Guide and Patterns of Fashion to the rescue.
Unfortunately, with sleeves, you have to make two. And here’s the kicker – they have to match – as mirror images! It looks like the back of the silk is a different color here, but that’s just the lighting.
Sleeve attached. WITH piping! You’ll notice, however, that there are no photos showing both sleeves together. See caption above.
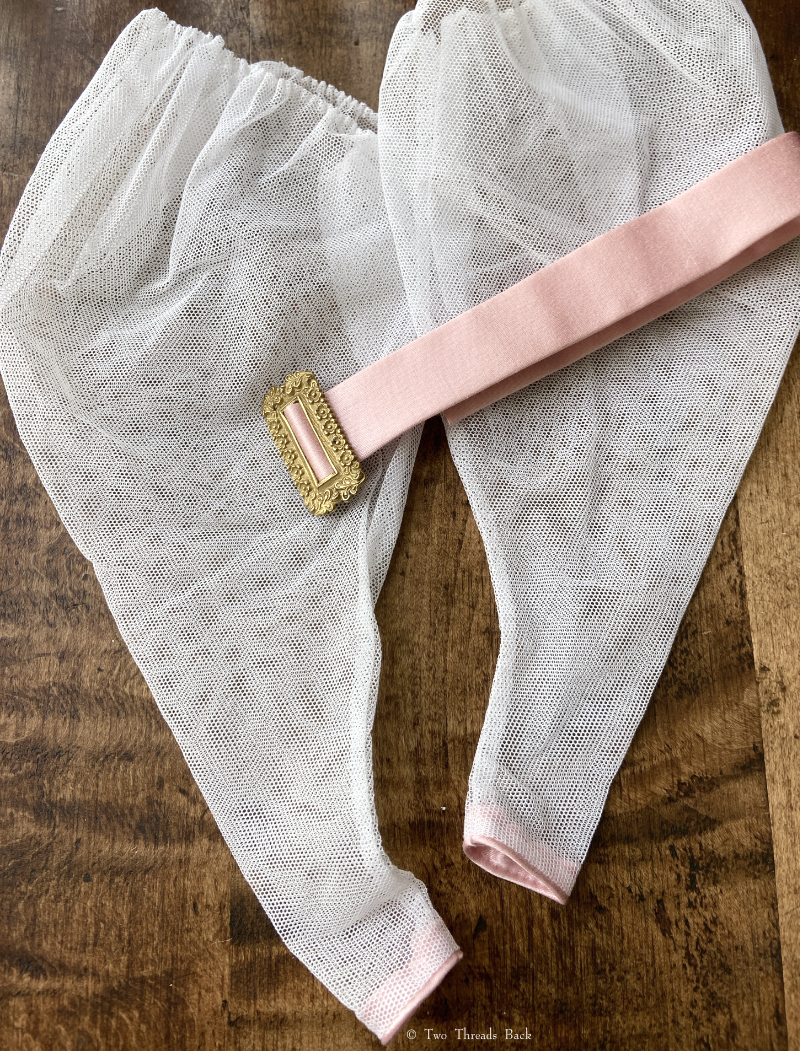
My favorite part! The oversleeves. Until I started searching for examples to go by, I had no idea they were such “a thing.” But the internet is full of portraits of women wearing them. The buckle was a lucky find on Etsy. Vertical rectangular buckles were also very much “a thing.” (Hint: I have one listed there myself right now!)
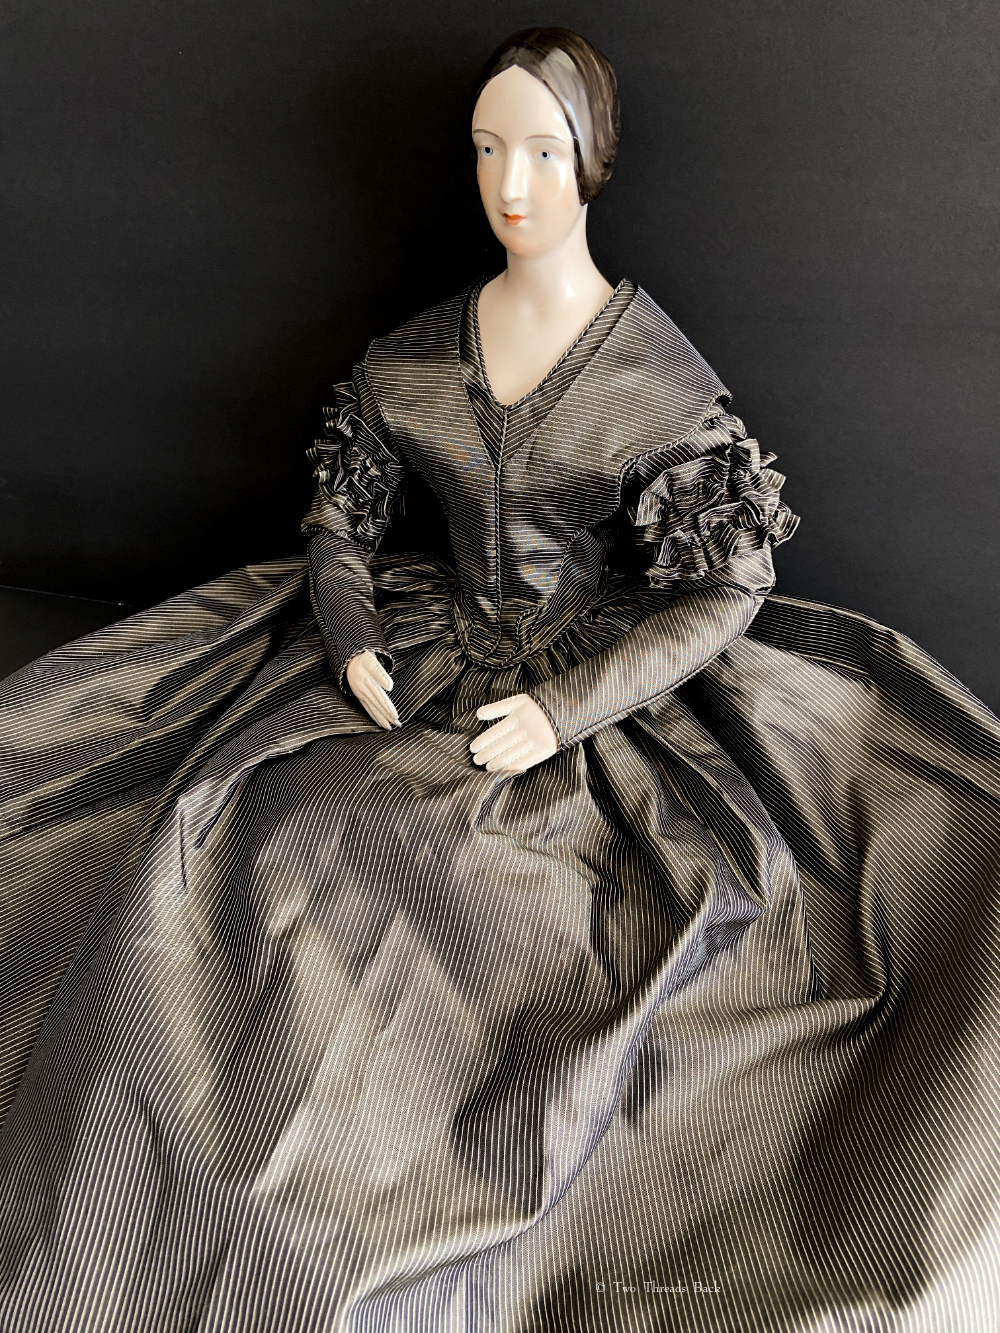
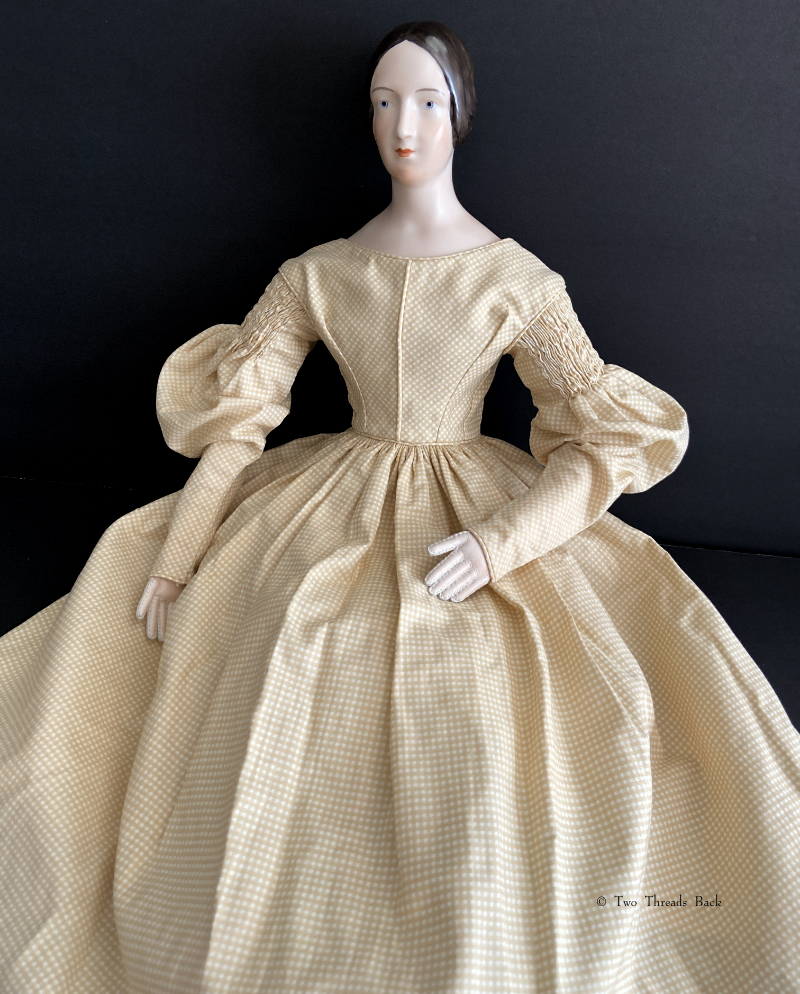
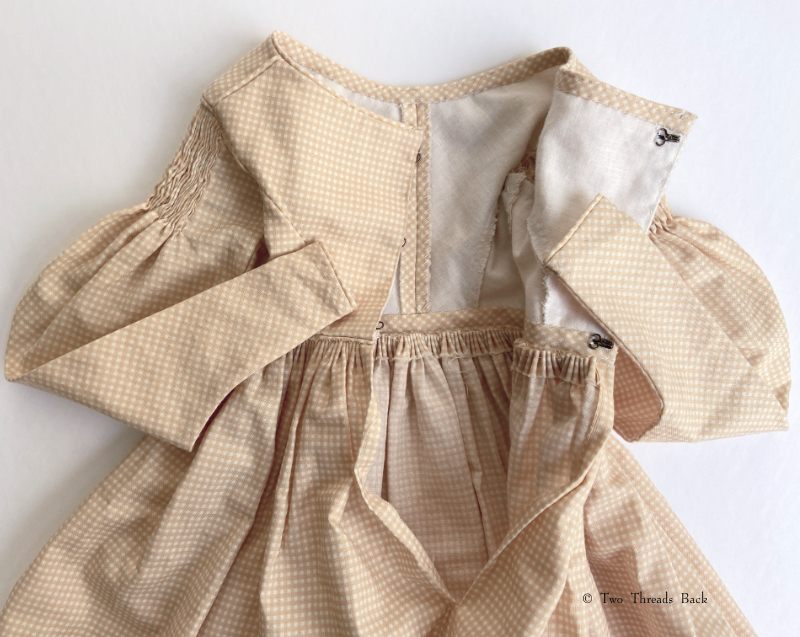
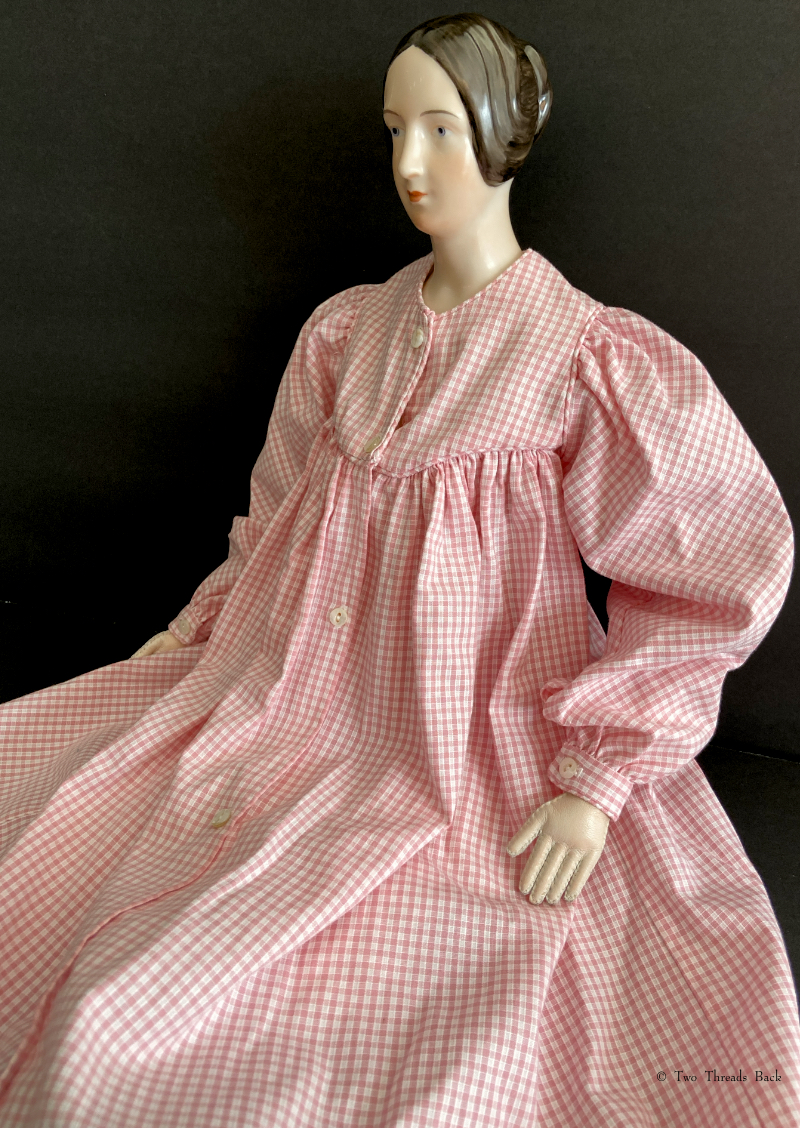
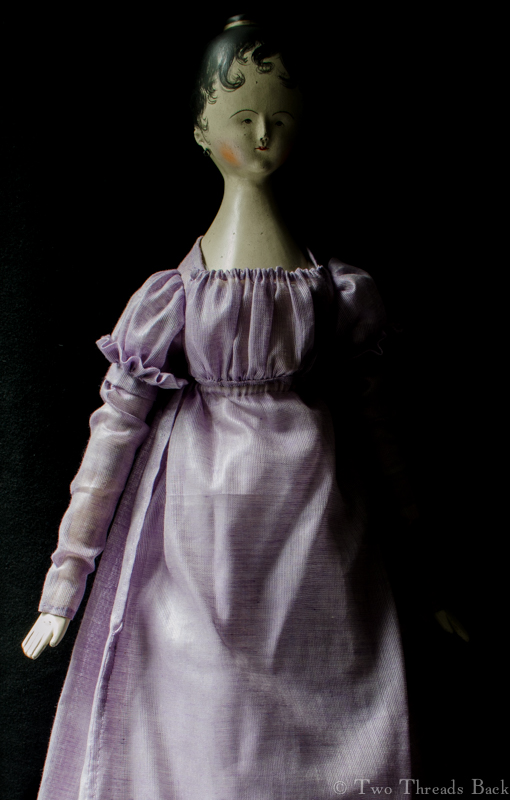
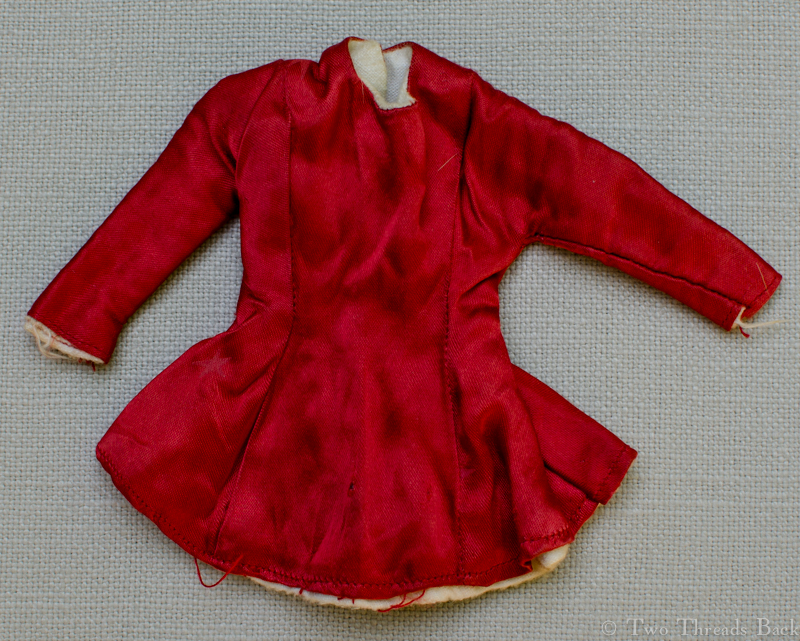
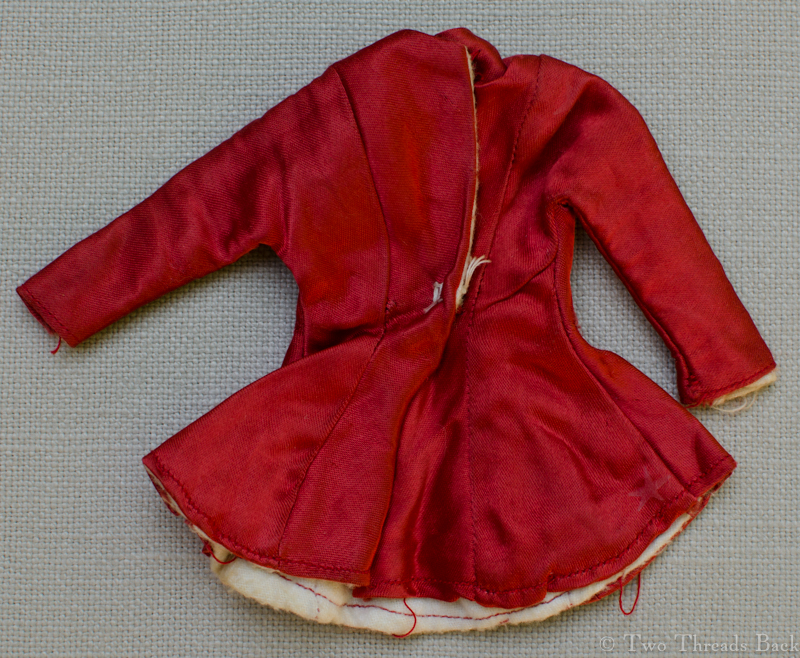
Moving towards 1840s here, with tighter sleeves and long pointy waists, as my lady became a young matron and wanted a more dignified style. And guess what? Scarlett wasn’t the only one who could make a gown out of curtains! I bought this silk years ago for windows. It was the perfect weight for a doll dress. You might say we “just saw it in the window and couldn’t resist!”
Let’s see… what went wrong during construction? First I tried to use some vintage glazed lining that wasn’t up to the job. Too many needle holes and it cracked. Started over. Then realized I’d cut the bodice in a totally modern way. Started over. Then made yards of sleeve trimming which I trashed because it looked awful on the sleeves. Started over.
After all that, the skirt was too easy. Except that I hemmed it first for convenience, then left the wrong edge open for the waistband. Started over. Maybe there’s no such thing as too easy?
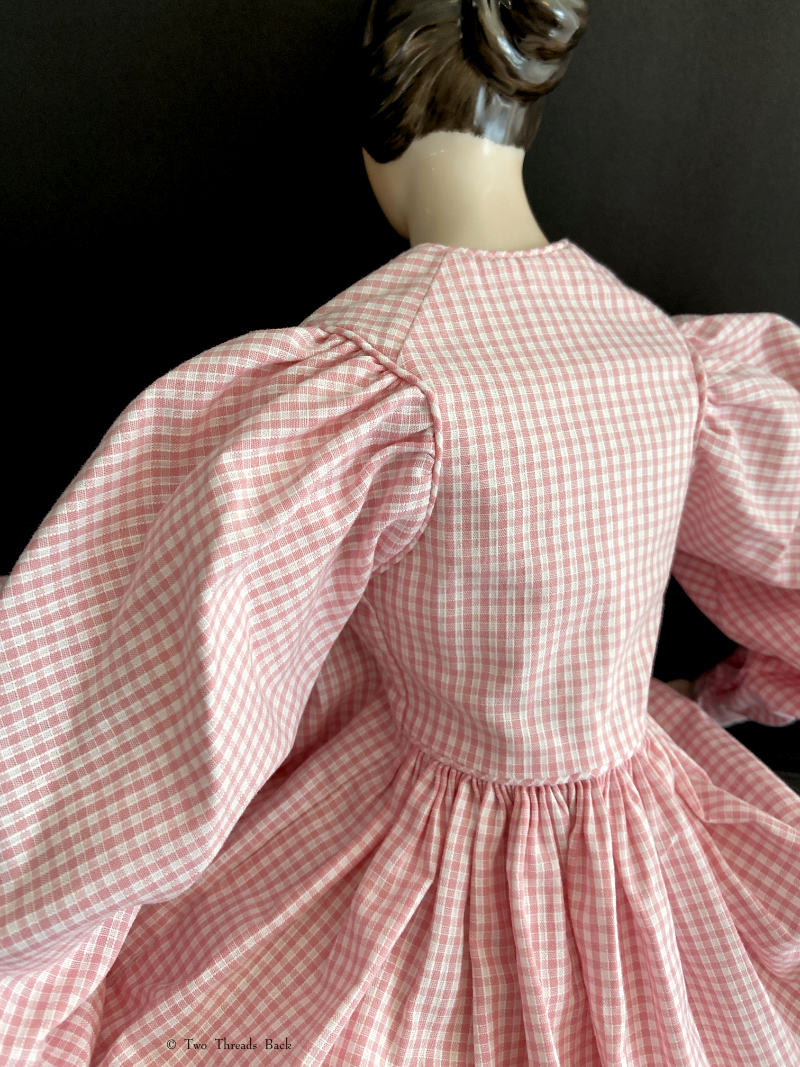
This gown was a pleasure to sew because the cotton was so thin, like original calicos and ginghams. The sleeves were cut like the floral dress, then gauged (gathered) to fit close to the arm.
A tippet! Can’t have an 1830s wardrobe without at least one!
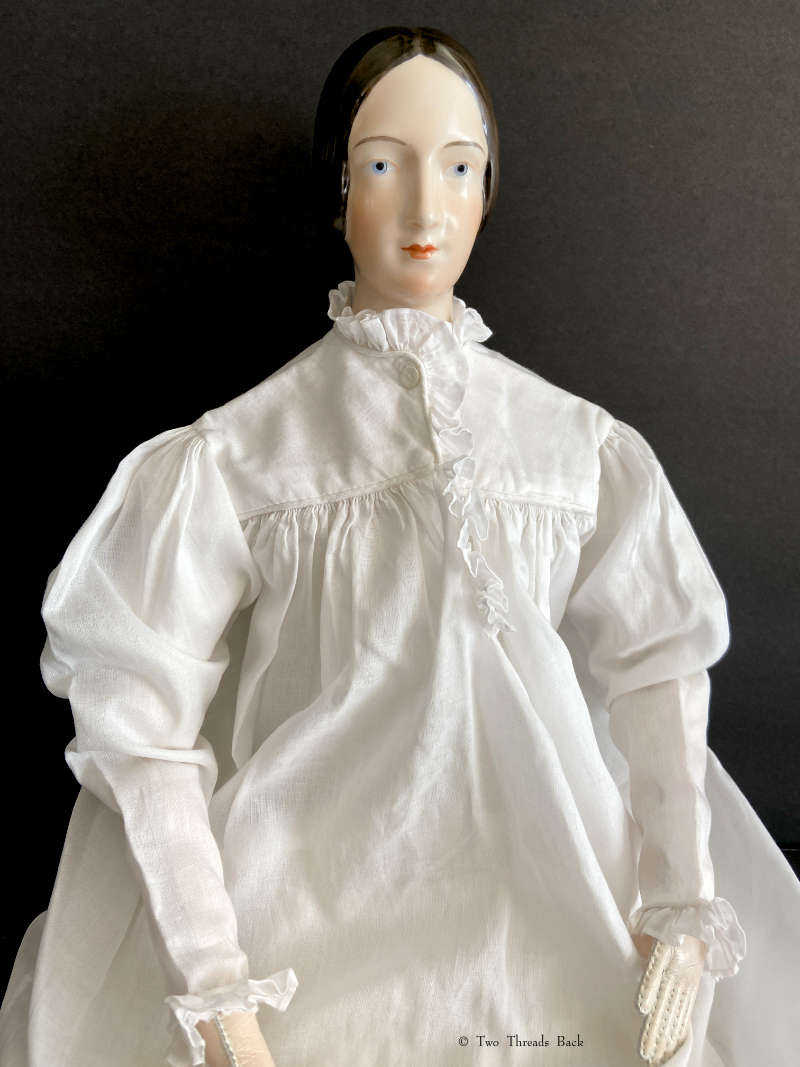
My lady needed a nightdress and I had an unfinished project that was doomed to remain that way. So I used parts of it for her gown. I shouldn’t say what’s inauthentic about it, but I will: the hem shouldn’t have tucks, but it does.
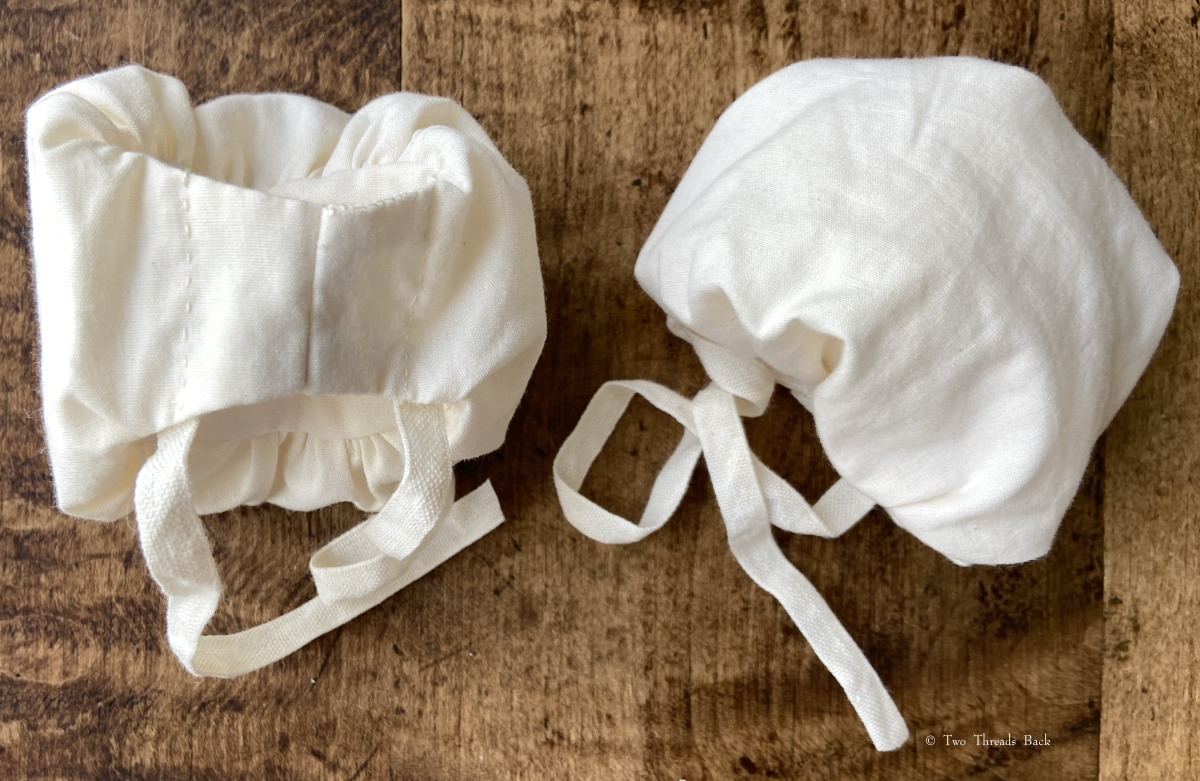
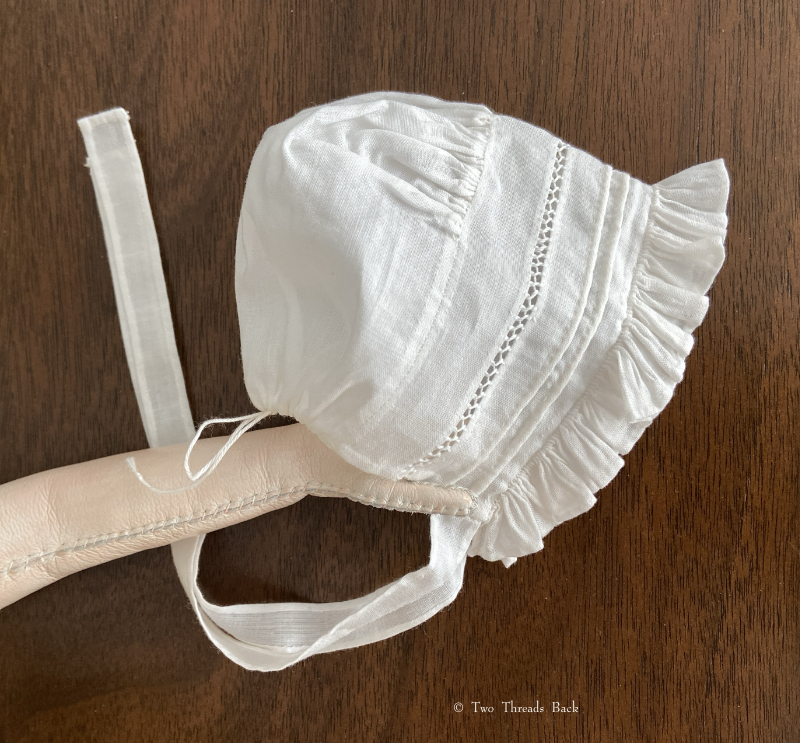
To compensate for taking liberties with the nightgown, I went the extra mile for her night cap and actually sewed the strings (ties) like originals were done, instead of using ribbons. The hems are tinier than they look in the photo, and my vision is now a little worse.
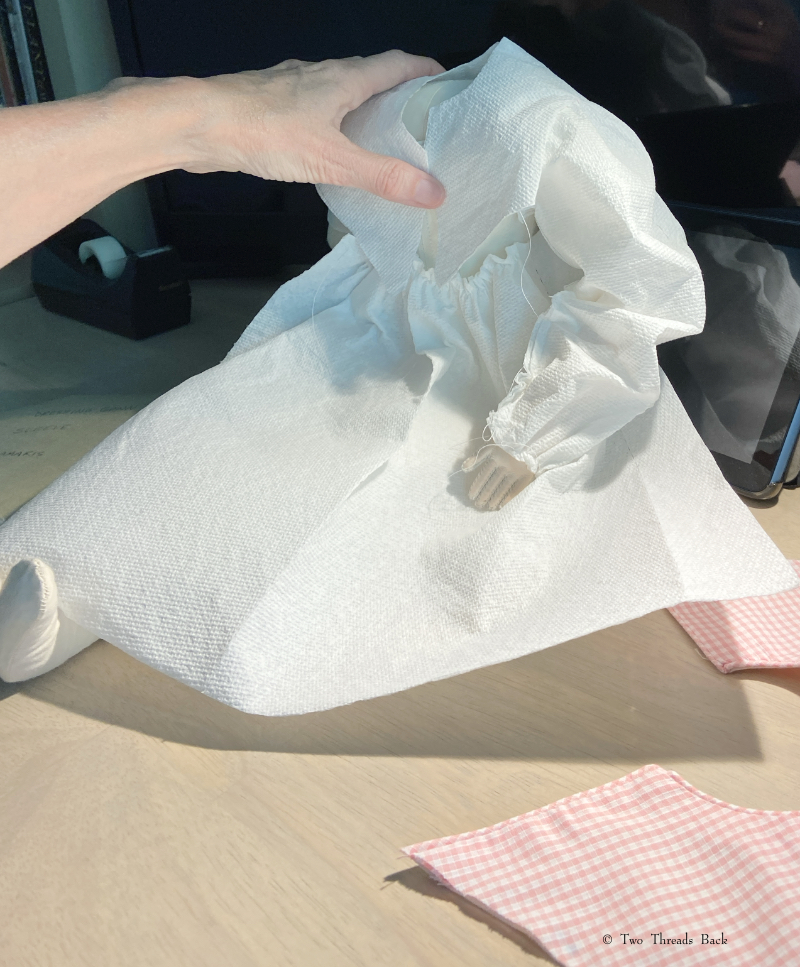
I’ve never watched a horror movie, ever. But making this dressing gown felt like I was living one. I had only a few online images to go by (e.g. Augusta Auctions here). Figuring out how to make the lining fitted in the back and tie around the front and the yoke attach to the front skirt and the sleeves fit it all… I was within an inch of setting fire to days of tortured work. So I put it away for a long time, then got it back out and fought it till I won. NEVER AGAIN. (Photo of me using my patented paper towel pattern method.)
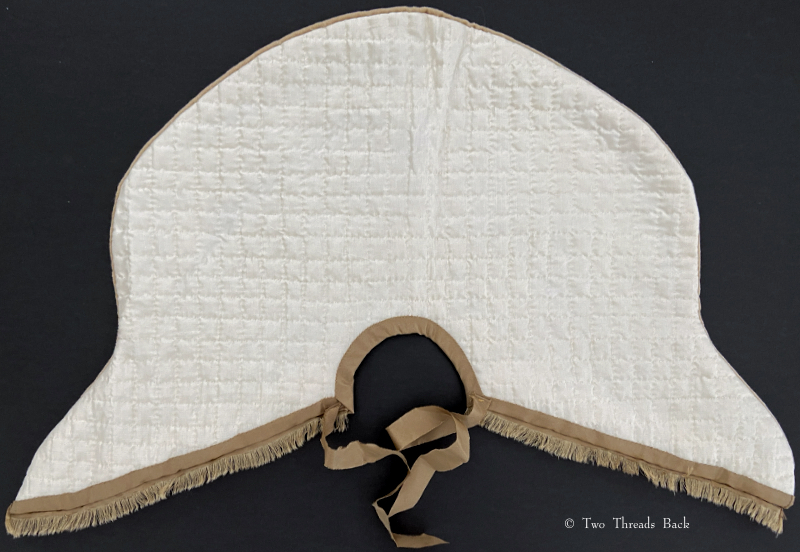
Last of all, a cloak for cold weather. It’s made of a dull gold cotton velveteen, lined with ivory silk which is quilted with wool batting. It’s edged with silk ribbon unraveled into fringe and a curly silk trim.
The quilting took ages and I had to stitch it flat on a table to keep it straight. Some of the lines are crooked anyway.
I really should add another gown or two to her wardrobe, perhaps some more accessories and a bonnet. She’s also missing something else important, and I can’t seem to find the perfect fit. She needs a name! Suggestions welcome – if they show a True Taste. We won’t worry about Correct Principles.
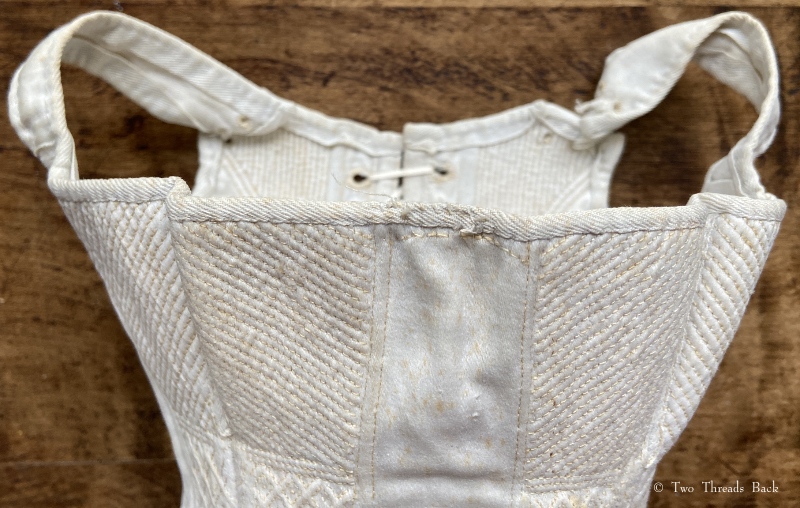
Click to enlarge and see the decorative dot in the center of each diamond.
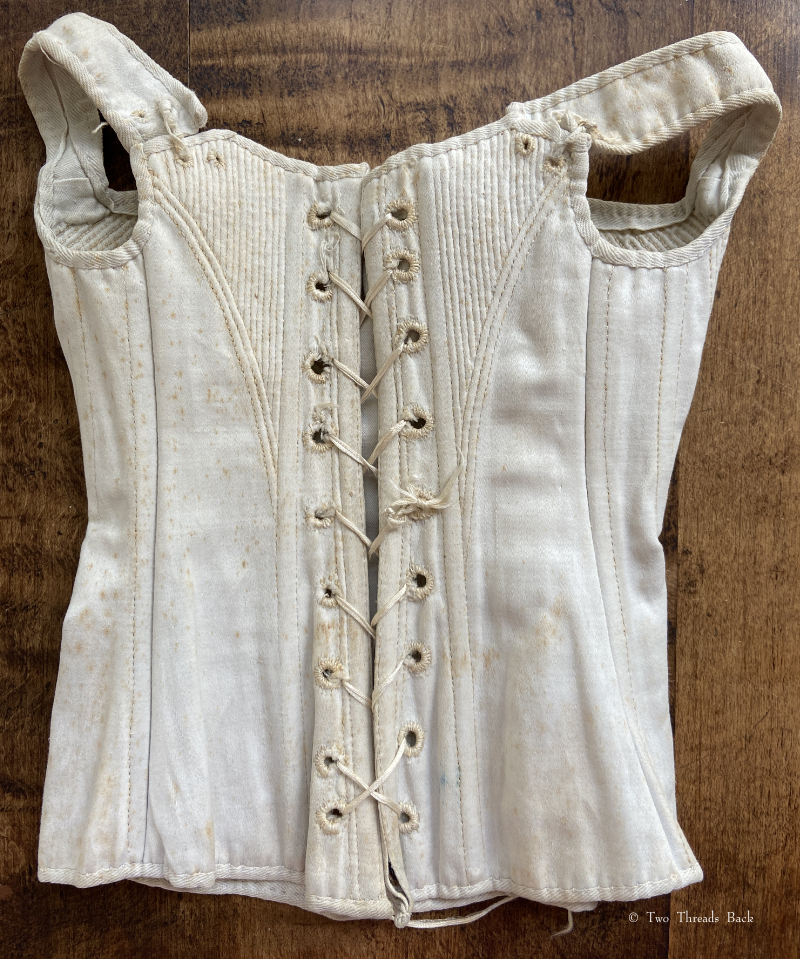
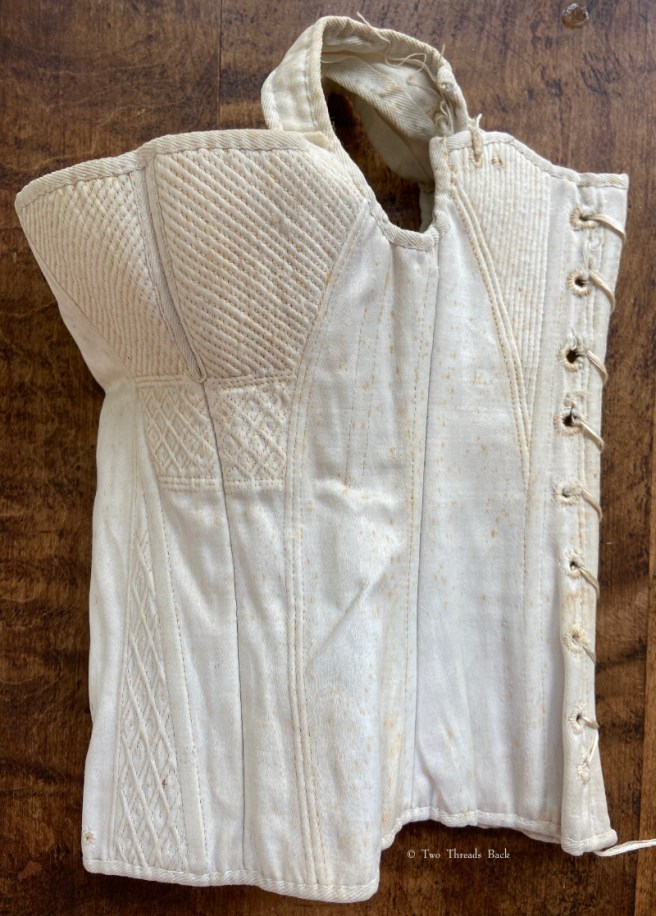
Not only do I have a weakness for plain sewing, but for miniature things as well. Tiny garments like doll clothes, or the samples that girls made when they were learning to sew are irresistable! That’s why I was thrilled to find this half-size treasure from – can it be the 1820s? At first I thought it must have been made for a doll, but it would have required a pretty large little lady for that time, and the incredible detail seems extreme for a doll. Maybe it was a shop model, or sent from a corset-maker to a client as a style sample? It’s certainly a puzzle, so I’d welcome any expertise!
Signs the lacing was pulled too tight…hmm…
The side view shows how the pattern was designed for the well-endowed! It’s not as noticeable from the front.
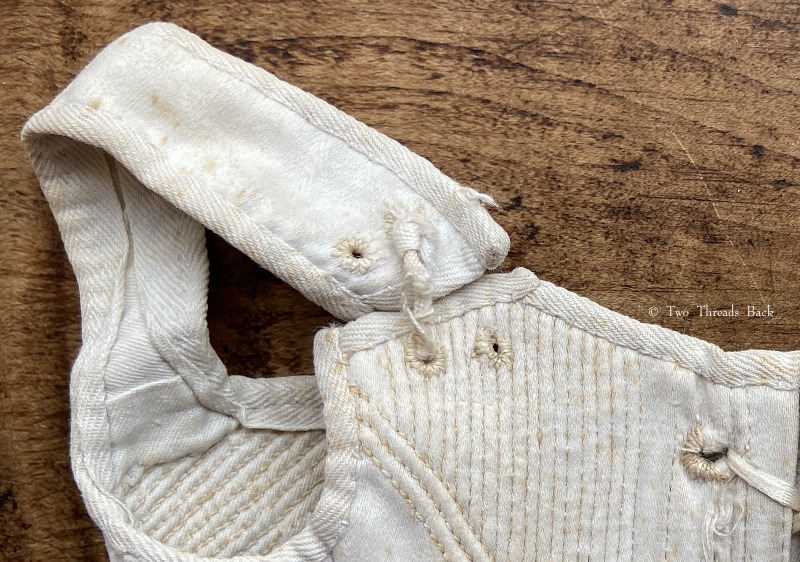
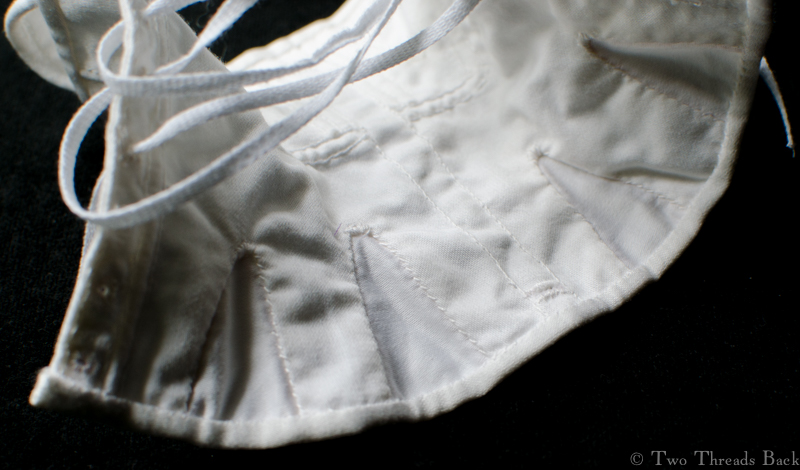
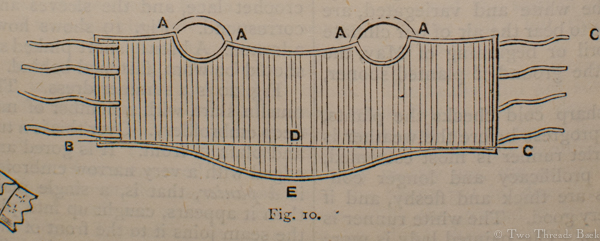
It’s seven inches in length, 12 around the waist, made of two layers of cotton sateen, bound with twill tape, and of course, hand-stitched. The silk laces are in place as found, laced closed. It’s sewn with very fine silk thread which I believe was originally white, but has now yellowed a little more than the cotton fabric. I can see whalebone inside one of the boning channels where there is a slight separation at the end. I have no idea what the cording is, but the backstitches that hold it in place are worked about 20 per inch!
Click to enlarge for better view – their stitching wasn’t totally perfect, but a whole lot better than mine!
Compared to earlier 18th century stays that were heavy and heavily boned, or to later corsets that might contort and constrict the female torso, this style – excluding the busk – seems pretty comfy. That didn’t stop the lectures on tight-lacing, even during the early 19th century. The Poughkeepsie Journal opined in 1823:
I deem the corset of the present day to be the perfect engine of torture, and infinitely worse than the stays of days gone by. These last besure were injurious, but they left the resemblance of a female shape; the corset on the contrary presents the waist as regularly round and untapering as a white lead keg. The olden stays I remember were laced with a silken string of the size of the finest twine, but the corset requires a cord equalling the bow-string of a Kickapoo Chief.
What on earth is a white lead keg? Well, I checked. There was such a thing. Like a metal paint bucket today – just don’t use it to draw your well water! The author insists
no other animal could survive it. Take the honest ox, and inclose his sides with hoop poles, put an oaken plank beneath him and gird the whole with a bed cord and then demand of him labor. He would labor indeed but it would be for breath. Splinter and belay a pig in the same way and a whine might be aspirated, but it would be a whine of expiration.
Assuming your ox was honest, it would probably agree with the author. Unfortunately, the belayed pig wouldn’t have a chance! (It’s not often that 19th century prose make me LOL, but that last sentence succeeded.)
In the 1820s, Dr. Godman, a physician, anatomist, and naturalist who lived a remarkably full but too-short life (click here to follow a quick rabbit trail) denounced busks – lengths of flat wood, bone or steel inserted into a channel down the center front of a corset – as especially injurious:
Another instrument of torture is added in the form of a steel or hickory busk, which is pushed into its sheath in the already too tight corset, extending along the whole length of the breast bone… to keep the body from bending forward in the centre, and to prevent the dress and corset from ‘hooping up,’ as it is called.
The following scene occurred at a boarding-house in Philadelphia. The girl of the house … filled the tea-kettle, and brought it to the kitchen hearth, where she placed it on a bench. To place it over the fire required considerable stooping, and this, as it turned out, was impossible to her. Repeated and fruitless were her attempts, by a sort of crouching attitude, to accomplish her object; there was no one present to assist or to relieve her from the restraint which prevented stooping, and in despair she gave up, and stood by the kettle as if debating what she should do. The mistress came to inquire if the water was boiling, and found it not yet on the fire! – to her utter amazement, ‘the young lady’ confessed that she had her ‘long-busk’ on – that her ‘lacing,’ which was excessively tight, was in a ‘hard knot’ and that she ‘could not possibly stoop’ to put on the kettle!
He wasn’t without humor either:
Can anything on earth be more ungraceful than the gait, the walk of a female who is extremely corsetted? From the shoulders down, as stiffly inflexible as the parlour tongs, she can only advance by a sideling shuffle of the feet, which appear to get forward by stealth…
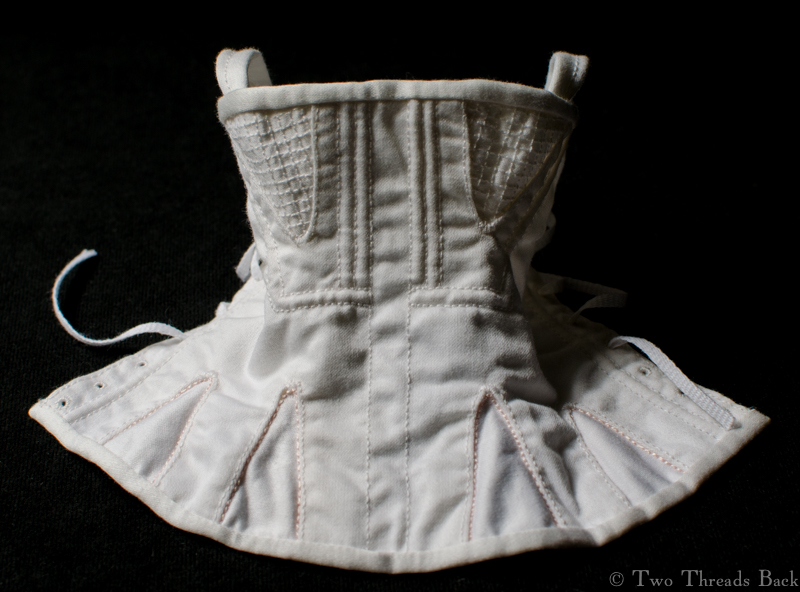
Here you can see the bottom of the busk pocket from the outside and the eyelet holes for a tape or cord to hold it in place.This is the bottom of the corset showing the inside of the busk pocket. I’ve used a broken ivory fan stick to show how it was inserted.You can see the top of the busk pocket has a curved row of stitches to keep the busk in place.One strap is tied with a tape, and the other with a narrow cord. I can imagine a little girl doing this for her doll.
Maybe I’ll never know what this little corset was made for. The workwomanship (assuming it was a female stitcher) is exquisite, which suggests a model, either to exhibit skill or make a sale. But a few signs indicate wear, which makes me think it adorned a doll. Maybe its history included it all: made as a specimen of skill, served as a model or sample, and then retired to spend its later years on a later doll. Of ‘corset’ doesn’t really matter, whatever its past, it’s still a work of art!
I don’t remember where I first came across the term “lap-bag.” It was used in the infuriatingly casual way that long-dead authors have of assuming we know what they’re talking about, and I didn’t give it much thought. But when I recently came across the illustration below, c.1860, my reaction was – in the words of my 4-year-old grandson – “what is the heck of that?”
Of course I pursued the elusive lap-bag, only to discover it wasn’t so peculiar after all. It has a respectable history, especially if you consider it’s only a variation on a very useful, very humble, and very common garment. I think this young emigrant to Australia summed it up perfectly in 1850:
The ladies gave me a nice piece of print to make a lap-bag, which will be very handy on board ship, as it ties round the waist, and has little pockets to hold one’s thimble and scissors.
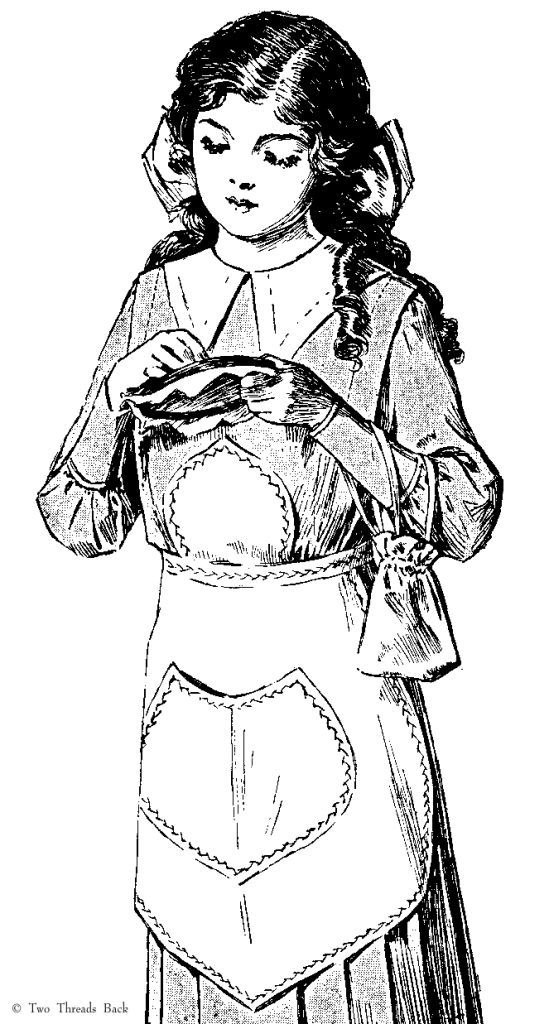
It’s simply a type of pocketed apron that was used for keeping sewing items handy, something especially helpful for girls’ sewing classes. The pinafore was another variation, recommended as early as the 1810s for plain needlework lessons, both in England and America.
Each girl should be provided with a pin-afore, or slip … taken in at the conclusion of school time…. The pin-afores are marked 1, 2, 3, &c. up to the number of girls that the desk contains: the number of the desk is also marked upon them, thus – 5/3, which would signify that the pin-afore belongs to the 5th girl in the third desk.
In 1858, when Alice Neal penned her reminiscences of Eliza Leslie for Godey’s Lady’s Book, she remembered her own school days.
As long ago as sewing was made a special branch of female education – and we leave our readers to infer the date [she was born in 1828] – the Wednesday afternoons at the school which I attended in Boston were enlivened by reading aloud. The circle of little people, with their pink and blue chintz “lap-bags,” a style of sewing receptacle entirely unique, stitched away on their sheets and patchwork, while the older girls read in turn.
A children’s story from 1871 tells how “The girls all had to be provided with lap-bags, worn like aprons, with the ends brought up and stitched together. These were to keep the work from getting soiled, and hold the thimble, cotton, needles, scissors, etc.” School inventories included lap-bags, and one teacher explained,
These little lap-bags,” remarked the teacher, are the very first articles I teach the children in the Primary class to make; and they use them through all the grades until they graduate from the cutting department. Each bag is labelled, and at the close of the sewing hour the work is neatly rolled up, put inside, then collected in these large baskets.
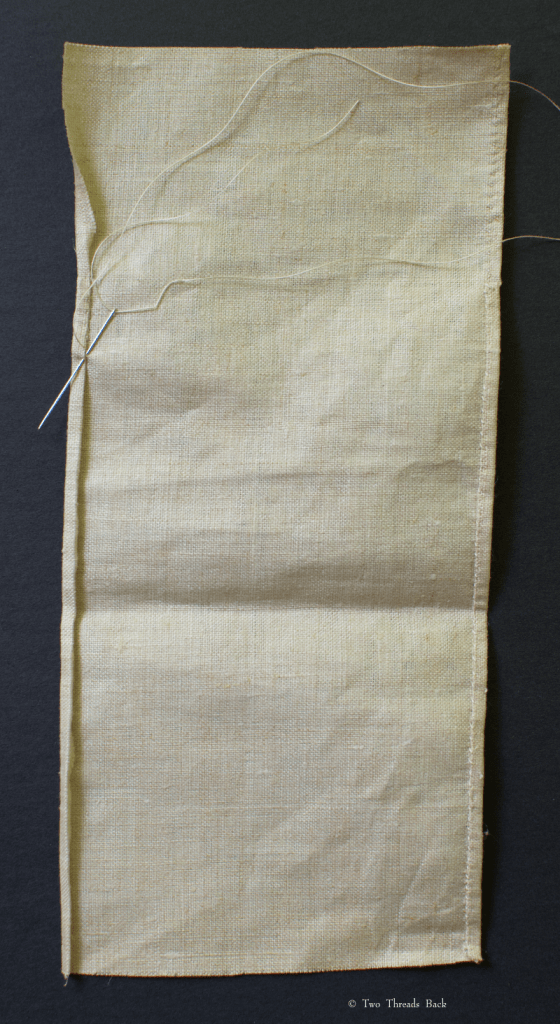
Some later sources called them sewing aprons, but these matched the description as being aprons “made of extra length to allow the turning up of a quarter yard or so for a pocket.” After reading all about these receptacles, I decided to attempt my own. It’s quicker and cheaper to make things in miniature, so doll size it would be!
But what to use? I found references to brown holland (unbleached linen), calico prints, Scotch gingham (a better quality gingham), and pink and blue chintz. My obsession with charity sewing schools inclined me toward the brown holland, since that was the utility fabric they suggested. I just happily happened to have a bit of it with the original glaze (a glossy sizing) remaining, so the next step was to make sense of the directions that accompanied the illustration. Simple. For most people.
A pattern to scale. Yes, including the gusset.
Oops. I had actually started hemming one side before it dawned on me that either the pocket or the apron would be hemmed the wrong side out. Snip and flip to the rescue!
Time to insert the gusset. Yes, the pattern was to scale. Apparently the finished gusset had a growing spell.
Next came the marking. As much as I wanted to follow advice and place the numbers where they’d show when the work was folded, I couldn’t make it work. But my doll will still take her place as the “fifth girl in the third row.”
I also made the “pincushion of white calico with a cover of coloured print to which the tape is sewn, so that the pincushion being taken out, the cover may be washed with the bag.” In theory.
A lap-bag ready for work.
Trust writers of the era to impart moral virtue into anything that would hold it. I don’t mind, at least not when they’re praising hand sewing.
If it is best to train the child along aesthetic lines in any phase of art, then let him be trained to appreciate and prefer a piece of true art in needle-work, even plain sewing, over a wholesale manufactured article which may be bought at cheap rates.
Let me illustrate by a school girl’s sewing apron, neatly though plainly made, hand-sewed by herself, and appreciated because she wove into its very stitches her own power and love of doing a thing for herself, and, too, having done it the best she could, over a very elaborate one selected from a whole boxful in a store marked “your choice for 10c.”
As aesthetic development and culture help to make a person a better person, so sewing can be made to help a girl to become a better girl and a more powerful and valuable woman to society.
Why not turn up your nose at that 10¢ store-bought apron, make your own, and become a powerful woman! You’ll be glad you did.
A few days ago, my husband and I went for a drive in the mountains of North Carolina to visit a very special lady. She’s a master wood carver with an international reputation and a long-time instructor at the John C. Campbell Folk School. At age 11, she learned wood carving from her mother, as well as other famous folk artists.
We met several years ago, and I was excited to learn that she had also carved dolls – Hitty dolls – although she wasn’t doing them any more. She promised to let me know me if she ever did, so I was thrilled (maybe you could call it the happy version of a hissy fit!) when she called to say that while clearing out her workshop she’d found a couple, one was the first one she ever carved – and was I interested? Was I? What a question!
Two pretty dolls in the hands of their maker!
The original doll was only lightly sanded and faintly painted with color, while her later work was more detailed and finished. But it was the first one that stole my heart. So Mehitabel has come home with me and is awaiting her wardrobe. It was delightful to visit and see the artist’s workshop and other examples of her carving. Sadly, she suffered a stroke earlier this year, so she’s not doing as much now. I did have the pleasure of seeing one especially stunning doll (it’s for sale! contact me for her info if you’re interested) which I’ve posted below.
Truly a work of art!
And here’s a glimpse of the beautiful work on a similar one waiting to be dressed.
And one last peek at a project that really took my breath away –
I’m so excited to have a new doll to dress. It’s not easy for me to sew tiny things, so I’ll have to take care that it’s one my Hitty fits!
MILLENER, or MILLINER, one who sells ribbands and dresses, particularly head dresses for women; and who makes up those dresses. Of this word different etymologies have been given. It is not derived from the French. The French cannot express the notion of milliner, otherwise than by the circumlocution marchand or marchande des modes….
Littleton, in his English and Latin Dictionary, published 1677, defines millener, “a jack of all trades;” q. d. millenarius, or mille mercium venditor; that is, “one who sells a thousand different sorts of things.” Encyclopaedia Britannica, 1823
It’s summer and I’m still here and still sewing a little (not quite a thousand things) although I haven’t posted for months now. Life has been really hard lately, but looking at Mélisande and dreaming of her wardrobe has brought a lot of cheer. Playing milliner (in the broader sense) for Mélisande has been more challenging, but that’s thanks to my penchant for tackling projects labeled “Do not try this at home!”
The exquisitely beautiful Mélisande was created by Kathy Patterson, a brilliant artist and doll maker (her historical dolls are perfection) who made my dream of an early 19th century wooden doll come true. She is a 19″ wooden lady, carved in the Grödnertal or Tuck Comb style of the early 1800s, and perfect for dressing in clothing from the Regency to Romantic eras. Let me qualify that: perfect for doll dressers who know what they’re doing.
Preparing to fell the seam on the sleeve and gusset cut-in-one. The first time.
As for the rest of us… well, it’s more of an adventure. I did know enough to start with a linen chemise – or shift, if you share Jane Austen’s scorn of “mock modesty.” Using a tattered and weary dresser cloth for fabric, I cut the arm gussets and sleeves in one piece, a little trick learned from looking at an original and which I think is also mentioned in The Workwoman’s Guide.
See the scattering of holes in the sleeve? Maybe I should’ve ignored them and pretended it was a real antique chemise.
However, as I was smirking over saving a few stitches on the gussets, time was playing a sneaky trick on me. Hint: check old fabric for flaws BEFORE you sew. That tiny stain may be just a stain when you cut out the sleeve, but by the time it’s been washed and ironed it could deteriorate into a hole. Or two. Or three. And you might not find them until you’re dressing the doll for her final photo session. And you’ll have to unstitch and redo it all. Sigh.
Finished. For the second time. Drawstrings are placed inside both front and back, since I was copying an original that was done the same way.
Once again, fighting patterns. It takes 3 times as long as the sewing!
During the years when shifts were becoming chemises, stays were morphing into corsets. There were so many fashion changes over those decades that I didn’t really know which style to go with: long, short, cording, boning, busk? I just picked a look I liked (and had a grownup pattern to go by) and made it. Pink embroidery was a nice idea but mine looked messy so I picked it out. Instead, I limited the pink accents to extra stitching in the gores and was rather pleased with the result.
A closeup of the pink silk I used to accent the gores. I managed to erase all trace of the pulled out embroidery fails. I wish my stitches were more even, but shadows and highlights in photographs can hide a multitude of irregularities.
A view of the inside. You can barely see the little buttonholed slit at the bottom for inserting a busk, if Mélisande ever decides to wear one. Personally, I think her posture is a little stiff already.
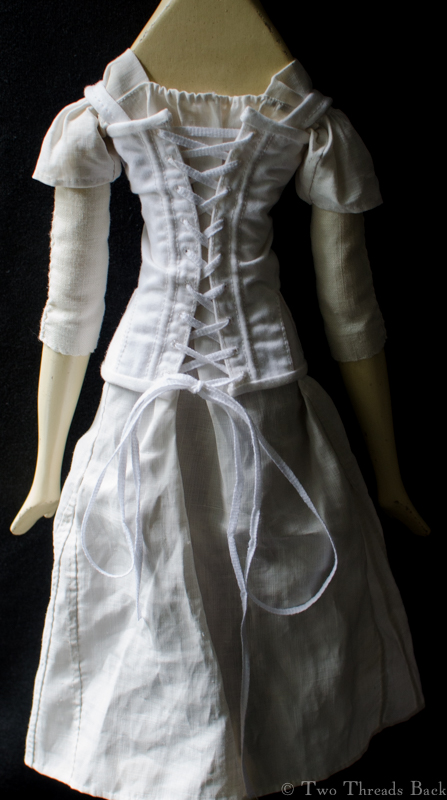
All laced up. Maybe not authentically, but it’s too much work to fuss!
Next, Meli needed a petticoat and I needed one to copy. Unfortunately, there is a dearth of extant Regency “bodiced” petticoats. But sheer cotton dresses require petticoats, so I used a couple of tiny internet images of originals and my imagination.
The petticoat with a bodice. I made the skirt front flat and kept the gathers in the back.
Yes, I skipped making any fastenings. I will eventually go back and add some ties, but I was just plain tired of the petticoat by this time! I did, however, add some stitches to protect the opening from tearing. Definitely a period technique.
The finished petticoat.
All undies on. Ready for the gown!
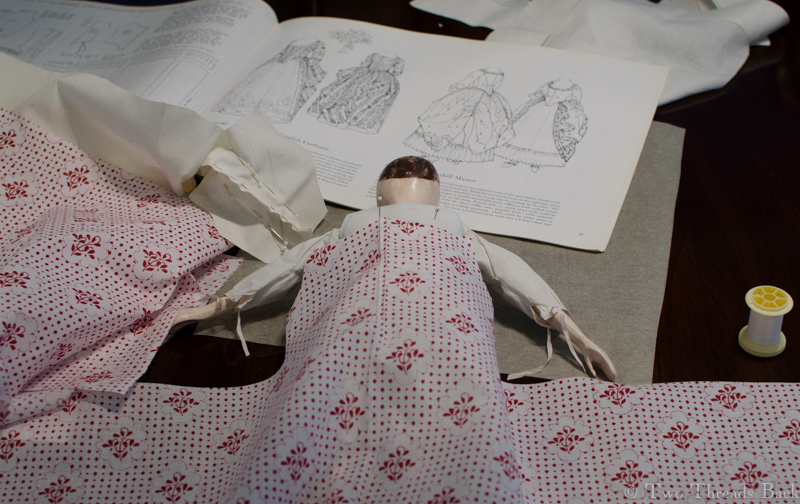
Finally (2 years later) it was time for the gown! One cool thing about patterns in books is that while costumers fret over enlarging them, doll dressers find them just right! Kinda sorta. I still had to rely on my old standbys, paper towels and tape, to get the fit.
Designing and fitting, here we go again. But the “The Heart of the Tree” provided inspiration!
To make a pretty morning or afternoon gown (I’m not sure how to tell the difference – maybe look at what you’re wearing and then look at the clock?), I used some unusual sheer lilac cotton with a silky sheen on one side. The loose weave made it a bear to sew, though.
Can you see how loose the weave is? That meant taking really tiny stitches to prevent fraying and bad-hair-day seams. Ok, the seams were still a little frizzy.
Here’s the apron/bib front dress opened to show how it’s put together.
The bodice was the hard part. I lined it with glazed linen (I doubt I’ll do that again) and extended the lining so it could fold over to close in the front with tiny pins. The bib front is gathered and then the skirt is attached all around. The puffed sleeves are unlined. I intended to do something a little more creative than a ruffle, but I need some more practice first.
Last of all were the detachable long sleeves. They were sooo easy to make compared to the rest of the wardrobe. I should probably have made them a little longer for authenticity’s sake. Maybe another time.
Next on the list are some white muslin accessories, and then I plan to trim a bonnet, something truly millinerical. I have to say the last part of the definition quoted above really resonates with me, “Jack (or Jane?) of all trades.” And, I could add, mistress of none, but oh how much fun!
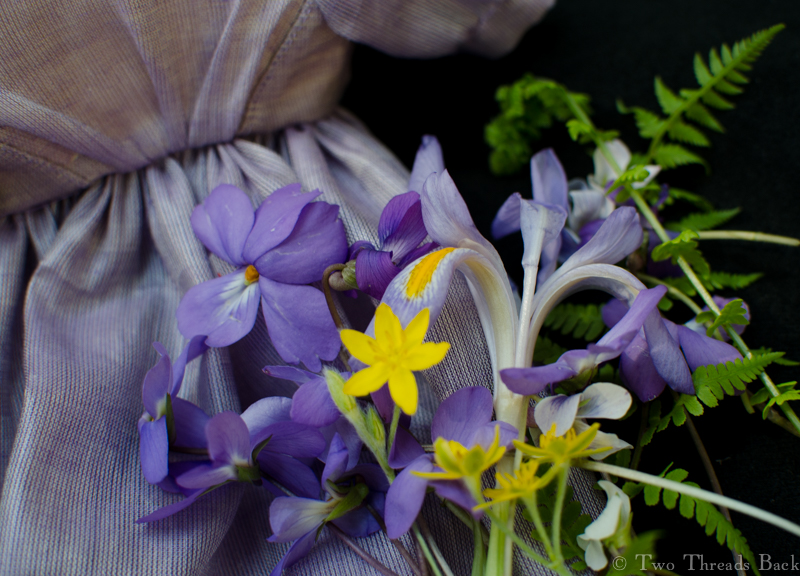
If only I could make trimmings as pretty as nature! Wildflowers from my yard – can’t do better for inspiration, hmm?
You’re never too old for dolls at Christmas! At least I’m not. I’d like to introduce Jessamine, a lovely doll made in the style of Izannah Walker, by the incomparably brilliant artist Paula Walton.
I’ve always longed for a doll like this lovely girl, and waited years before I was able to bring her home. I’ve had her for a while now, but that practice waiting has served me well – because it’s taken over a year to dress Jessamine in her first (hand sewn by me) outfit! But Christmas is here and she is ready.
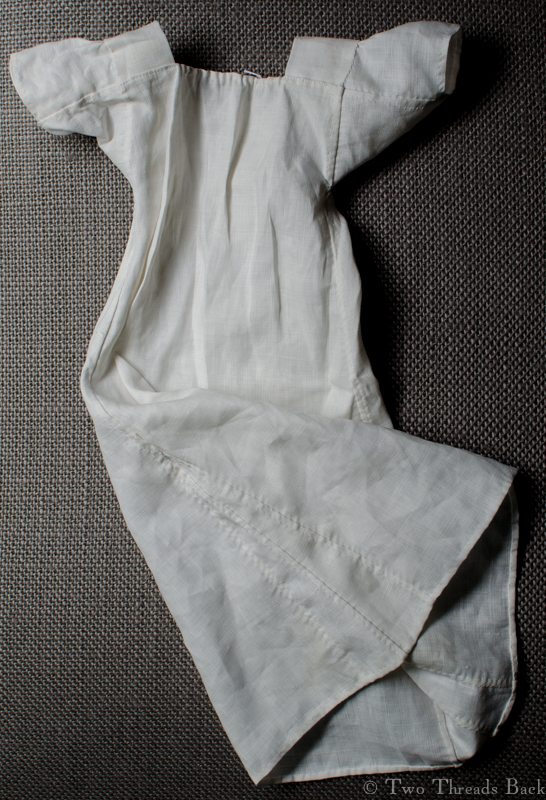
The chemise came first, and I tried to make it with the same details that a real mid-19th century young lady’s might have had: gussets, gores, and binders. I know, unless you’re used to period costume terms, they sound like instruments of torture. I guess they were, actually, for me! It would have been a lot easier to make a simple doll chemise, and from now on any others will be quite plain. They’ll have to be; this one is so bulky that a dress has to be specially cut to fit over it. Live and learn.
Next came the drawers. Since Jessamine is an older girl, I decided she would have split rather than closed ones. Well, really I just wanted to make them that way. Of course that means it’s trickier for her to pose with them while retaining her modesty. But we managed. I suppose you can tell from the photo that this wasn’t taken in December? And surprise – it wasn’t this year, either!
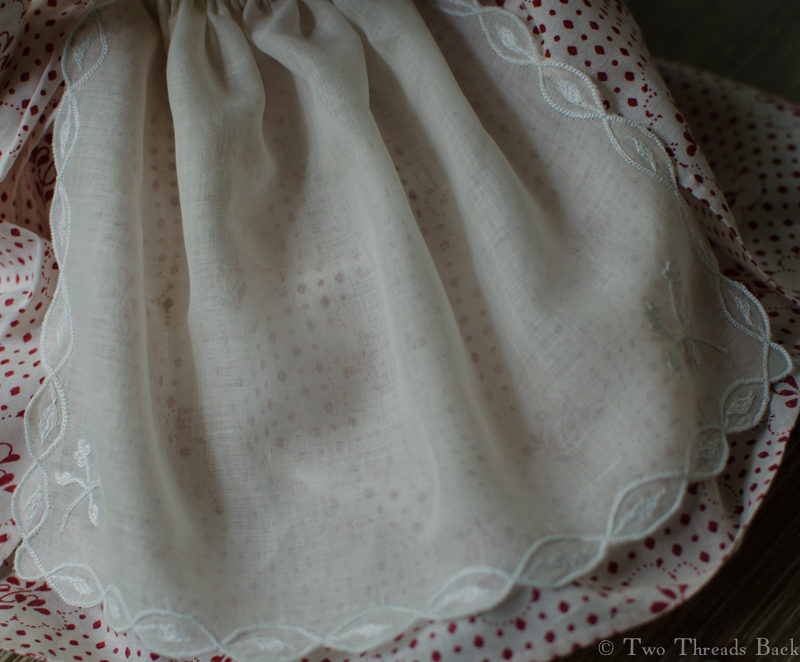
A petticoat was essential, and this one is so full that she wouldn’t need another. It was made from the embroidered ruffle of an early 20th century, mass-produced, low quality, damaged piece. The elderly lady I purchased it from was apologetic over its condition, saying she was told that her great aunt had stood too close to the fire. While it’s sad to take apart anything, thereby tearing it from its history, some things wouldn’t survive at all otherwise. (I’m sounding rather apologetic myself, hmm?) But now this scorched phoenix has a future and a past!
Every young lady would need a corset, or if she wasn’t quite ready for that, a corded waist or stay-waist (or some other term for the same garment). Even though there are a zillion doll corsets out there for inspiration, I went exploring Cassell’s for a likely pattern.
I adapted it to Jessamine’s age (@150 or so) and used the fabric from a c1900 scrapped doll corset. What girl wouldn’t love lilac stays? There was a lapse of time between the modeling session below and the actual completion of the corset. Months, maybe? But I eventually finished the eyelets and added the straps.
After many more months (Pharaby was taking all my time) I began Jessamine’s dress. The fabric was a happy accident: an online store sent the wrong print years ago, and it’s been in my stash ever since. I made so many mistakes that I lost count. Yep, sleeves again; one went in upside down. Aaaalll the seams and gathers had to be picked out and redone. What’s so embarrassing is that I didn’t even notice it was upside down until I’d done all that unstitching for another reason – to make the gathers match the other side. Duh. Maybe that was why they weren’t even?
If you spend any time looking at 19th century portraits and daguerreotypes of children, you’ll notice that many (most?) girls wore coral necklaces. I was delighted to find a bargain to finish her ensemble. It was sold as a doll necklace but looks suspiciously like a bracelet. No matter. The graduated coral pieces make it look enough like a necklace to suit us just fine.
I wish I could claim credit for the pretty red shoes, but that goes to the her incredibly talented maker. Here’s a peek at Jessamine’s feet – too sweet! Transported back to 1860 as a child, I would have been sooo tempted to take her wading in the summer! (My dolls suffered worse.) But it’s December, I’m grown up, and there’ll be no such mischief. We wouldn’t want St. Nicholas to leave only a lump of coal, would we?
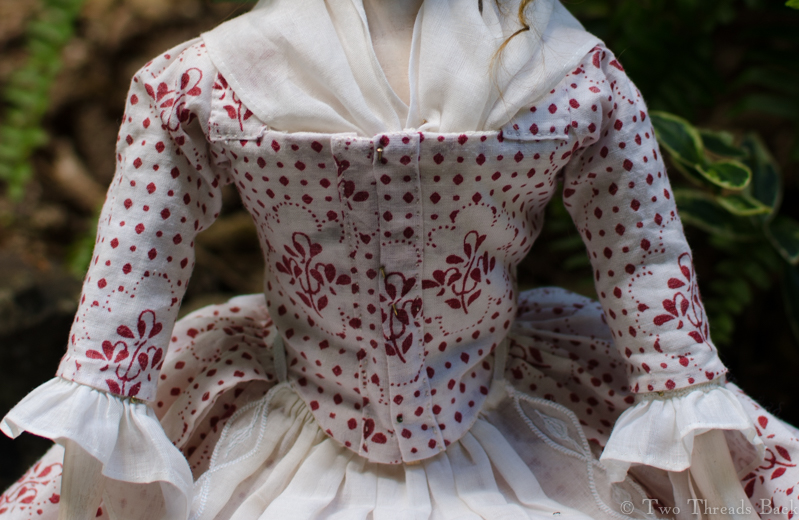
Pharaby, all 16 inches of her, is finally dressed. And contrary to my original intentions, this may be her only outfit! No Pharaby, it’s not you, it’s me.
Since I haven’t posted our progress on the gown and final accessories, I decided to say it with (mostly) pictures. For the gown, I’d purchased a red and white cotton that proved not to be colorfast. Guess who has a cute little pink spotted ironing board cover now? However, I’m so in love with the fabric that I’d choose it again. It reminds me of the dress on the Dudmaston doll, seen here.
We started with the usual nightmare of pattern-making misery, as I tried to draw a bodice that would fit her form. Yes, I know some people can do this in 3 minutes or less.
It looks so simple once it’s cut. It wasn’t.
You wouldn’t know that I took a dressmaking workshop at Colonial Williamsburg a lifetime ago. I was too dazzled for much to stick. The nicest memory I have of it is their relaxed attitude toward mistakes. “Yaroo!” as Flavia de Luce would say!
When it started to look like a teensy little gown I began to get excited – motivation to see it through!
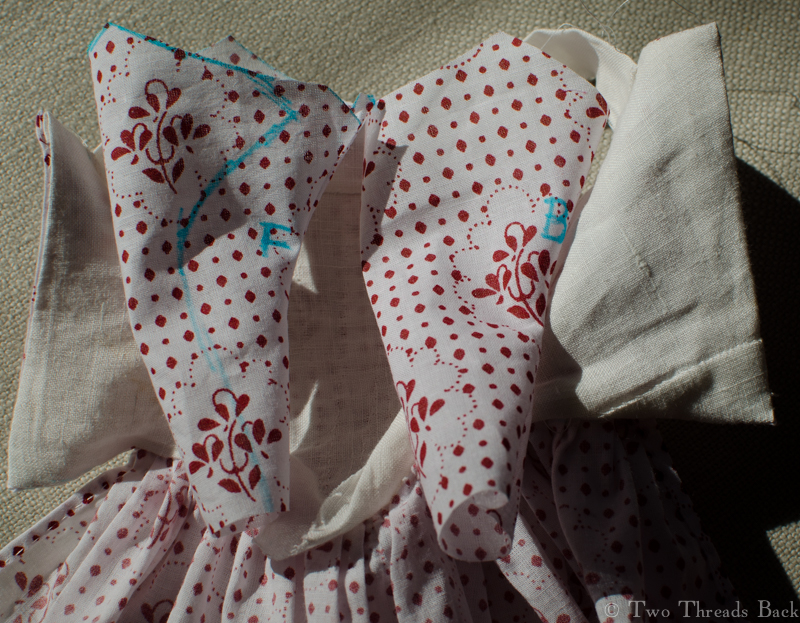
Do you know what the “F” and “B” stand for?
I had to sew the skirt to a paper strip in order to get the pleats even sort of even.
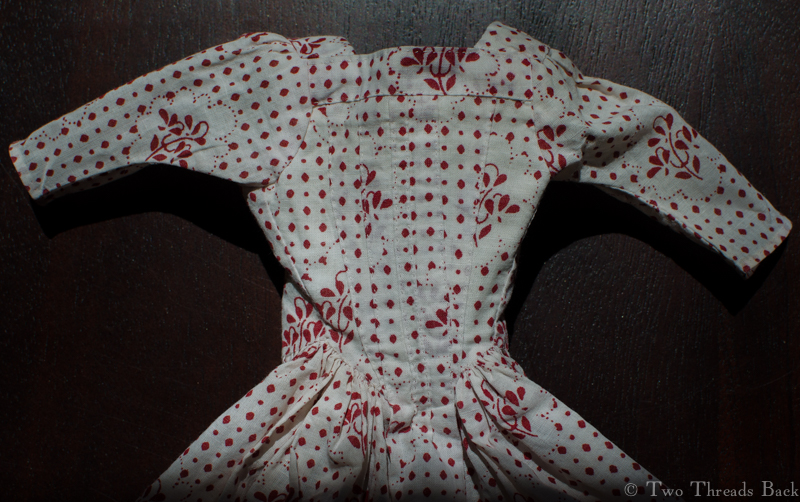
At last! The gown is finished. Or is it? Maybe you’ll notice an alteration in the final photos.
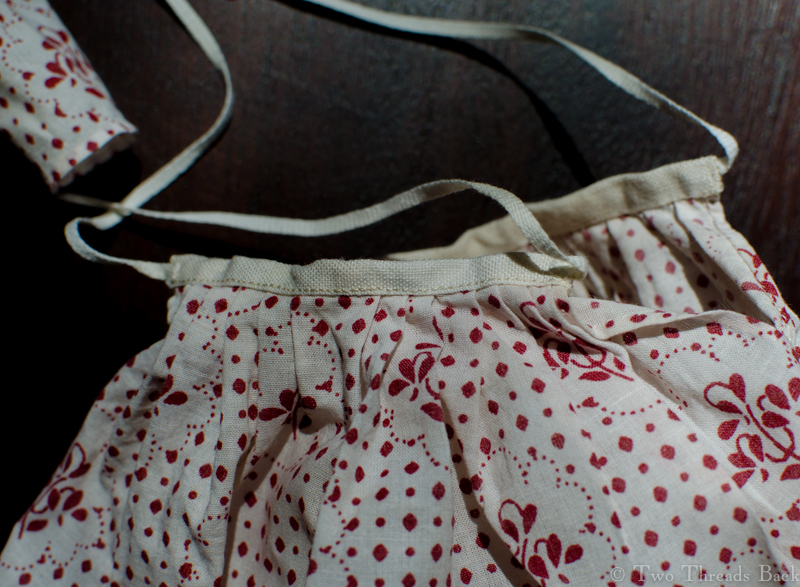
And here’s the petticoat, the only really easy part to sew.
A close-up of the gown folded open, showing the linen lining pieced just like originals could be. Theirs were probably due to a scarcity of fabric. Mine was due to inept fitting.
Gown with matching petticoat.
A view from the back.
I was complaining earlier about the accumulation of stuff around Pharaby’s middle. At this point I decided to replace the waistband on her under petticoat to make it more to scale – and reduce her girth.
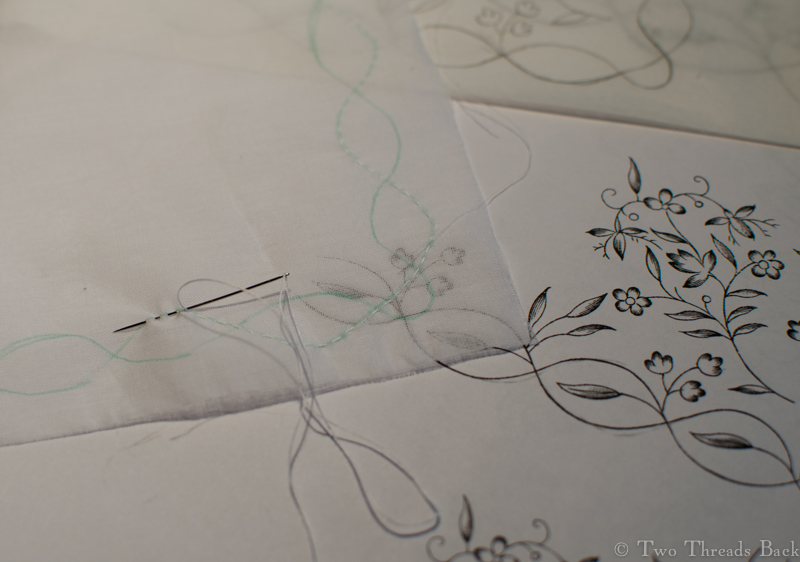
With the gown and petticoat finished, I moved on to her apron. I wanted to use some original 1770s patterns for the embroidery. However … with my limited fancywork repertoire, I had to choose REALLY SIMPLE designs that could be done in a couple different stitches. Like chainstitch. Buttonhole. Running.
I scanned the original pattern and then scaled it to different sizes to find one that would work. Ok, it’s really still too big, but we settled.
The edges are buttonholed, the leaves are simple running or darning stitches, and the sprigs are chainstitch. The leaves looked horrible when I was working them, but once they were all done it wasn’t quite so bad.
The apron, modeled by Pharaby.
Next came her handkerchief (or fichu, or half-handkerchief). I didn’t do any lace or embroidery on it, since she planned to wear it tucked in. It’s made of the same lovely muslin as her apron. It’s different from her sleeve ruffles, which were salvaged from an antique piece. The older stuff just can’t be matched today, although this came pretty close!
Her fichu, tucked in place; tiny brass pins keep everything secure.
From the back, with her hircine wig curls wimping out in our Georgia humidity.
Most of my silk ribbon was for embroidery and too narrow for the cap. So like everyone else in the colonies, we had to wait on the latest imported goods to find just the right ribbon. A couple of little thread loops were required to hold the ribbon in place on the back, since I wanted it removable. And without having to pick out tacking threads!
Last of all were the shoes. I hadn’t a clue how to do them and I’m afraid it shows. This time I didn’t even bother reading or watching tutorials. I just jumped in with both…hands. Pharaby’s poor little feet are only an inch and a half long, and unique. I don’t mean compared to other doll feet, I mean compared to each other. So I made paper ones for patterns, and then used silk scraps and lined them with linen. They’re green because that’s what I had, and I happen to adore green shoes. They’re bound with blue ribbon because the only ribbon wide enough was some left from her cap!
She has Cinderella tendencies. The right shoe occasionally goes its own way when we’re not looking.
The soles are made from bits off a leather apron. I’m a little embarrassed to show them since they fall so far short of the exquisite slippers I’ve seen done by experts. But everybody needs shoes to relax in and not worry about spoiling. Right?
Pharaby practices directing traffic or perhaps gazes blankly at a wall of ivy, so that you may see her from the back. She’s wearing her bum roll for a little poofiness in the petticoats.
So Pharaby’s finished, for now anyway. She’s very dear to me, after this long adventure. And she’ll always be a reminder of my father’s love of fun – and love for me.
In honor of Mother’s Day, I thought I’d share one of my happiest memories. I don’t have many things saved from my childhood, but I do have this beloved dress made by my mother. Barbie was the doll when I was growing up, and oh how my sister and I loved playing with ours!
We put them through the tortures and triumphs of every book or TV plot we knew – and invented even more. They pioneered across raging rivers, got lost in space, and escaped drowning in birdbaths. Once we discovered that flour paste hardened into the perfect cast for a broken limb, our poor Barbies fell out of so many trees that they looked like mummies on crutches.
But best of all was dressing them. You hadn’t really played Barbies until you’d changed their clothes at least a dozen times. One special Christmas my mother made Barbie clothes for us – and if you have two little girls close in age, you don’t make a few different ones for each child. You make two of everything, both alike.
To a seven year old, surprises just happen. I never wondered how the splendid array of doll costumes came to be under the tree. But my mother told me later that she had to sew late at night, after we were asleep. Two. Of. Everything.
Here’s the skating costume that she made out of red satin, lined with white flannel. She couldn’t have known the night she sewed this that her work would still mean so much, so many years later. I’ll be sure to tell her today.