Well, one never was in Kansas and the other isn’t now! Here are two sweet sewing books. The one made by Eliza is American, from Kansas. The one made by Dorothy, who reminds me more of Glinda the Good, is from England. Besides the Wizard of Oz connection (I admit that was a stretch) they have other things in common.
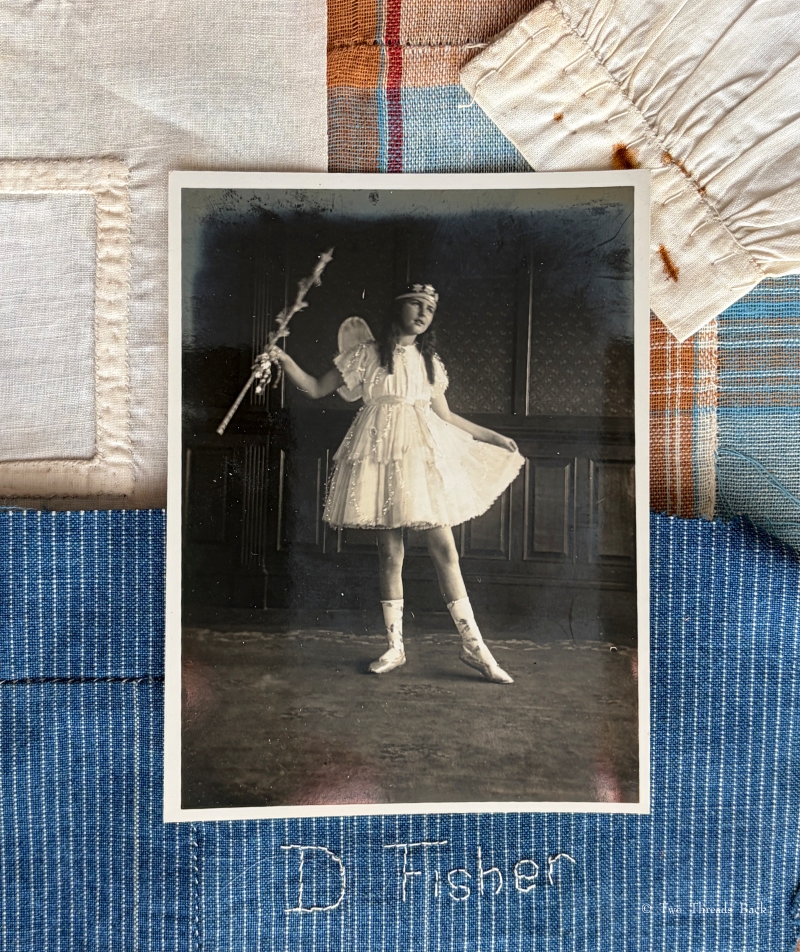
TIME. Eliza’s book is dated 1912-1913, and was compiled during her Home Economics Housekeeper’s Course at Kansas State Agricultural College. Dorothy’s book isn’t dated, but assuming the photo is of her and taken around the time she attended the class, it was probably made soon after Eliza’s. It seems they studied sewing at different ages, however. Dorothy was obviously still a young girl, while Eliza was over 30 when she completed her course, as census records show she was born in 1881.
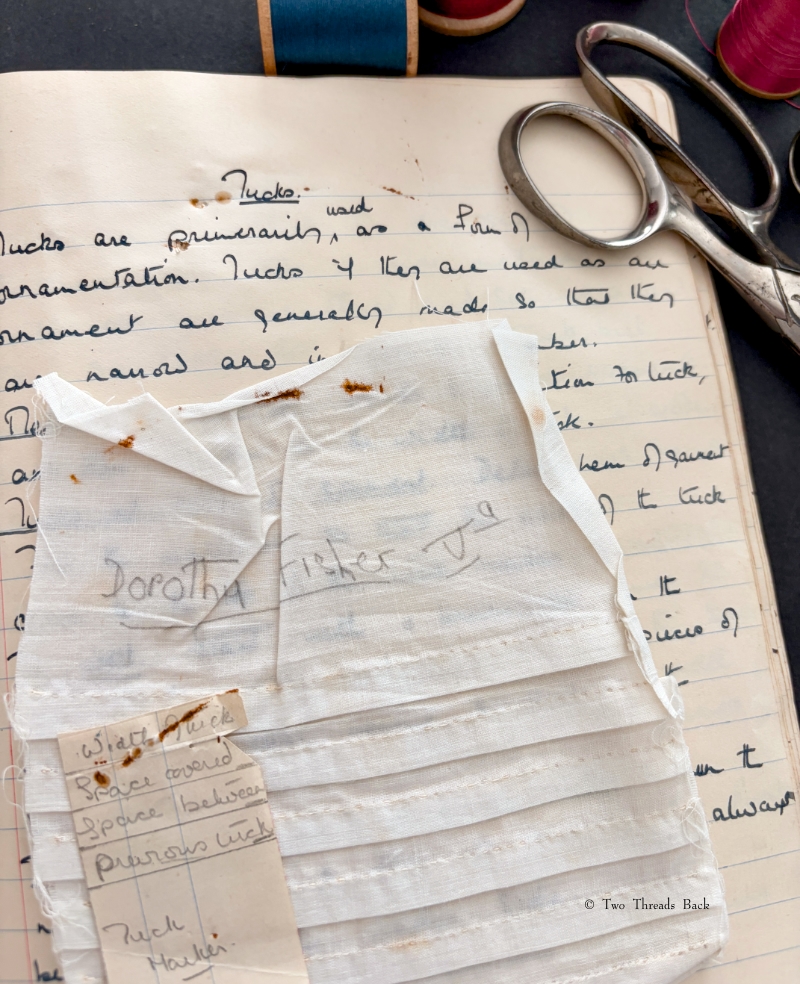
TECHNIQUES. Both cover the basic hand sewing stitches and seams, and they included samples of them in their books. They also learned patching, darning, and making plackets. Dorothy’s work is all done by hand, but Eliza has samples made by hand and machine.
Dorothy obviously put effort into her work, but compared to others I’ve seen, I don’t think sewing was her favorite subject.
Eliza’s work is more precise. However, she was older and likely more experienced when she took her course.
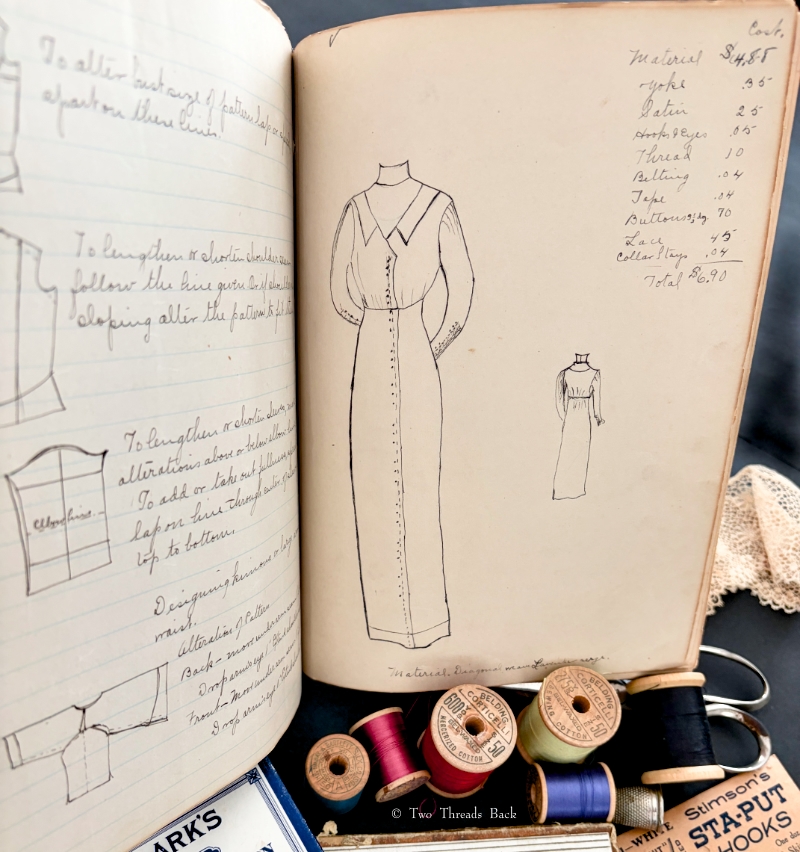
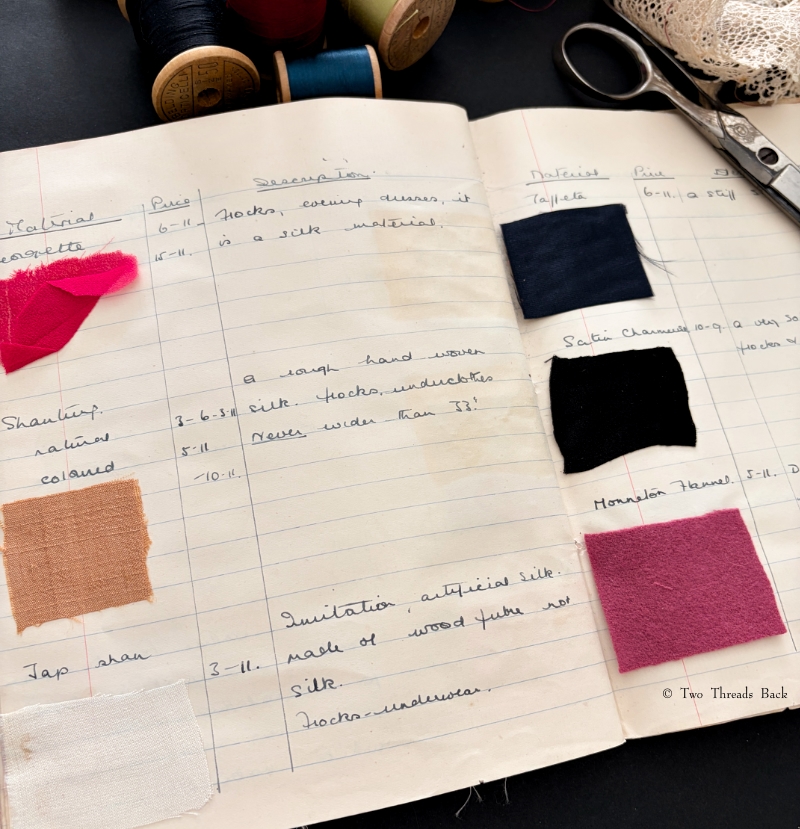
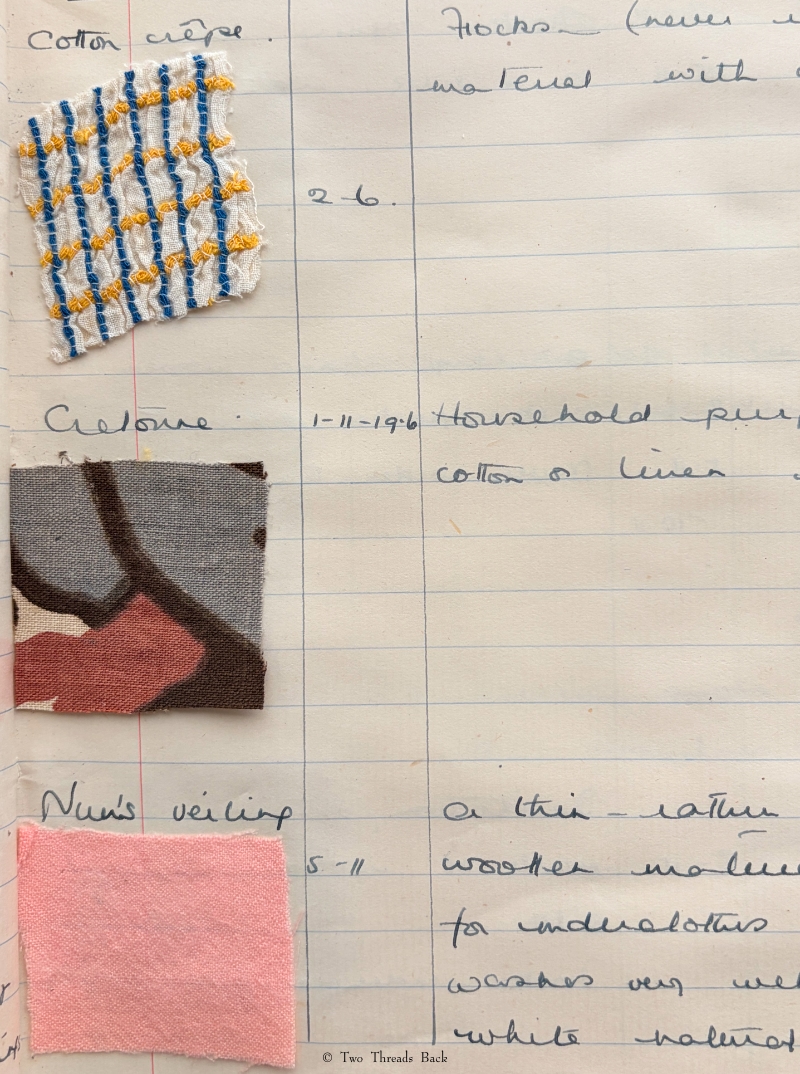
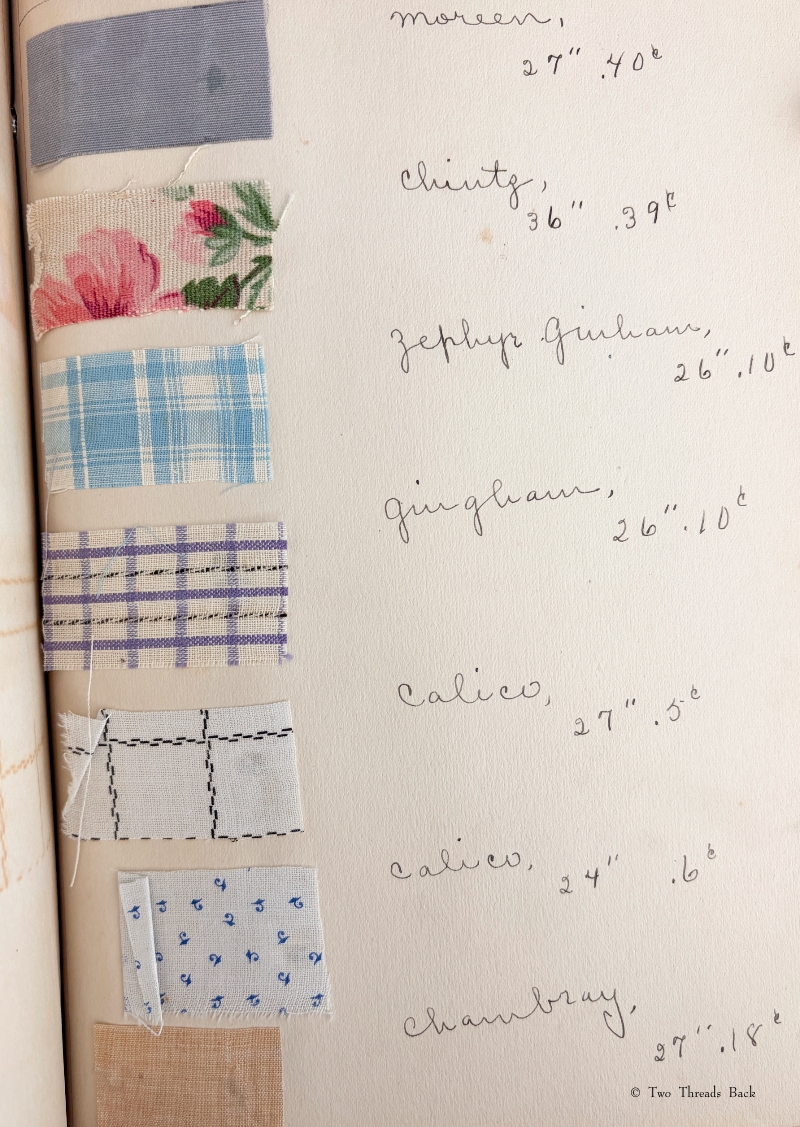
TEXTILES. Thrift was a virtue! Learning to make clothing economically was considered an important part of their education. Students needed to be familiar with fabric types and know which ones were appropriate for different garments. Truth in advertising could often be … well, elusive. And illusive. (For how to promote sales the right way, you can see some extravagant 1892 marketing here.) Textbooks practically encouraged suspicious shopping, and gave hints on how to distinguish good goods from bad goods. Both Eliza and Dorothy included swatches of fabrics in their books, a feature that became common after 1900.
Dorothy noted prices and purpose. Some of the fabrics are the same, or at least they go by the same name, today: georgette, shantung, taffeta.
I wonder if Dorothy was allowed to sew with any of these? I suspect not.
Eliza’s book has 3 pages of cottons, in addition to wool and silk!
The fabric samples are my favorite part of early 1900s-era sewing books. “Extinct” (or nearly) names appear in catalogs, journals, and books from those days, and while research and historians provide helpful descriptions, there’s nothing quite like seeing and touching a tiny bit of the textile for myself. Tarantulle is longcloth – who knew? Not me. A dictionary defines nun’s veiling, and yes, you can still buy it today (I checked), but it’s so much more fun to see a pink snippet from 1915. Textbooks tell me that albatross was wool, but Eliza had a nice cotton specimen. I can’t imagine asking for albatross at a fabric shop today! Well, if there were any fabric shops left today. There aren’t any near me. Maybe they’re still in Kansas?
“About 1849.” Except for the owner’s name, that’s really all I know about the history of this particular little sewing album. It’s bound with marbled paper card stock, edged with silk ribbon, and the colorful pages have the feel (and unfortunately the quality!) of children’s construction paper. Written inside the front cover is “made about 1849 by Mary M. Quiston, later Mrs. Reid, later Mrs. Porter.” (The “M. Quiston” might be “McQuiston.”)
Samplers of cross stitch (marking), embroidery, or darning skills have a long history in Britain, America, and Europe, but the popularity of books containing specimens of plain sewing stitches began in England in the 1810s. They were developed as part of the “monitorial” education system where pupils who had mastered a skill instructed the ones who were just learning it.
This system of “mutual education” was originally applied to basic reading, writing, and arithmetic, then to plain needlework since it was an essential part of female education. Understanding sewing instruction techniques was much easier if you had a small sample to see. Books with samples of hemming, stitching, seaming, marking, etc., were originally intended to help a teacher follow “the system” in her classroom, but also developed into treasured collections preserved by the girls who had worked them in order to demonstrate their accomplishments.
This is one of two caps included in the 1816 British and Foreign School Society manual, a book intended as a guide for educators who were using their monitorial system. It’s attached to the page so I can’t fold it out to show it well, but there’s a tiny number “1” marked in red cotton barely visible on the left. The other cap is marked (surprise!) “2.”
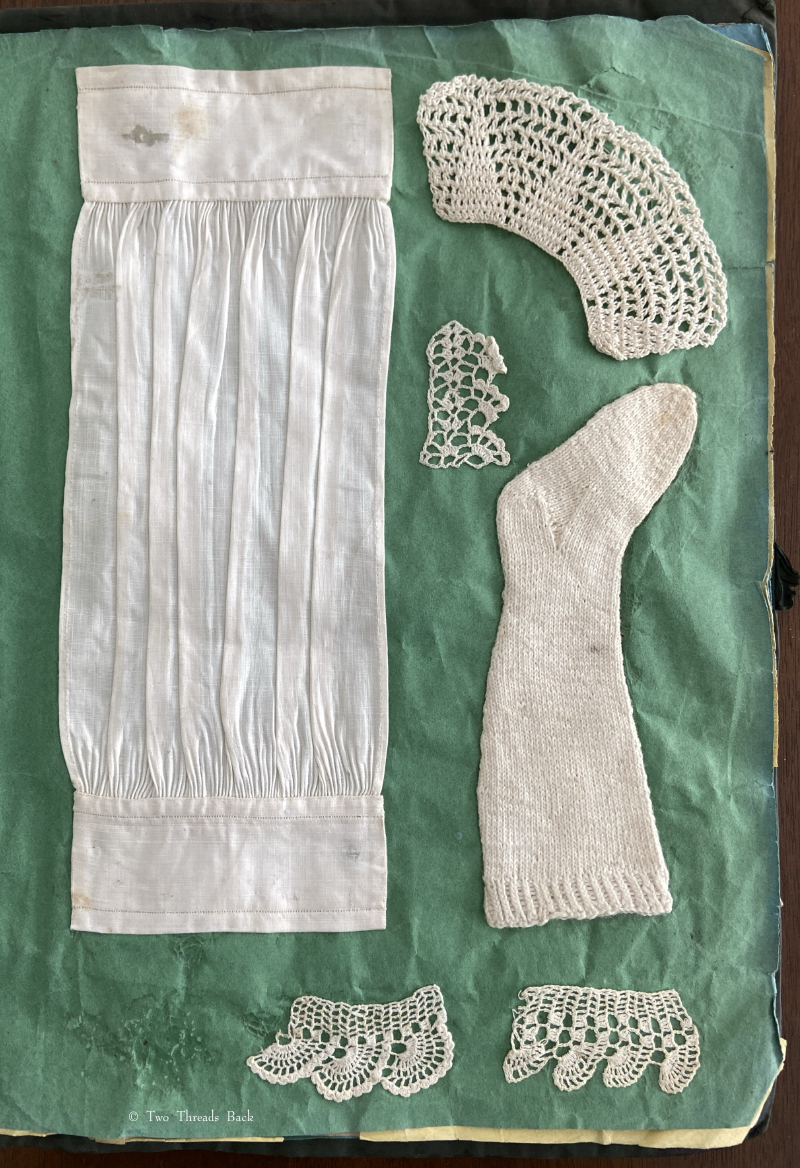
The earliest books might include a miniature shirt, cap, or apron, but it wasn’t long before they added other items like stockings, sleeves, dresses, trims, etc. to the classes. Educators appreciated the savings in time and expense that using small samples offered (and heaven knows charity schools needed to economize!) but maybe they had another reason as well: it was fun making tiny garments that were just like doll clothes! Here are some of my favorite pages from Mary’s book.
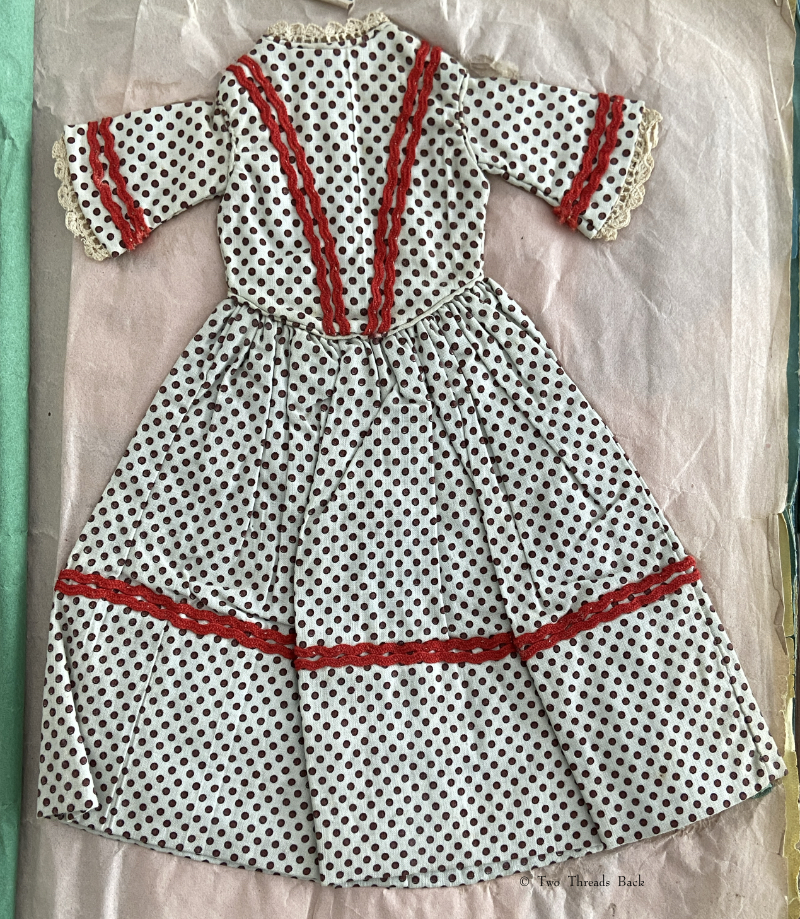
This dress is a simpler style than the sheer one above and it’s made of printed cotton.
Mary sewed this child’s dress with nine tucks in the skirt, gauged gathers, and trim she (probably) made herself.
We can’t forget the MOST important garment in the Plain Sewing repertoire: The Shirt. No course in plain sewing was complete without this accomplishment!
Here’s an example of the practice cuffs or wristbands that would have been worked before she advanced to making the above shirt. Knitting was also an essential needlework skill for women, and most 19th C sample albums included examples. There was a single full-sized stocking tucked into the book also.
Plain and fancy! Mary did all the hemming, seaming, and making buttonholes in her earliest lessons, but she obviously got to learn some fancywork as well. If you get a thrill looking at daguerreotypes of that time (Pinterest is sooo addictive) you might recognize the vandyke collar pattern that was so popular then.
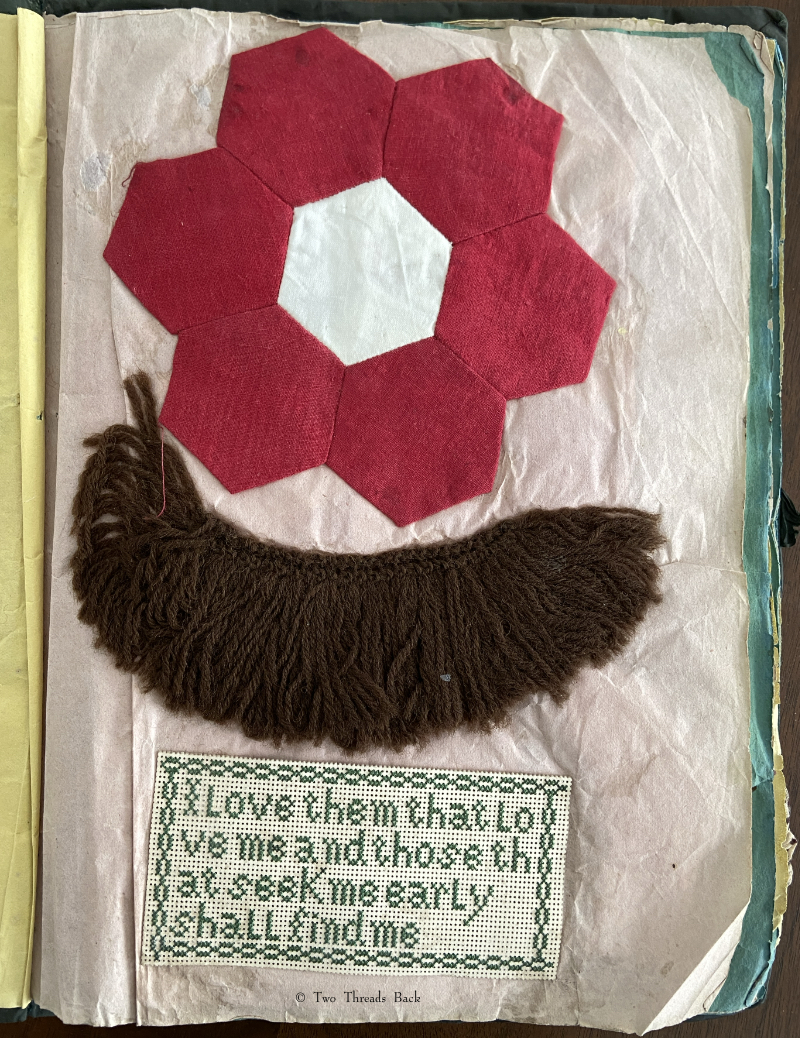
Nope, it’s not a walrus mustache. It’s some pretty (or not!) wool trim, useful for Victorians who didn’t know the meaning of restraint in decor. Mary also made a hexagon quilt patch and worked a scripture verse on punched paper. I don’t understand why 19th C needle workers seem so untroubled by words that run out of roo– m. Why???
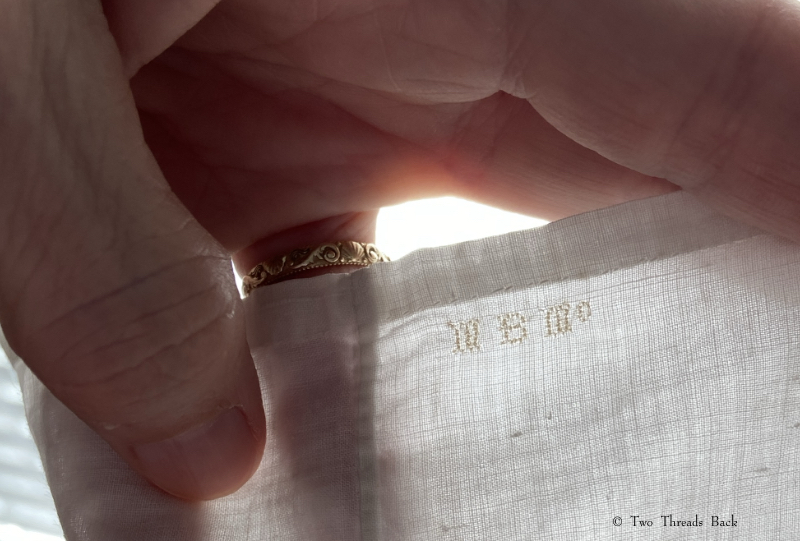
Two pairs of undersleeves were kept with the book. I assume they were Mary’s work because they have her initials marked in cross stitch. I’ve circled them in the photo to show how small they are. The sleeves show wear, so I don’t know if they were part of her sewing instruction or later work that stayed with her album.
The marked initials are less than 4mm tall. I never cease to be amazed at the tiny stitches they could make. The letters look like M B Mc to me. McQuiston?
I wish I knew more about Mary. How old was she when she learned to sew? Did she have daughters who wanted to take the dresses for their dolls? I would have! Did she use her skills for the rest of her life, or pack them away, back “around 1849”?
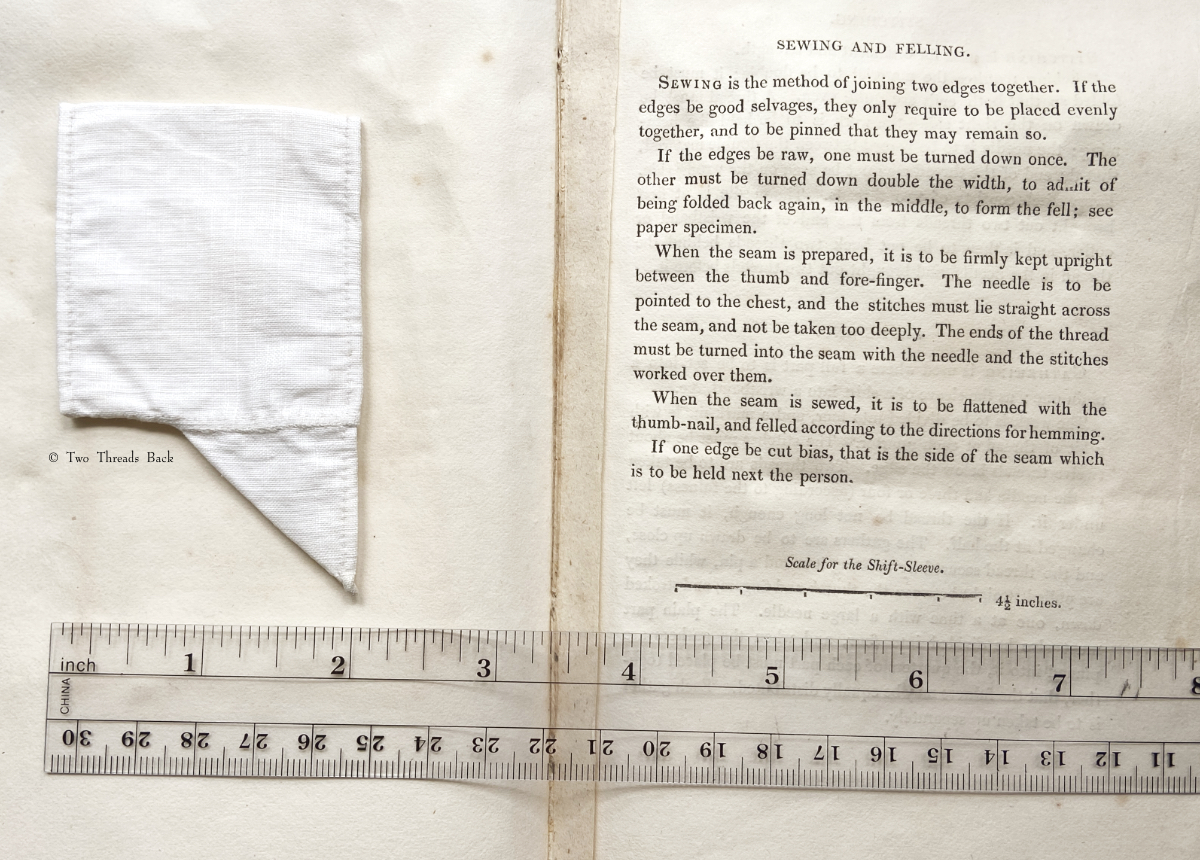
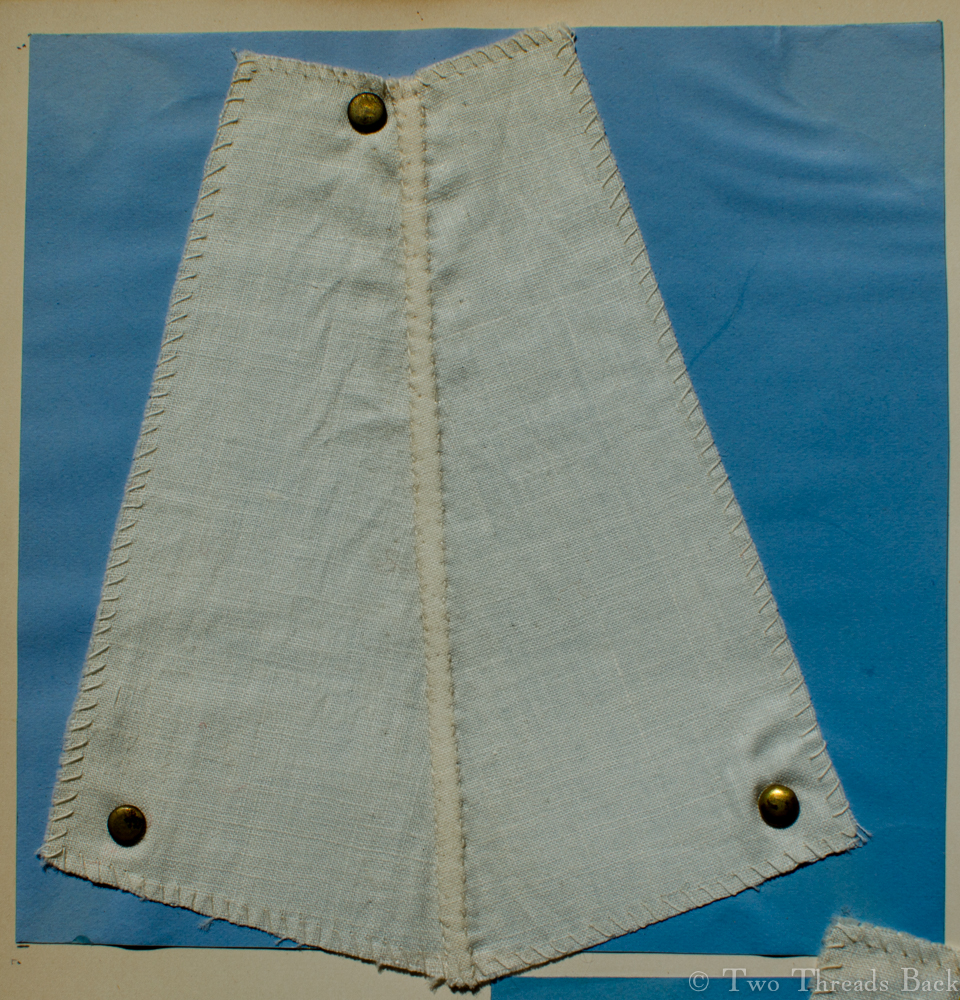
Sewing instruction manual belonging to Miss Peacocke, 1832. She conquered Sleeve Gussets for a Shift.
Tutorials aren’t usually a feature of this plain sewing blog, but I set out the steps for someone who needed help with sleeve gussets, and thought I’d share for anyone who flirts with insanity when inserting them for dolls or costume. I like pictures in sequence best – except maybe when assembling anything from Ikea!
A gusset is a little piece of fabric inserted to reinforce or to increase the ease of movement in garments like shirts and shifts – you can see in the pictures how it gives more room under the arm. They were used up until mid-19th-century-ish when fashion, fitted patterns, and sewing machines made them pretty much obsolete, though some sewing classes included directions for small ones at garment openings into the 20th century.
Plain sewing projects might include a sample sleeve gusset, because they used basic stitches like hemming, felling, and sewing/seaming1. A miniature size was practical, saving both time and material; the ones pictured here were pasted in books meant as guides for sewing teachers.
Closeup look at another specimen. It’s also been hemmed on the side that would be inserted into the body of the garment, but that’s only for extra hemming practice and tidiness of the specimen.
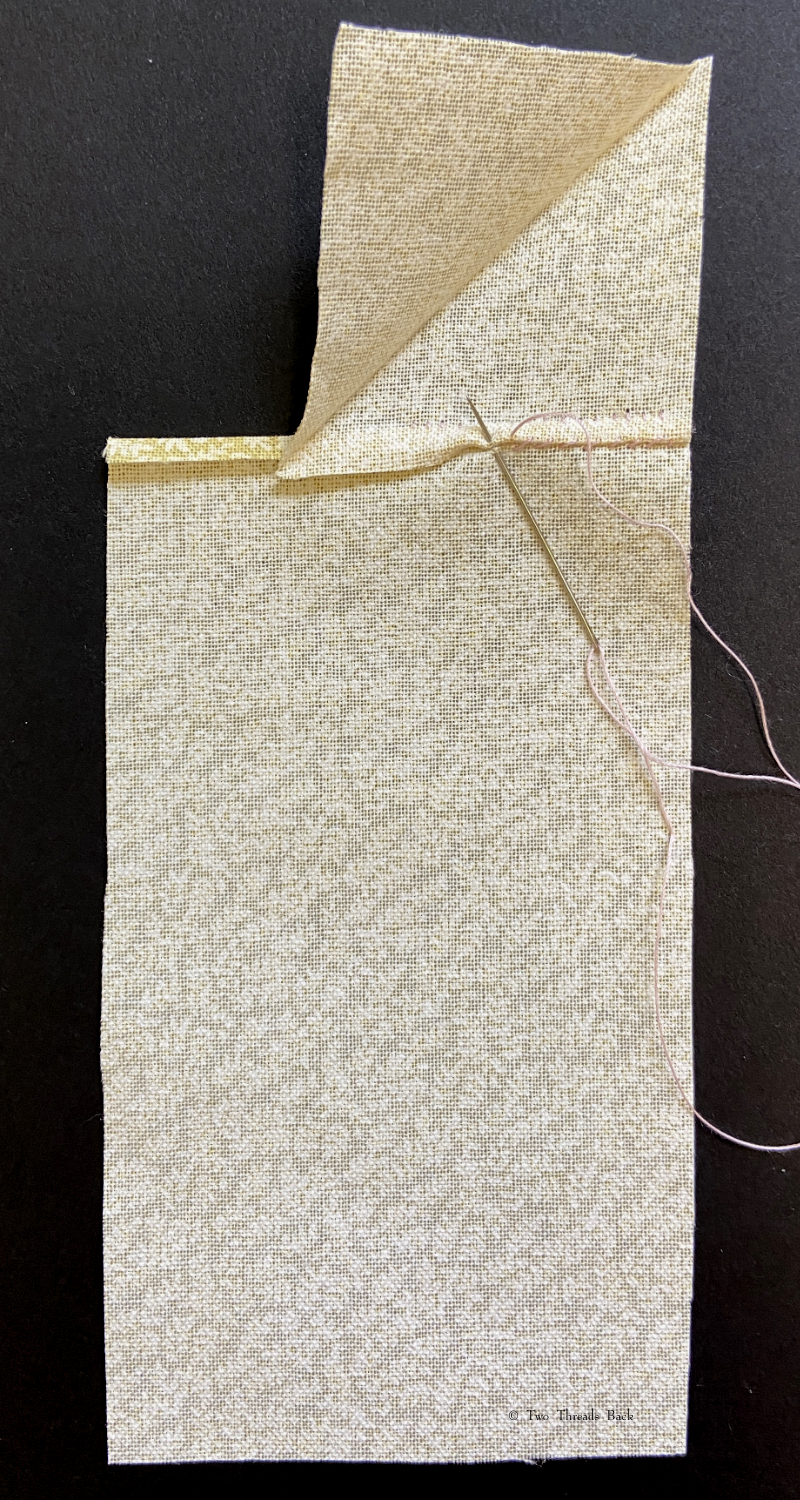
So just how hard can it be to sew straight seams on a little square? Well, if you want all the edges to be neatly enclosed, lie flat, and the right size when finished, it can be a pain in the armpit! The following sequence shows the “sew-and-fell” method, replicating the miniature specimens above. I’ve seen other methods – and I have some examples – but this one set the standard for fine needlework.
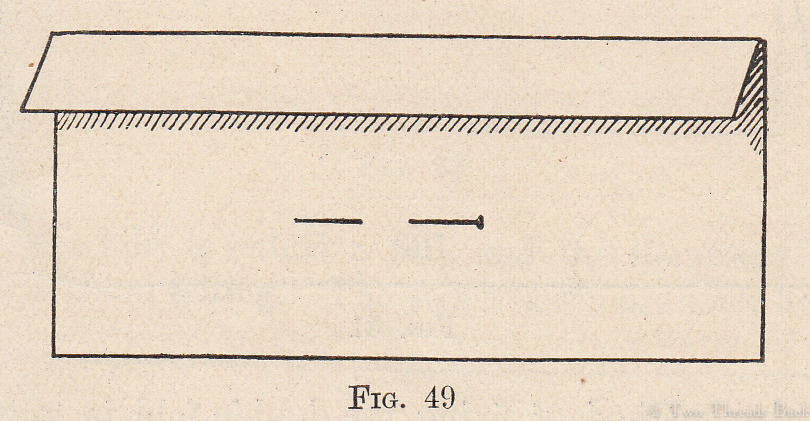
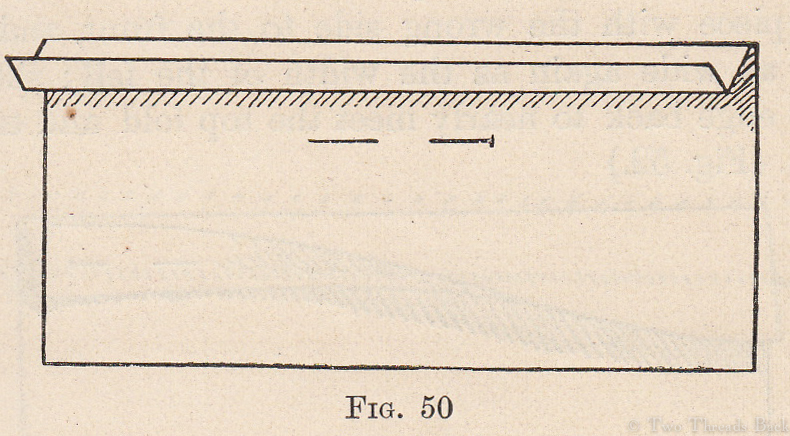
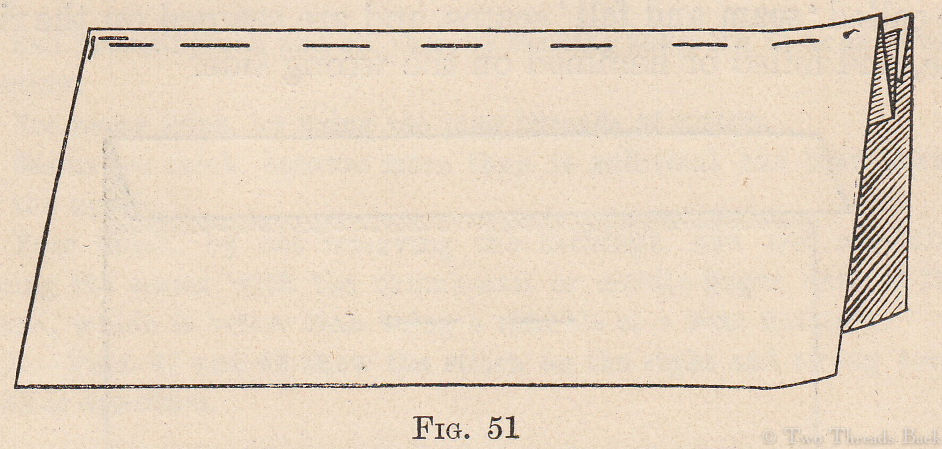
Note: In 19th century manuals, the deeper double fold for felling was always completed before any sewing was done. See pics Fig. 50 and 51 here. That’s difficult to illustrate in a photo sequence, so I’ve made the second fold after the seaming is done.I’ve used a coarse cotton printed on one side, contrasting thread, and big stitches (ha!) so that it’s easier to see.
Above: The sleeve piece is on the left, the gusset on the top right, and a finished gusseted sleeve on the bottom right.
Above: Fold the sleeve edge down to the desired width of the seam. Crease the gusset diagonally and then fold it down twice as deep as the sleeve.
Above: Place the sleeve and gusset wrong sides together and then seam together, stopping just short of the end, since that side will be folded next.
Above: This is the same step as above, viewed from the side. You can see that the gusset side fold is twice as deep as the sleeve side fold. (It should already be folded back again, ready for felling, if you want to do it exactlyas they taught it.)
Above: Fold/fell the gusset edge down over the sleeve edge. WARNING: OPTICAL ILLUSION! Sometimes the gusset crease in this photo appears to be folded back onto the right side instead of forward onto the wrong side. It’s all in how your eye first perceives the image. It’s actually folding forward toward the needle.
Above: Next, fold the adjoining edge of the gusset – this time it’s the gusset’s turn to be the narrower fold! (You can see why the stitching wasn’t taken all the way to the edge earlier.) Fold the bottom edge of the sleeve twice as deep. Then with a little twist, bring corner A down to meet corner B, fold to fold.
Above: Now seam the gusset and sleeve together, and keep on going past the end of the gusset, seaming the rest of the sleeve together.
Above: A view of the inside, looking up into the sleeve from the gusset opening, before the sleeve edge is felled down over the gusset edge.
Finally, fell the sleeve edge over the gusset and keep on going, all the way to the end of the sleeve. This photo is peeking inside the sleeve, to give perspective. Of course when you’re actually SEWING it, you’ll need to turn the sleeve inside out!
The author of The Workwoman’s Guide (1838) may have been a little impatient with gusseting herself. She suggests simply hemming the gusset evenly all around, hemming the sleeve where it will be inserted, and then seaming the two together. I’ve done that myself! As long as the work is neat….
Gussets – Much depends upon the nicety of the putting in and finishing off, but when well accomplished they have a peculiar charm to a good needlewoman.
Personally, I find peculiarcharm in just finishing one with my good humor intact. I’ll save the appreciation of niceties for those glorious gussets worked long ago.
1 Terms used for stitches differ according to time and place. The stitch I’m referring to here, a very shallow overcasting used to “butt” two pieces of fabric together, was called seaming or sewing. The term sewing was more common in the first part of the 19th century in English and Irish manuals. Seaming was more popular later. There are no early American sewing manuals, but in the U.S. over-and-over stitch was frequently used by mid-century and then overhanding was popular later (as distinct from overcasting which was a wider stitch used to prevent edge raveling). I usually call the stitch seaming because calling it sewing would be really confusing (even more than this footnote!) and over-and-over stitch is too wordy to verbify!
Maybe you’ve heard of “l’esprit d’escalier” or “staircase wit.” I hadn’t until recently, even though I’ve suffered from it all my life. It describes that maddening moment when you come up with the perfect, brilliant reply – after it’s too late to be useful. Well, finding the perfect image just a little too late can happen in blogging, too!
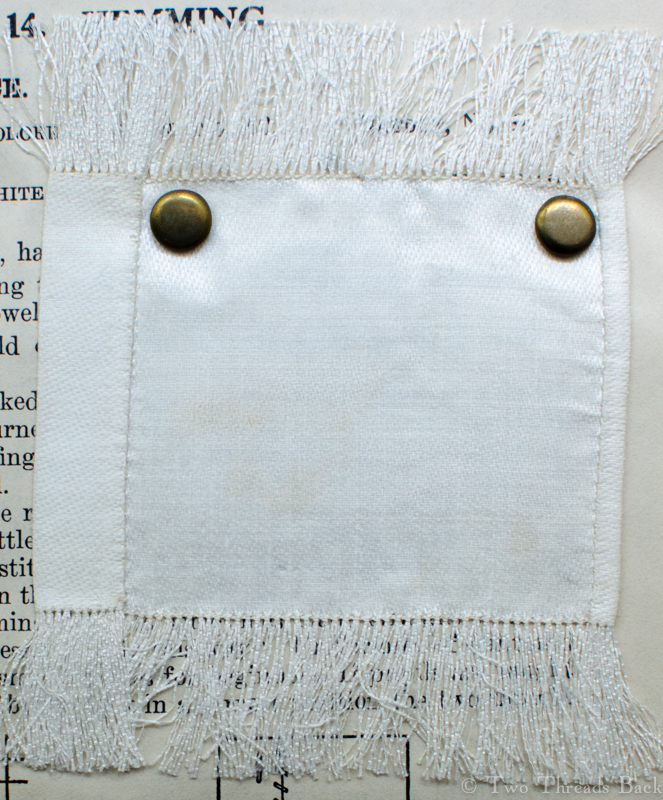
It’s been a year since I wrote the last post about sewing aprons. I’d wanted an example to study and to illustrate the post, but in decades of searching and collecting I’d never come across one. Wouldn’t you know, it was only two weeks later that I actually found a real surviving one! It’s obviously not an early nineteenth century apron like I’d really love to find, and I can’t be positive it was used for sewing, but it fits the all the descriptions to a T.
A closer look at the button, the featherstitching, the direction of the hems on the sides, and the “seamed” band.
It’s a charming white dimity with pink featherstitching and a waistband that buttons. Late 1800s, early 1900s perhaps? It looks like it could have been made in school, rather than at home. I say that because the stitches seem to be textbook-style hand sewing: precise (if not dainty) hemming, seaming, setting-in, and buttons, combined in a class-projecty sort of way. And a couple of tiny ink spots near the bottom!
Seeing an example close up did answer the hemming question for me: did they fold the side hems face up or face down before turning up the bottom for the pockets? Or did they do a little snip on the edge so that each hem could be folded to the back, the way I did for the doll’s apron? Answer: face up. For this one, anyway. The nice deep pockets are then seamed together so that the folded hems are inside.
I hope the maker was happy with her little apron. I suspect she treasured it since it’s survived all these years. Maybe it proved useful for holding her sewing things while she was climbing stairs – and she had the wit to appreciate it!
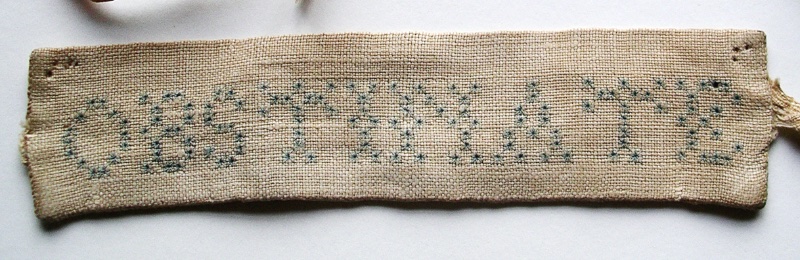
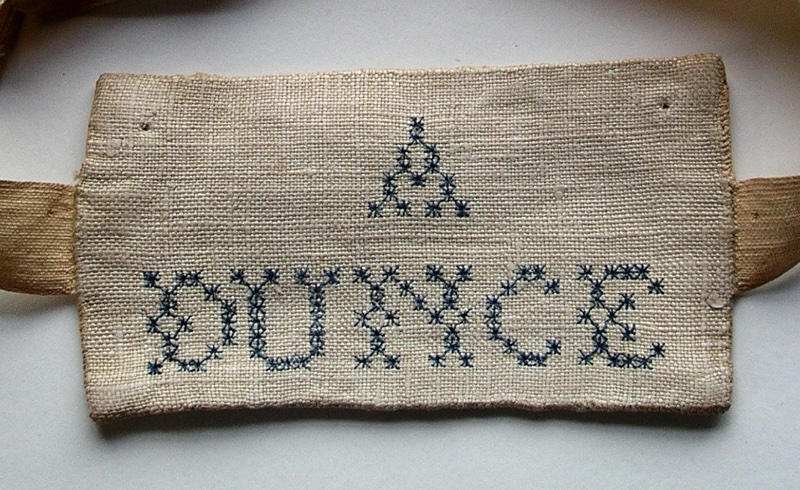
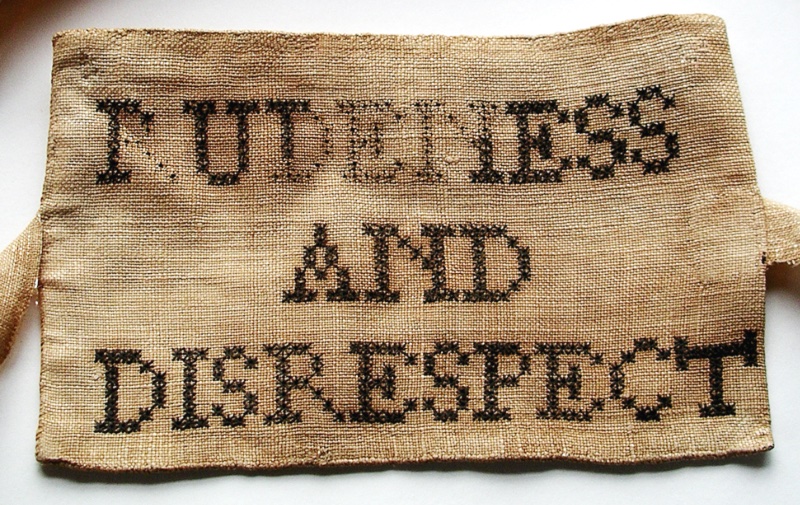
To have to sew your own punishment! Although I suppose to some people sewing is punishment.
Above is my attempt at making a 19th century punishment badge. These were meant to be worn around the head of a schoolchild who was guilty of the named crime, probably made by another pupil. I copied the lettering exactly and have to confess I was torn between the pathos and humor. Inattention?
Mea culpa. Courtesy Christ’s Hospital
Public humiliation as a form of discipline is as old as history, but it takes on a particular poignancy when you think of little children wearing a label proclaiming their crime, for all their small world to see.
Remember Jane Eyre?
On reaching the bedroom, we heard the voice of Miss Scatcherd: she was examining drawers; she had just pulled out Helen Burns’s, and when we entered Helen was greeted with a sharp reprimand, and told that to-morrow she should have half-a-dozen of untidily folded articles pinned to her shoulder.
“My things were indeed in shameful disorder,” murmured Helen to me, in a low voice: “I intended to have arranged them, but I forgot.”
Next morning, Miss Scatcherd wrote in conspicuous characters on a piece of pasteboard the word “Slattern,” and bound it like a phylactery round Helen’s large, mild, intelligent, and benign-looking forehead. She wore it till evening, patient, unresentful, regarding it as a deserved punishment. The moment Miss Scatcherd withdrew after afternoon school, I ran to Helen, tore it off, and thrust it into the fire: the fury of which she was incapable had been burning in my soul all day, and tears, hot and large, had continually been scalding my cheek; for the spectacle of her sad resignation gave me an intolerable pain at the heart.
Helen wore a paper sign, but it seems some children were made to spell out the crimes by stitching their own badges. The next excerpt is from The Sunday School Teacher’s Magazine and Journal of Education, 1855. The author recalled attending a free school as a small girl. It was taught by Miss Middleton, a lady of independent means who had devoted her life, rather ineffectually it seems, to good works.
Our governess considered it needful to govern by at least a mixture of severity with kindness. Her modes of punishment were various. A rather formidable one was binding a label with a specific crime marked upon it around the forehead, and placing the culprit on a form as an object for the deliberate gaze of the whole school. Most likely these expressive tokens of guilt were originally manufactured by the children’s own hands, and remind one of a murderer erecting his own gibbet.
Once a long row of delinquents was ranged on a form, who had committed some kind of treason during our mistress’s absence; and absent she frequently was from her post. We had then a scholar who was notorious for her unconquerable love of fun… She being amongst the mounted ones, contrived to overbalance the form, and bring all to the ground, producing a scene which very naturally excited the mirth of all who beheld it, and turned our punishment into a frolic.
That must have been a sight! I wonder if they were all wearing their labels when they tumbled to the floor? The author goes on to describe what happened when she was falsely accused of tearing a pinafore and made to “wear her crime.”
Photo Courtesy Christ’s Hospital
But the question with my governess was, ” Who rent [tore] the pinafore?” Somebody must have; though having been perpetrated in the dark, it was probably rather difficult to determine the author. Now I was one of the least, and therefore as likely to be guilty as any one. I suppose by this reasoning Ann brought her mind to the conviction that I was the guilty party, and she unhesitatingly accused me of the crime. I very naturally denied the charge. But I was compelled to wear the most detestable of all the bandages, and mount the form with the word LIAR branded on my brow. Can I ever forget that moment? No! the scar of that wound will not be effaced by time, however long a space be allotted me; and though I have long ceased to bear malice, the memory of this painful circumstance will be for ever connected with the name of Ann W. Surely nothing chafes the soul of a child so much as an unjust accusation, and unmerited punishment. – Maidstone. Christiana Elizabeth.
If you’ve read the Plain Needlework page on this blog, you know about Joseph Lancaster’s contribution to needlework education. However, some of his early comments on class discipline are rather hard to take – at least for modern sensibilities, even when allowing for the times in which he wrote. He also used labels to shame children who offended. From his 1807 manual,
When a boy is disobedient to his parents, profane in his language, or has committed any offence against morality, or is remarkable for slovenliness, it is usual for him to be dressed up with labels, describing his offence, and a tin or paper Crown on his head. In that manner he walks round the school, two boys preceding him, and proclaiming his fault; varying the proclamation according to the different offences.
And another reference,
Labels of Disgrace. When boys are in habits of talking, or being idle in school time, it is common in the free schools under my direction, as variety in punishment, to make an offender stand up and suck his fingers, with the label ‘Idle’ or ‘noisy’ or ‘suck-finger baby.”
Courtesy Christ’s Hospital
These methods were mild compared to others he recommended. Although to be fair, I can’t imagine the task of managing – much less teaching – a single class of over a hundred unruly street children.
What sort of offenses warranted this fate? Thanks to generous help from Christ’s Hospital, Horsham, we can see some of the unacceptable behaviors marked on bands from their museum collection.
“Punishments for moral offences, which consist in branding the offender as a thief, a liar, or some other odious appellation, by making him wear a label with any such inscription round his neck, should be indignantly repudiated by the teacher,” -1872 Handbook on the Teaching and Management of Elementary Schools. Photo Courtesy Christ’s Hospital
1866 Report, “There are, it seems, teachers in Boston who do not make much use of the rod, but resort to other modes of punishment which are quite as objectionable, such as shutting up children in closets — though absolutely forbidden, plastering up their mouths — unusual if not cruel, decorating their heads with the dunce’s cap, or placing upon them some badge of disgrace.” Photo Courtesy Christ’s Hospital
Note how the ties are attached differently in this one. Perhaps it was meant to be worn around the neck. A Sunday School Guide from 1806 states, “The standing on a stool, or form, in a corner, for a certain time, and in some cases with a label hung round their neck, specifying why they stand there… may be tried before the extremity of expulsion be used.” Photo Courtesy Christ’s Hospital
From The Christian Observer, 1805: “If the child asks pardon and behaves properly, she is soon restored to her place; if not, she passes to the form entitled Disobedience; and for immoral offences they are sent to the form of Disgrace, with a label, declaring the offence, fastened to them.” Photo Courtesy Christ’s Hospital
This one is hemmed rather than backed, and has what is likely the class or form marked on the side. Photo Courtesy Christ’s Hospital
I’m probably guilty of all, but the one that caught my attention was INATTENTIOn. That had my name written all over it (ha) so that’s the one I wanted to make. Although from respect – and exhaustion – I left out ‘DURING PRAYERS.’
The bands reminded me of the tiny sewing samples made for needlework lessons, illustrating plain sewing techniques.
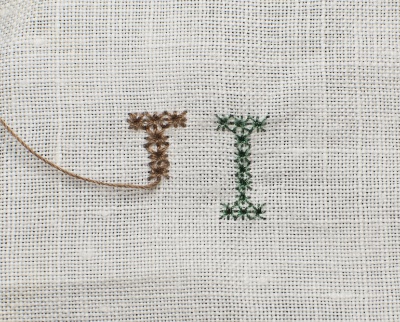
Tiny marking sampler from teaching manual, 1833.
The first one needed was marking. Cross-stitch is the basic marking stitch, but these are marked with “oylet” or “eye-let-hole” stitch, which is
quite a fancy stitch, and rarely employed. The oylet holes are formed by working in small stitches round each square, about four stitches in the four corners, and four intermediate stitches between, are necessary to form each oylet hole. -Workwoman’s Guide, 1838
or as directed here, in 1853:
Eye-let-hole Marking is done by making a stitch across two threads from the centre as a fixed point, above, below, on each side, and at each of the four angles.
Well OK, no problem, I could do that. Or so I thought until I tried it on a scrap of old linen. Enter 5 diopter magnification with 60 little LEDs, and voila! Of course my eyes were crossed and my head tilted sideways for a week.
I hadn’t even done the first letter before I realized that the stitches that resembled little stars on the original looked like lumpy knots on mine. Even worse at reading distance than in the close-up photo. Hint: use the right thread. Finer silk worked much better. I also learned that it takes twice as long to unpick an “oy-let” as it does to stitch it!
Finishing the badge was a little easier. I folded the linen back onto itself, and then “seamed” the other three sides. Seaming (also called sewing, oversewing, overhanding in the 19th century) is my favorite stitch to do, and you can see a beautiful example of it around the edges of this tiny specimen from 1820.
The label needed ties, too. I’m amazed that nineteenth century classes even included a “proper” way to do something as simple as sewing on ties or tapes. In the illustration below, the tape has the raw end tucked under and three sides are hemmed to the fabric. Then the tape is folded back against the fabric and the fourth edge is seamed to the fabric. Neat, sturdy, and strong as super glue. Well, theirs were anyway.
I don’t have a purpose for the band I made; I’m not even sure why I felt compelled to make one. Perhaps it was just a way to almost touch the past. It would be a shame to lose its lessons.
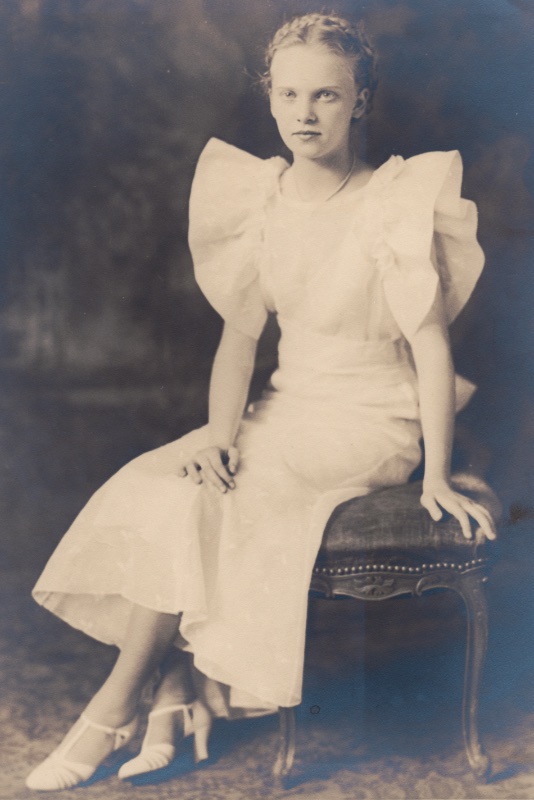
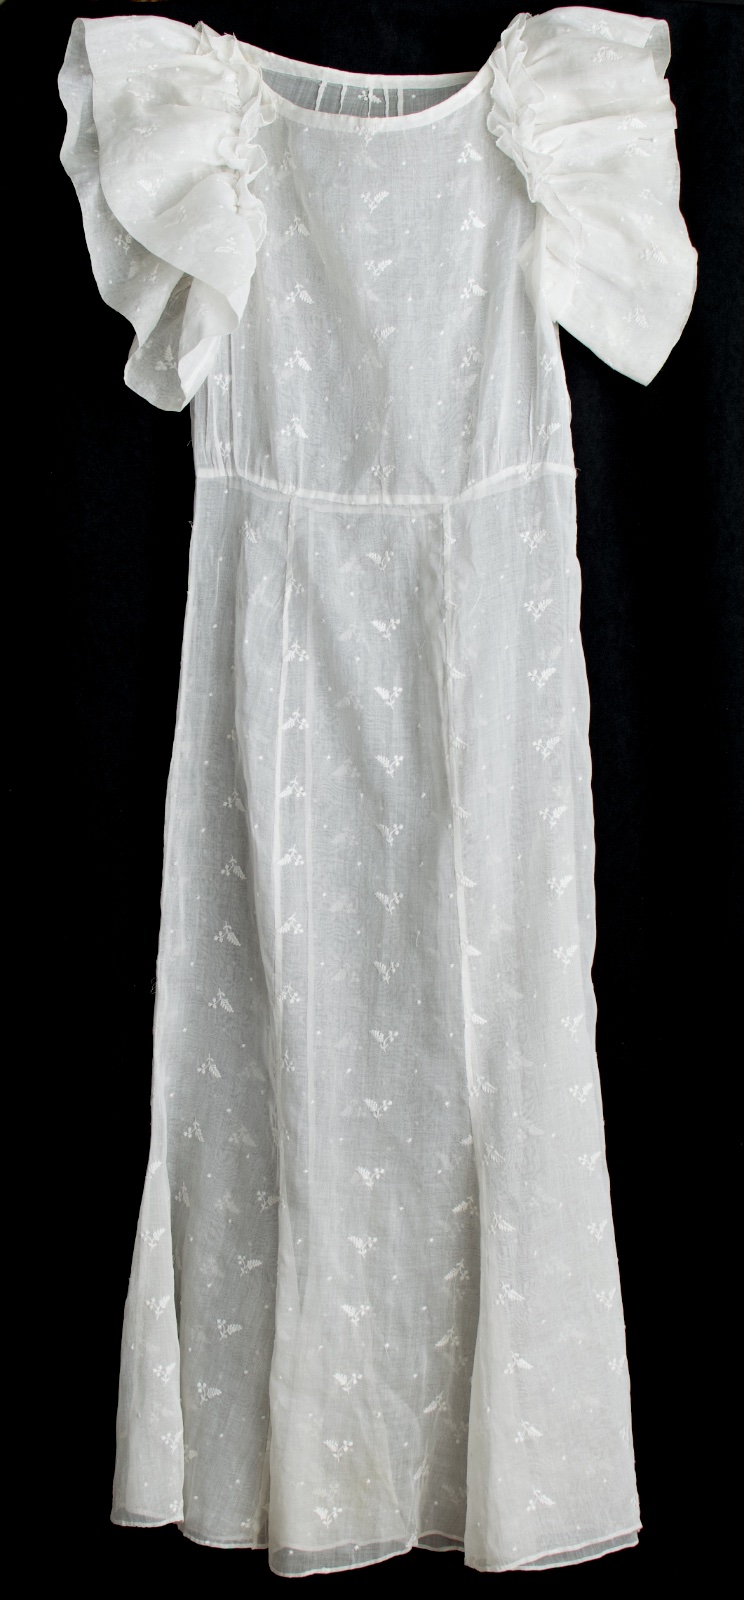
Anna’s graduation photograph, 1934. Isn’t she lovely?
It’s a delight to follow the evolution of hand sewing instruction from its earliest days up to more modern times – at least if you consider the 1930s modern!
Thanks to a friend who wanted to share her mother’s dress, I’ve had another chance to peek into a Domestic Economy class, this time in Brooklyn, New York, in 1934. The teacher was Miss Gimbel, and she must have been a wonderful sewing teacher – she was certainly very good at understanding what kind of project would please a girl of 13. Fluffy ruffles in dainty white, in a lesson she could wear to her graduation!
The dress needed a little TLC before it could show off. Although in excellent condition for its age, a bath was in order.
A good soak works wonders.
I’ve laundered a lot of cotton and linen over the years, and was hopeful that Anna’s dress could be restored. It was made of embroidered organdy and (of course) had been starched. Starch does not age well, in case you haven’t noticed! But a few days of soaking and a lot of water changes, and the frilly frock was refreshed.
Restored to glory!
Once again I was surprised to see how simple it could be to sew a garment by hand. I’m so accustomed to modern clothing with all the double-stitched and felled seams, finished inside and out, that anything else is startling. I’ve got sportswear so heavily reinforced that the stitches could stand alone if all the fabric were to melt away!
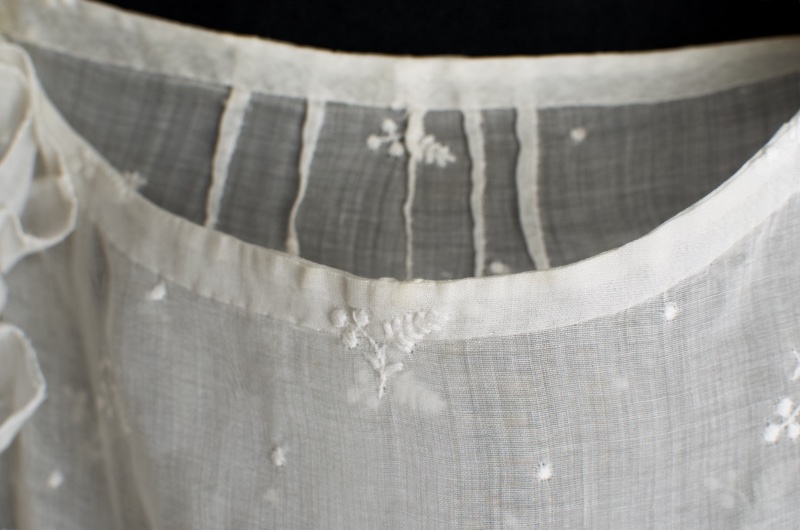
But not here. Anna used very simple basting, running, hemming, and gathering on plain and French seams. The ruffle edge was overcast.
You can see the neatly turned hem, and where she took greater pains with the collar binding than the much longer narrow hem, which I’ve folded up to show.
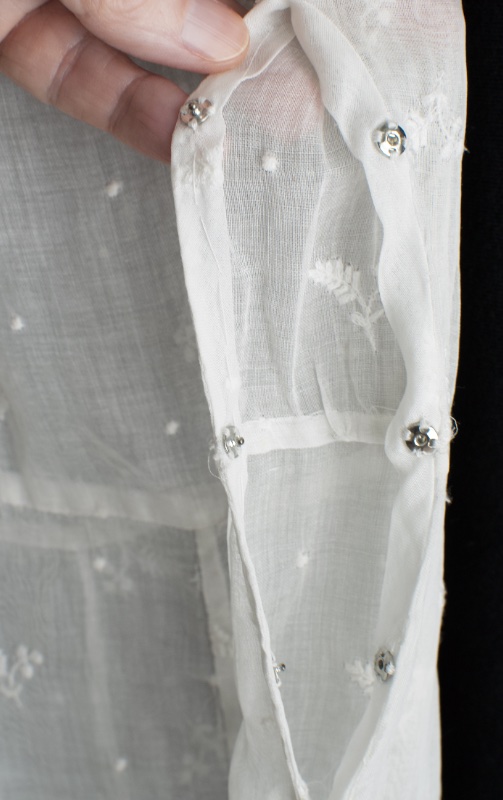
The armholes have a self-fabric binding, and the dress closes on one side with snaps. The basting thread is still present, perhaps serving to hold the placket in place.
Weekly sewing lessons from the first through the eighth grade were part of a public school education for Anna. Her work was neat and elegant, a skill to be proud of. I think she learned well and wore her reward for a very special occasion!
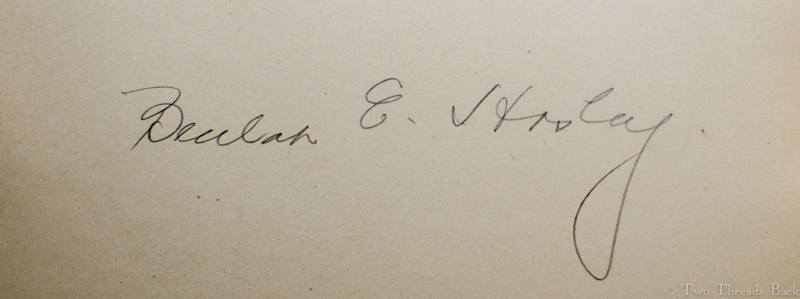
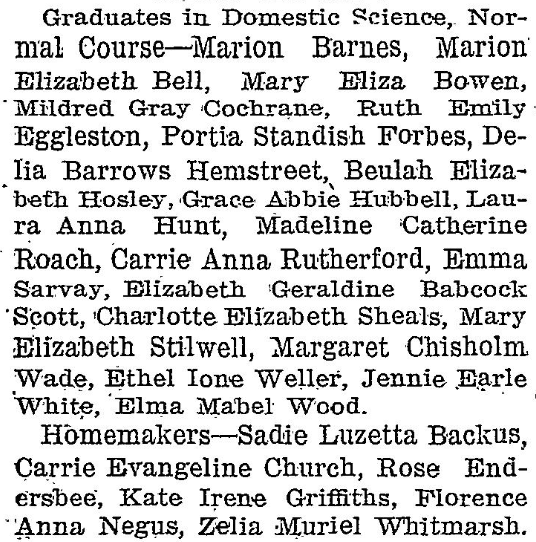
Beulah Hosley did indeed land a job as a sewing instructor – for $30 a month! Her date of assignment was June 17, 1912. But she resigned three days later. What happened to Miss Hosley and why am I curious?
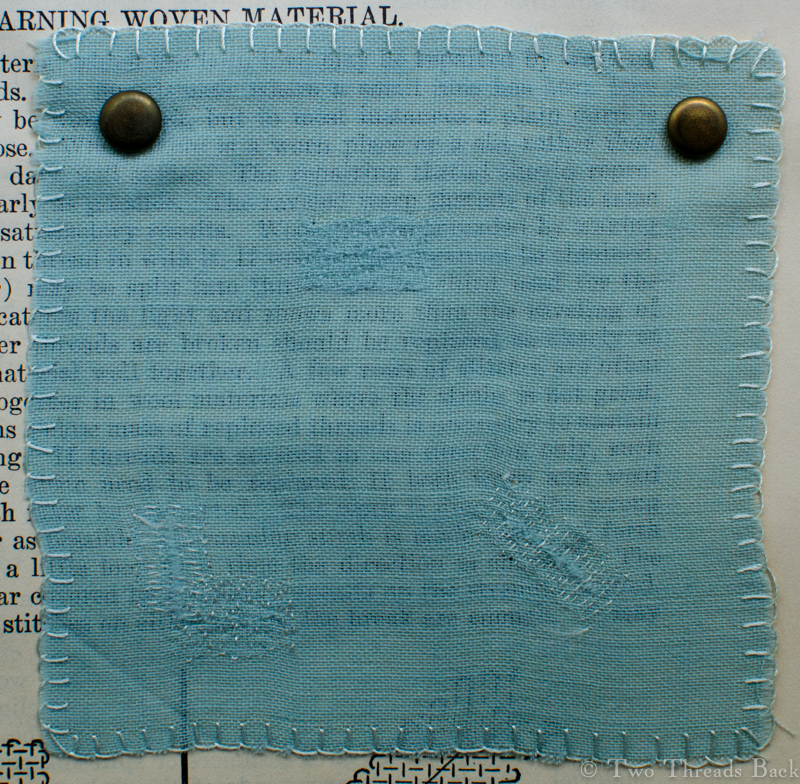
It’s because I found her name inside the cover of a sewing manual from 1911. The textbook is a neat little edition, with all her samples carefully worked and attached to the pages. Most versions of this book that I’ve come across are larger with more samples, but it appears that Beulah learned all that was necessary to become a sewing teacher.
She was, if not exactly ahead of her time, at least up with the times. At age 21, her graduation in Domestic Science from the State School of Agriculture in Canton, New York qualified her to teach or to … keep house very nicely!
“The fourth annual commencement exercises of the State School of Agriculture were held at the opera house yesterday afternoon, and proved intensely interesting. The State School of Agriculture and the Domestic Science department are advancing by leaps and bounds, and the entering class is expected to largely exceed any prior one.” – The Ogdensburg Journal, June 12, 1912.
Don’t you love their names? It’s easy to date the popular ones. But I do wonder about the difference between “Domestic Science” credentials and “Homemakers.”
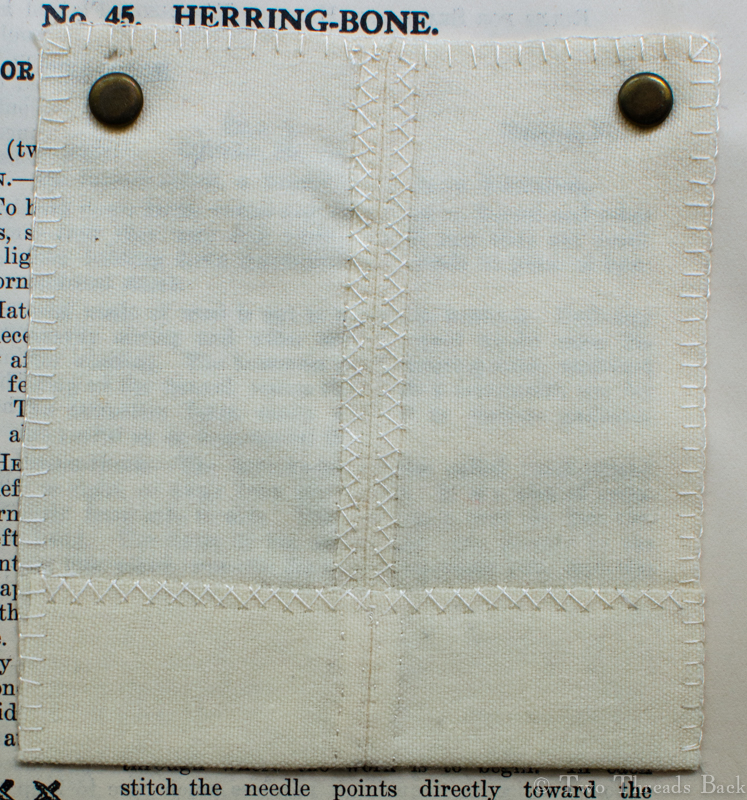
Beulah Hosley learned how to hem, tuck, herring-bone, darn, mend, gather, and do all the other stitches required for handwork. I would guess that she also learned to use a machine and perhaps some basic garment cutting, but I didn’t find any further information on those classes.
But why so short a tenure at her first job? Homesickness? It was far from her home in St. Lawrence County. Or perhaps it was where she was teaching: the Rome State Custodial Asylum in Oneida County New York. The name conjures Dickensian images of miserable people living in wretched conditions. But when I read more about the early years of the home, I realized that Charles Dickens and Nellie Bly had prejudiced me somewhat. Somewhat.
The institution was founded in 1827 as the Oneida County Poorhouse, and it remained in existence until 1989. As I scanned circa 1910 reports from the Board of Managers, it was evident that much care and effort went into the enormous task of providing for and educating the people who lived there.
They had a dairy, a hennery, a piggery; an orchestra, a baseball team, a choir; a menagerie, fairs, and concerts. Everything was recorded and reported, from the number of cases of tuberculosis to pink eye to syphilis, as well as how many quarts of blackberries and currants were consumed. And of course, sewing classes! Still, to read the reports is to glimpse the struggles, the suffering, and the shame found even in an “enlightened” institution in the early 1900s.
But back to Beulah’s story. I haven’t learned why she didn’t stay there, nor whether she found another teaching job. I do know that she went on to live a comfortable life; she married a couple of years later and had children. Her name appeared in the college alumni publications for many decades after. Did she use her sewing skills at home? Quite possibly. She certainly left a lovely record of the skills she acquired, beautifully preserved for our admiration!
And now back to plain sewing….
A teacher’s sample, dated 1900.
Do you know how to write instructions in such a simple, straightforward, concise manner that anyone can follow them perfectly? I wish I did.
I was working on a project that required an explanation of “felling,” and reached the point where a little testing of the prototype was in order. I found a Reluctant Victim, and with mild apprehension, gave her the draft to read and check for clarity. She read, pondered, frowned, sighed.
Fail.
The work prepared for running or backstitching.
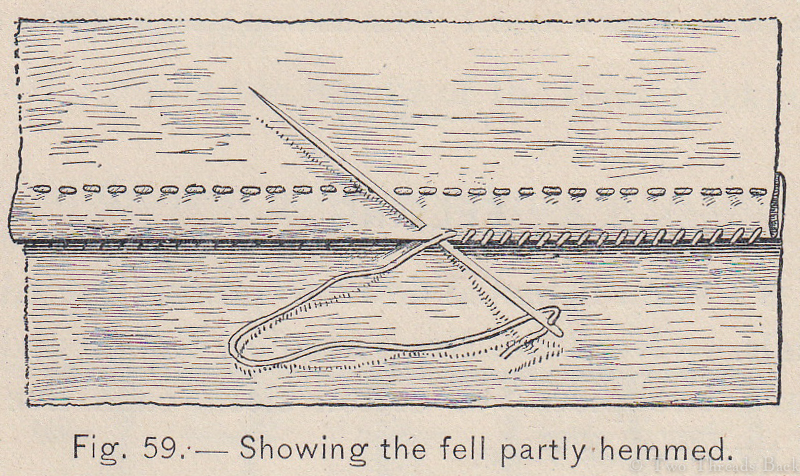
The fabric after it has been sewn together, and the fell is being hemmed down.
After some discussion, I realized that there was more to this little bit of plain sewing than could be covered in my one-sentence description. Why? Because there are a couple of variations, as well as some similar stitches that our g-g-grandmothers used (e.g., French seam, counter-hem, German hem, mantua-maker’s hem) to confuse things. Too much info for a sound bite project.
Sure, felling is just a method of joining two pieces of fabric so that the raw edges are enclosed and hemmed down. But there wasn’t only one way to fell a seam: it was that first line of sewing that made the difference.
The first line of sewing joins the two pieces of fabric. The second one (it was always almost always hemming in hand work) fastens down the folded edge. So for the first line,
You could use a running stitch. You could use a backstitch (called stitching in early English texts). You could use a half-backstitch (variation of the above). You could use a very shallow overcasting stitch (called sewing -common earlier, or seaming – common later, in 19th century English texts).
This difference in the first line of stitching made all the difference in understanding period instructions on how to fold it and how to hold it. (Sorry, Kenny.) That’s what gave me real problems when trying to condense my instructions.
Methods that use a running stitch or a backstitch are easier to explain, and they’re the ones most people use today when hand sewing. You place the pieces right sides together and sew. Then spread the work open, fold one edge over to cover the other, and hem it down.
Seaming
It’s the last method that gets a little tricky, the one that uses seaming (I’ll use that term since that’s what I called it in Plain Needlework and to use “sewing” can be confusing!) for the first line of … sewing. (See what I mean about confusing terms?)
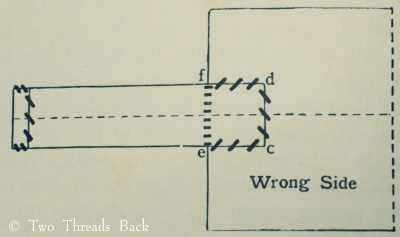
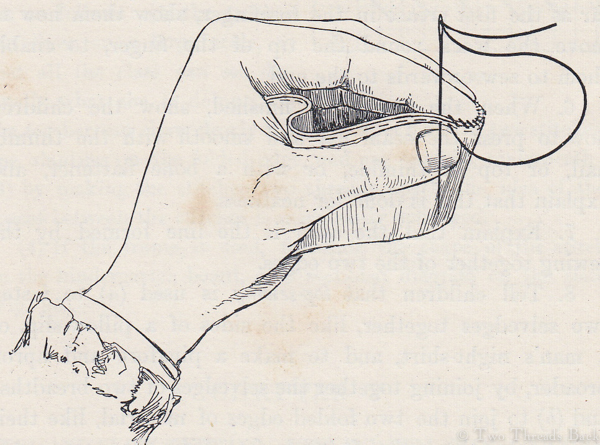
The work held properly for seaming, from a period manual.
Seaming was a sturdy method of joining two pieces that utilized every inch of fabric. When you spread the seam open, the edges look butted together.
Linen used for underclothing early in the century had nice selvages that could be joined this way. Therefore, it’s easy to see how a seamstress would be inclined to use the same stitch if she had to join two “cut” (non-selvage) edges. Because you should never use selvages that have unsightly little holes!
An excerpt, dated 1821:
SECOND CLASS.
Q. How should you fix a seam? – A. I turn one paper down once, and the other once on the right side, and turn it back again the same width to form the fell.
Q. What do you do next? – A. I pin the two pieces together.
Q. What should you do before you fix two selvages together? – A. Examine them, to see if there are any little holes in them.
Q. If there are, should you sew them together? A. No, cut them off, and fix a fell seam.
How do you prepare and hold the fabric if you want to use seaming? Most of the old manuals say the fabric is held wrong sides together and worked on the right side. And that’s how all the illustrations show it. After all, if you’re turning down the edges before you seam them, you don’t want those pesky folded parts in the way while you work, right?
But there are a few sources that say otherwise. A Sewing Course for Teachers advises placing right sides together for seaming, because the slanted bits of thread will then be inside, and the straight bits will be hidden in the grain of the fabric on the right. (See the pics in the Flower Patch post for an example.)
And in that venerable text, The Workwoman’s Guide, A Lady states
The work for sewing is thus prepared: the two selvages are placed together, or if there are no selvages, the raw edge of one piece is turned down once, and the edge of the other piece is turned down double the width, and then half the width is turned back again for the fell. The two pieces are pinned or basted together, with the parts turned down face to face and held firmly between the finger and the thumb…
At first I assumed she meant to place both whole pieces of fabric face to face. But after considering a century’s worth of other sources, I think “A Lady” meant that only the folded down parts are face to face. The two pieces of fabric are actually wrong sides together.
So what was “the rule” back then? I believe that seaming without felling was done either on the right or wrong side of the fabric – assuming there was a difference in the right and wrong sides! And I think seaming for felling was usually done on the right side with the little folds tucked inside. But does it really matter? Maybe I’m the only soul on earth who finds it interesting?
Folding for Felling, the old-fashioned way:
If, however, you also like picayune sewing trivia, below are some images showing the method of folding for felling. I’m really surprised that such consistent, detailed instructions and examples have survived. And very, very grateful!
Children learned by first folding paper in preparation for felling. Plain sewing manual, 1821.
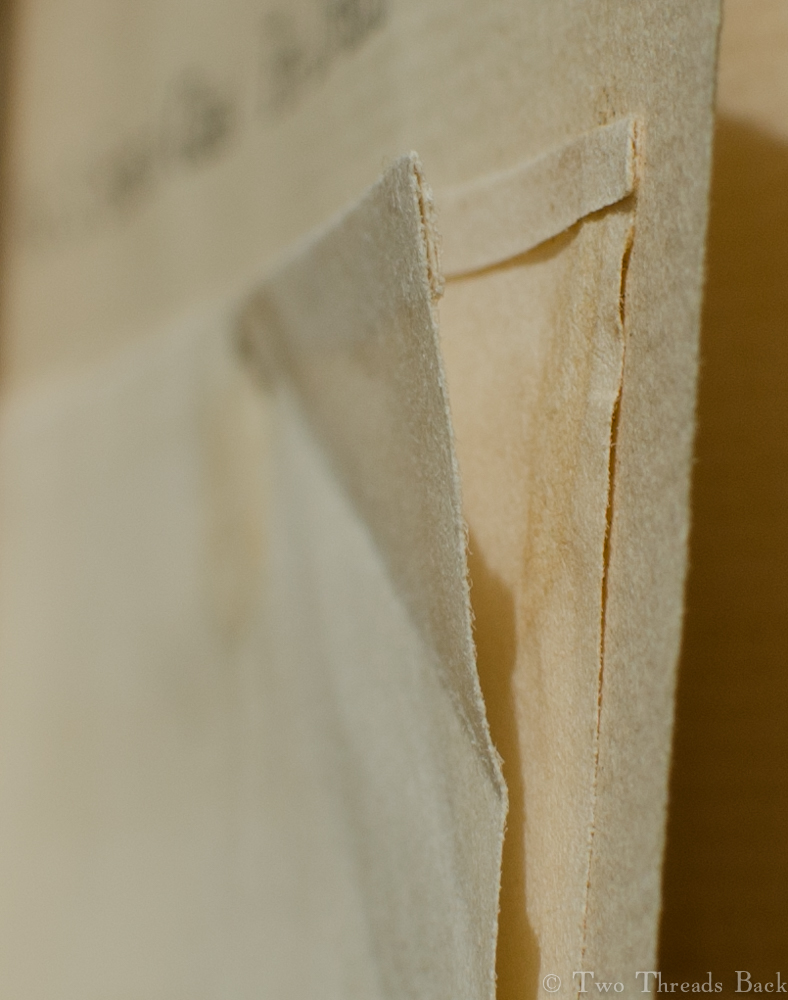
A close-up of the folded paper that has come unglued.
Even closer-up! You can just barely see the double fold in the top paper.This 1890s manual illustrates the fold on the first piece.The fold on the second piece.
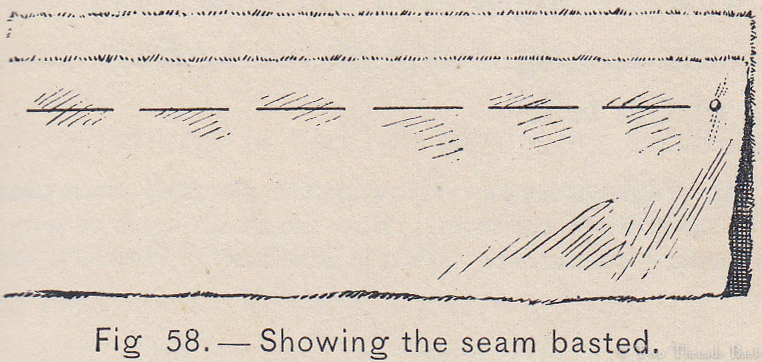
The pieces aligned and basted together for seaming.
Now, what method do I use? Mostly run-and-fell. But sometimes I use seaming because it’s my favorite stitch to work. I recommend doing what suits your project or suits your fancy. Anyone who sews two left sleeves on a blouse, twice!!, can’t be too snooty about setting standards.
Although some 19th century sewing teachers were! Writing in 1884, Miss Jones insists,
“Run-and-fell is not allowable in plain needlework. It must be called ‘scamp-work.’ If properly done, it takes as long as the seaming and even then is not very secure….”
Tackling this topic helped my muddled mind, and made me decide to simplify that project. Run-and-fell only for that one. I guess that makes me a shameless promoter of scamp-work!


