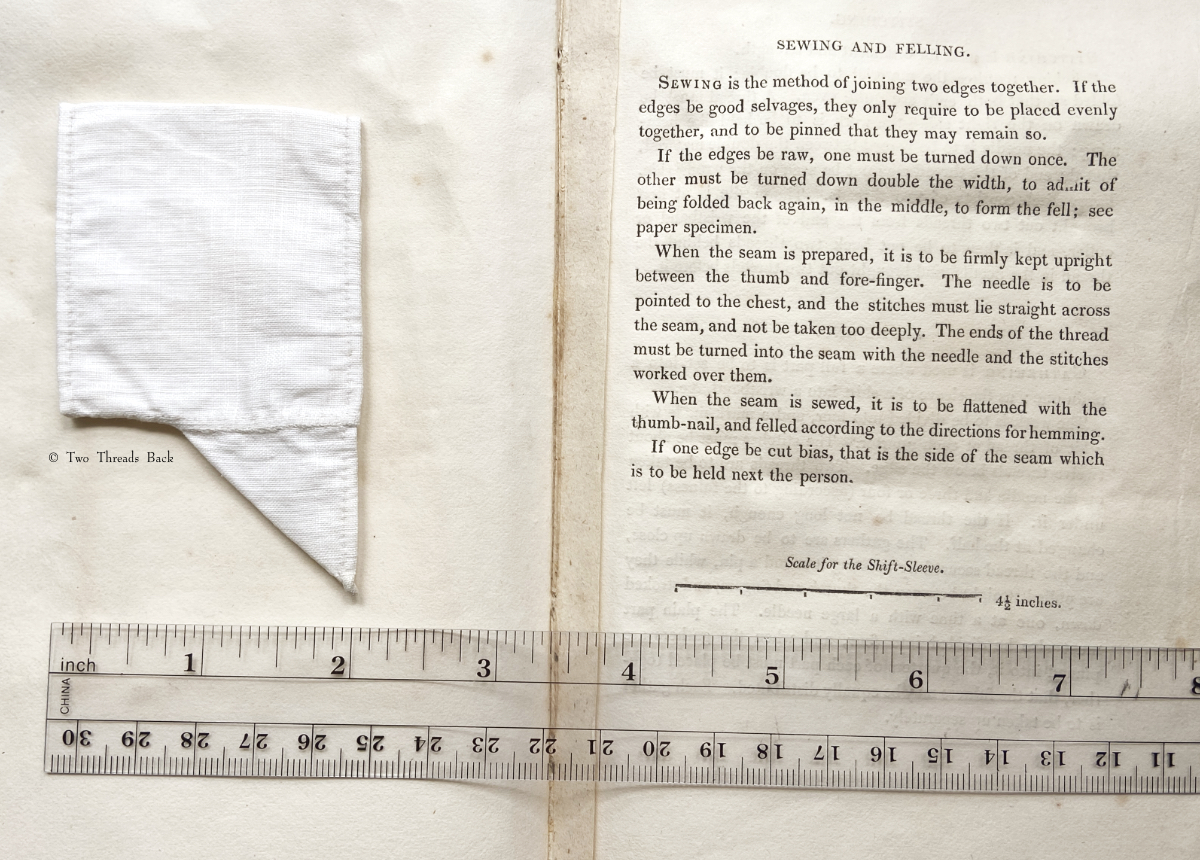
Sewing instruction manual belonging to Miss Peacocke, 1832. She conquered Sleeve Gussets for a Shift.
Tutorials aren’t usually a feature of this plain sewing blog, but I set out the steps for someone who needed help with sleeve gussets, and thought I’d share for anyone who flirts with insanity when inserting them for dolls or costume. I like pictures in sequence best – except maybe when assembling anything from Ikea!
A gusset is a little piece of fabric inserted to reinforce or to increase the ease of movement in garments like shirts and shifts – you can see in the pictures how it gives more room under the arm. They were used up until mid-19th-century-ish when fashion, fitted patterns, and sewing machines made them pretty much obsolete, though some sewing classes included directions for small ones at garment openings into the 20th century.
Plain sewing projects might include a sample sleeve gusset, because they used basic stitches like hemming, felling, and sewing/seaming1. A miniature size was practical, saving both time and material; the ones pictured here were pasted in books meant as guides for sewing teachers.
Closeup look at another specimen. It’s also been hemmed on the side that would be inserted into the body of the garment, but that’s only for extra hemming practice and tidiness of the specimen.
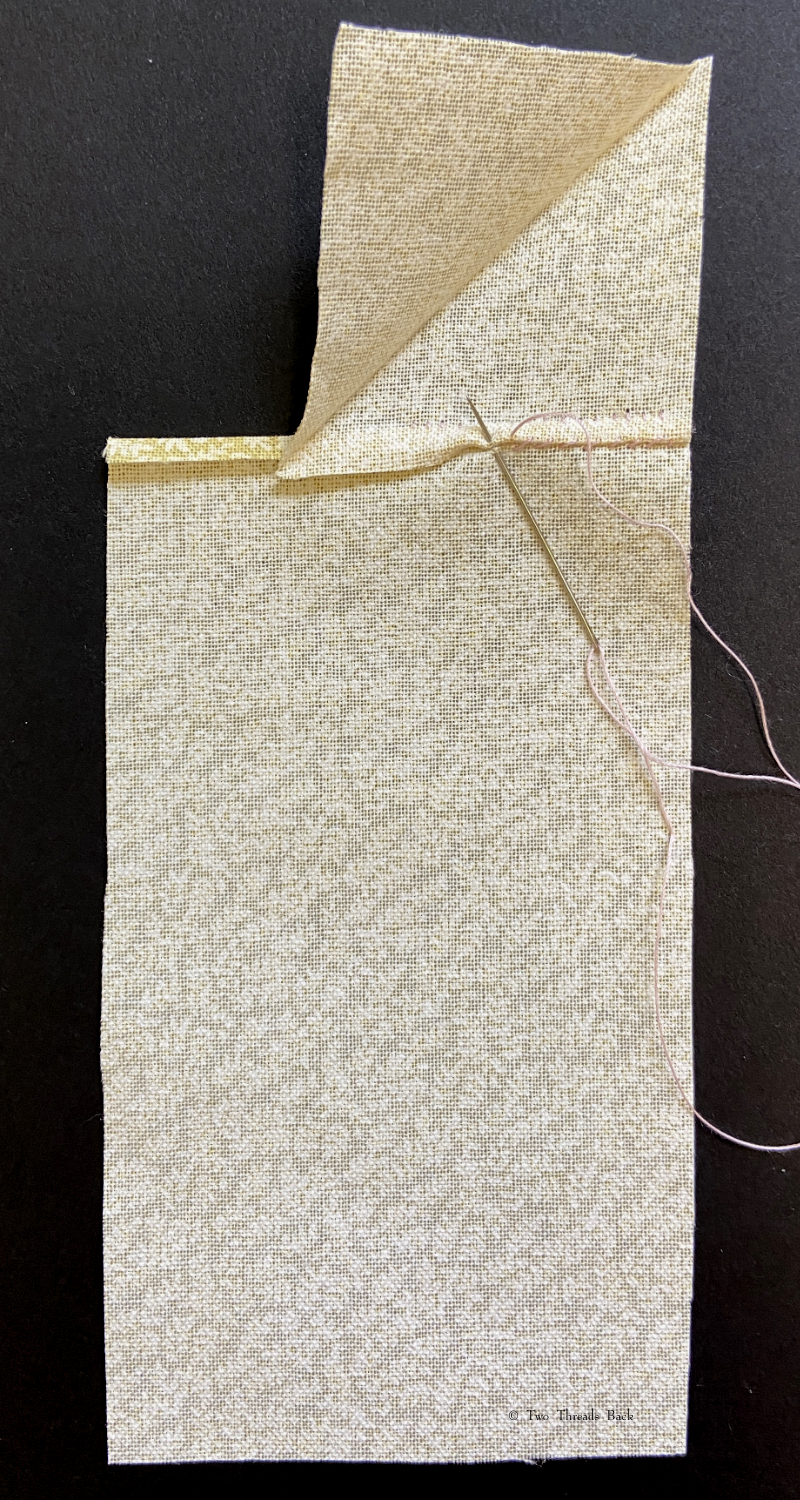
So just how hard can it be to sew straight seams on a little square? Well, if you want all the edges to be neatly enclosed, lie flat, and the right size when finished, it can be a pain in the armpit! The following sequence shows the “sew-and-fell” method, replicating the miniature specimens above. I’ve seen other methods – and I have some examples – but this one set the standard for fine needlework.
Note: In 19th century manuals, the deeper double fold for felling was always completed before any sewing was done. See pics Fig. 50 and 51 here. That’s difficult to illustrate in a photo sequence, so I’ve made the second fold after the seaming is done.I’ve used a coarse cotton printed on one side, contrasting thread, and big stitches (ha!) so that it’s easier to see.
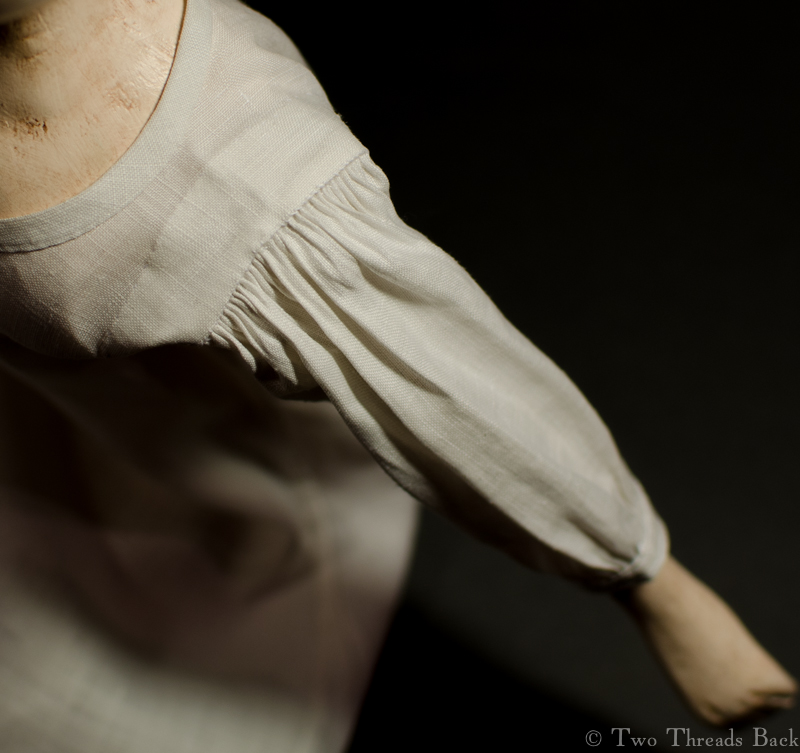
Above: The sleeve piece is on the left, the gusset on the top right, and a finished gusseted sleeve on the bottom right.
Above: Fold the sleeve edge down to the desired width of the seam. Crease the gusset diagonally and then fold it down twice as deep as the sleeve.
Above: Place the sleeve and gusset wrong sides together and then seam together, stopping just short of the end, since that side will be folded next.
Above: This is the same step as above, viewed from the side. You can see that the gusset side fold is twice as deep as the sleeve side fold. (It should already be folded back again, ready for felling, if you want to do it exactlyas they taught it.)
Above: Fold/fell the gusset edge down over the sleeve edge. WARNING: OPTICAL ILLUSION! Sometimes the gusset crease in this photo appears to be folded back onto the right side instead of forward onto the wrong side. It’s all in how your eye first perceives the image. It’s actually folding forward toward the needle.
Above: Next, fold the adjoining edge of the gusset – this time it’s the gusset’s turn to be the narrower fold! (You can see why the stitching wasn’t taken all the way to the edge earlier.) Fold the bottom edge of the sleeve twice as deep. Then with a little twist, bring corner A down to meet corner B, fold to fold.
Above: Now seam the gusset and sleeve together, and keep on going past the end of the gusset, seaming the rest of the sleeve together.
Above: A view of the inside, looking up into the sleeve from the gusset opening, before the sleeve edge is felled down over the gusset edge.
Finally, fell the sleeve edge over the gusset and keep on going, all the way to the end of the sleeve. This photo is peeking inside the sleeve, to give perspective. Of course when you’re actually SEWING it, you’ll need to turn the sleeve inside out!
The author of The Workwoman’s Guide (1838) may have been a little impatient with gusseting herself. She suggests simply hemming the gusset evenly all around, hemming the sleeve where it will be inserted, and then seaming the two together. I’ve done that myself! As long as the work is neat….
Gussets – Much depends upon the nicety of the putting in and finishing off, but when well accomplished they have a peculiar charm to a good needlewoman.
Personally, I find peculiarcharm in just finishing one with my good humor intact. I’ll save the appreciation of niceties for those glorious gussets worked long ago.
1 Terms used for stitches differ according to time and place. The stitch I’m referring to here, a very shallow overcasting used to “butt” two pieces of fabric together, was called seaming or sewing. The term sewing was more common in the first part of the 19th century in English and Irish manuals. Seaming was more popular later. There are no early American sewing manuals, but in the U.S. over-and-over stitch was frequently used by mid-century and then overhanding was popular later (as distinct from overcasting which was a wider stitch used to prevent edge raveling). I usually call the stitch seaming because calling it sewing would be really confusing (even more than this footnote!) and over-and-over stitch is too wordy to verbify!
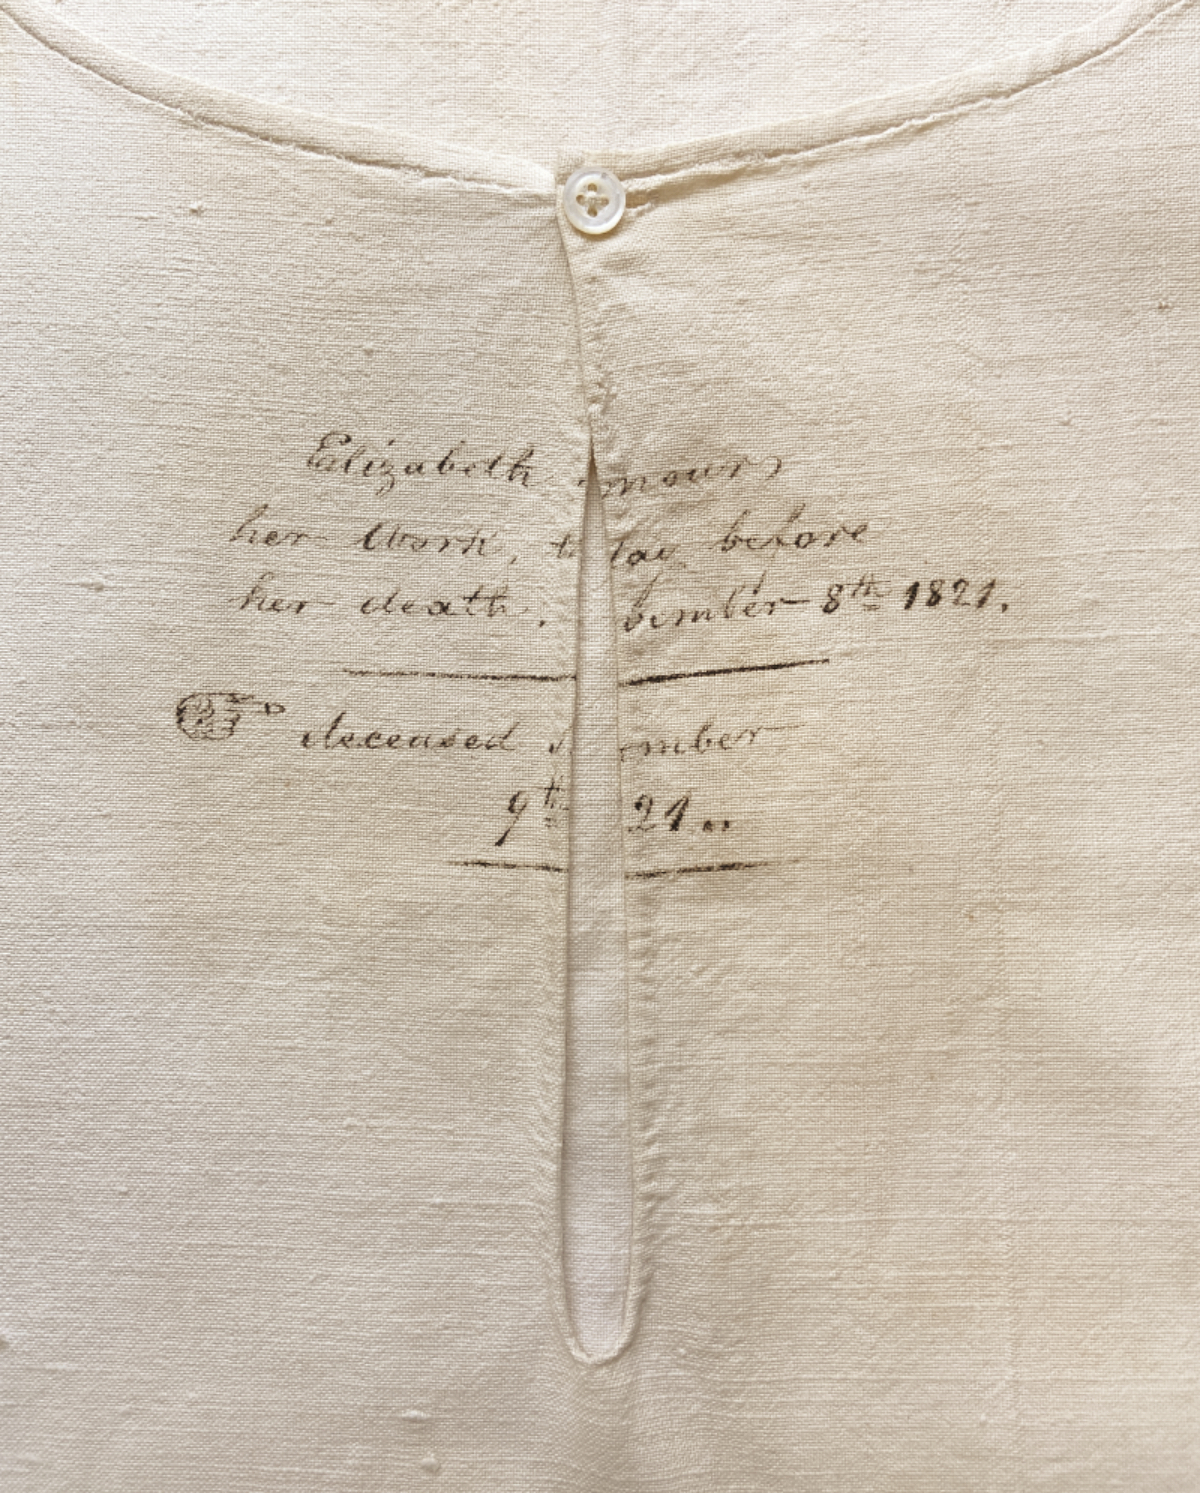
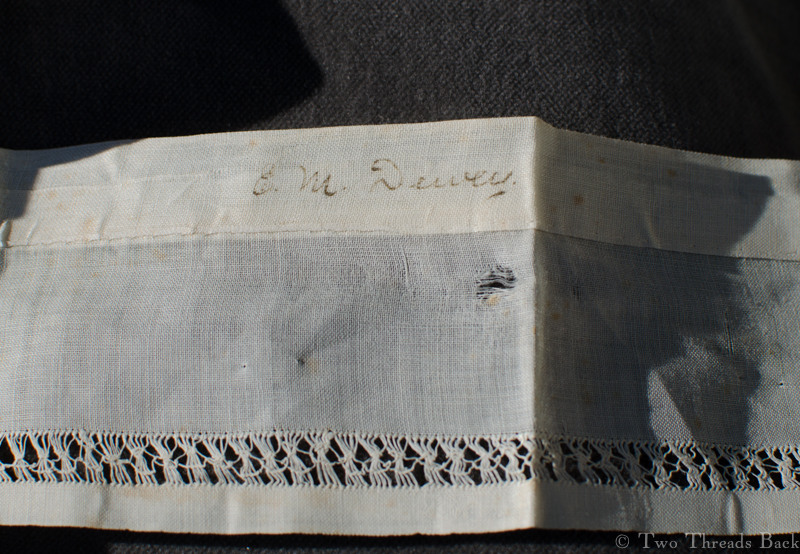
Elizabeth Armour, her work, the day before her death. November 8th, 1821. deceased November 9th, 1821.
Most of the time we never know who wore the antique clothing that we preserve and study, much less who made it and when. So it’s thrilling to find a piece with a story that connects us to a life lived long ago. Her name makes her real.
Shifts and chemises follow closely behind men’s shirts as prime examples of plain sewing. This rare linen shift has its provenance inscribed in ink across the heart. Not only does it give the name of the maker, Elizabeth Armour, but it tells when she made it, November 8, 1821, and when she died – the next day.
Occasionally notes are found attached to clothing, usually intended for family members to pass down, or perhaps when donated to museums. But I’d never seen one quite like this! How could I help but try to find out more about Elizabeth?
Elizabeth Armour’s plain shift, still in excellent condition.
Thanks to the wealth of genealogical data available online now, it was easy to search for a woman with that name and date of death. What a thrill to find her! Of course, I can’t be positive it’s the same person, but the odds seem pretty good.
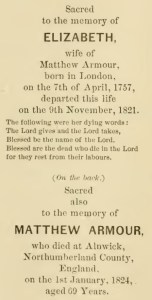
Transcript of Elizabeth’s gravestone.
Elizabeth, wife of Matthew Armour, was born in London on April 7, 1757, and died on November 9th, 1821 in Philadelphia. She was buried there in Christ Church and St. Peter’s Churchyard on November 11, 1821. Her name was entered in the register of burials as “Eliza. Armor.” I don’t know whether the gravestone still exists, but at least a record of it does:
The following were her dying words: The Lord gives and the Lord takes, Blessed be the name of the Lord. Blessed are the dead who die in the Lord for they rest from their labours.
Who was Elizabeth and what was her life like? I found traces. Elizabeth Nesbet married Matthew Armour in the City of London at the church of St. Andrew Holborn on July 2, 1780. She next appeared as the mother of Susannah Nesbitt Armour who was christened at Christ Church and St. Peter’s in Philadelphia on July 3, 1785.
Wait, Philadelphia? 1785? It bargles (as my daughter used to say) the mind! More American history than I can even begin to explore. I suppose there are so many books, essays, and dissertations written on that place and time that they would collectively collapse my little local library. Even the church the Armours attended has a past so rich it makes me dizzy. Benjamin Franklin, George Washington, Betsy Ross, and many of the signers of the Declaration of Independence attended, all during the years the Armours were worshiping there as well.
In 1788, son William was born. Matthew appears on various records during those years as a house carpenter. If there were other children besides Susan and William, I didn’t find a record of them. We know the hazards of illness and accidents in those days, but in 1793 a yellow fever epidemic (here’s a compelling read) struck Philadelphia killing 5,000 of the 45,000 residents, and caused another 17,000 to abandon the city. It struck again in 1797, ’98, and ’99. Did it touch the Armours or their kin? I doubt I’ll ever know.
Matthew continues to appear in the early 1800s on tax, census, or manifest records (he made trips to England) as a carpenter. The family moved several times within the city through the years, and siblings Susan (as she was known) and William apparently never married, but kept house together and owned a dry goods store. In an 1811 affadavit sworn as a super cargo, William (at age 22) states he was 5’9″, fair complexion, blue eyes, with 3 scars on his left forefinger! There’s something eerie about knowing 200-year-old personal details like that. But perhaps no more than slipping my hand in the sleeve of Elizabeth’s chemise?
Elizabeth may have been ailing by 1821, since the cause of death was “dropsy.” We know what she was doing in the days before her death because of the inscription on her shift. More poignantly, we know how much her handwork meant to someone, probably her daughter Susan. I understand how that feels; I have handmade treasures from my late parents that move me to tears when I hold them.
Philadelphia, Nov. 9th, 1821 Died this day of Dropsy Elizabeth Armour aged 64 years.
Matthew returned to England sometime after Elizabeth’s death, where he died at Alnwick on January 1, 1824, aged 69. In 1830, Susan and William’s cousin, Martha Cheesman (b.1818), came from England to live with them in Philadelphia. William died in 1851, and Susan in 1857. She left an estate of $15,000 with bequests to Christ Church Hospital, the Northern Home for Friendless Children, her nieces, and the remainder to her “cousin Martha Cheeseman.” That was a lot of money for the time. It seems that the dry goods business was very profitable! I was getting a little lost and weary of genealogical research at this point, so I let the trail end with cousin Martha’s death in 1906. Perhaps the shift had been left in her care?
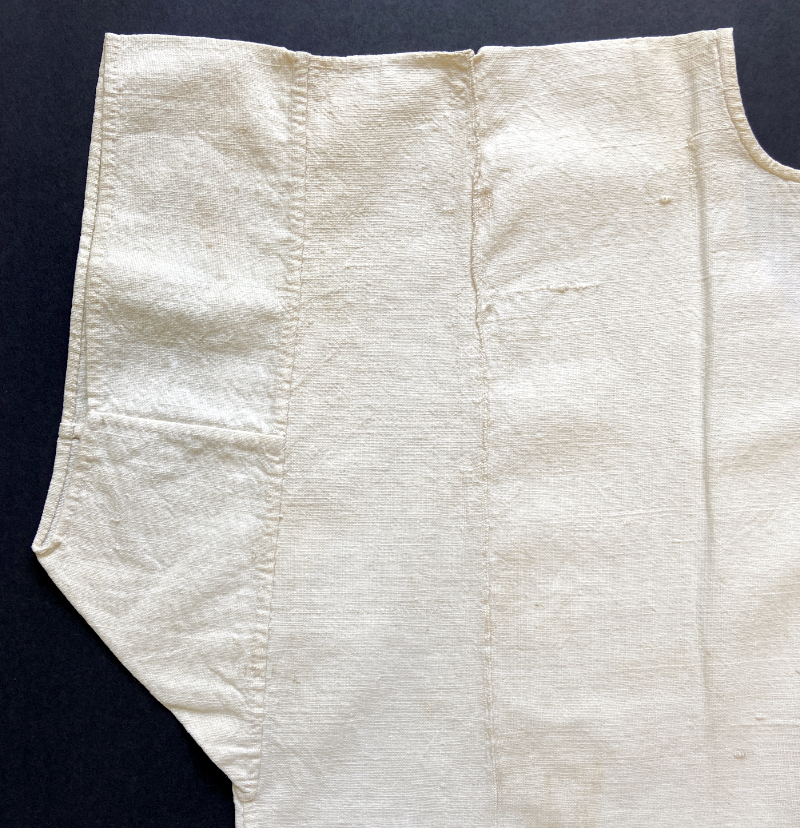
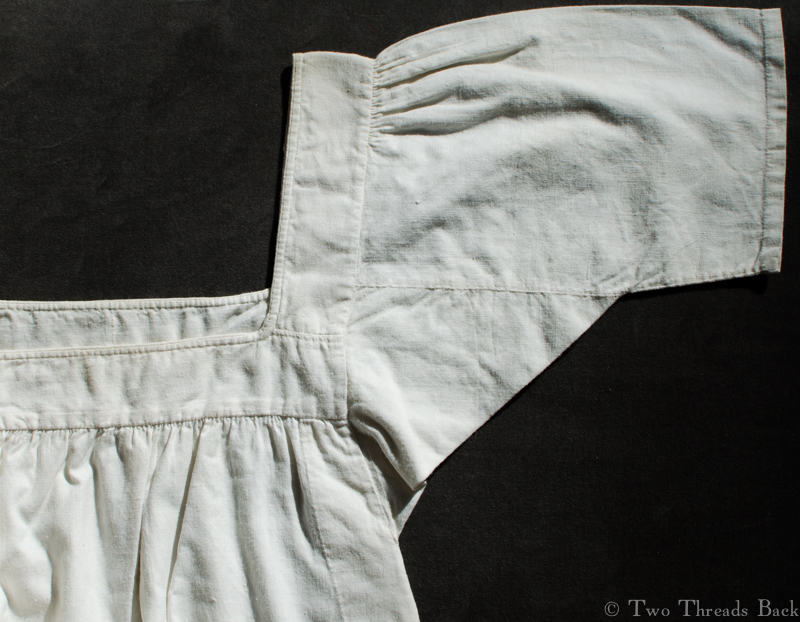
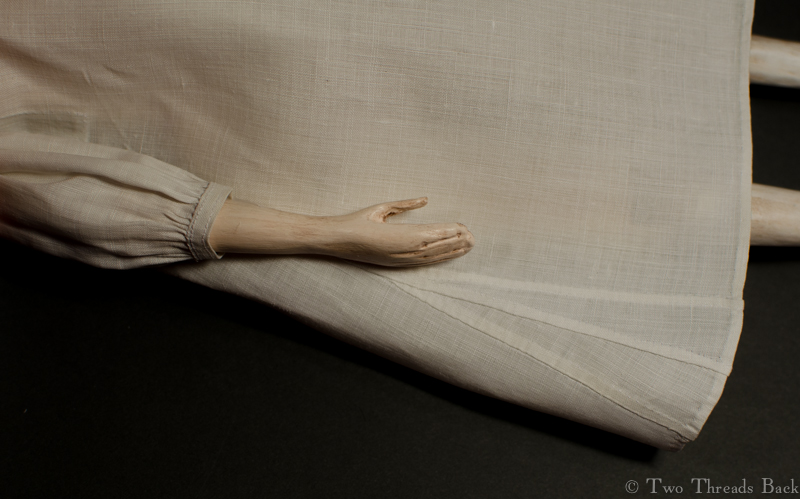
The shift is very simple. The linen is homespun and sewn with linen thread. The economic impact of the War of 1812 and then the Panic of 1819 meant times were still hard, so perhaps homespun was a necessity. The stitching is neat and even, but not particularly fine. The fabric was of insufficient width and so another piece was seamed to it to make the full width of the body, and then folded at the shoulder.
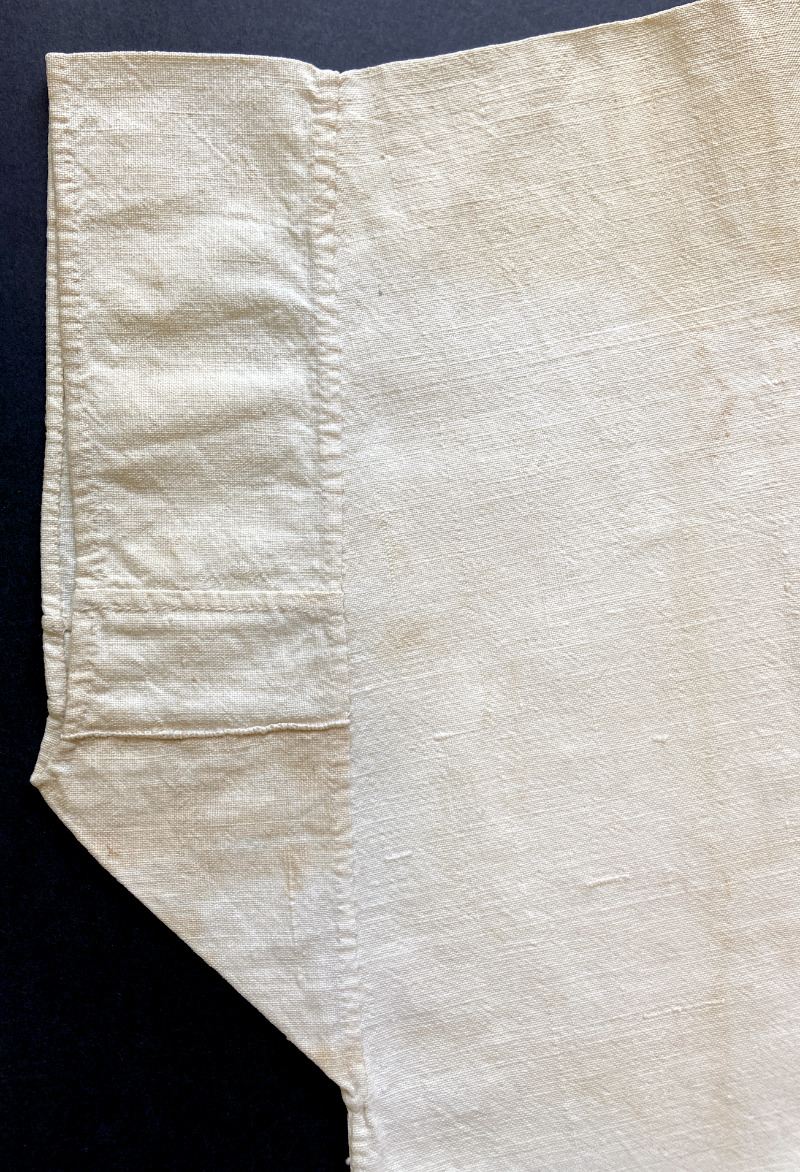
Left sleeve viewed from the back. You can also see the seamed join where fabric was added to a selvedge to make it wide enough.
The sleeves are short, and the right one is pieced. There are gussets under the arms with a small curve at the bottom. It angles slightly wider toward the hem, but has no gores. The seamed join was sewn from the outside, and because the materials were a bit coarse and the stitches a bit deep, it makes a slight ridge. I can see why it’s positioned on the outside, since it would be rather uncomfortable against the body. The inscription was made before the slit was cut for the opening, because the writing is folded under where it’s hemmed. I don’t know if Elizabeth made the shift for herself, her daughter, or a servant, but it could be considered a “comfortable” size more than a petite one.
The right sleeve is pieced, using every scrap of fabric. The left one is whole.
A view of the narrow hem and join. You can see how she “seamed” (narrow overcasting) with wrong sides together. It should make a flat, nearly invisible seam, but the linen and thread are coarse and she took the stitches rather deep.
Elizabeth Armour, maker of the shift, lived from 1757 until 1821 in England and America, through the years of the founding of the United States in a city where the most radical historical events were occurring. And what serendipity! She was there when JOSEPH LANCASTER was living (briefly) in Philadelphia! She learned plain sewing in 18th century England, and was able to make a thrifty shift of homespun linen using a minimum of fabric, in the “old” fashion – just as styles were about to change from “shifts to chemises.”
The majority plain needlework I’ve seen (or drooled over) through the years, whether manuals, samplers, or items of clothing, has been from England, and the rest from here in the U.S. It’s truly remarkable to find “threads” from England, America, world-changing history, endearing family sentiment, Joseph Lancaster, and plain needlework all sewn together with a story in this shift. I’m awed.
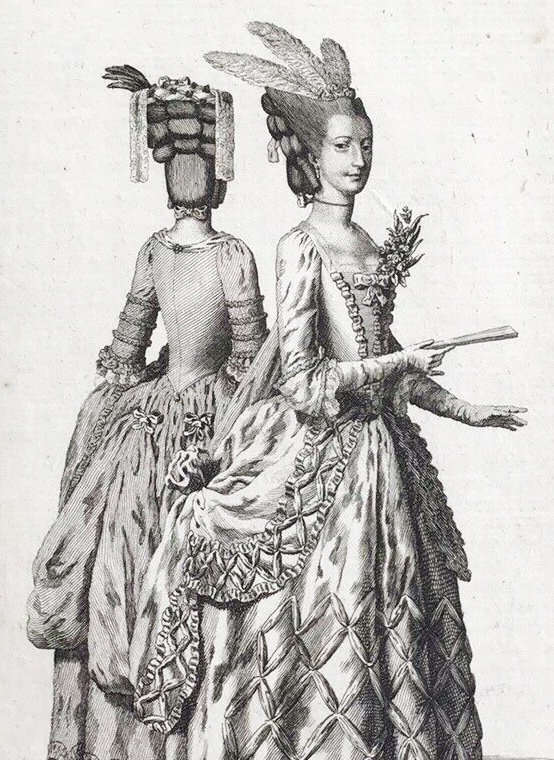
I know what lappets are, costumely speaking, and with regard to women’s millinery. They’re those long, lacy, streamer things that hang down from a headdress. The fanciest ones were made of fine lace and could be terribly expensive. They were popular in the 18th century but seemed to fade by 1800 when the classical look was in vogue, and then regained favor, at least with “mature” ladies, in the middle to late 19th century. Early ones were usually found in pairs, or occasionally joined slightly shaped in the middle, while 19th century ones could be . . . more creative.
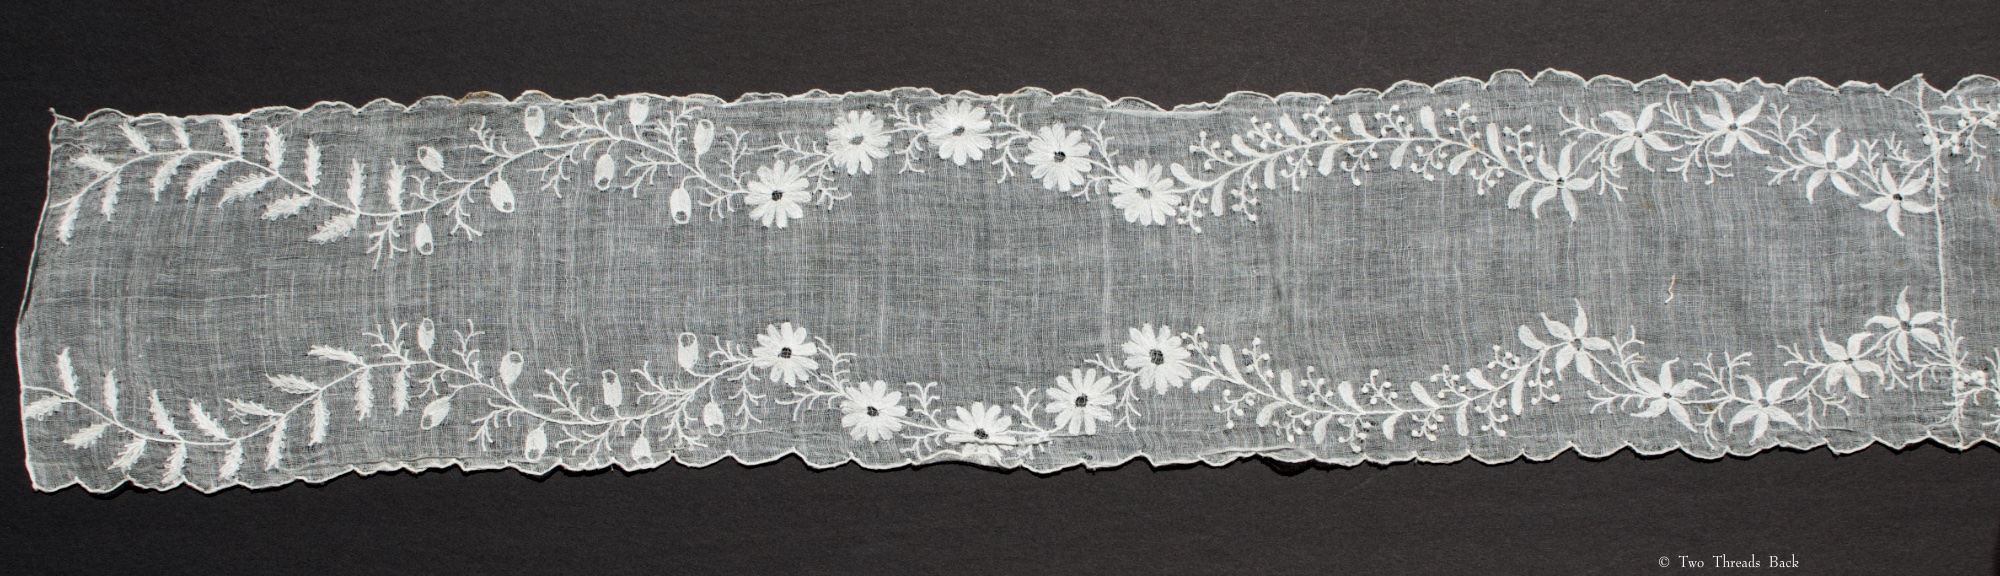
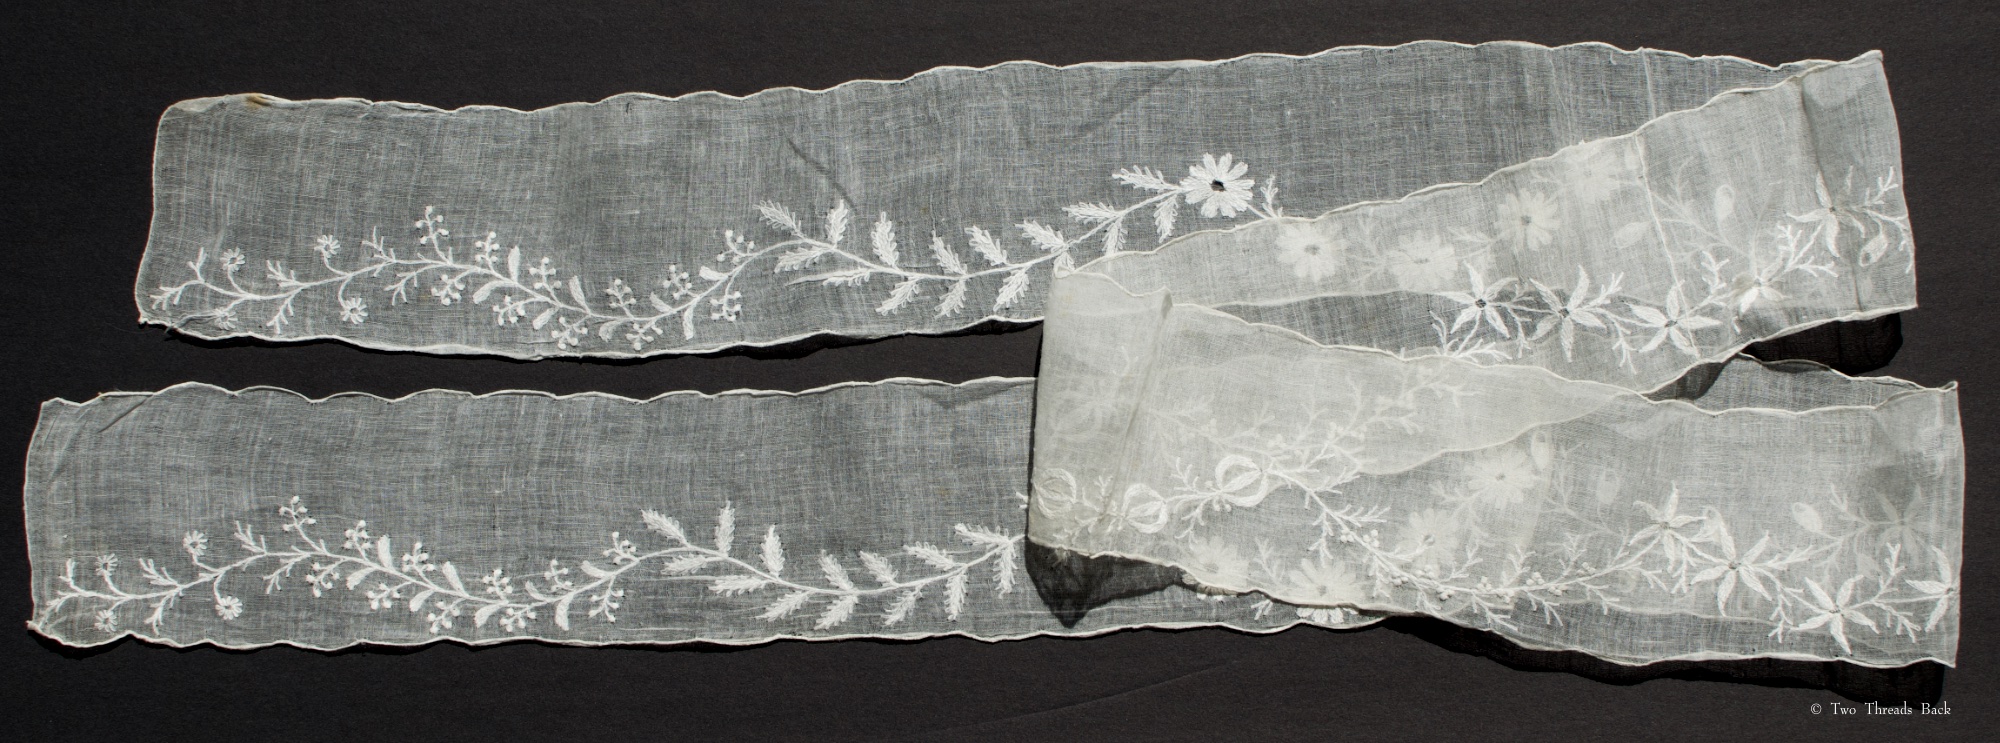
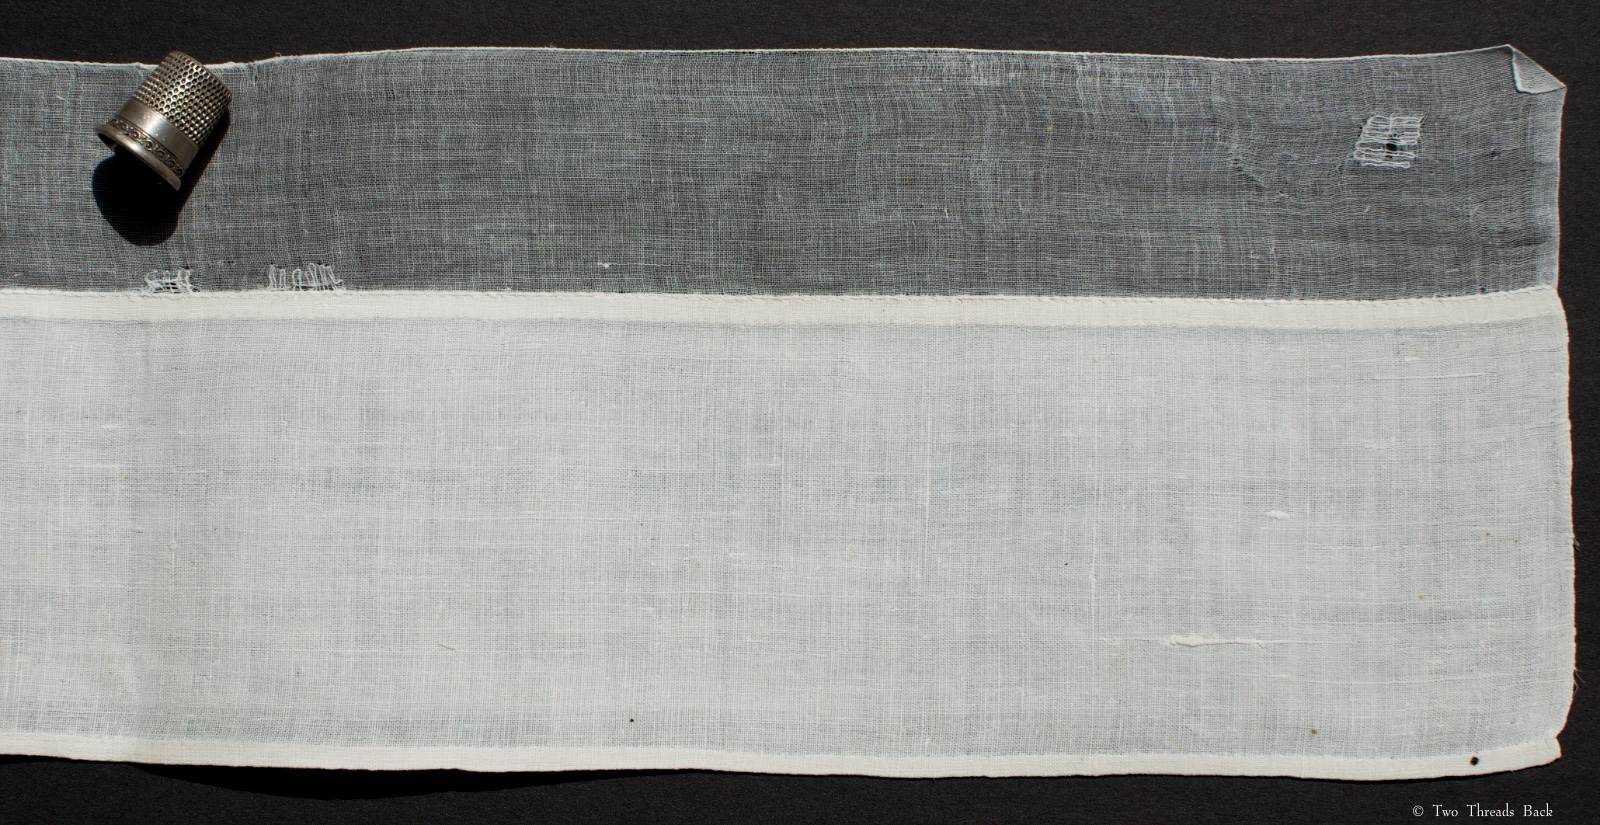
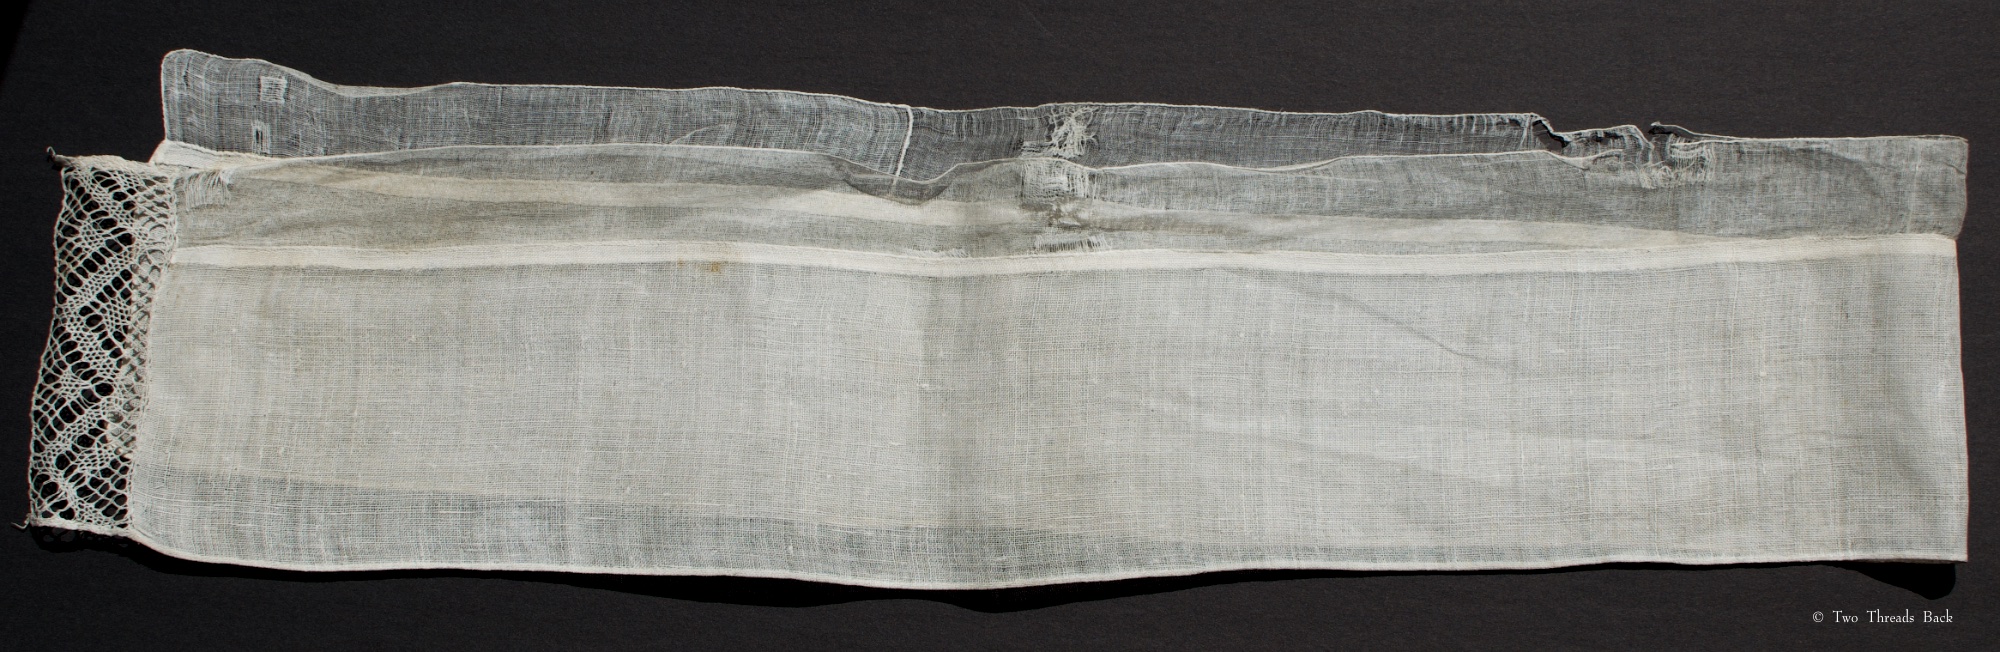
But what have I got here? Two different long strips of fine white muslin, neatly (but probably not professionally) embroidered with whitework. Are they one-piece lappets, or something else?
They appear to date to the late 1700s or early 1800s, judging by the materials and floral patterns. One is 58″ x 4″ and the other is 63″ x 3.” The design on the wider one is mirrored on both edges, while the other is worked along one edge only. All edges are scalloped, and there’s a join on both at 20 inches (not the middle) from one end which the embroidery carries right across. Found together + like patterns + like materials = same maker? The design was embroidered to fit, which indicates they weren’t cut from another garment. They seem too fragile for a sash and too narrow for a scarf.
So how in the world would you wear them? It seems like draping across the top of your head would be a bit awkward. I’d feel about as graceful wearing a length of toilet paper.
The most fabulous book on accessories of this era is Heather Toomer’s Embroidered with White, and I searched it for clues. It has beautiful photos of lappets. In pairs. With dense embroidery. Sigh. In her book on the next time period (just as brilliant), lappets appear as extensions of other accessories, such as fichus and pelerines. So I’m still wondering what these were for. Help!
The fabric is joined about 20″ from one end (not centered) on both pieces.
The darning is finer than the embroidery!
While on the subject of long narrow textiles, I’ll present my next puzzle: tuckers. I’m wandering into dangerous territory when discoursing on 18th century costume, since I know so little. However, I had no trouble finding period references to tuckers. Their wearing location on female anatomy guaranteed attention, one way or another.
Tuckers, as defined in 18th century dictionaries:
TUCKER, tuk’-ur. f. A small piece of linen that shades the breasts of women.
-A Slip of Linen or Lace, pinned along the Top of Women’s Stays -A border of linen or lace on the bosom of a shift -A fine piece of lace, cambrick, &c. pinned or sewed round the neck of a woman’s shift, gown -A shred of linen &c., about the neck of a woman’s shift -A slip of fine linnen, run in a small kind of ruffle, around the uppermost verge of the women’s stays -A strip or ornament of linen worn by women at the uppermost verge of the stays
Then we have Garsault’s 1771 L’art de la lingère, where I’m up to my tucker in speculation:
Tour de gorge en mousseline festonnée. Il se fait d’une aune de long sur un seizieme de large. Painfully translated: Scalloped muslin tucker. It is made one [≈yard] long by one sixteenth wide. A 1788 French-English dictionary defines “tour de gorge” as “tucker,” and “tour de dentelle” as a lace tucker.
This post is already too long to include Joseph Addison’s slightly naughty essay on the tucker – although if you’re curious, you can find one of many reprints here.
There’s no lack of period illustrations of tuckers, but it’s the logistics that have me baffled. Sure, you can tuck a straight band of fabric around the top of your stays – but then all but a few inches in front is hidden under a gown. You can tuck a straight length around the neckline of your gown – but then you have to negotiate the curves, and my mystery pieces seem awfully wide to do it without looking rumpled.
A Lady’s Maid Soaping Linen c.1765-82 Henry Robert Morland 1716-1797 CC-BY-NC-ND 3.0 I don’t presume to know if she wearing a “separate” tucker, or if that’s trimming on her shift. Or neither. But it’s a good illustration of the trickiness of turning corners!
A Laundry Maid Ironing c.1765-82 Henry Robert Morland 1716-1797 CC-BY-NC-ND 3.0 Her frill seems to be a little fuller.
Many paintings show gathered ruffles at the neckline, whether lace or embroidery, although the Lady’s Maid Soaping doesn’t look very frilly. Of course you could always adorn your own tucker, if you were good with a needle.
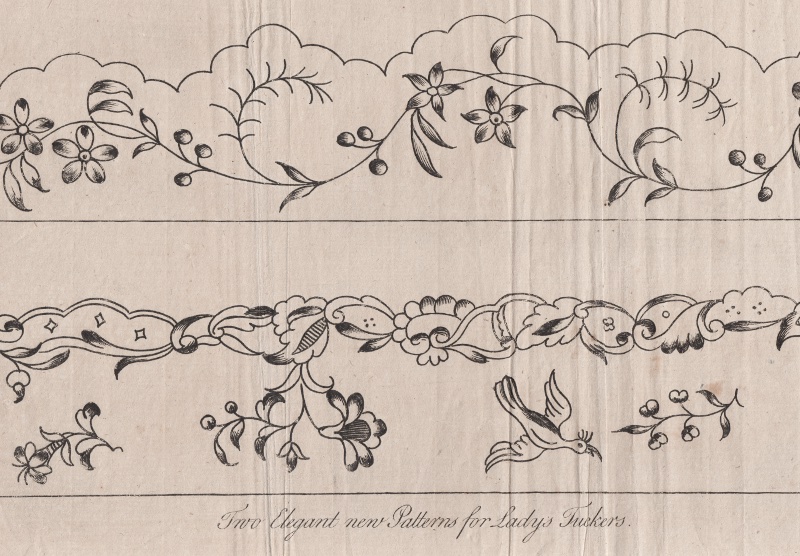
A pretty pattern from 1772.
Now here are the four long strips of linen that perplex me, ornamented along one edge, all owned by a woman who lived from 1760-1805, in France. They measure a bit over 40″ long and the linen is @3.5″ wide. If they’re not tuckers, what the heck are they and how did she wear them? Maybe they were part of a headdress. Folk costume. Dresser scarf. Tourniquet with feminine flair.
A closeup of the careful mending. The darns are as fine as the other plain sewing.
There’s a bit of lace on one end only, and a cambric border on one edge. You can see there’s also a good bit of wear.
This one is in better shape, has lace along the edge, no trim on the ends. And her “marked” monogram.
A beautifully simple one, marked with both initials, although the cambric trim on this one didn’t fare so well.
I’ve called these pieces lappets and tuckers, but I truly don’t know. Research didn’t settle anything for me this time, so any help is welcome. Maybe someday in the future our descendants will ask the same questions about our garments. I know I’ve shopped for workout clothes and been just as confounded – these strappy scraps of spandex go how?!
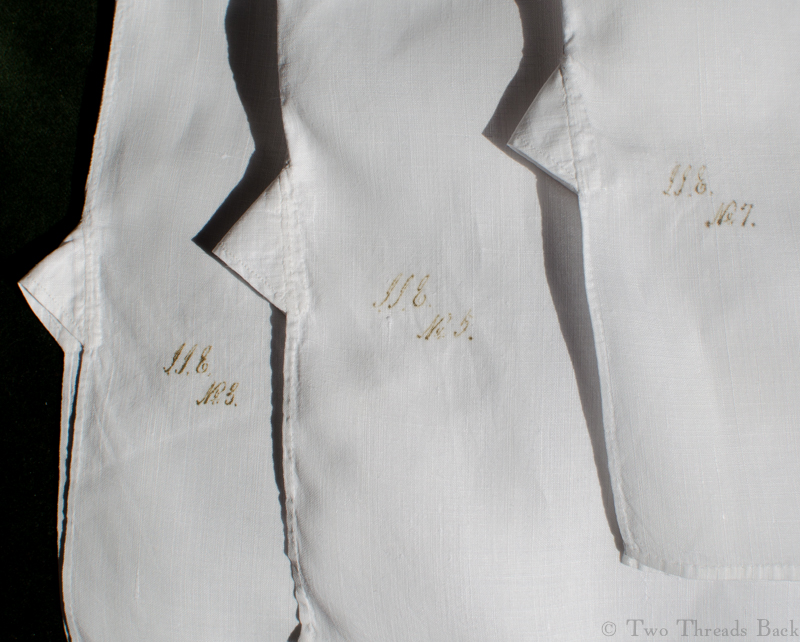
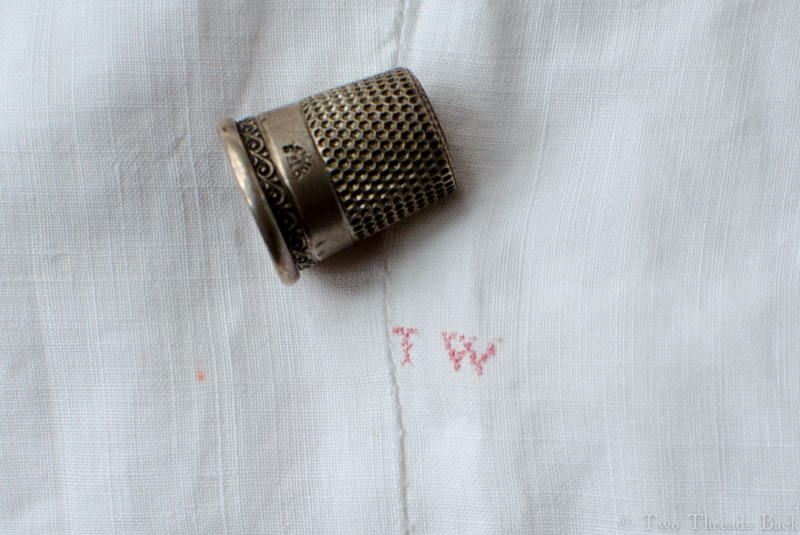
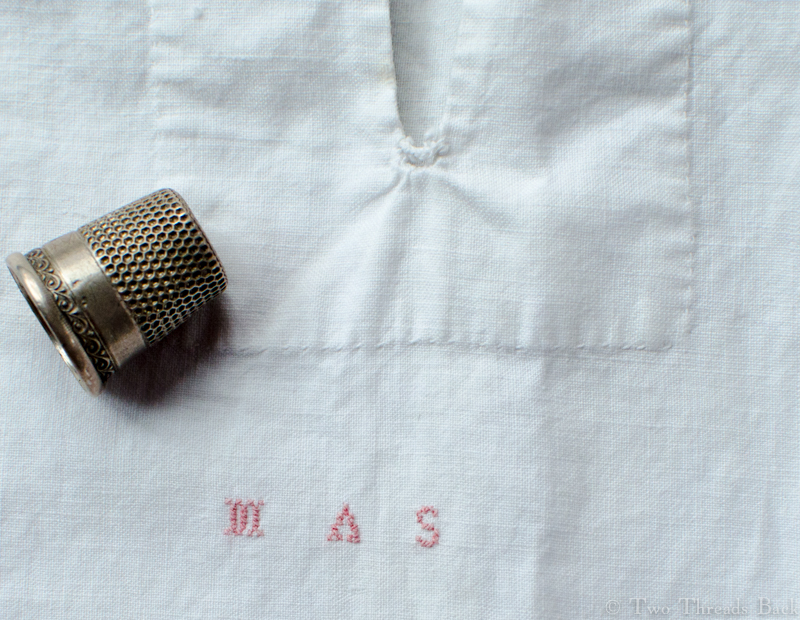
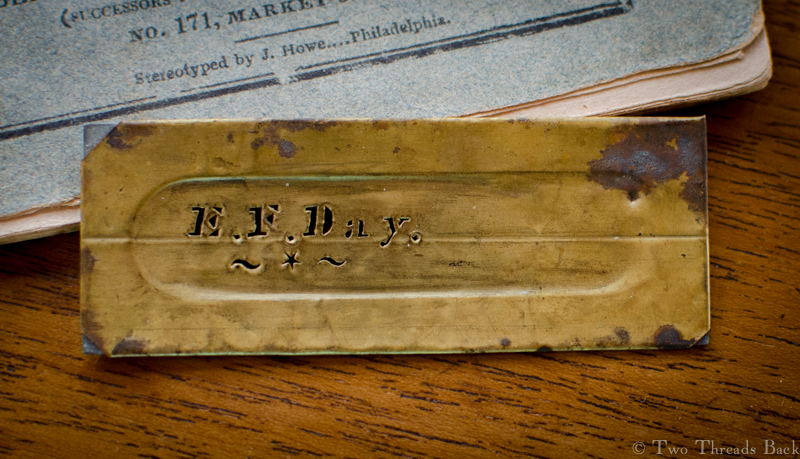
“Marking, as the name implies, is the art of putting some distinguishing sign or mark on body and household linen, so that it may not be lost, especially in the laundry. It is therefore necessary that all washing things are clearly and distinctly marked.”
A very early 19th century man’s square-cut shirt, marked “T W.”
A heavier linen shirt marked “P D.”
A lady’s cotton nightdress, c. 1830s or ’40s. Miss M.A.S. has marked it neatly below the center opening.
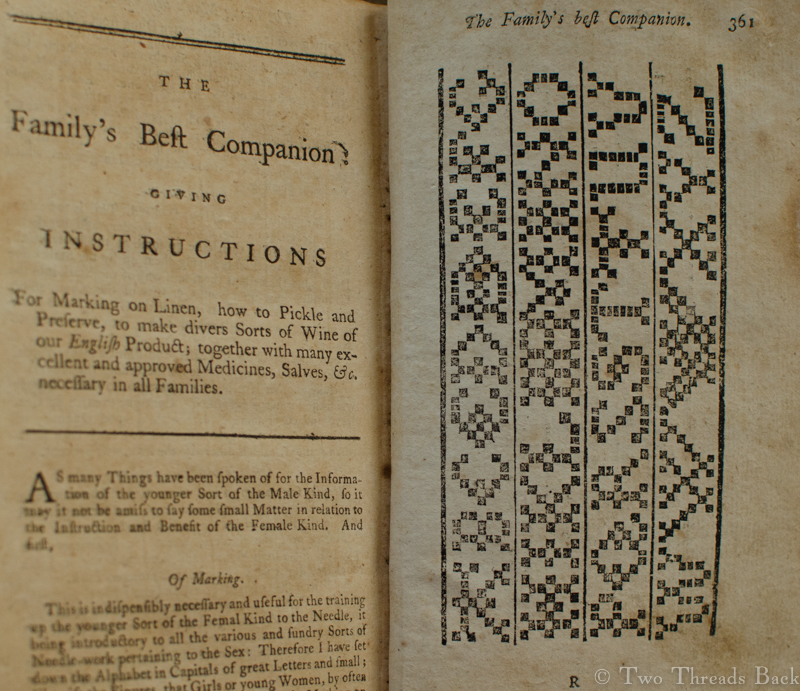
A pattern from “The Instructor, or Young Man’s Best Companion,” first published in the early 1700s; this American edition is inscribed 1786. Marking was “necessary and useful for training up the younger Sort of the Femal [sic] Kind to the Needle.”OK, let’s mark some linen. Find a chart or a sampler for a pattern (see left). Take a sheet or a towel, a shirt or a shift, and a ball of red or blue marking cotton or silk.
Make a cross-stitch, taking the first diagonal stitch over two threads of the fabric, and then another for the other side of the X. Your letters and numbers must each be finished off separately and not connected by a thread on the back. They will be about seven X’s in height.
Depending on how fine your fabric is, that means your A, B, C or 1, 2, 3 might be (gulp) 3/8 of an inch tall! Yes, seven little stacked crosses making your initials only 3/8″ high. I think good eyes and a sunny window would help.
Is it any wonder that marking was considered painfully tedious? Any wonder that any alternative method of defending your linen was highly desirable?
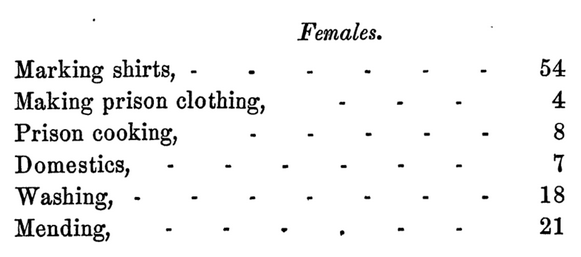
Just how bad was this sewing task? Maybe this list from prison records of the City of Boston in 1861 gives a hint. Notice the numbers?
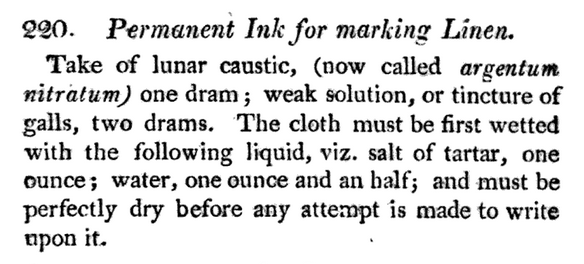
As a student of plain work, I’m in awe of the blindingly tiny stitches that were used for marking. I’ve blogged about it some here and here. But anyone who studies plain sewing will notice that during the 19th century, a new solution was the solution: indelible ink!
Here’s a recipe (one of several) from The New Family Receipt-Book, 1811:
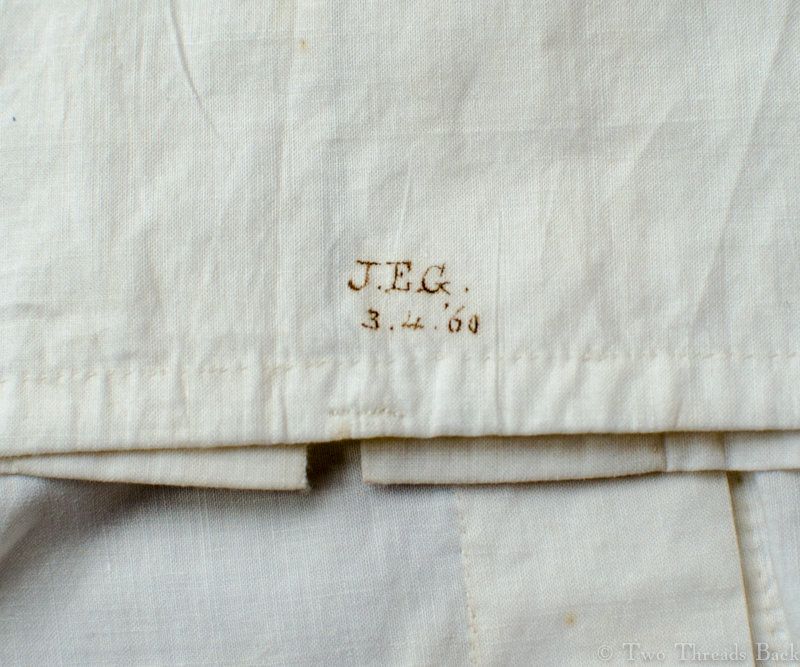
Apparently the new and easier way caught on quickly. By 1833, Lydia Maria Child states in The Girl’s Own Book, “Indelible ink is now so much in use, that the general habit of marking samplers is almost done away.” Letters marked with ink could be very neat and elegant, such as this example on a lady’s chemisette, dated 1860.
Or indelible ink could be somewhat … disappointing. Unlike stitches made with thread, you can’t pick out an uh-oh. Miss Colby probably cringed when she saw how this one turned out – an untidy finish to her corded stays.
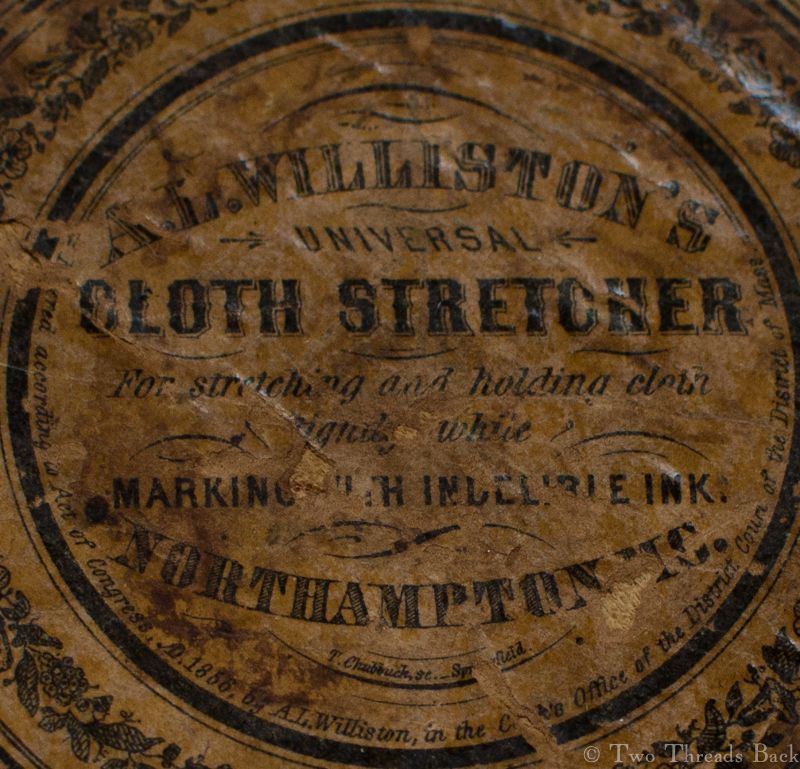
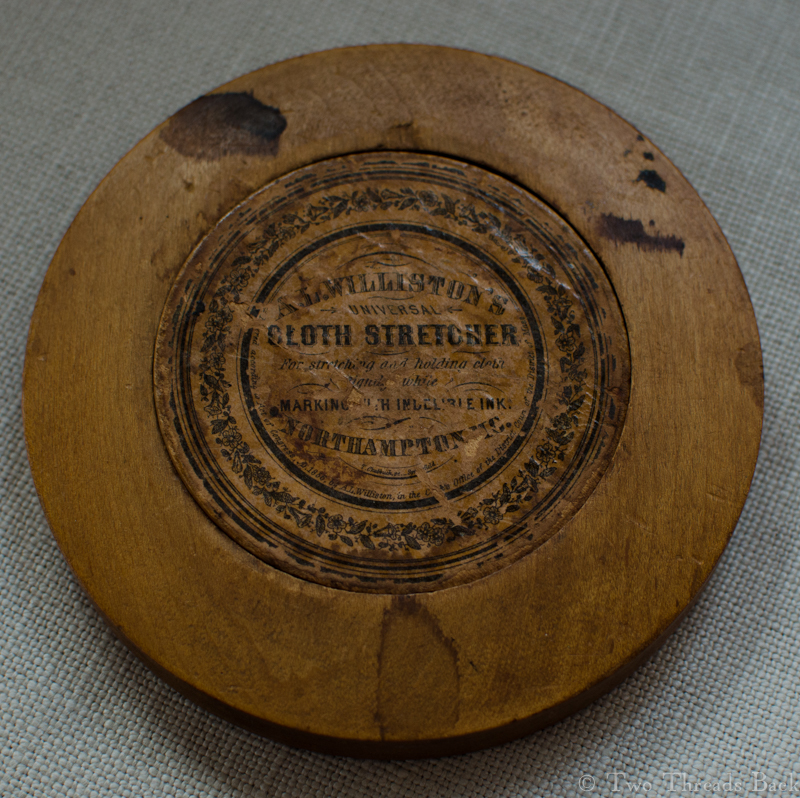
But wait! As we move from marking with needle and thread to marking with pen and ink, we’re moving into the decades of innovation: those glorious years celebrated by Great Exhibitions and more new patents than you could shake a stick at. Wouldn’t it be nice to have your cloth held taut while you wrote? A cloth stretcher could handle that.
Apparently this 1850s cloth stretcher worked pretty well, if its inky condition is any indication. The inner disk rests inside the outer ring; simply place the cloth you want to mark over the center and then place the ring around it – rather like an embroidery hoop.
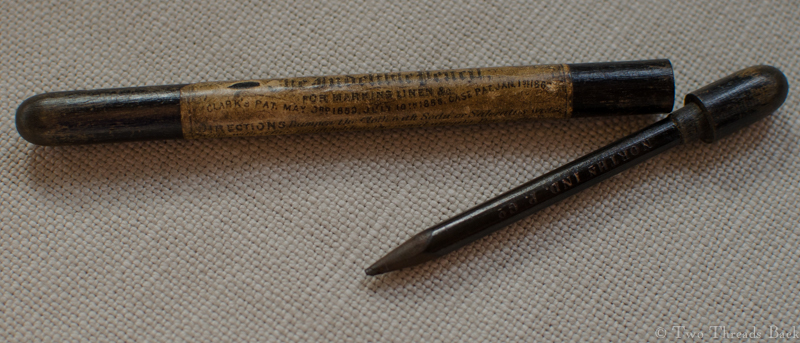
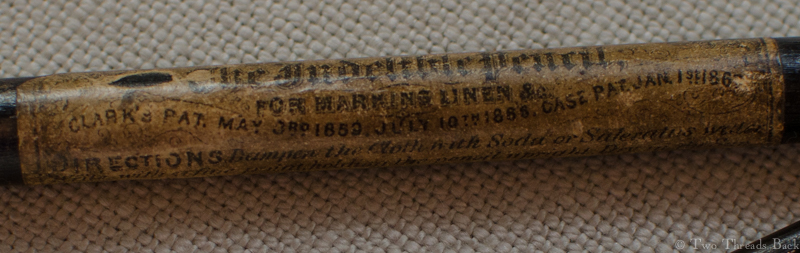
And if the ink got too messy, well, someone had an answer for that, too. An indelible marking pencil could solve all your linen identity crises. Housekeeper, is your “brain feeling considerably bothered” by directions for using ink? An indelible marking pencil can relieve it!
From the Franklin Institute, 1859.
Patented in 1859, this marking pencil has a suspiciously large amount of use left in it. But with later additional patents listed, it must have met with sufficient success.
Indelible ink, cloth stretchers, and marking pencils weren’t the only advances on cross-stitch. Stencils were available from stationers or engravers, and could be had by mail order. Mr. Congdon of Worcester, Massachusetts offered such aids, as seen in his ad from 1856:
But would stencils work with small letters and numbers on linen? Fortunately, we have surviving examples to show that they worked quite well.
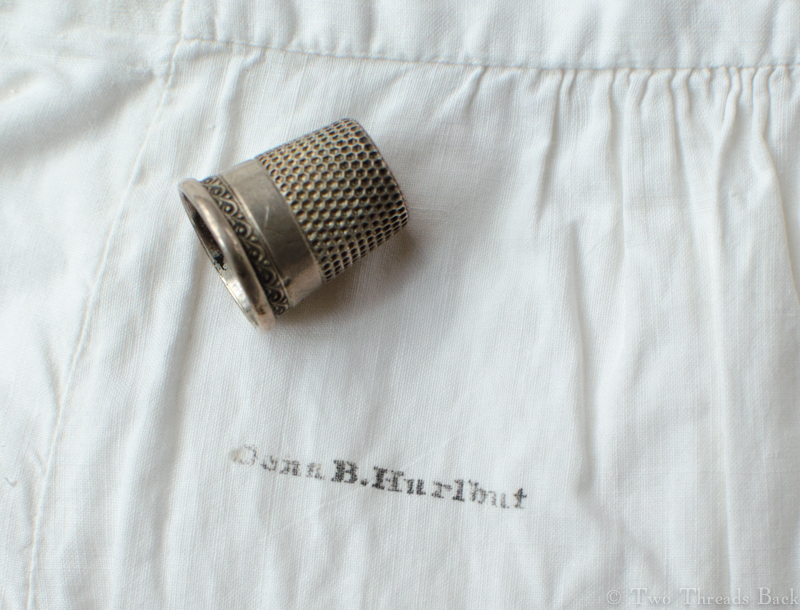
Miss Hurlbut was probably a Mrs. Hurlbut. A search turned up this bit of genealogy: “Cena B. Barrett m. Hiram Hurlbut 3 Feb. 1862, West Hartford, CT.”
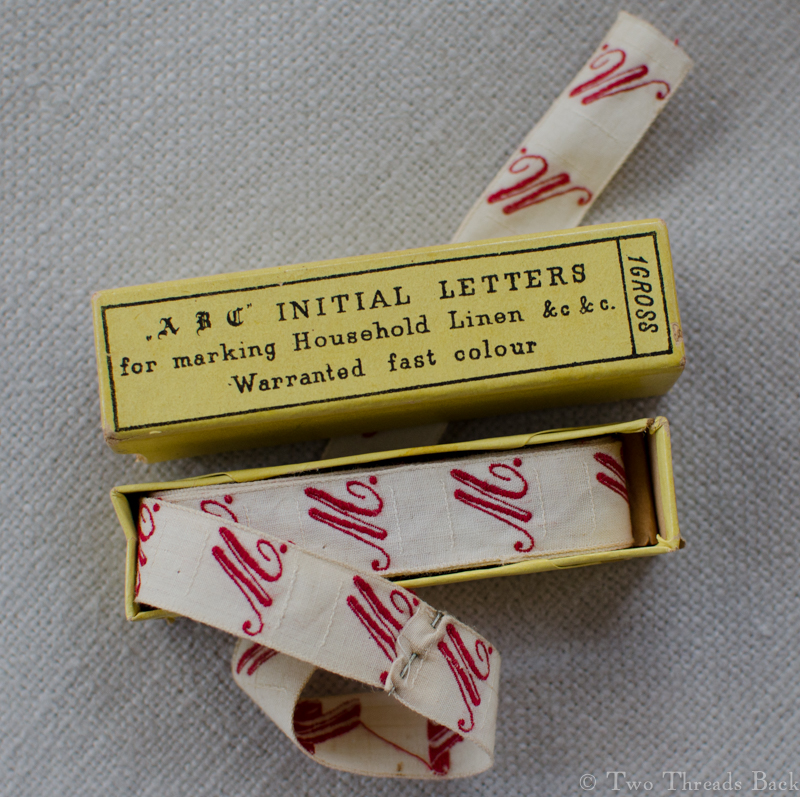
And if thread, ink, pencil, and stencil didn’t suit, along came another option: ready-made. The machine embroidered letters came on a length of tape. They even came in Traditional Turkey Red.
The pursuit of convenience was just as fervent in the 19th century as it is in ours today, but there have always been a few voices arguing the superiority of the old ways. They certainly kept marking in the needlework curriculum until the early 1900s. While requiring more skill and more time, marking with needle and thread rendered articles “ornamental, tidy, and finished.” I suppose the tiny marking stitches are the nicest way to make your mark – for all time!
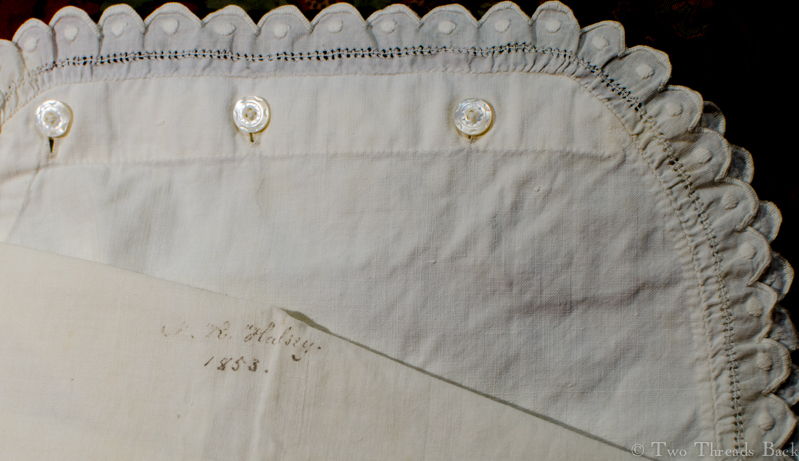
A cotton chemise, unlike either the French or English styles below. I’m going out on a limb here and guessing… American, 1853.
Wouldn’t you know it? Maybe there’s a Murphy’s Law of blogging. Just after proclaiming in my last post that there were no noteworthy distinctions in French and English chemises, I came across the illustrations you see below.
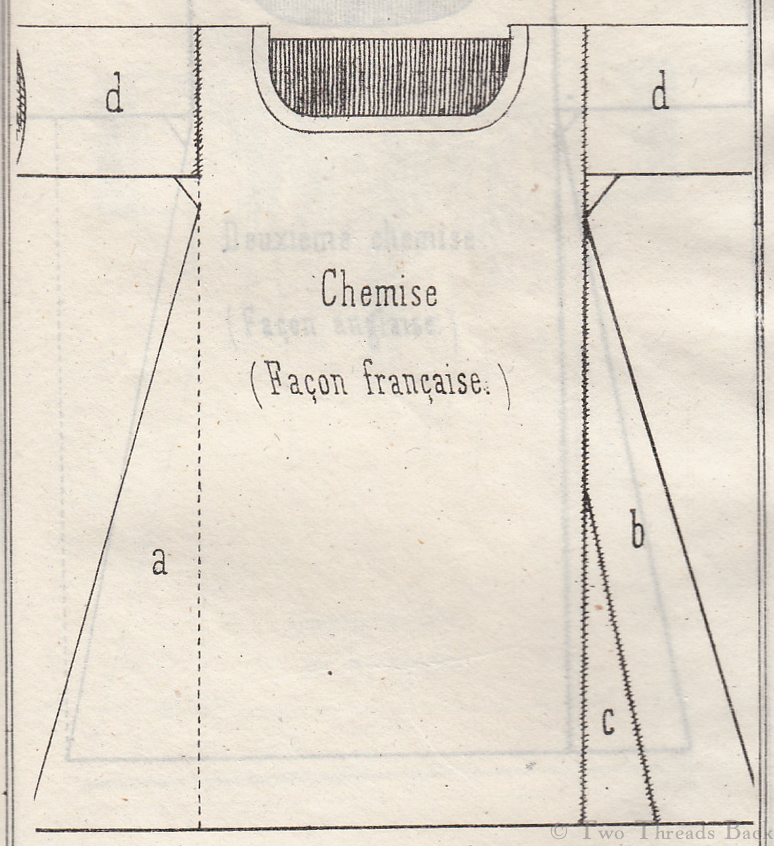
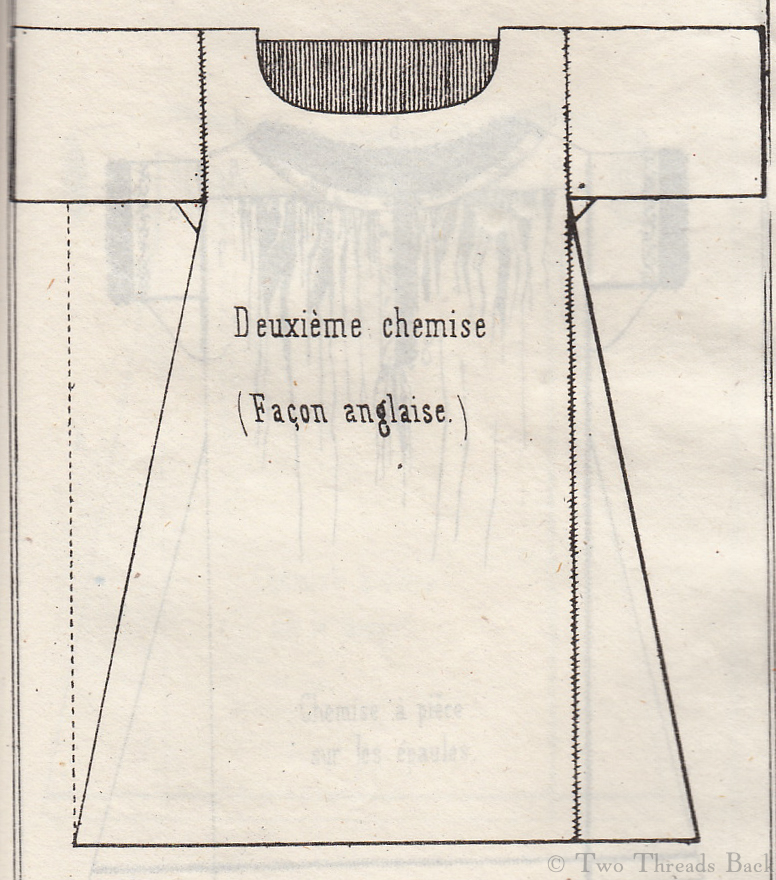
The only difference mentioned in the accompanying text is that the English style is for “skinny persons.” There may be more clues in the cutting directions, but with no knowledge of French, I’ll have to let that pass. The book was published in 1847, and is surprisingly primitive, at least compared to the detailed and beautifully illustrated French magazines of the same period.
However, I still can’t determine that English-made shifts were of one particular pattern, and the French used another. It seems more likely that a lady cut her shift and its gores according to the size of her fabric – and herself! But in the interest of Truth in Blogging, I submit the following:
Chemise Francaise. Of course it looks more complicated – they have a reputation to uphold.
Chemise Anglaise. No nonsense, for skinny persons.
Language is a funny thing. I suppose we’re all guilty of following fads in our choice of words, and we all have particular phrases we find irritating or amusing – in other people. I recently came across an example by Jane Austen, written in 1817, just as the polite name of a woman’s undergarment was changing.
So presumably Miss Austen was still wearing shifts, when other ladies were beginning to wear chemises. She wasn’t alone, however, in her annoyance with linguistic affectations. Pantalogia, a New Cabinet Cyclopaedia, Comprehending a Complete Series of Human Genius, Learning, and Industry, Alphabetically Arranged; with a General Dictionary of Arts, Sciences, and Words (1819) has this to say:
CHEMISE, the French word for that article of linen under dress which when worn by men is called a shirt, by women a shift. Some few modern English ladies, with an affected squeamishness of delicacy, restrict the term always so as to denote the article of female dress chemise de femme; but as every one knows what they mean by the expression, and we see no reason why every one should not know what they mean, we recommend the use of the old English term, and the abandonment of the corresponding French word.
Was there really any difference between a shift and a chemise? Well, yes and no. No, because they both referred to the same lady’s undergarment. Yes, because when the word “shift” was used (up until the early 19th century), the garment was usually made of linen and was simpler in cut. As the word “chemise” became standard, variations in pattern and trimming were increasing and the chemise was more often made of cotton.
So much for the term; now was there any significant difference in the French and English methods of making this garment? I haven’t found anything consistently, unmistakably, irrefutably, definitively identifiable. When I examine an old chemise, whether in a book, online, or in person, I can’t raise an eyebrow knowingly and say, Ah yes, English, 1832.
But with the interest and expertise I see popping up in blogs and books, I wouldn’t be surprised if someone has – or will – come up with a list of distinguishing features.
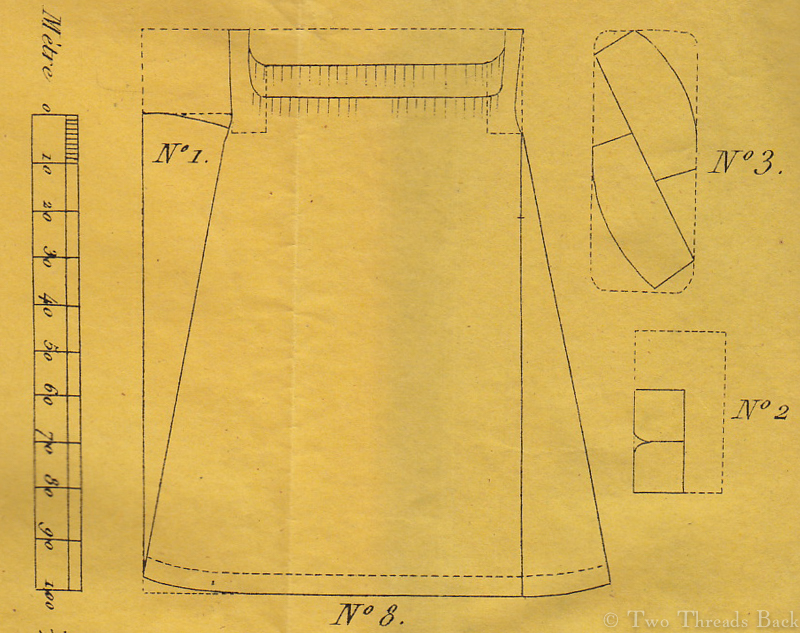
If you are curious (or courageous) and would like to compare for yourself, below is a pattern and description, 1840, from a French periodical. (Please excuse my awkward translation. If you are fluent in French and English, I beg you to let me know and help me correct it!) English patterns and instructions of the same date are available in the Workwoman’s Guide.
A pattern for a lady’s chemise, 1840.
No. 8 is a woman’s chemise. For ten chemises, purchase 25 meters of percale; take off a meter, and cut the rest into ten pieces; fold these pieces into two; on side No. 1, cut the gore that you add to the other side, cut by a thread as shown in No. 2; inside cut two gussets; indent around the neck; this is shown in No. 3; the sleeves are cut on the bias. Gather slightly on top of the arm and hem the bottom with backstitching. The armholes have to be a little curved under the arm. Take the remaining meter, measure a narrow band along the edge, then cut twenty pieces for double shoulder straps; these pieces are indicated by dotted lines; place a narrow piece of tape between the shoulder strap and its lining, there you insert the sleeve and backstitch, and you fold the lining over; gather the top of the chemise, as indicated, and insert a narrow tape of a meter in length; then cover this piece of tape with a band of percale; using backstitching and hemming, then fold under. Mark the chemise over the left gusset.
“The art of marking was brought to perfection many years ago, and if our great grandmothers could but see the meagre attempts made by us now-a-days, I fancy they would have some contempt for the system by which our needlework abilities are tested.”
– A. K. Smith, 1892
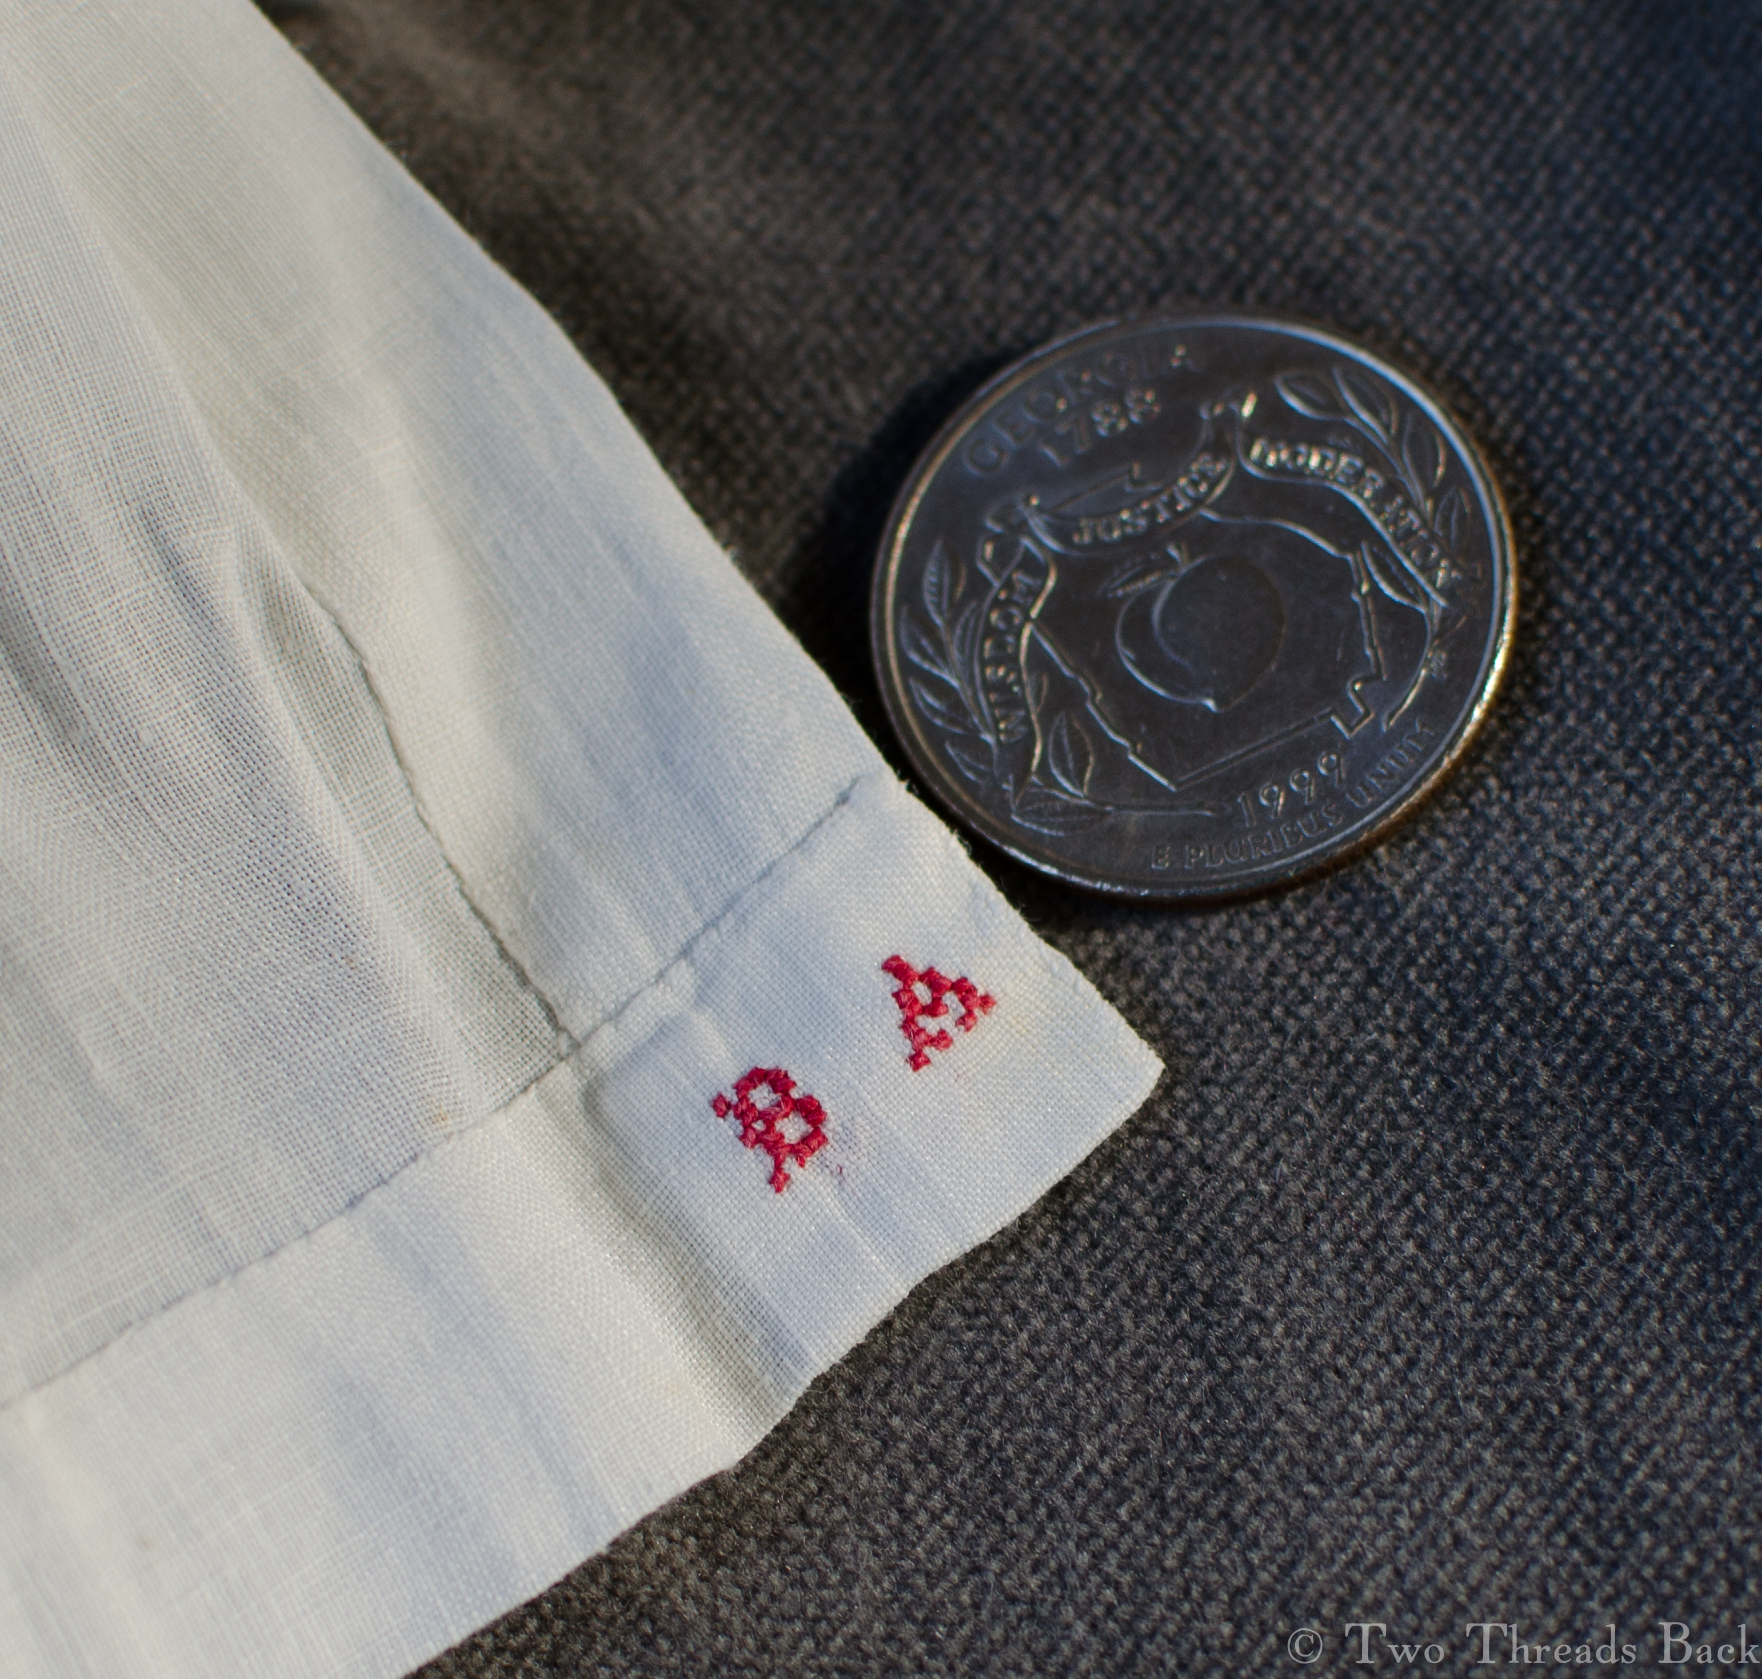
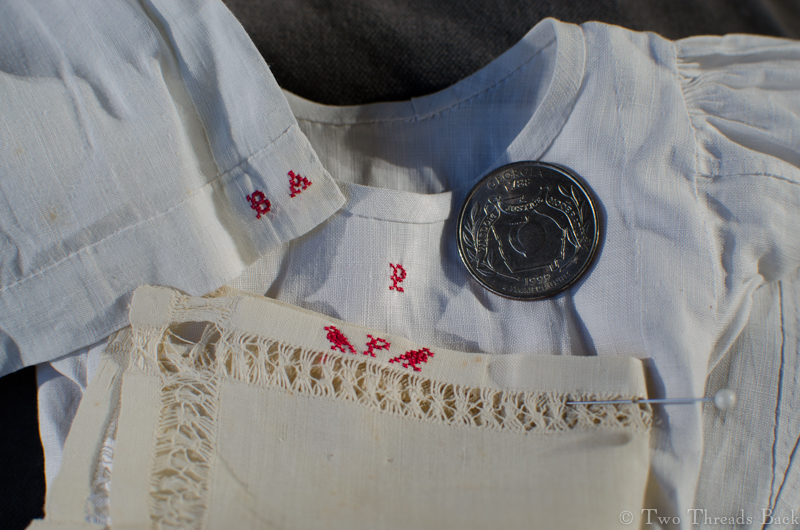
They would certainly have some contempt for how long it took me to mark Pharaby’s shift, regardless of the quality of my work! I should have tended to this little essential when I first made it, but better late than never. We can’t have her single shift getting lost in the laundry, can we?
A lovely linen baby shirt marked with Turkey red cotton; note the quarter next to it for size. I’ve kept the image full size, for anyone who wants to view beautifully done original marking up close – just click the image.
First I had to do some practice stitching. Sampler collectors and makers would laugh at how astonished – and intimidated – I am by the miniscule cross-stitches made during the past 200 years. You can see from this little baby shirt (last quarter 19th C) how blithely they marked countless linens. I’m guessing at the “blithely” part, but since I have many shirts from this baby, somebody was doing a lot of marking!
Making it to Pharaby’s scale would be impossible, since barely matching ordinary period work would be the best I could hope for.
I used a pretty little c1900 linen collar to experiment on (damaged – I wouldn’t inflict my needle on it otherwise), as you can see in the picture.
A linen collar marked with ink that I used for practice. “No textiles were harmed during the making of this experiment.”
Since the threads in linen are not all exactly the same size, my stitches over two threads looked a bit messy. I tried sewing over four (too big) or over however many made a perfect square (too awkward). By this time I was just about ready to use ink, like the collar owner! But hey, I’m all about plain sewing, right?
A lot of trial and error showed that to be small enough, I’d have to work over two threads, no matter how lumpy my letters looked. I found that just like many projects, things that look pretty awful as I’m working, look a little better when I’m done. Or maybe I’m just cross-eyed by then!
The baby shirt, Pharaby’s shift, and the practice piece, all together. The little birds I tried were from a pattern by the most knowledgeable sampler collector I’ve ever met. Maybe Pharaby will make a sampler one day….
Maybe Graceless, Pointless, Feckless, and Aimless – but not Shiftless!
Shiftless no more! Pharaby can compost the fig leaves now.
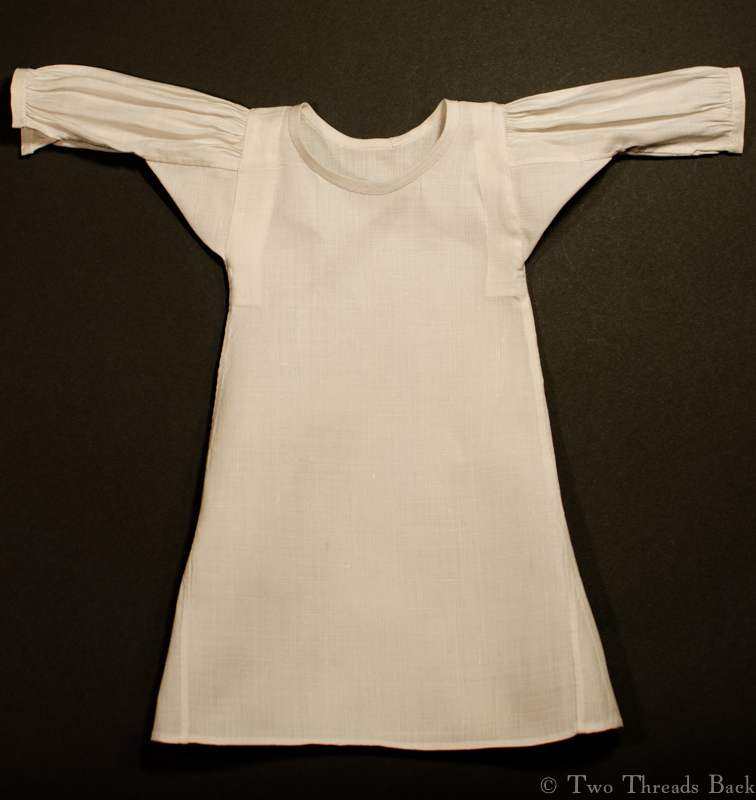
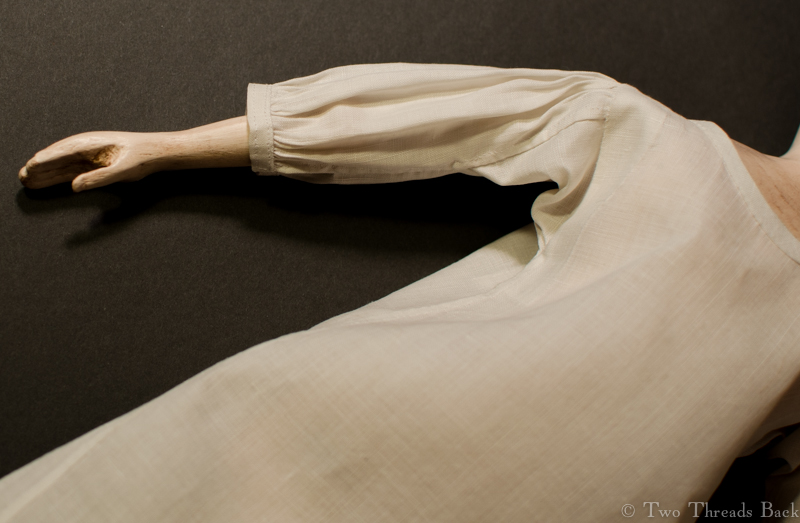
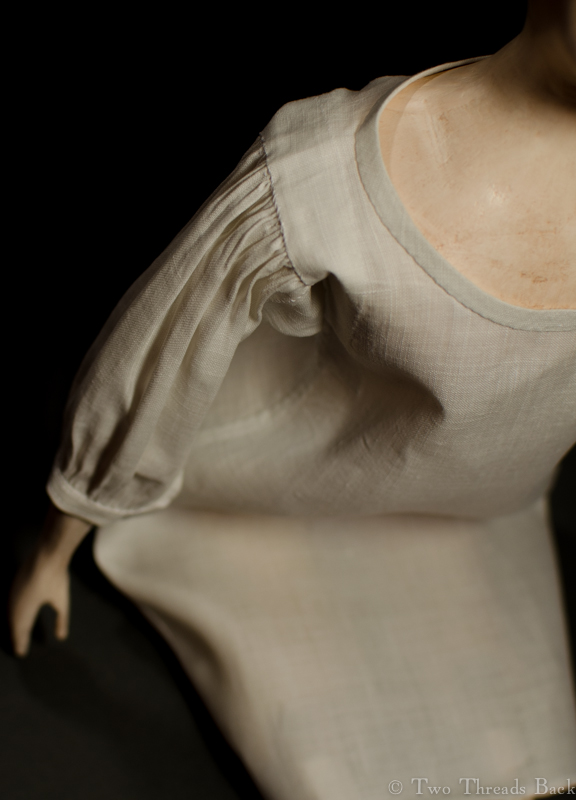
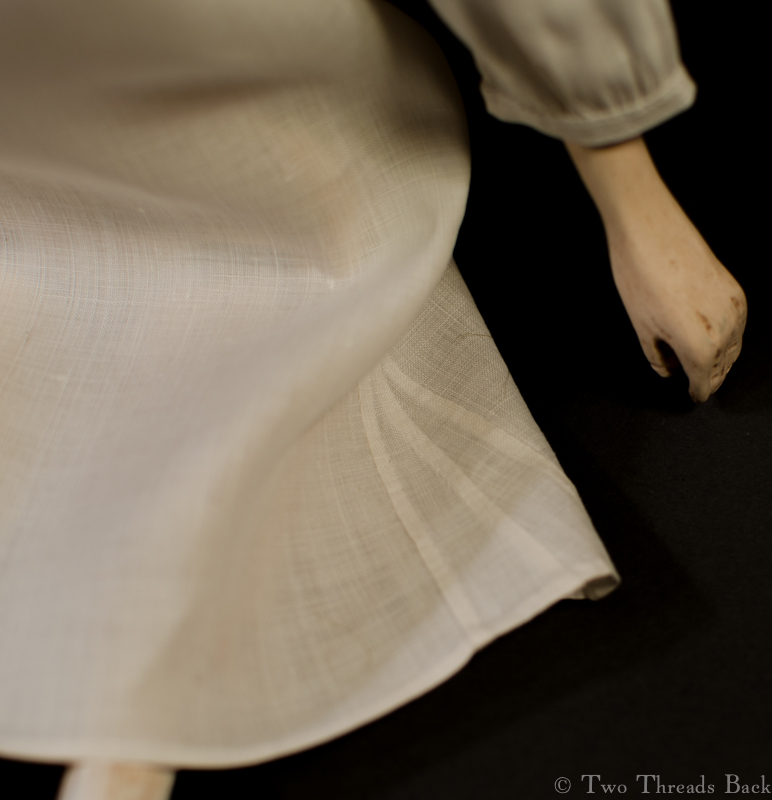
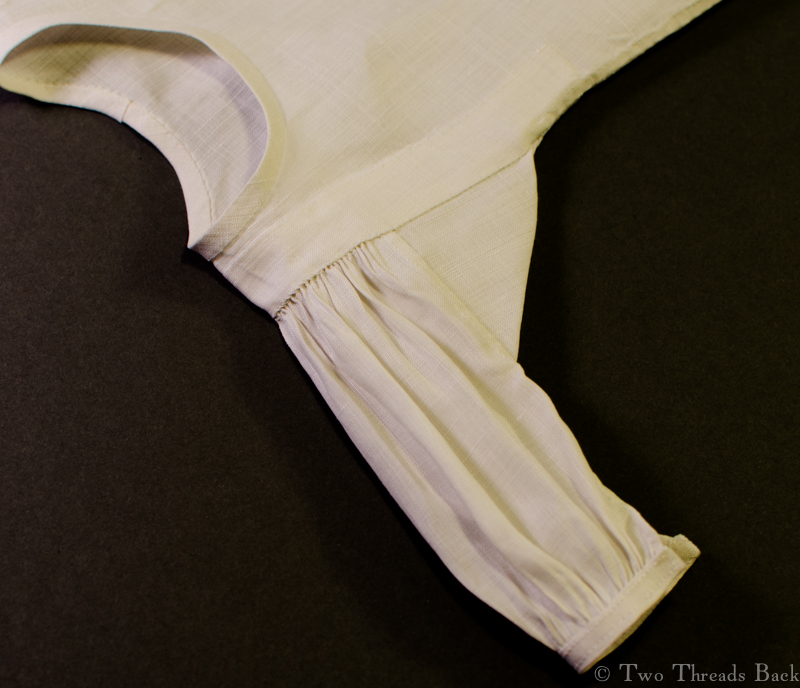
To make her shift, I used some fine old linen with a silky feel, and I scaled a pattern in Costume Close-Up (is there anyone who doesn’t use that pattern?). Then I proceeded to sew up the gores, body, and neckline. When it came to the sleeves, though, I was perplexed. What was typical, plain or gathered? I reeeeally wanted to do gathered.
Not being an eighteenth-century-fashionista, I pulled out costume books and scoured the internet for guidance (see this awesome study). Most of the images of extant shifts I found – there were a few exceptions – had sleeves without gathers at the armscye, or shoulder. But period art seems to imply that shifts did have them; otherwise, how so fluffy? That means that 1) I didn’t look in the right places, 2) I couldn’t see details and misinterpreted the pictures, 3) they didn’t survive as often, or 4) some dates were wrong. Maybe all four, plus some more reasons I haven’t thought of yet. Oh well.
However! I found two or three images of exquisite little shifts on early wooden dolls in museums, and those had sleeves that were gathered at the armscye. I think. Anyway, I love setting in gathers and it’s my toy, so that’s what I did.
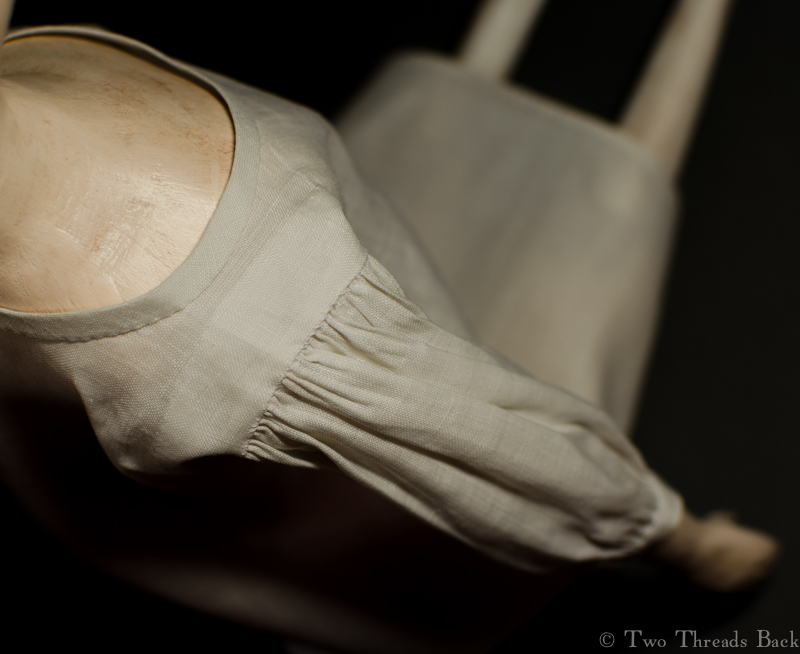
Now another dilemma. To stitch or not to stitch, that was the question. I was so accustomed to seeing the stitching (now called backstitching) on the wristbands of men’s shirts, that her little cuffs looked as bare as she did. But, duh for me, I’d already set in the gathers. Could I do it, post hoc stitching? Why not – if there’s a harder way, I’ll find it. You don’t see any close-up photos of the cuffs here, do you? Ha.
Next came the binders, those reinforcing strips that are a standard feature in men’s shirts. I can only guess how common they were in women’s shifts, because they don’t usually show in photos, nor are they noted in descriptions. But I’ve long speculated that originally binders were there just for “setting in” gathers – support for a stress area was just a bonus. So in they went.
Now the question you’ve been too polite to ask: did it fit? Pharaby said it would do. She’s not fussy. Any doll destined to wear fashions spanning a century or so – at the same time – can’t afford to be.
Oh, but she does expect me to mark her shift and add ties for her cuffs. She hasn’t decided about frills.