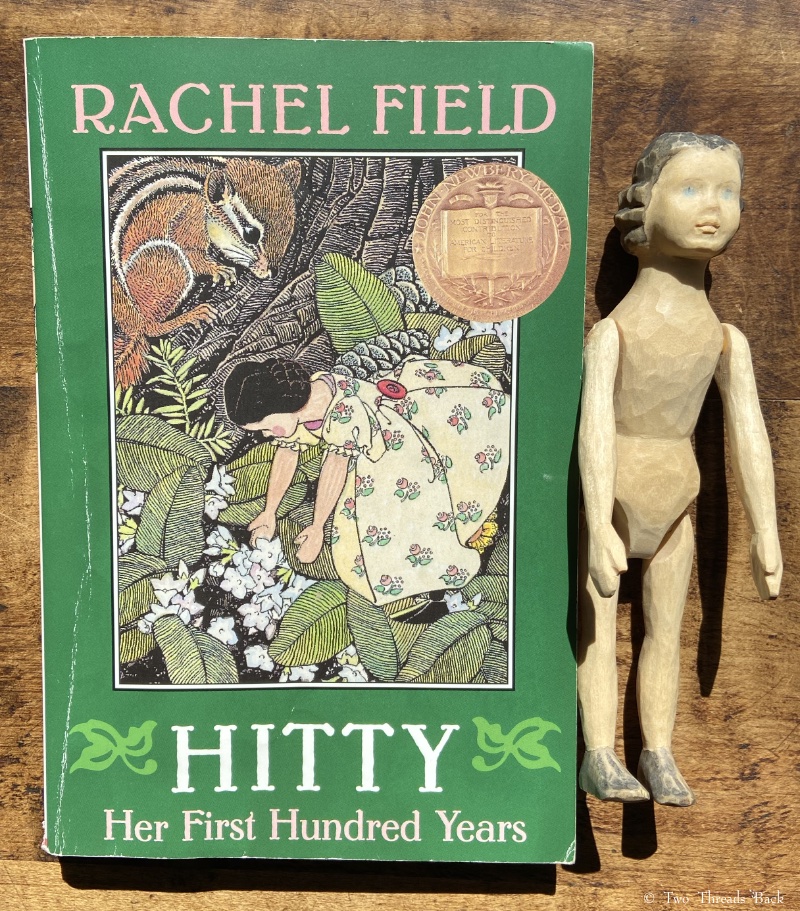
A few days ago, my husband and I went for a drive in the mountains of North Carolina to visit a very special lady. She’s a master wood carver with an international reputation and a long-time instructor at the John C. Campbell Folk School. At age 11, she learned wood carving from her mother, as well as other famous folk artists.
We met several years ago, and I was excited to learn that she had also carved dolls – Hitty dolls – although she wasn’t doing them any more. She promised to let me know me if she ever did, so I was thrilled (maybe you could call it the happy version of a hissy fit!) when she called to say that while clearing out her workshop she’d found a couple, one was the first one she ever carved – and was I interested? Was I? What a question!
Two pretty dolls in the hands of their maker!
The original doll was only lightly sanded and faintly painted with color, while her later work was more detailed and finished. But it was the first one that stole my heart. So Mehitabel has come home with me and is awaiting her wardrobe. It was delightful to visit and see the artist’s workshop and other examples of her carving. Sadly, she suffered a stroke earlier this year, so she’s not doing as much now. I did have the pleasure of seeing one especially stunning doll (it’s for sale! contact me for her info if you’re interested) which I’ve posted below.
Truly a work of art!
And here’s a glimpse of the beautiful work on a similar one waiting to be dressed.
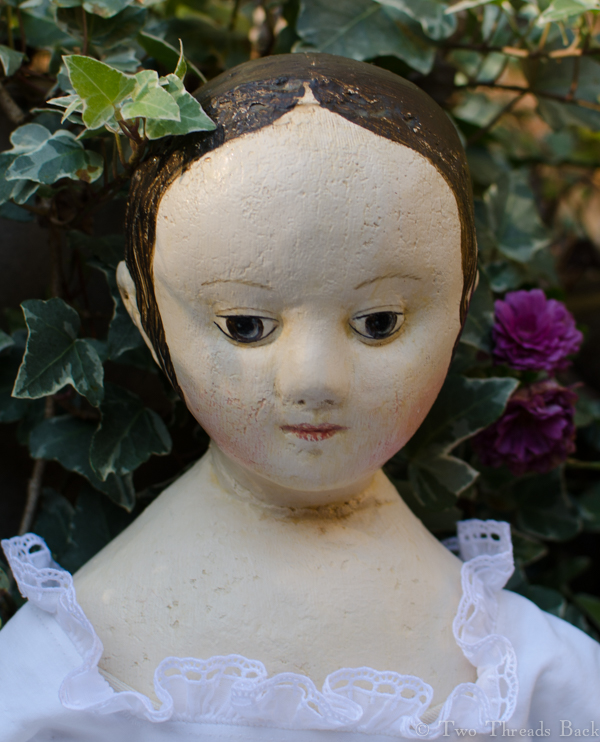
And one last peek at a project that really took my breath away –
I’m so excited to have a new doll to dress. It’s not easy for me to sew tiny things, so I’ll have to take care that it’s one my Hitty fits!
MILLENER, or MILLINER, one who sells ribbands and dresses, particularly head dresses for women; and who makes up those dresses. Of this word different etymologies have been given. It is not derived from the French. The French cannot express the notion of milliner, otherwise than by the circumlocution marchand or marchande des modes….
Littleton, in his English and Latin Dictionary, published 1677, defines millener, “a jack of all trades;” q. d. millenarius, or mille mercium venditor; that is, “one who sells a thousand different sorts of things.” Encyclopaedia Britannica, 1823
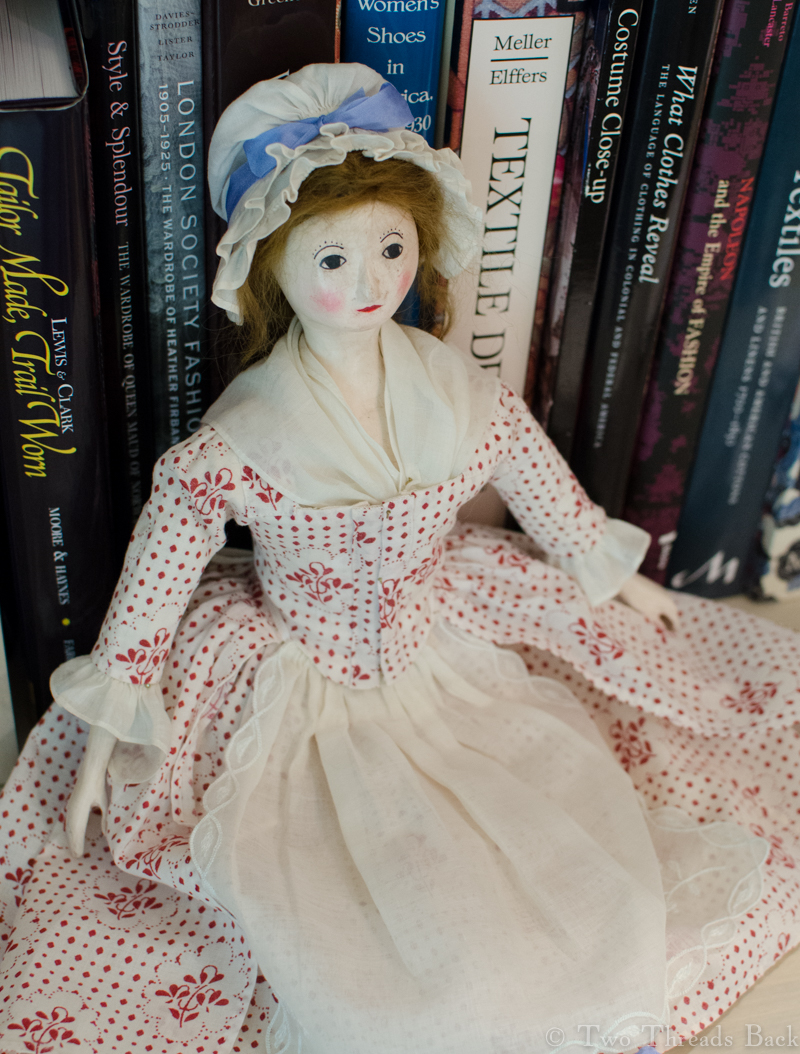
It’s summer and I’m still here and still sewing a little (not quite a thousand things) although I haven’t posted for months now. Life has been really hard lately, but looking at Mélisande and dreaming of her wardrobe has brought a lot of cheer. Playing milliner (in the broader sense) for Mélisande has been more challenging, but that’s thanks to my penchant for tackling projects labeled “Do not try this at home!”
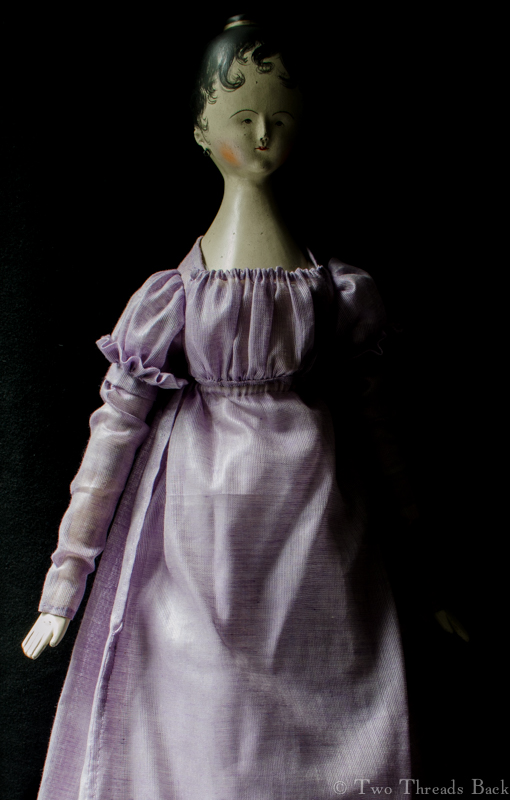
The exquisitely beautiful Mélisande was created by Kathy Patterson, a brilliant artist and doll maker (her historical dolls are perfection) who made my dream of an early 19th century wooden doll come true. She is a 19″ wooden lady, carved in the Grödnertal or Tuck Comb style of the early 1800s, and perfect for dressing in clothing from the Regency to Romantic eras. Let me qualify that: perfect for doll dressers who know what they’re doing.
Preparing to fell the seam on the sleeve and gusset cut-in-one. The first time.
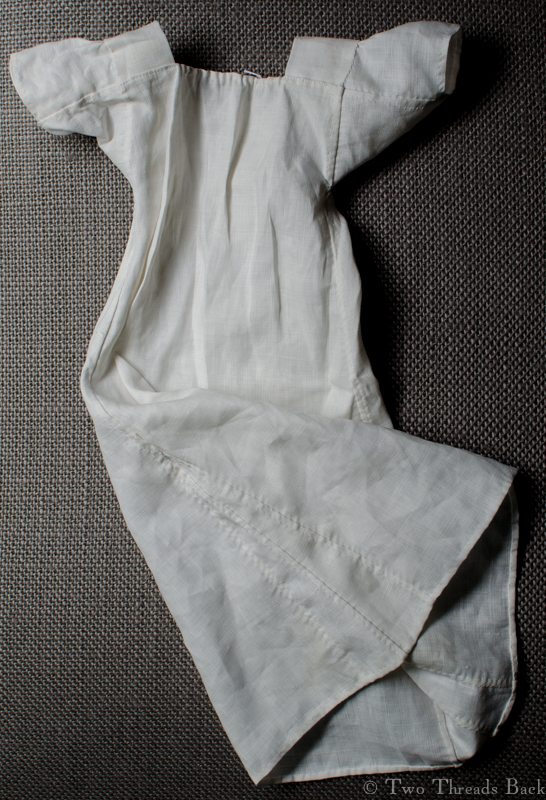
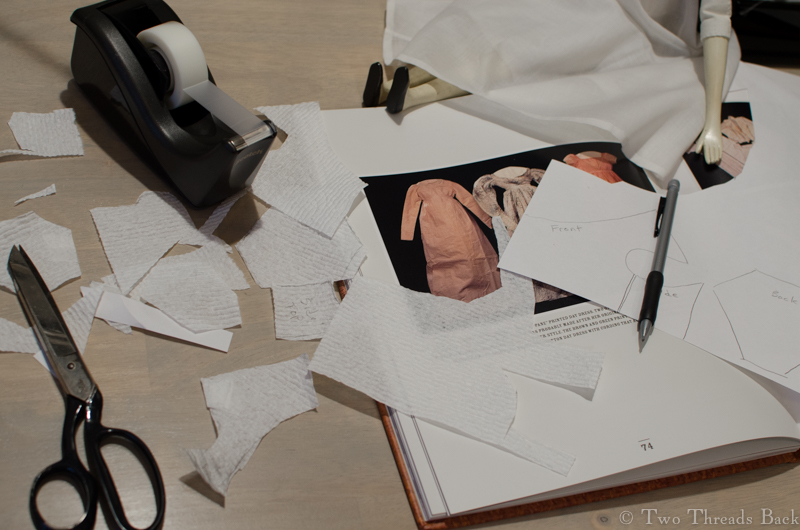
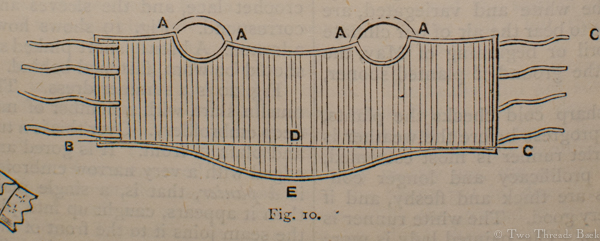
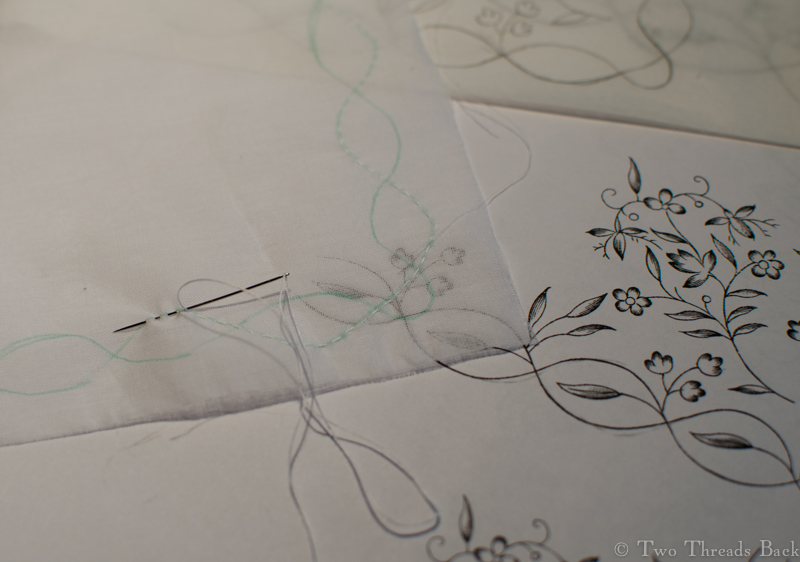
As for the rest of us… well, it’s more of an adventure. I did know enough to start with a linen chemise – or shift, if you share Jane Austen’s scorn of “mock modesty.” Using a tattered and weary dresser cloth for fabric, I cut the arm gussets and sleeves in one piece, a little trick learned from looking at an original and which I think is also mentioned in The Workwoman’s Guide.
See the scattering of holes in the sleeve? Maybe I should’ve ignored them and pretended it was a real antique chemise.
However, as I was smirking over saving a few stitches on the gussets, time was playing a sneaky trick on me. Hint: check old fabric for flaws BEFORE you sew. That tiny stain may be just a stain when you cut out the sleeve, but by the time it’s been washed and ironed it could deteriorate into a hole. Or two. Or three. And you might not find them until you’re dressing the doll for her final photo session. And you’ll have to unstitch and redo it all. Sigh.
Finished. For the second time. Drawstrings are placed inside both front and back, since I was copying an original that was done the same way.Once again, fighting patterns. It takes 3 times as long as the sewing!
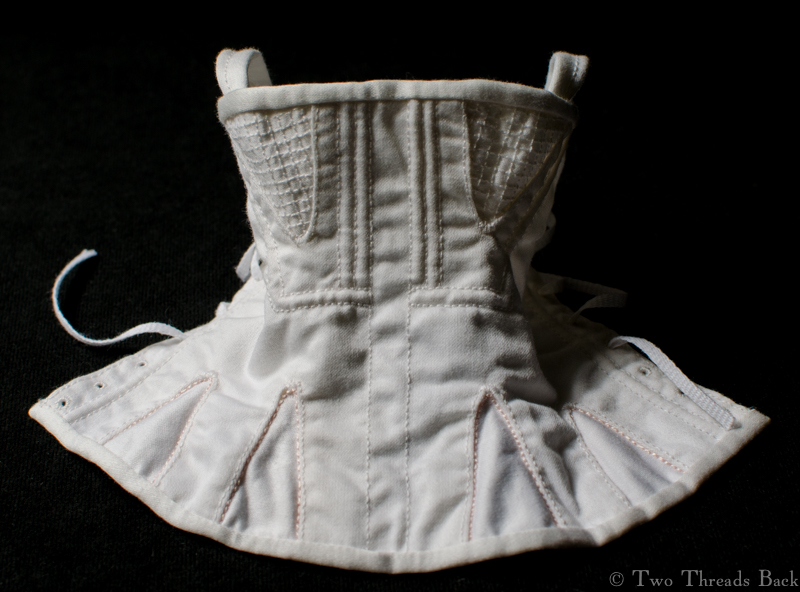
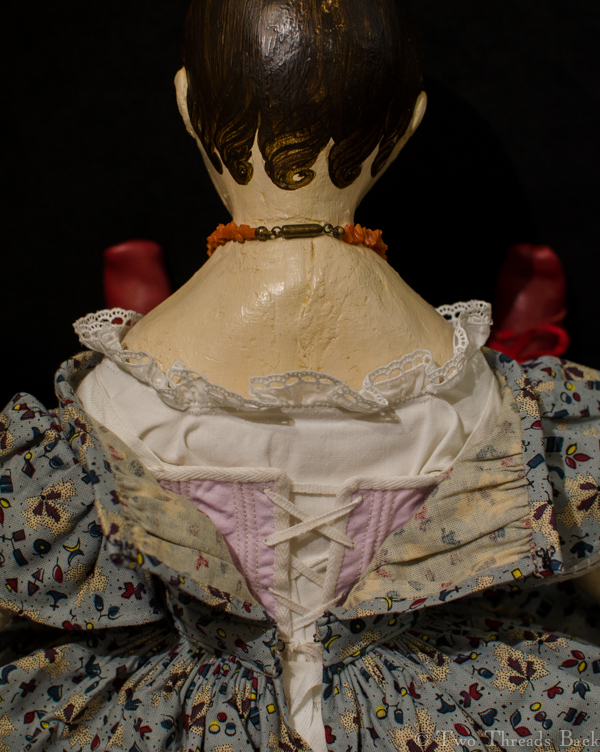
During the years when shifts were becoming chemises, stays were morphing into corsets. There were so many fashion changes over those decades that I didn’t really know which style to go with: long, short, cording, boning, busk? I just picked a look I liked (and had a grownup pattern to go by) and made it. Pink embroidery was a nice idea but mine looked messy so I picked it out. Instead, I limited the pink accents to extra stitching in the gores and was rather pleased with the result.
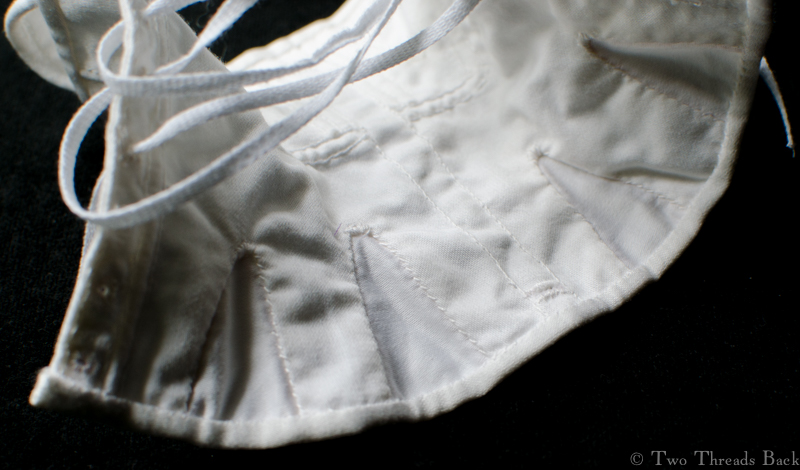
A closeup of the pink silk I used to accent the gores. I managed to erase all trace of the pulled out embroidery fails. I wish my stitches were more even, but shadows and highlights in photographs can hide a multitude of irregularities.A view of the inside. You can barely see the little buttonholed slit at the bottom for inserting a busk, if Mélisande ever decides to wear one. Personally, I think her posture is a little stiff already.All laced up. Maybe not authentically, but it’s too much work to fuss!
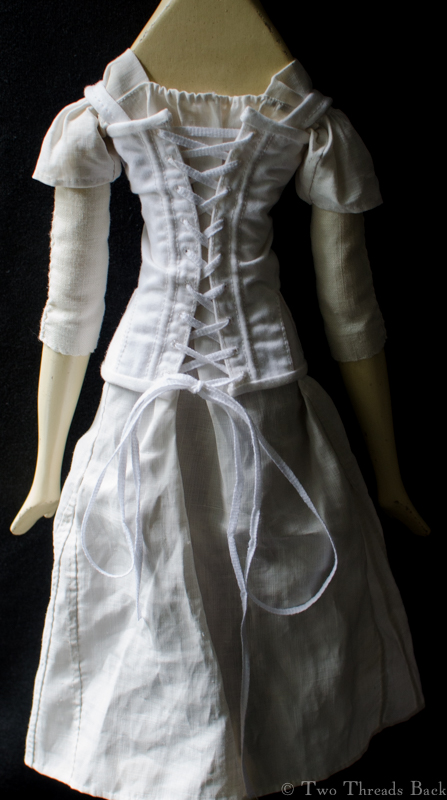
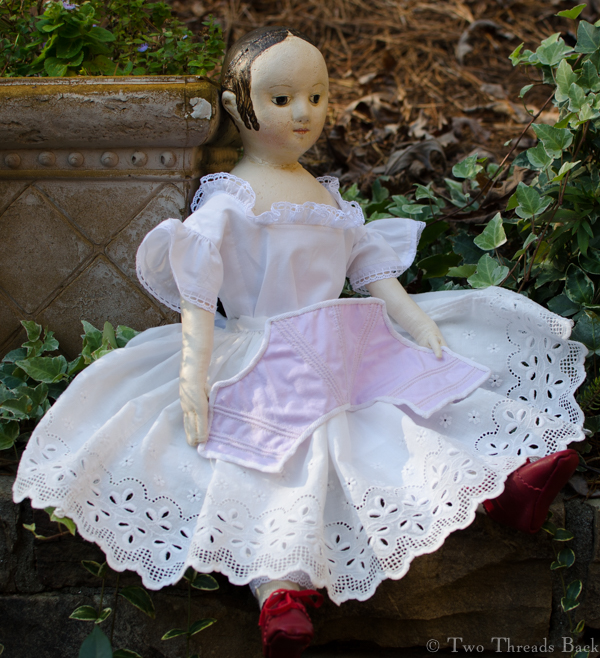
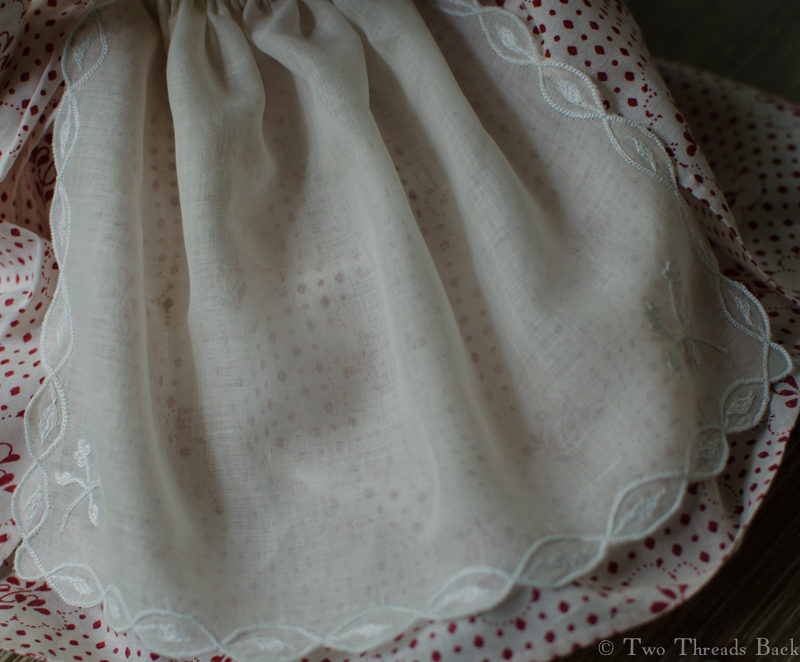
Next, Meli needed a petticoat and I needed one to copy. Unfortunately, there is a dearth of extant Regency “bodiced” petticoats. But sheer cotton dresses require petticoats, so I used a couple of tiny internet images of originals and my imagination.
The petticoat with a bodice. I made the skirt front flat and kept the gathers in the back.Yes, I skipped making any fastenings. I will eventually go back and add some ties, but I was just plain tired of the petticoat by this time! I did, however, add some stitches to protect the opening from tearing. Definitely a period technique.The finished petticoat.All undies on. Ready for the gown!
Finally (2 years later) it was time for the gown! One cool thing about patterns in books is that while costumers fret over enlarging them, doll dressers find them just right! Kinda sorta. I still had to rely on my old standbys, paper towels and tape, to get the fit.
Designing and fitting, here we go again. But the “The Heart of the Tree” provided inspiration!
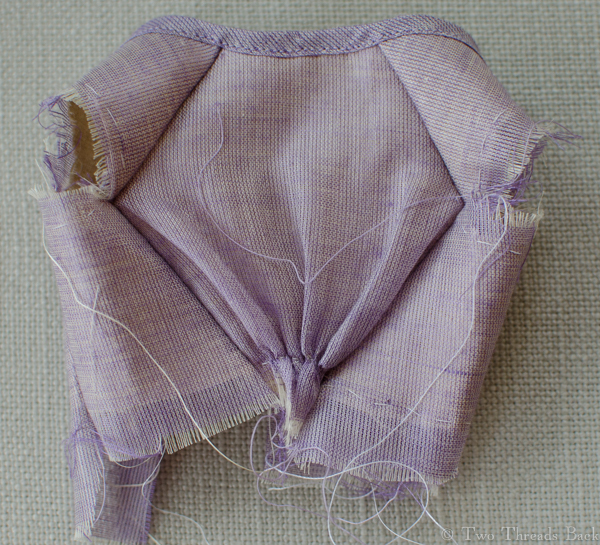
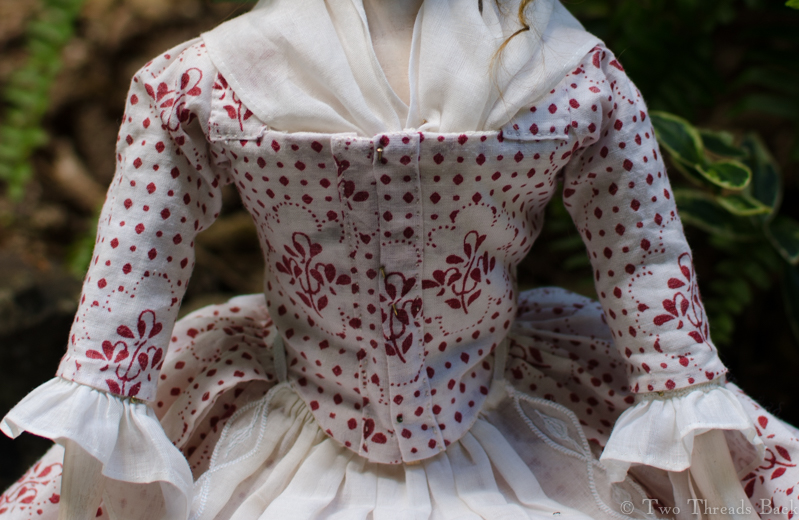
To make a pretty morning or afternoon gown (I’m not sure how to tell the difference – maybe look at what you’re wearing and then look at the clock?), I used some unusual sheer lilac cotton with a silky sheen on one side. The loose weave made it a bear to sew, though.
Can you see how loose the weave is? That meant taking really tiny stitches to prevent fraying and bad-hair-day seams. Ok, the seams were still a little frizzy.
Here’s the apron/bib front dress opened to show how it’s put together.
The bodice was the hard part. I lined it with glazed linen (I doubt I’ll do that again) and extended the lining so it could fold over to close in the front with tiny pins. The bib front is gathered and then the skirt is attached all around. The puffed sleeves are unlined. I intended to do something a little more creative than a ruffle, but I need some more practice first.
Last of all were the detachable long sleeves. They were sooo easy to make compared to the rest of the wardrobe. I should probably have made them a little longer for authenticity’s sake. Maybe another time.
Next on the list are some white muslin accessories, and then I plan to trim a bonnet, something truly millinerical. I have to say the last part of the definition quoted above really resonates with me, “Jack (or Jane?) of all trades.” And, I could add, mistress of none, but oh how much fun!
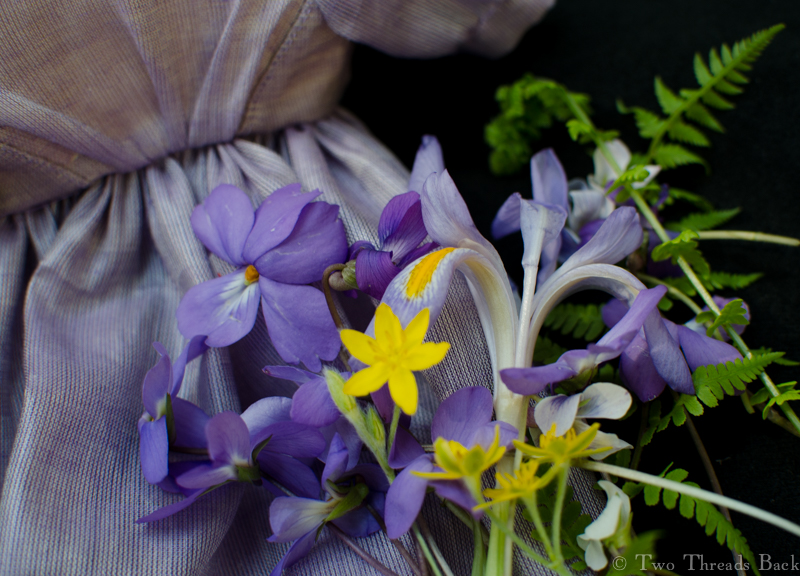
If only I could make trimmings as pretty as nature! Wildflowers from my yard – can’t do better for inspiration, hmm?
I’ll be sewing in Captain Nichols’ room, which will be outfitted for the 1910s with a 1914 hand crank machine, Miss Leah (a 1916 dress form), and an early garment drafting system that looks like a torture device, as well as all the hand sewing accoutrements necessary for a visiting seamstress.
I’ll be making doll clothes from patterns in the Mary Frances Sewing Book. Or at least fudgeling. I’m better at that than sewing!
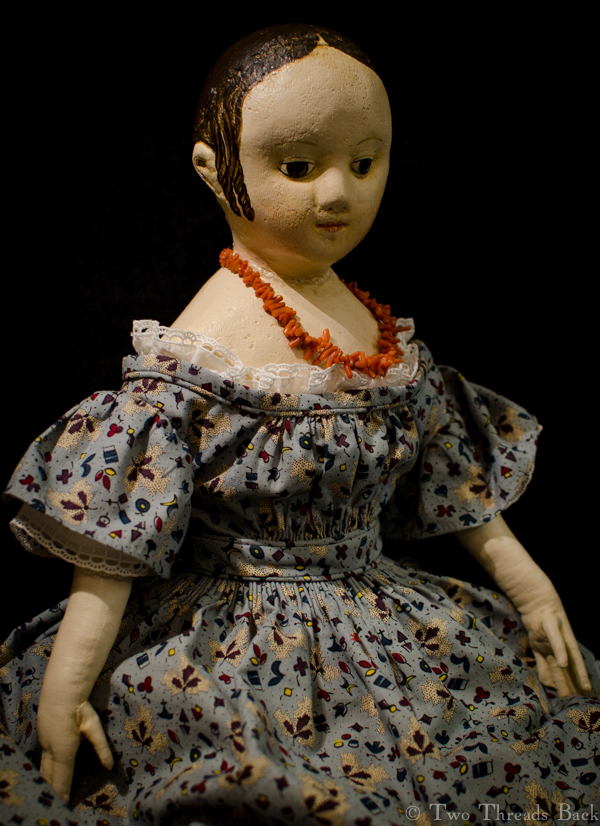
You’re never too old for dolls at Christmas! At least I’m not. I’d like to introduce Jessamine, a lovely doll made in the style of Izannah Walker, by the incomparably brilliant artist Paula Walton.
I’ve always longed for a doll like this lovely girl, and waited years before I was able to bring her home. I’ve had her for a while now, but that practice waiting has served me well – because it’s taken over a year to dress Jessamine in her first (hand sewn by me) outfit! But Christmas is here and she is ready.
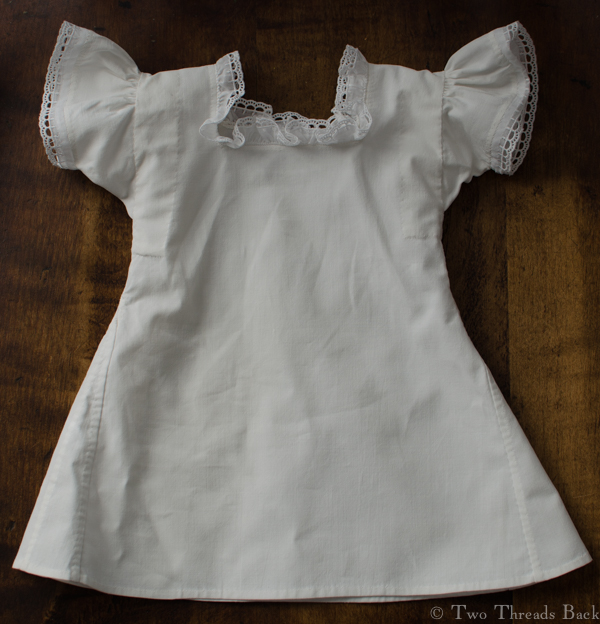
The chemise came first, and I tried to make it with the same details that a real mid-19th century young lady’s might have had: gussets, gores, and binders. I know, unless you’re used to period costume terms, they sound like instruments of torture. I guess they were, actually, for me! It would have been a lot easier to make a simple doll chemise, and from now on any others will be quite plain. They’ll have to be; this one is so bulky that a dress has to be specially cut to fit over it. Live and learn.
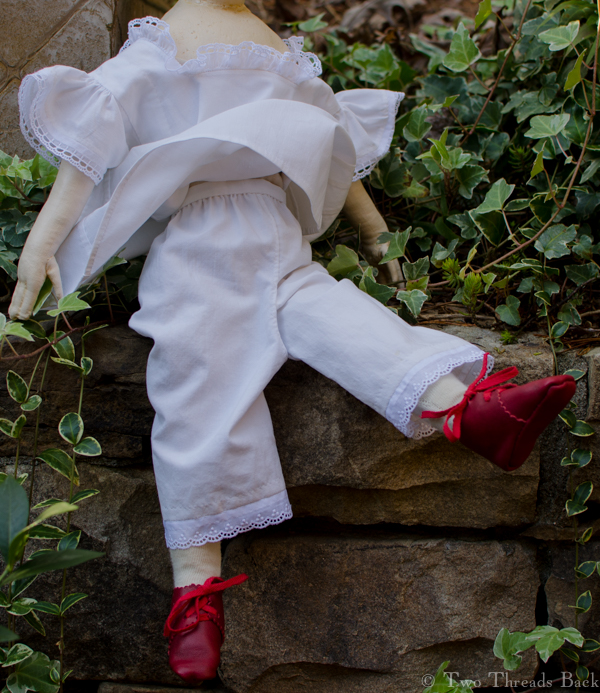
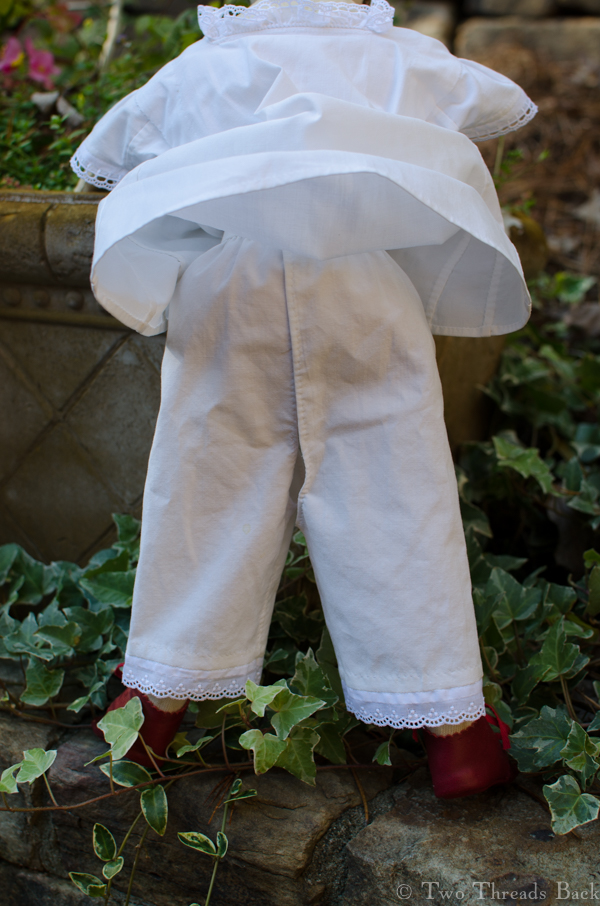
Next came the drawers. Since Jessamine is an older girl, I decided she would have split rather than closed ones. Well, really I just wanted to make them that way. Of course that means it’s trickier for her to pose with them while retaining her modesty. But we managed. I suppose you can tell from the photo that this wasn’t taken in December? And surprise – it wasn’t this year, either!
A petticoat was essential, and this one is so full that she wouldn’t need another. It was made from the embroidered ruffle of an early 20th century, mass-produced, low quality, damaged piece. The elderly lady I purchased it from was apologetic over its condition, saying she was told that her great aunt had stood too close to the fire. While it’s sad to take apart anything, thereby tearing it from its history, some things wouldn’t survive at all otherwise. (I’m sounding rather apologetic myself, hmm?) But now this scorched phoenix has a future and a past!
Every young lady would need a corset, or if she wasn’t quite ready for that, a corded waist or stay-waist (or some other term for the same garment). Even though there are a zillion doll corsets out there for inspiration, I went exploring Cassell’s for a likely pattern.
I adapted it to Jessamine’s age (@150 or so) and used the fabric from a c1900 scrapped doll corset. What girl wouldn’t love lilac stays? There was a lapse of time between the modeling session below and the actual completion of the corset. Months, maybe? But I eventually finished the eyelets and added the straps.
After many more months (Pharaby was taking all my time) I began Jessamine’s dress. The fabric was a happy accident: an online store sent the wrong print years ago, and it’s been in my stash ever since. I made so many mistakes that I lost count. Yep, sleeves again; one went in upside down. Aaaalll the seams and gathers had to be picked out and redone. What’s so embarrassing is that I didn’t even notice it was upside down until I’d done all that unstitching for another reason – to make the gathers match the other side. Duh. Maybe that was why they weren’t even?
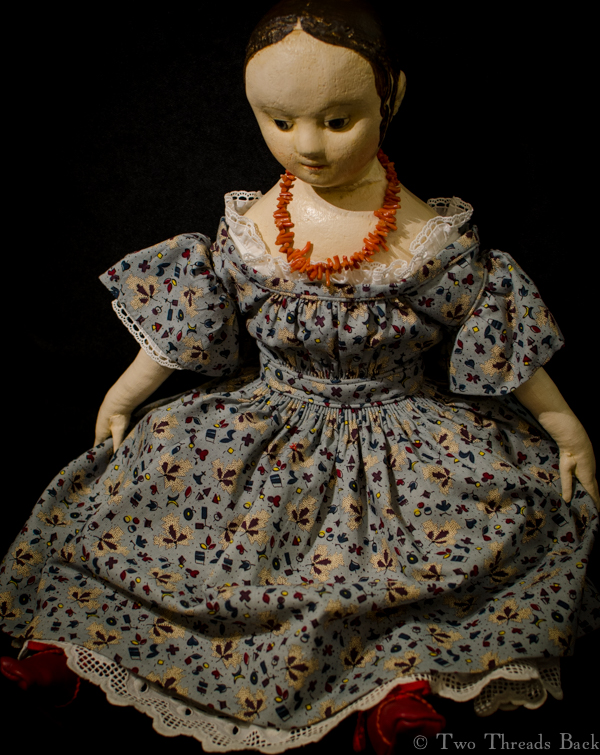
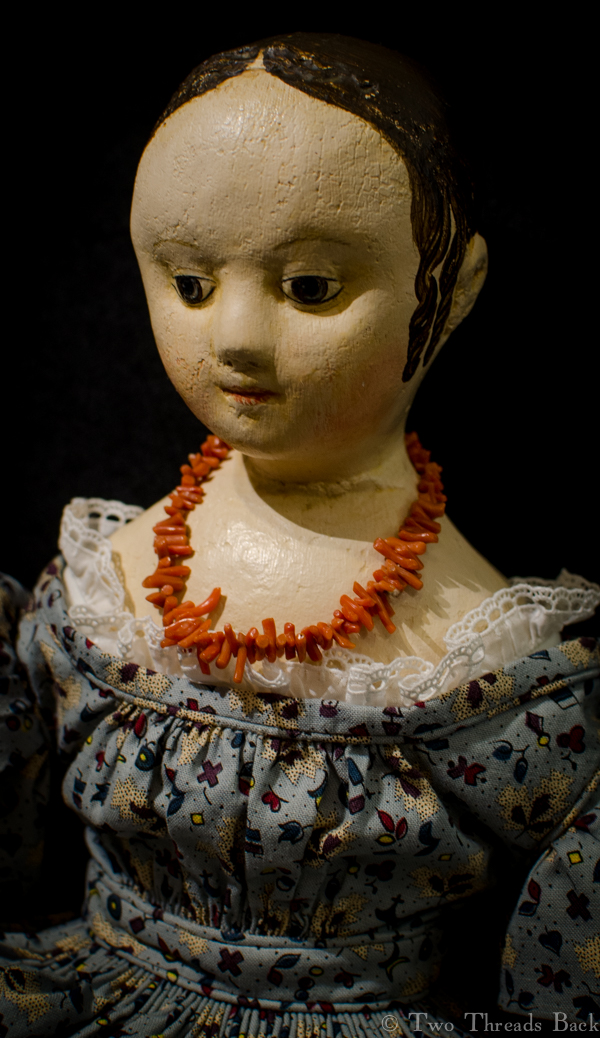
If you spend any time looking at 19th century portraits and daguerreotypes of children, you’ll notice that many (most?) girls wore coral necklaces. I was delighted to find a bargain to finish her ensemble. It was sold as a doll necklace but looks suspiciously like a bracelet. No matter. The graduated coral pieces make it look enough like a necklace to suit us just fine.
I wish I could claim credit for the pretty red shoes, but that goes to the her incredibly talented maker. Here’s a peek at Jessamine’s feet – too sweet! Transported back to 1860 as a child, I would have been sooo tempted to take her wading in the summer! (My dolls suffered worse.) But it’s December, I’m grown up, and there’ll be no such mischief. We wouldn’t want St. Nicholas to leave only a lump of coal, would we?
Pharaby, all 16 inches of her, is finally dressed. And contrary to my original intentions, this may be her only outfit! No Pharaby, it’s not you, it’s me.
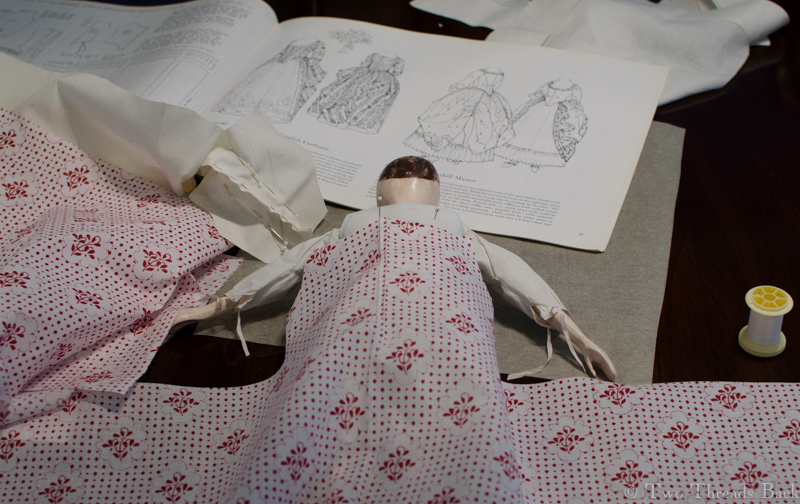
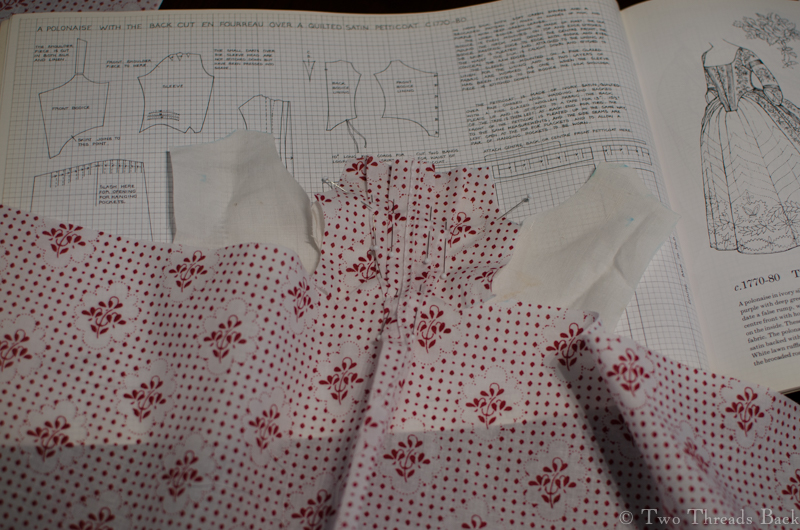
Since I haven’t posted our progress on the gown and final accessories, I decided to say it with (mostly) pictures. For the gown, I’d purchased a red and white cotton that proved not to be colorfast. Guess who has a cute little pink spotted ironing board cover now? However, I’m so in love with the fabric that I’d choose it again. It reminds me of the dress on the Dudmaston doll, seen here.
We started with the usual nightmare of pattern-making misery, as I tried to draw a bodice that would fit her form. Yes, I know some people can do this in 3 minutes or less.
It looks so simple once it’s cut. It wasn’t.
You wouldn’t know that I took a dressmaking workshop at Colonial Williamsburg a lifetime ago. I was too dazzled for much to stick. The nicest memory I have of it is their relaxed attitude toward mistakes. “Yaroo!” as Flavia de Luce would say!
When it started to look like a teensy little gown I began to get excited – motivation to see it through!
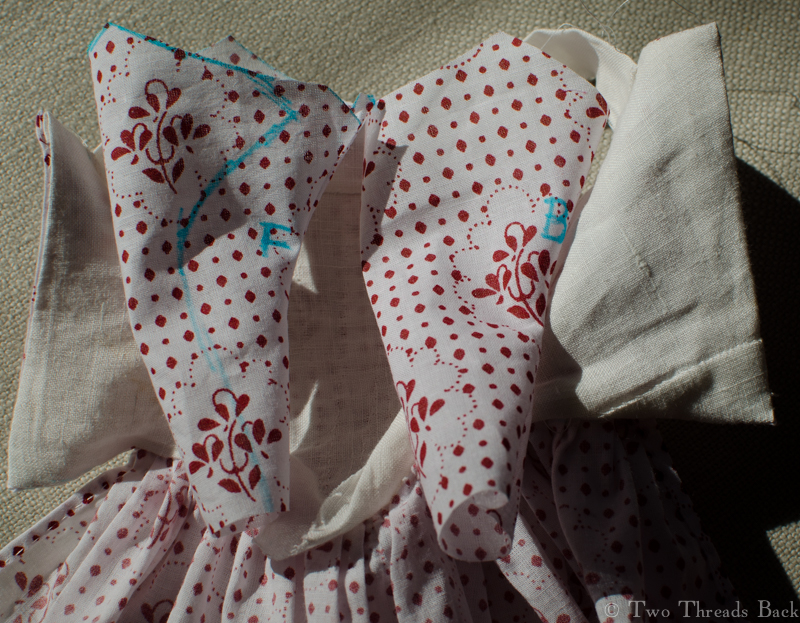
Do you know what the “F” and “B” stand for?
I had to sew the skirt to a paper strip in order to get the pleats even sort of even.
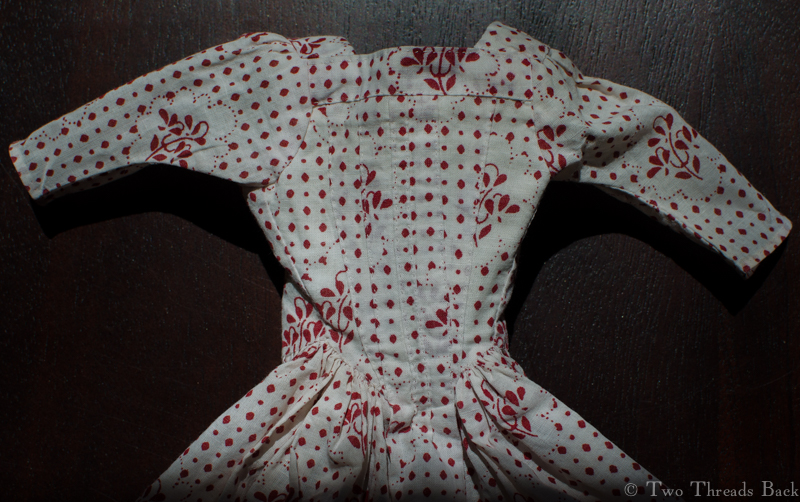
At last! The gown is finished. Or is it? Maybe you’ll notice an alteration in the final photos.
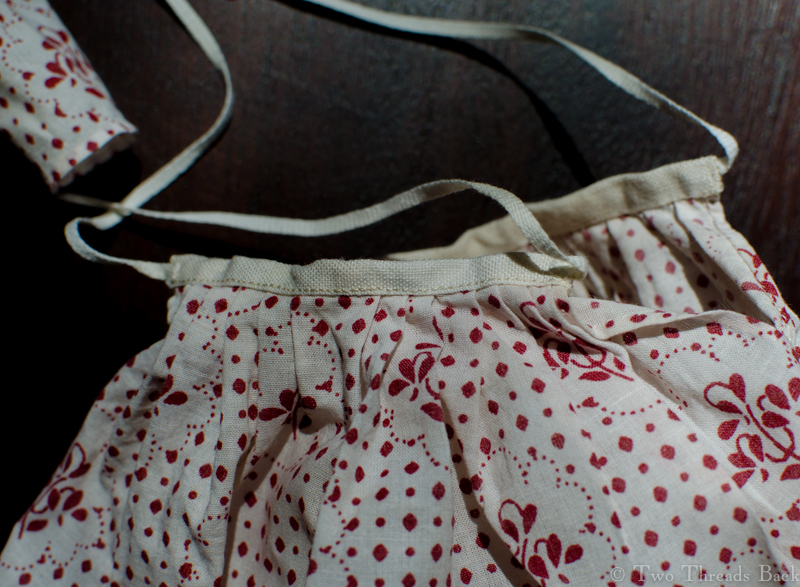
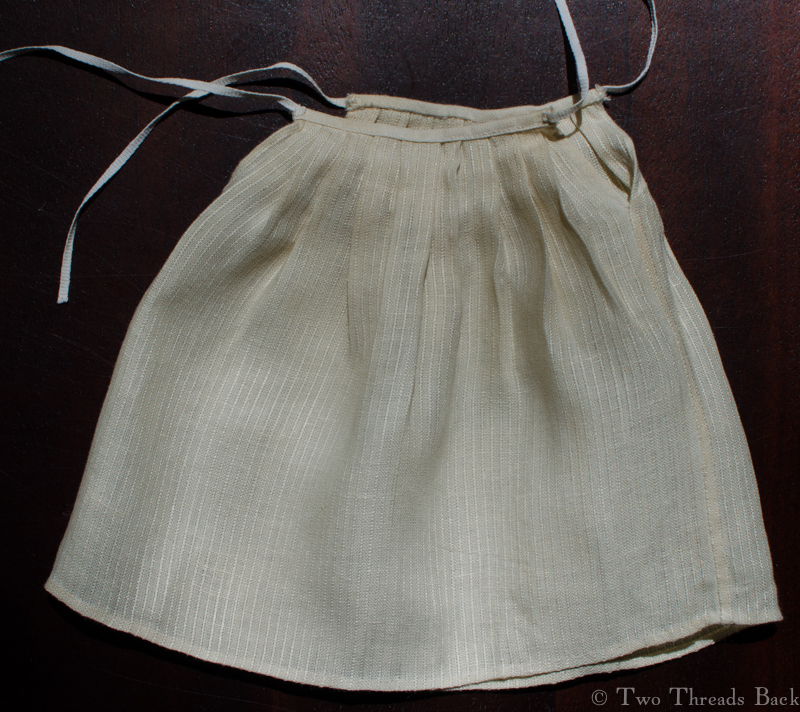
And here’s the petticoat, the only really easy part to sew.
A close-up of the gown folded open, showing the linen lining pieced just like originals could be. Theirs were probably due to a scarcity of fabric. Mine was due to inept fitting.
Gown with matching petticoat.
A view from the back.
I was complaining earlier about the accumulation of stuff around Pharaby’s middle. At this point I decided to replace the waistband on her under petticoat to make it more to scale – and reduce her girth.
With the gown and petticoat finished, I moved on to her apron. I wanted to use some original 1770s patterns for the embroidery. However … with my limited fancywork repertoire, I had to choose REALLY SIMPLE designs that could be done in a couple different stitches. Like chainstitch. Buttonhole. Running.
I scanned the original pattern and then scaled it to different sizes to find one that would work. Ok, it’s really still too big, but we settled.
The edges are buttonholed, the leaves are simple running or darning stitches, and the sprigs are chainstitch. The leaves looked horrible when I was working them, but once they were all done it wasn’t quite so bad.
The apron, modeled by Pharaby.
Next came her handkerchief (or fichu, or half-handkerchief). I didn’t do any lace or embroidery on it, since she planned to wear it tucked in. It’s made of the same lovely muslin as her apron. It’s different from her sleeve ruffles, which were salvaged from an antique piece. The older stuff just can’t be matched today, although this came pretty close!
Her fichu, tucked in place; tiny brass pins keep everything secure.
From the back, with her hircine wig curls wimping out in our Georgia humidity.
Most of my silk ribbon was for embroidery and too narrow for the cap. So like everyone else in the colonies, we had to wait on the latest imported goods to find just the right ribbon. A couple of little thread loops were required to hold the ribbon in place on the back, since I wanted it removable. And without having to pick out tacking threads!
Last of all were the shoes. I hadn’t a clue how to do them and I’m afraid it shows. This time I didn’t even bother reading or watching tutorials. I just jumped in with both…hands. Pharaby’s poor little feet are only an inch and a half long, and unique. I don’t mean compared to other doll feet, I mean compared to each other. So I made paper ones for patterns, and then used silk scraps and lined them with linen. They’re green because that’s what I had, and I happen to adore green shoes. They’re bound with blue ribbon because the only ribbon wide enough was some left from her cap!
She has Cinderella tendencies. The right shoe occasionally goes its own way when we’re not looking.
The soles are made from bits off a leather apron. I’m a little embarrassed to show them since they fall so far short of the exquisite slippers I’ve seen done by experts. But everybody needs shoes to relax in and not worry about spoiling. Right?
Pharaby practices directing traffic or perhaps gazes blankly at a wall of ivy, so that you may see her from the back. She’s wearing her bum roll for a little poofiness in the petticoats.
So Pharaby’s finished, for now anyway. She’s very dear to me, after this long adventure. And she’ll always be a reminder of my father’s love of fun – and love for me.
In honor of Mother’s Day, I thought I’d share one of my happiest memories. I don’t have many things saved from my childhood, but I do have this beloved dress made by my mother. Barbie was the doll when I was growing up, and oh how my sister and I loved playing with ours!
We put them through the tortures and triumphs of every book or TV plot we knew – and invented even more. They pioneered across raging rivers, got lost in space, and escaped drowning in birdbaths. Once we discovered that flour paste hardened into the perfect cast for a broken limb, our poor Barbies fell out of so many trees that they looked like mummies on crutches.
But best of all was dressing them. You hadn’t really played Barbies until you’d changed their clothes at least a dozen times. One special Christmas my mother made Barbie clothes for us – and if you have two little girls close in age, you don’t make a few different ones for each child. You make two of everything, both alike.
To a seven year old, surprises just happen. I never wondered how the splendid array of doll costumes came to be under the tree. But my mother told me later that she had to sew late at night, after we were asleep. Two. Of. Everything.
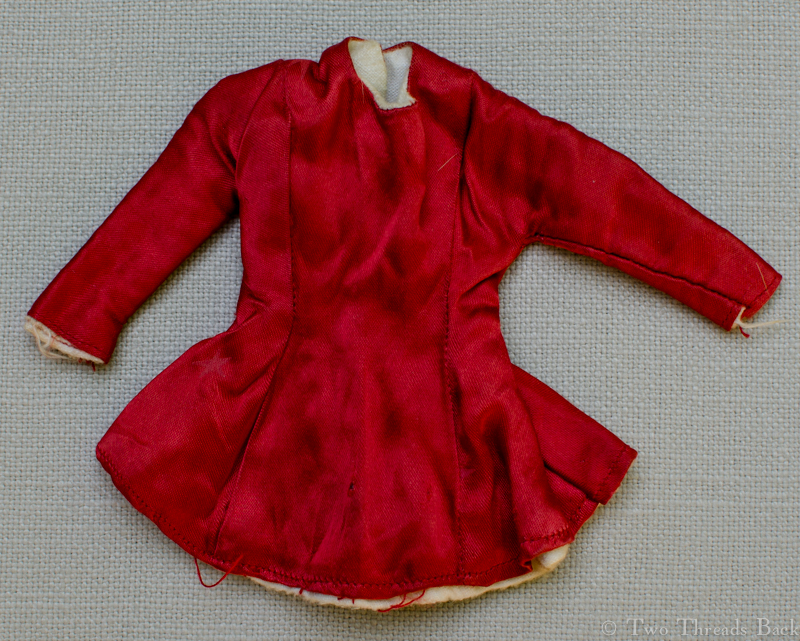
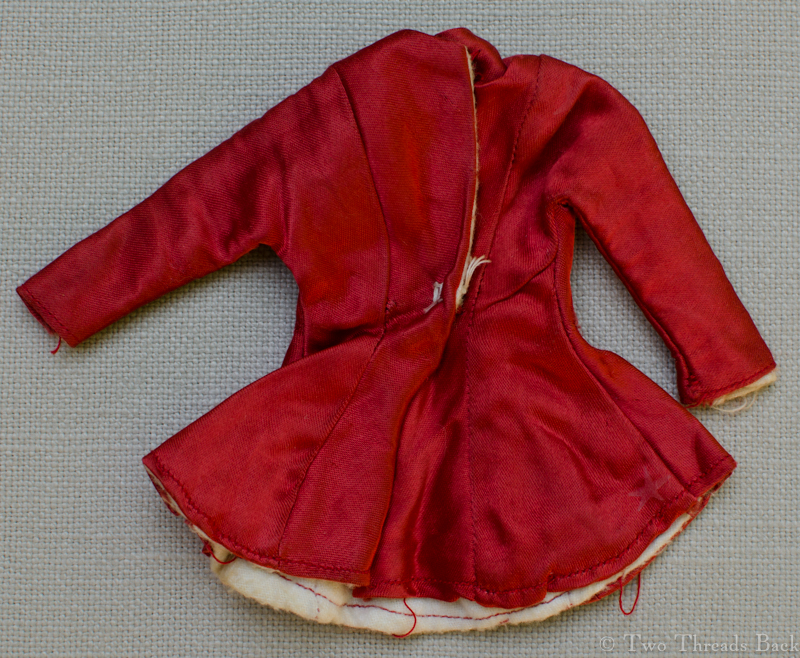
Here’s the skating costume that she made out of red satin, lined with white flannel. She couldn’t have known the night she sewed this that her work would still mean so much, so many years later. I’ll be sure to tell her today.
Actually, that should be “Pharaby Sets Her Cap Aside” – for now, anyway. I haven’t completely neglected Pharaby all these months, but sometimes remembering to take photos, and then remembering where I saved them, delay my writing about her wardrobe’s progress.
This project also took longer than I thought it would. It was hard figuring out what I wanted her to wear. Most surviving Queen Anne dolls just have little bits of lace and silk gathered and stuck atop their heads, or if they’re wearing more constructed caps, the photos don’t show sufficient details for me to copy. And sometimes the surviving headwear is not original to the doll, being so obviously 19th century that even I can tell!
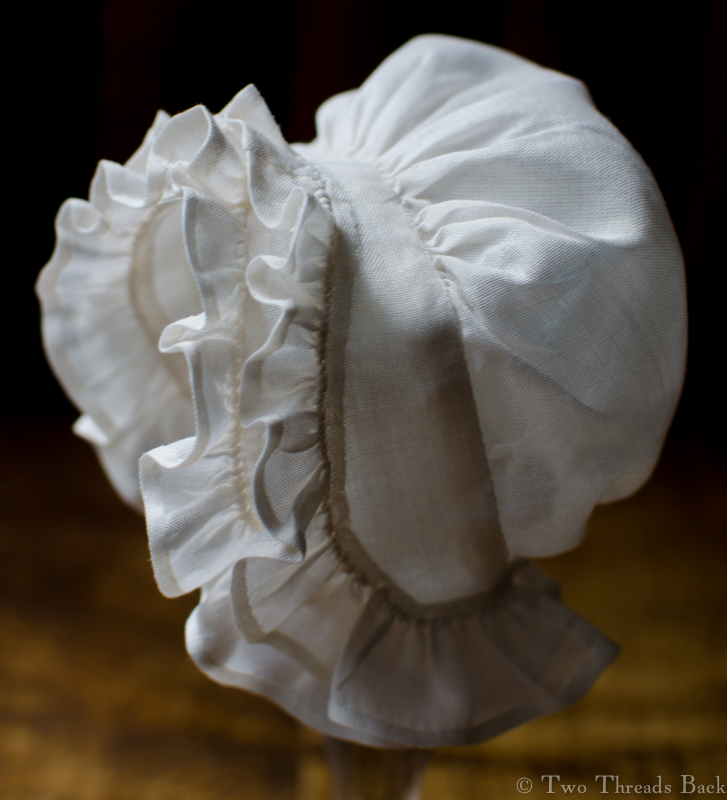
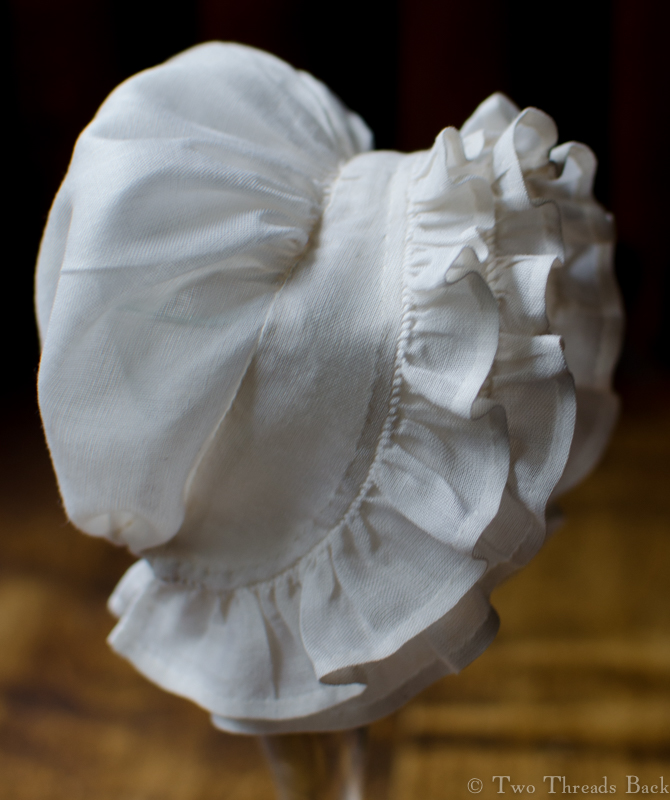
In the end I decided on this style, because it was easy to make a pattern and I’m familiar with the sewing techniques. The cap is formed from a simple half circle gathered at the base of the neck and the crown and trimmed with plain frills.
I did experience one of those aha moments when attaching the headpiece/band/brim to the crown. It was easy to “set in” the little gathers on the top thanks to the fact that the band was double. It worked just the same way as setting a gathered sleeve into a cuff! Maybe that’s why they so often had double brims?
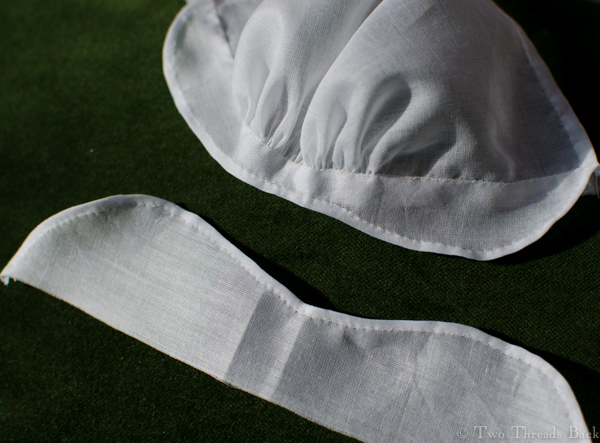
My attempt at narrow hems was a flop, at least compared to what 18th century women could do. But I did manage a very nice tiny eyelet for the back drawstring. It would have been nicer if I’d also remembered to put in the strings and tack them in place before I hemmed the casing down! Did you know that you can thread a large needle and retro-fit a string into a casing?
Perhaps you’ve noticed none of these pictures show Pharaby wearing the cap? That’s due to my inadequacies as a perruquier. Every time I place something on her wig and then remove it, a few mo-hairs (groan) come loose from the carefully arranged style. In order to keep it all together until her final dressing, I had to limit the try-on’s. Pharaby won’t be modeling her cap for a while, so I let a wineglass serve as a mannequin – and then serve to celebrate one more project done!
(If you expected the Lucy Locket quote on this one, maybe I succeeded in surprising you?)
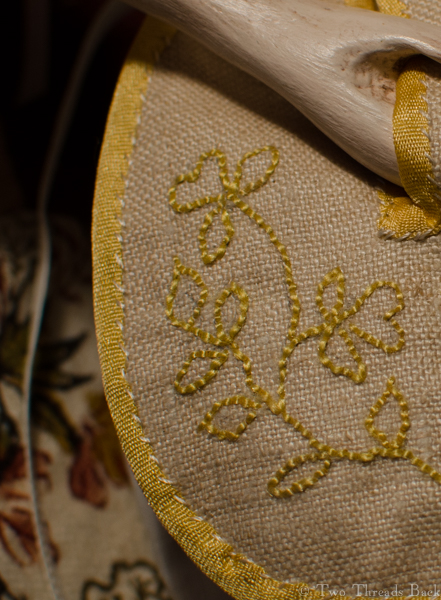
There are so many images available online that it was hard to choose a model for her pocket. I finally settled on “the look” of a sweet little doll version in the online Pockets collection at the VAD. (Click the link and then search for “doll´s pocket Nottingham.”) It resembled a couple of others, also worked in yellow thread, that were made for women rather than dolls. And it only required a backstitch!
The pattern: traced, pricked, and pounced. The fluff of canary-colored silk is the remains of my fight with the floss.
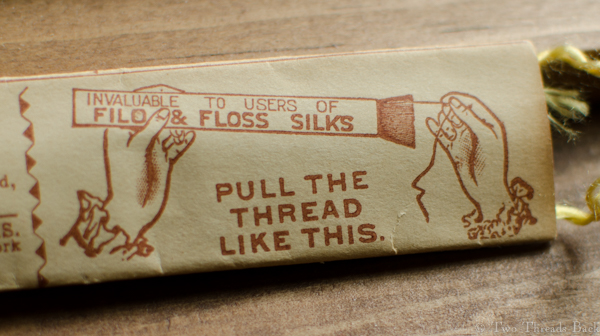
The design I used was loosely based on an 1770s pattern from The Lady’s Magazine. I scanned the original pattern and scaled it down to Pharaby-size. Then I raided a stash of old 1890s embroidery silks. I tried using the thread as it came from the skein, but it was way too thick – using only one ply made it almost small enough. And I can tell you that it did NOT work like the illustration on the wrapper!
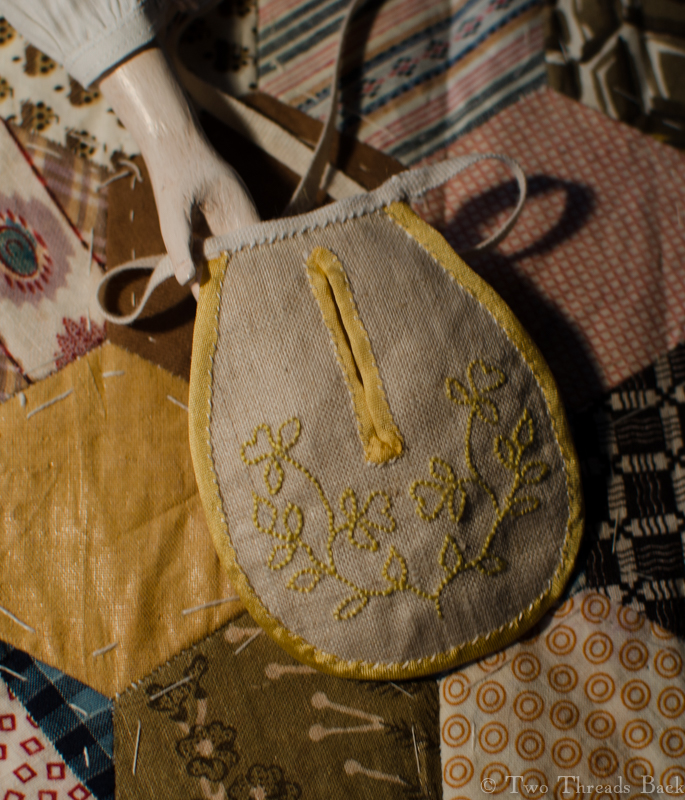
As you can see from the remaining yellow fuzz, it was a struggle. But once that was done, it was pretty simple to cut out the front and back, then bind them with some matching yellow silk.
I tried. It didn’t work like the picture.
To finish the pocket, I added narrow tapes on the ends. Yes, one MORE thing to go around her waist. But now she has a place to carry her handkerchief – when I make her one.
Oh! And while she was showing off her pocket, I took a picture of her wearing her marked shift. I neglected to do that in the last post, and she let me hear about it.


 And one last peek at a project that really took my breath away –
 I’m so excited to have a new doll to dress. It’s not easy for me to sew tiny things, so I’ll have to take care that it’s one my Hitty fits!