Yesterday a friend sent me a link to the most exciting news I’ve seen all year. Mr. Darcy’s Shirt is coming to the U.S.! Yes, you can forget Tutankhamun’s treasures or the Beauty of Xiaohe. Mr. Darcy’s shirt outranks them all.
Who can forget the (totally not in the book) scene from the 1995 Pride and Prejudice film where Mr. Darcy rises from the lake at Pemberley after his swim, only to run into the startled and stunned Miss Elizabeth Bennett? Be still my heart.
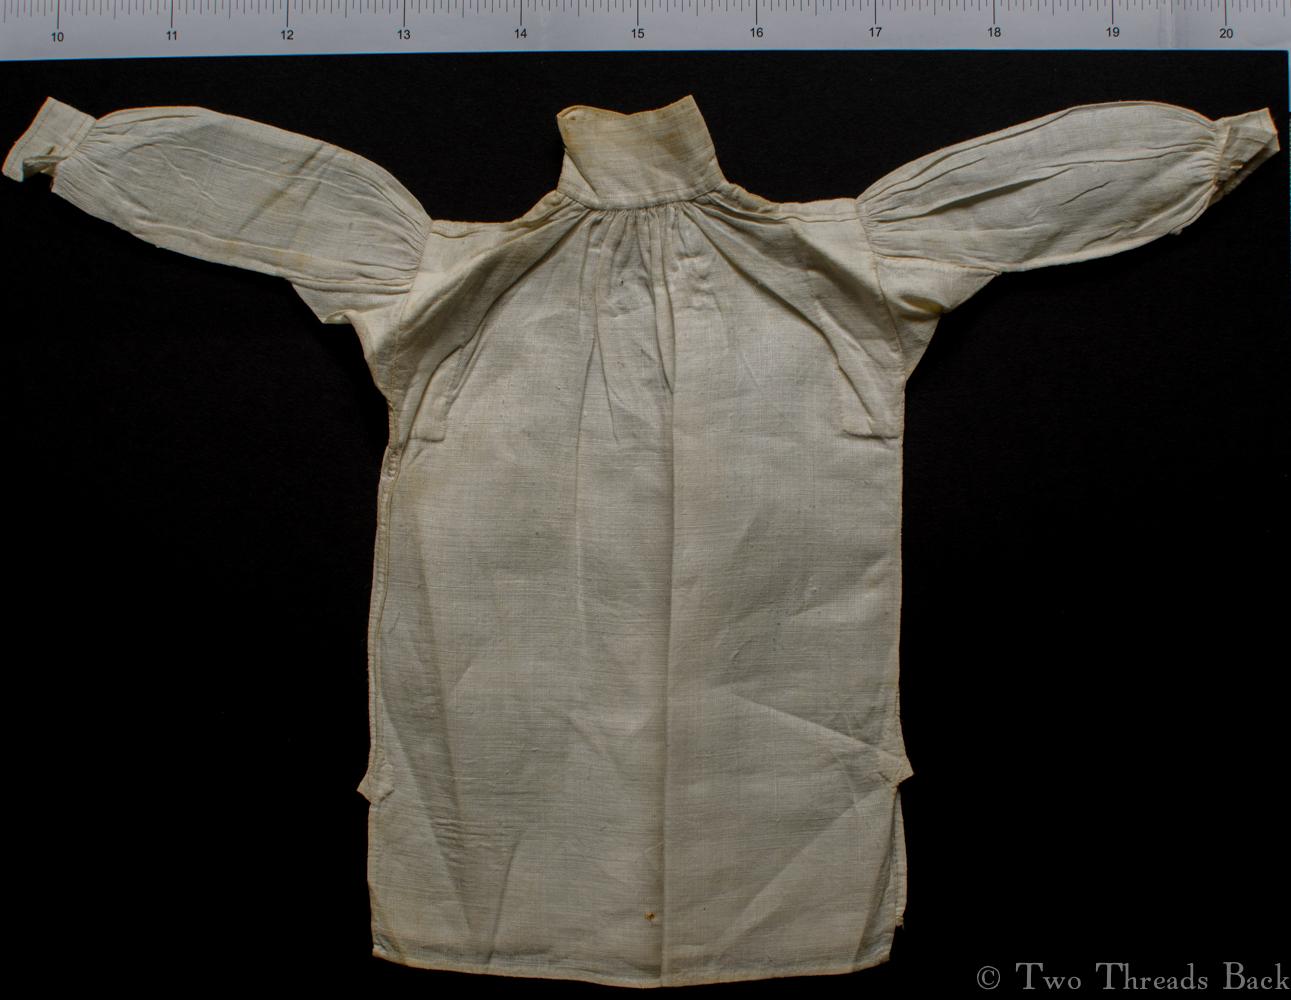
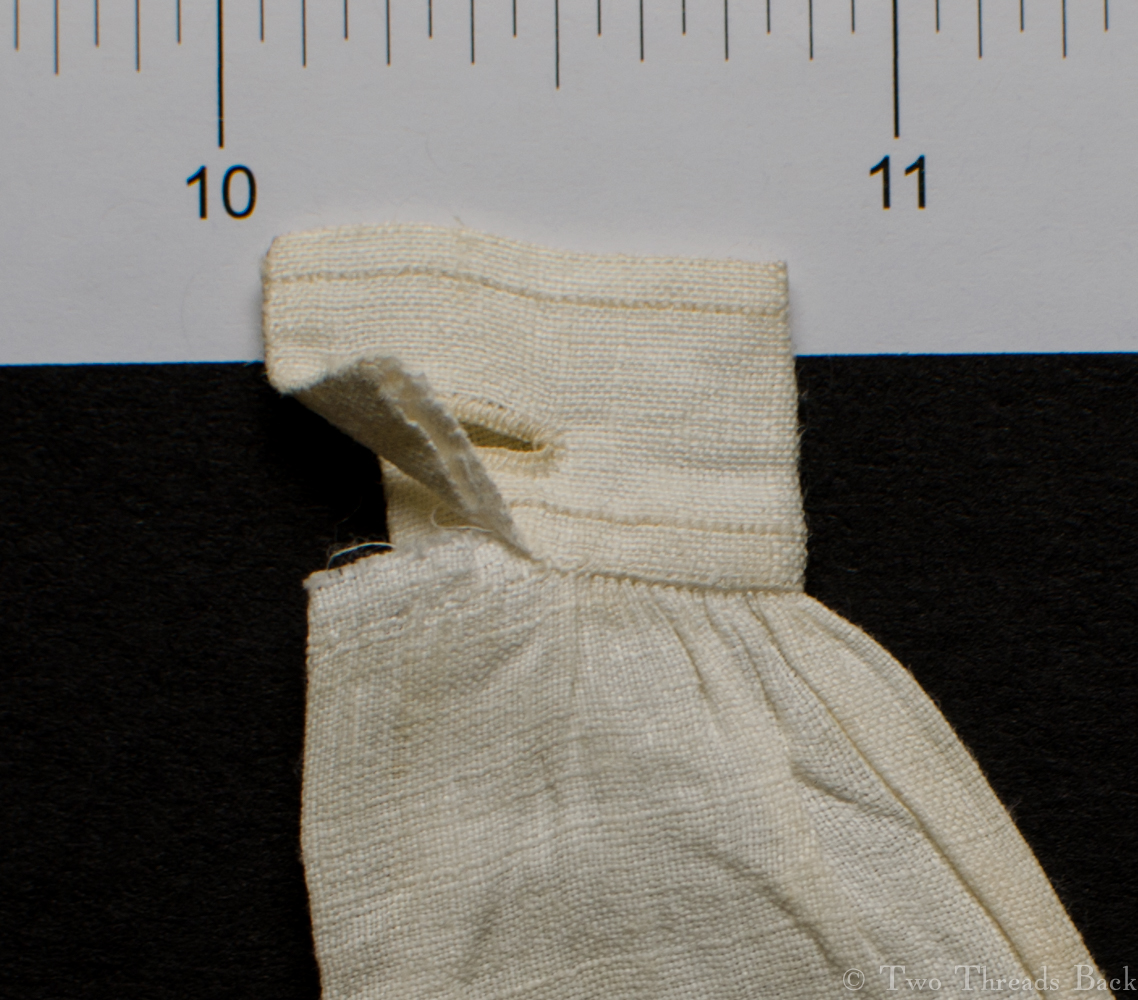
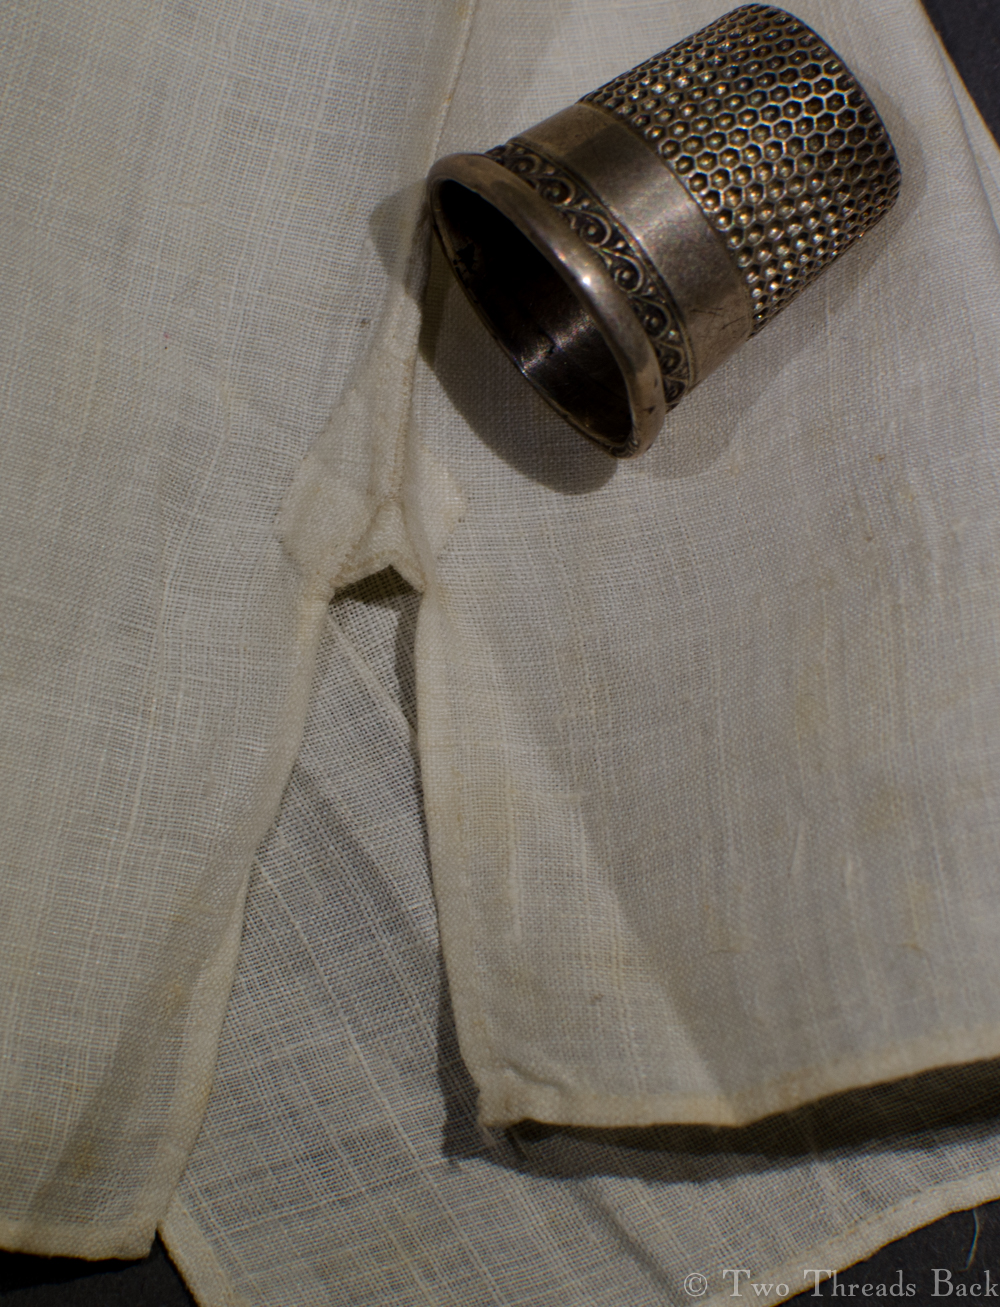
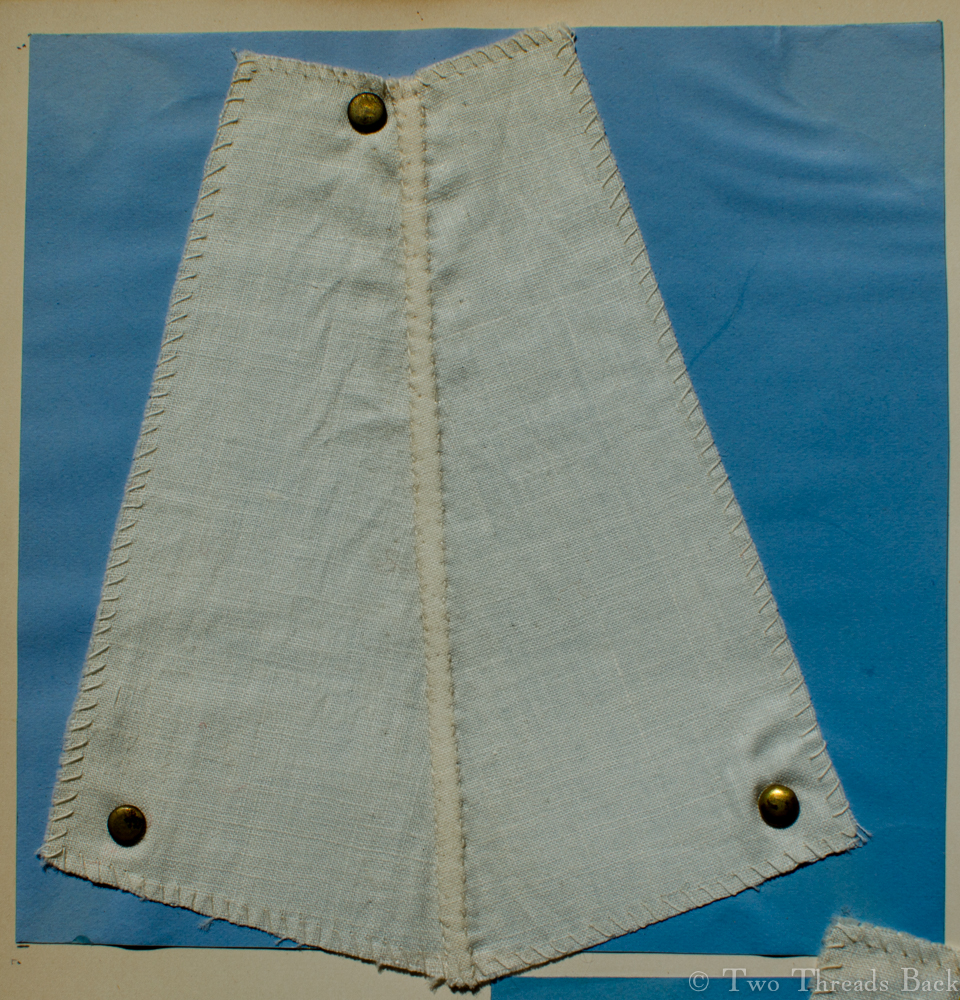
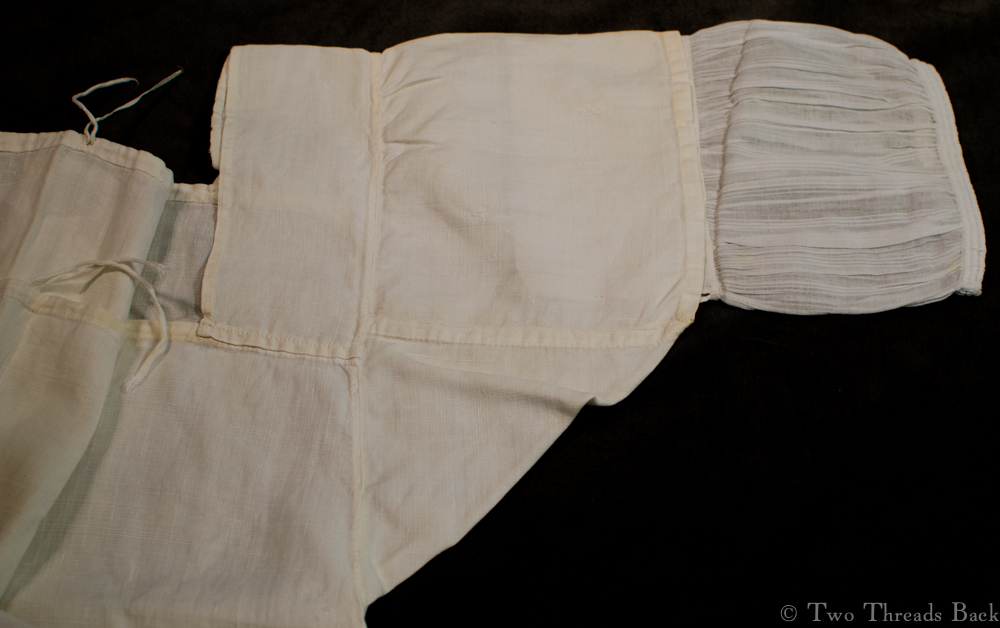
Unfortunately I won’t get to see the celebrity shirt on display, so I’ll have to content myself with a miniature version. This is a tiny “sampler” shirt dated 1838, very much like the square-cut linen one that embarrassed the soggy Colin Firth and melted the rest of us.
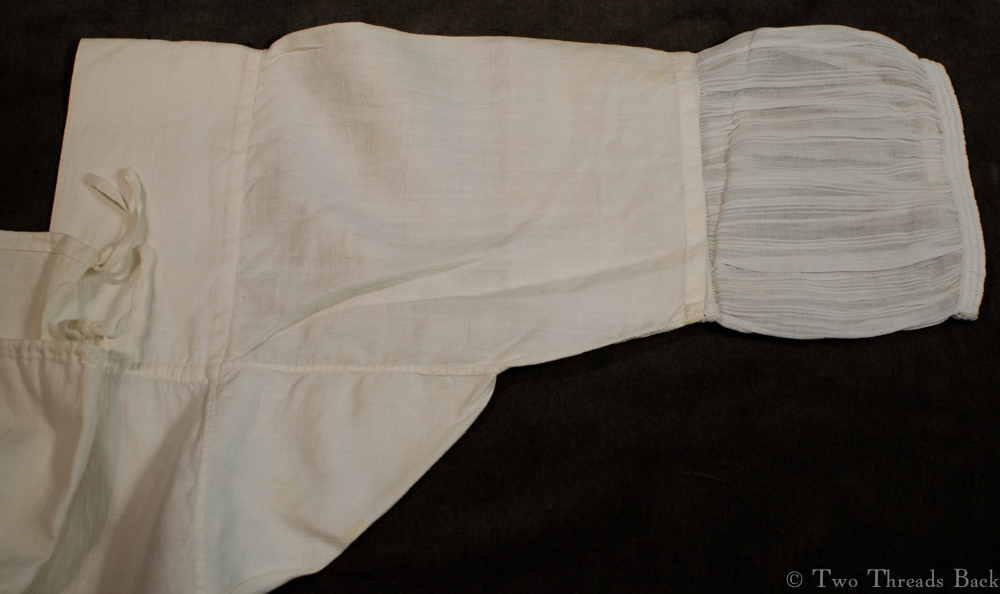
It measures 7 inches from the top of the tall collar to the hem. The cuff is 1 and 3/8 by 1/2 inch. The backstitches per inch are so small that I cannot count them. There are microscopic gussets on the collar, the sleeve openings at the wrists, and the side flaps. Oh, and of course there are the underarm gussets that are a whopping 1 inch long.
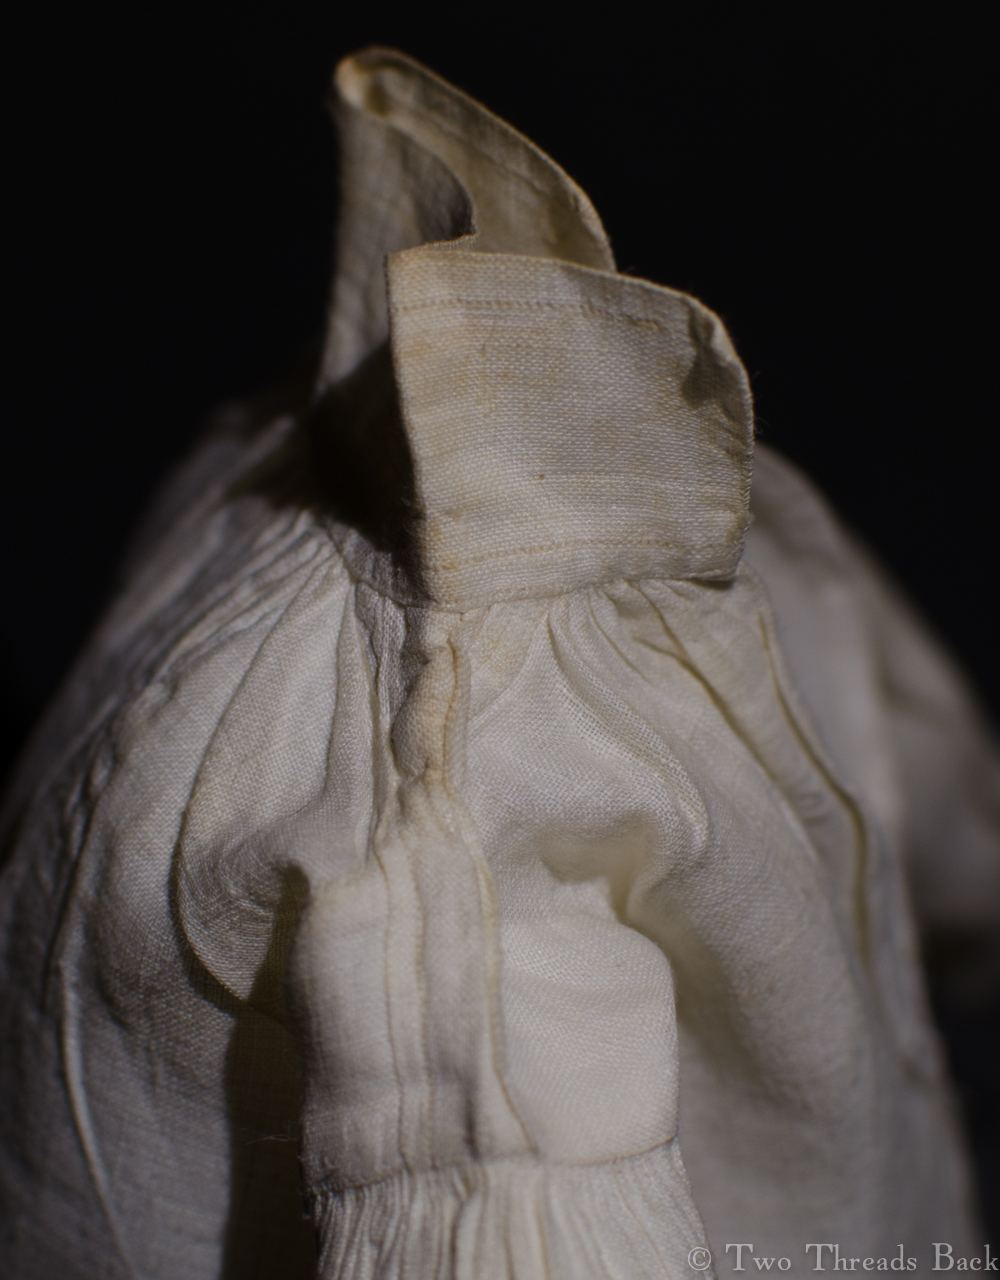
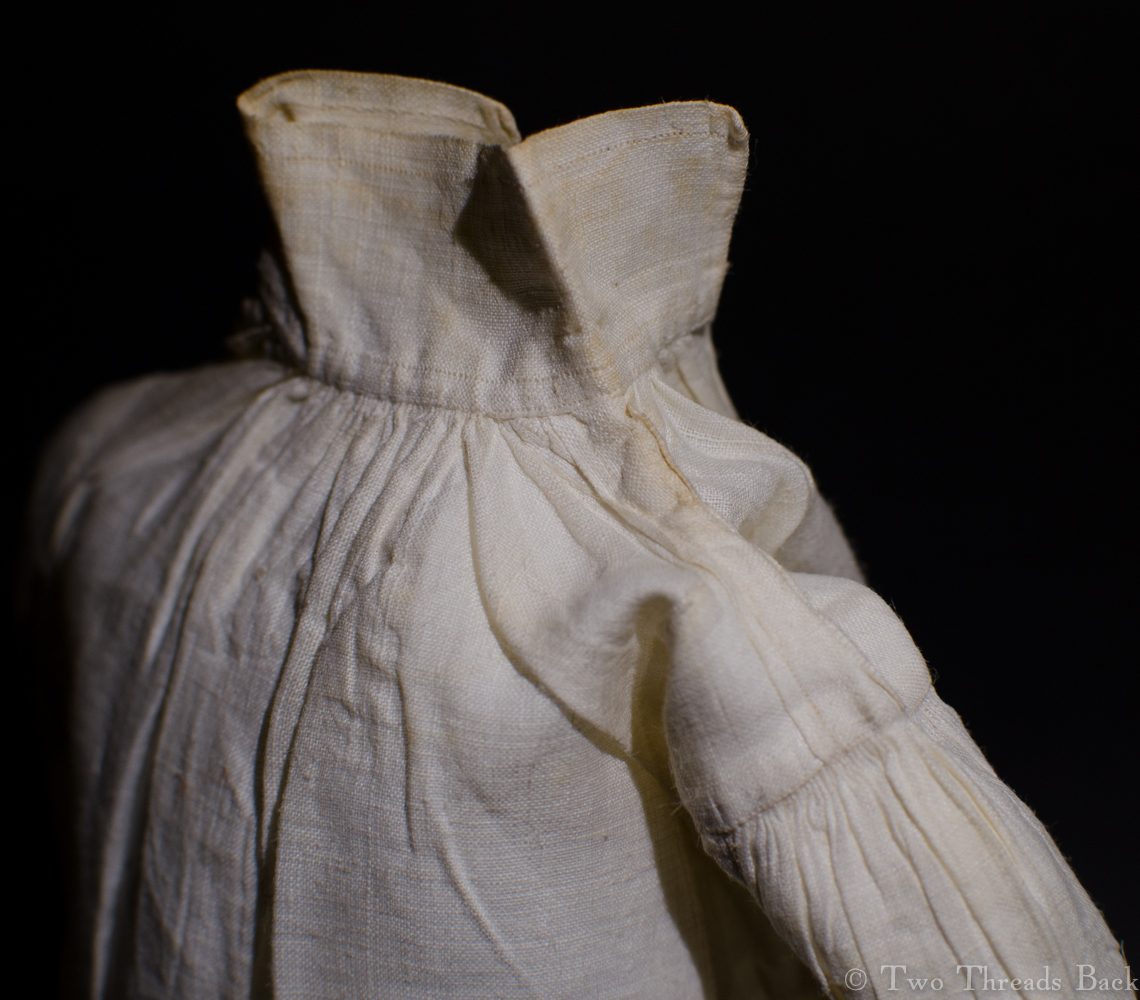
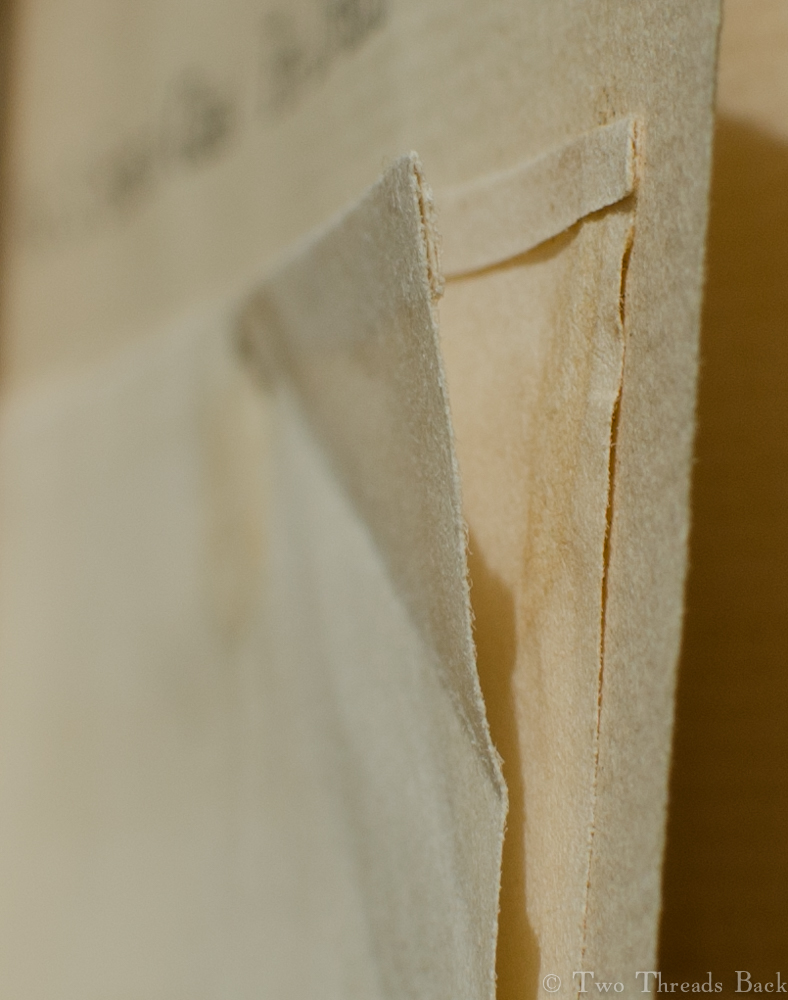
The back – notice the “binders” which line the armscyes inside the shirt.Here you can see the tiny collar gusset, over which the “shoulder strap” lies.A view of the shoulder strap which is backstitched on both edges.
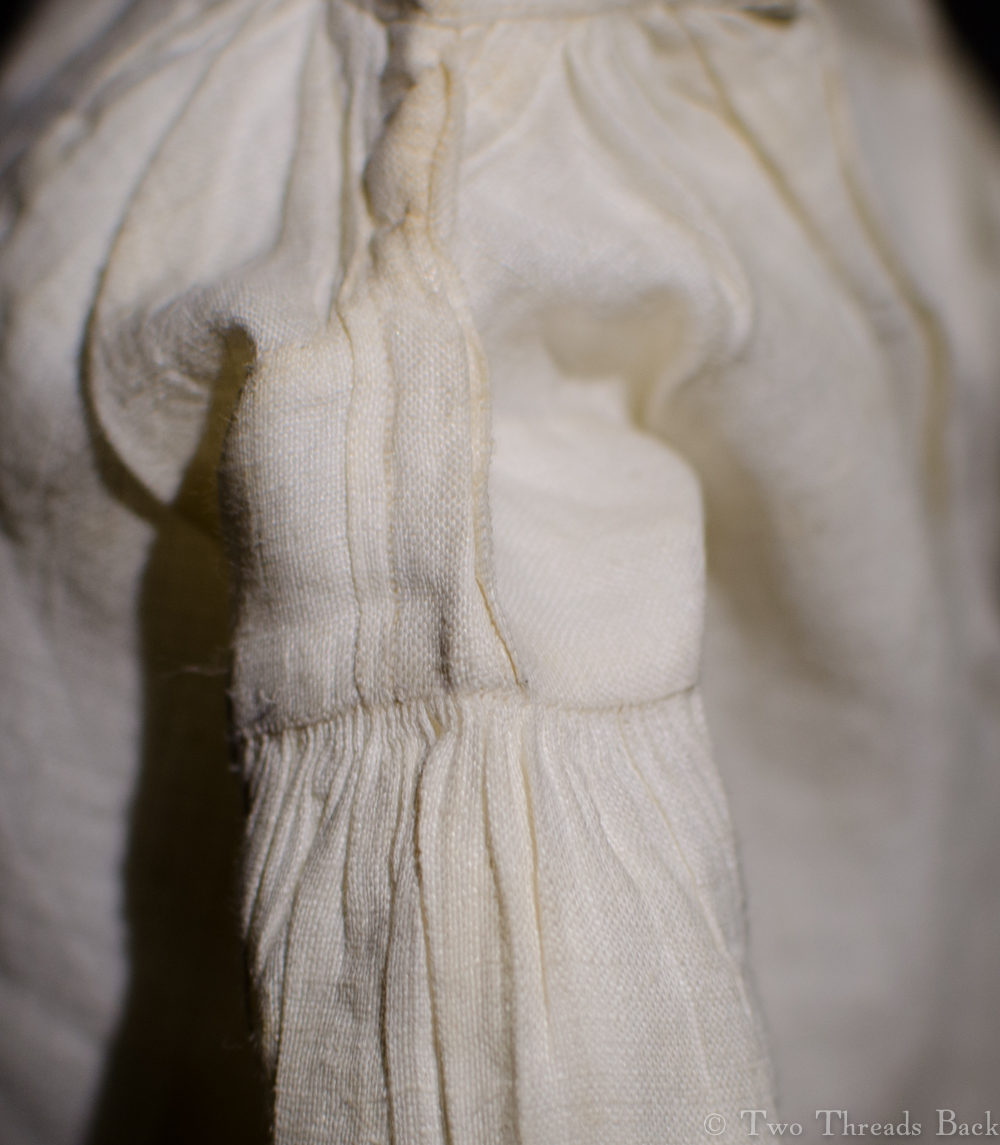
The sleeves are set into the body with gathering and stroking.You can barely see the diminutive gusset at the end of the sleeve opening. Its purpose was to allow ease, so the shirt would be less likely to tear at that joined seam.This cuff has come unstitched, and you can see how tiny the sewn gathers are.Here is a view of the gusset for the side flaps of the shirt, also meant to reduce tearing and the seam.
Colin Firth in a wet linen shirt, or a sampler made by tiny fingers in days long gone? I don’t know which one makes my heart beat faster: the man-sized or the miniature. But who would shrink from a closer examination of either?
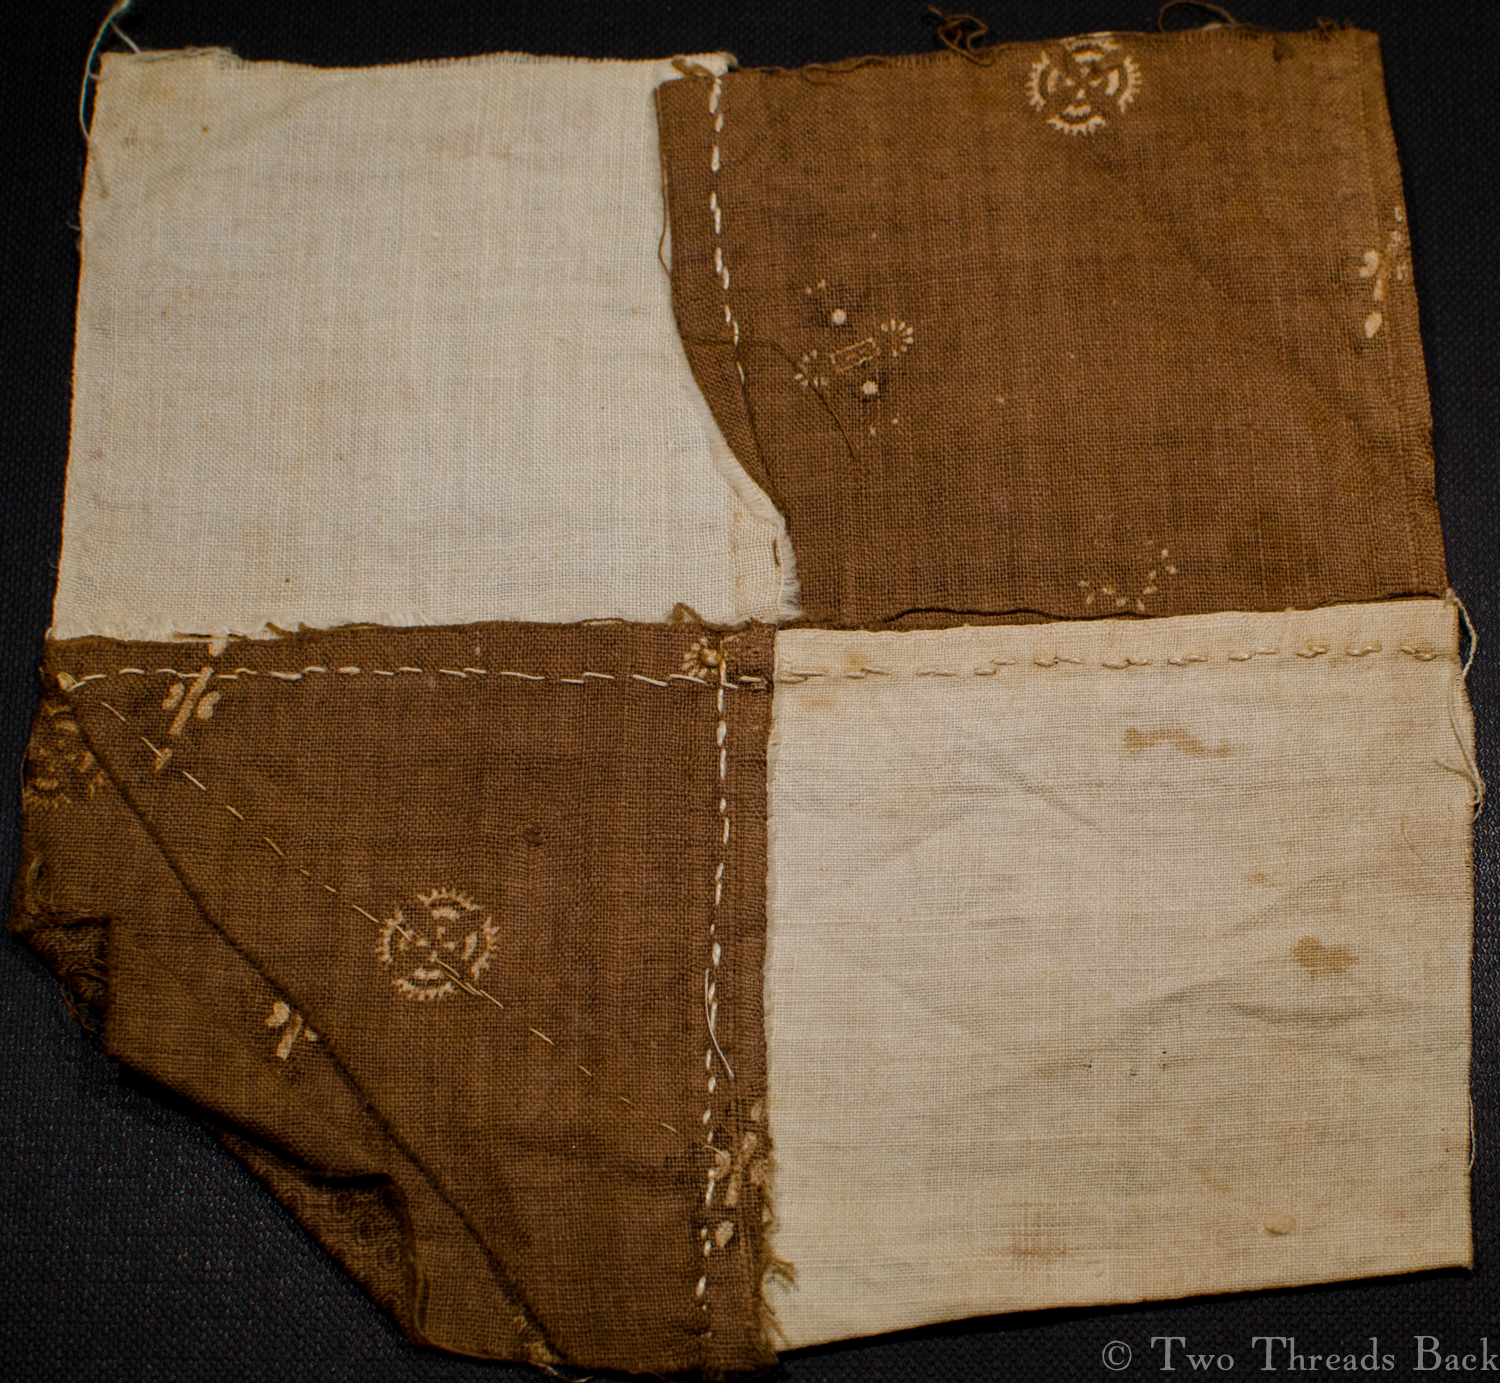
Mary’s neat sewing, with the squares joined by “seaming.” The finished block measures 5 1/2 inches square.
There once was a lady who lived and sewed in New England, way back around 1810. She had a little girl who wanted to help, and so she taught her how.
This lady (I’ll call her Mary because there’s a 27.4% chance that was her real name) was making a simple quilt out of four patch squares. Calico was dear, so she used every teensy scrap she had to make the patches.
This is a view of the back showing Mary’s careful piecing. The narrowest blue striped bit measures 3/8″ inch, not including the seam allowance.
She gave Betsy (I’ll call Mary’s daughter Elizabeth because there’s a 14.3% chance that was her real name) some squares to practice on. Betsy wanted the pretty patterns to work with, but Mary was reluctant to use those for lessons, so she compromised. One print, one plain.
Betsy’s finished square. Do you notice something a little odd here?
Well, Betsy finished her block, and Mary finished 89 others. Then she packed them all away. They were never made up, but remained in a box in the attic for 200 years. Don’t you wonder why?
Betsy’s work from the back. Yes, her stitches are a little clumsier than Mary’s, but she was learning. And they’re straighter than mine – go Betsy!
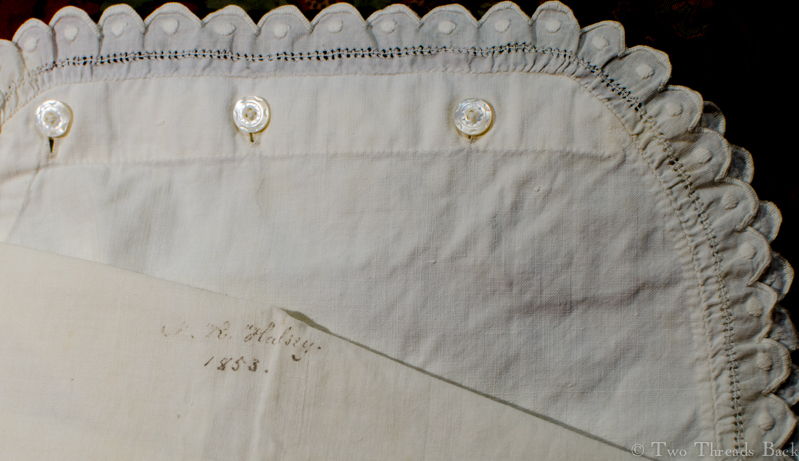
A cotton chemise, unlike either the French or English styles below. I’m going out on a limb here and guessing… American, 1853.
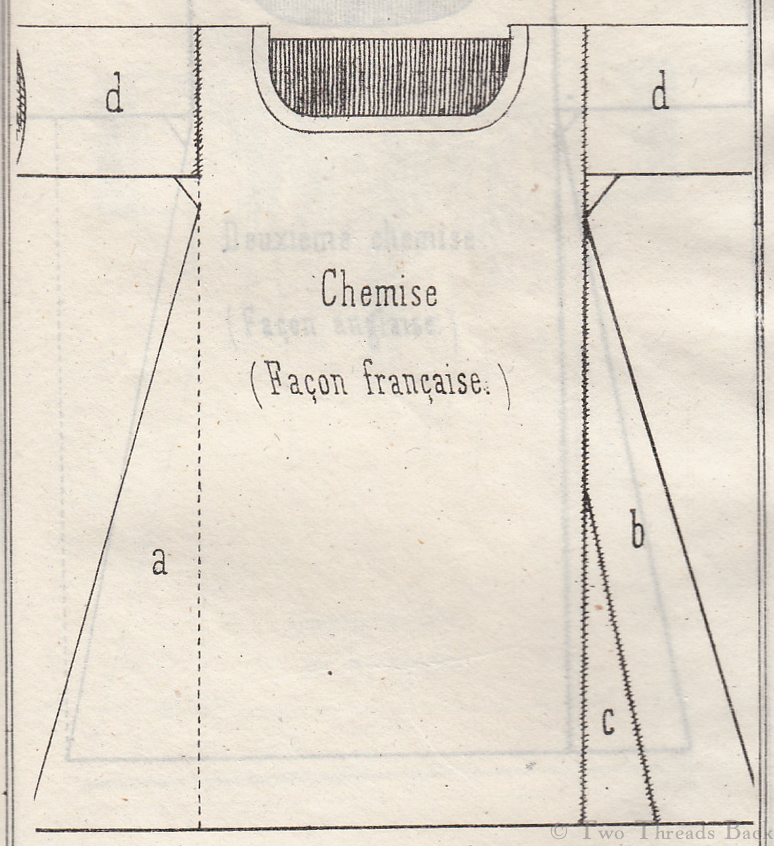
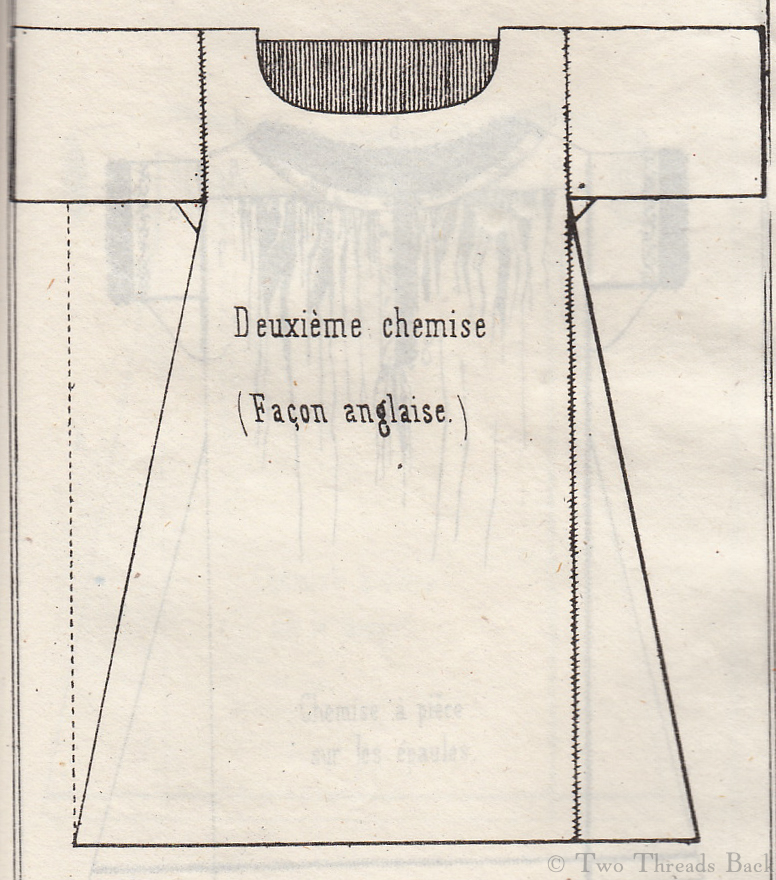
Wouldn’t you know it? Maybe there’s a Murphy’s Law of blogging. Just after proclaiming in my last post that there were no noteworthy distinctions in French and English chemises, I came across the illustrations you see below.
The only difference mentioned in the accompanying text is that the English style is for “skinny persons.” There may be more clues in the cutting directions, but with no knowledge of French, I’ll have to let that pass. The book was published in 1847, and is surprisingly primitive, at least compared to the detailed and beautifully illustrated French magazines of the same period.
However, I still can’t determine that English-made shifts were of one particular pattern, and the French used another. It seems more likely that a lady cut her shift and its gores according to the size of her fabric – and herself! But in the interest of Truth in Blogging, I submit the following:
Chemise Francaise. Of course it looks more complicated – they have a reputation to uphold.Chemise Anglaise. No nonsense, for skinny persons.
Language is a funny thing. I suppose we’re all guilty of following fads in our choice of words, and we all have particular phrases we find irritating or amusing – in other people. I recently came across an example by Jane Austen, written in 1817, just as the polite name of a woman’s undergarment was changing.
So presumably Miss Austen was still wearing shifts, when other ladies were beginning to wear chemises. She wasn’t alone, however, in her annoyance with linguistic affectations. Pantalogia, a New Cabinet Cyclopaedia, Comprehending a Complete Series of Human Genius, Learning, and Industry, Alphabetically Arranged; with a General Dictionary of Arts, Sciences, and Words (1819) has this to say:
CHEMISE, the French word for that article of linen under dress which when worn by men is called a shirt, by women a shift. Some few modern English ladies, with an affected squeamishness of delicacy, restrict the term always so as to denote the article of female dress chemise de femme; but as every one knows what they mean by the expression, and we see no reason why every one should not know what they mean, we recommend the use of the old English term, and the abandonment of the corresponding French word.
Was there really any difference between a shift and a chemise? Well, yes and no. No, because they both referred to the same lady’s undergarment. Yes, because when the word “shift” was used (up until the early 19th century), the garment was usually made of linen and was simpler in cut. As the word “chemise” became standard, variations in pattern and trimming were increasing and the chemise was more often made of cotton.
So much for the term; now was there any significant difference in the French and English methods of making this garment? I haven’t found anything consistently, unmistakably, irrefutably, definitively identifiable. When I examine an old chemise, whether in a book, online, or in person, I can’t raise an eyebrow knowingly and say, Ah yes, English, 1832.
But with the interest and expertise I see popping up in blogs and books, I wouldn’t be surprised if someone has – or will – come up with a list of distinguishing features.
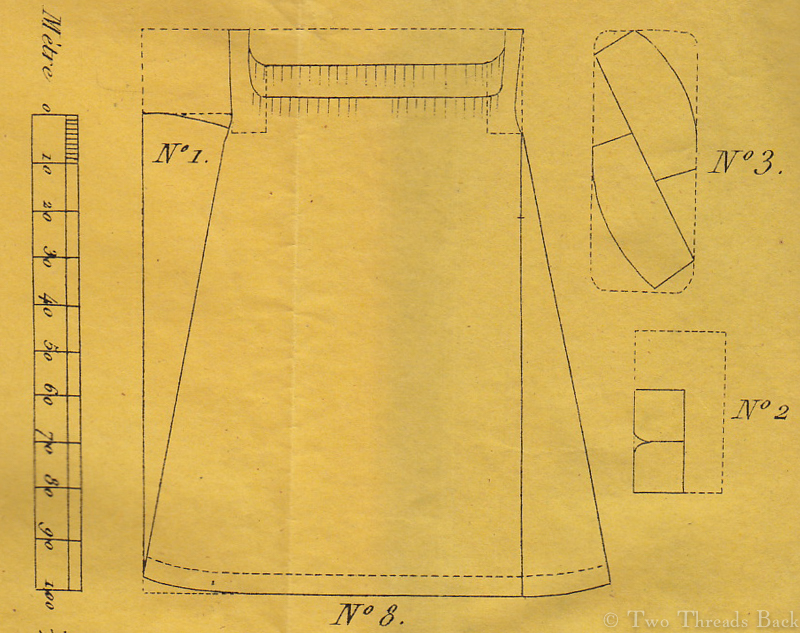
If you are curious (or courageous) and would like to compare for yourself, below is a pattern and description, 1840, from a French periodical. (Please excuse my awkward translation. If you are fluent in French and English, I beg you to let me know and help me correct it!) English patterns and instructions of the same date are available in the Workwoman’s Guide.
A pattern for a lady’s chemise, 1840.
No. 8 is a woman’s chemise. For ten chemises, purchase 25 meters of percale; take off a meter, and cut the rest into ten pieces; fold these pieces into two; on side No. 1, cut the gore that you add to the other side, cut by a thread as shown in No. 2; inside cut two gussets; indent around the neck; this is shown in No. 3; the sleeves are cut on the bias. Gather slightly on top of the arm and hem the bottom with backstitching. The armholes have to be a little curved under the arm. Take the remaining meter, measure a narrow band along the edge, then cut twenty pieces for double shoulder straps; these pieces are indicated by dotted lines; place a narrow piece of tape between the shoulder strap and its lining, there you insert the sleeve and backstitch, and you fold the lining over; gather the top of the chemise, as indicated, and insert a narrow tape of a meter in length; then cover this piece of tape with a band of percale; using backstitching and hemming, then fold under. Mark the chemise over the left gusset.
And now back to plain sewing….
A teacher’s sample, dated 1900.
Do you know how to write instructions in such a simple, straightforward, concise manner that anyone can follow them perfectly? I wish I did.
I was working on a project that required an explanation of “felling,” and reached the point where a little testing of the prototype was in order. I found a Reluctant Victim, and with mild apprehension, gave her the draft to read and check for clarity. She read, pondered, frowned, sighed.
Fail.
The work prepared for running or backstitching.
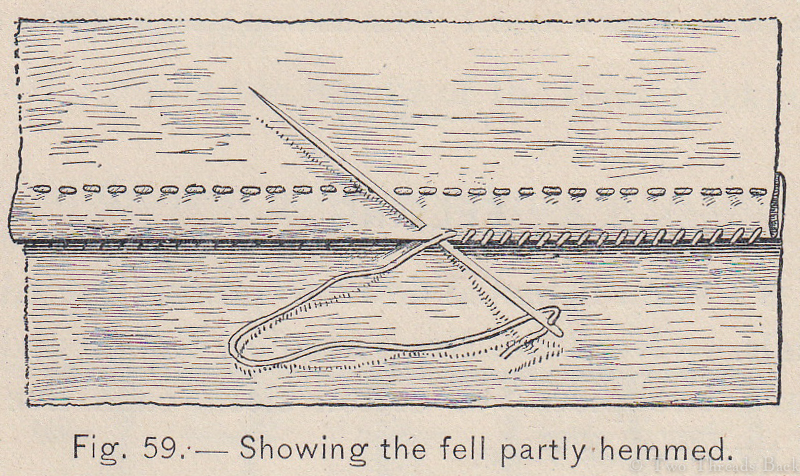
The fabric after it has been sewn together, and the fell is being hemmed down.
After some discussion, I realized that there was more to this little bit of plain sewing than could be covered in my one-sentence description. Why? Because there are a couple of variations, as well as some similar stitches that our g-g-grandmothers used (e.g., French seam, counter-hem, German hem, mantua-maker’s hem) to confuse things. Too much info for a sound bite project.
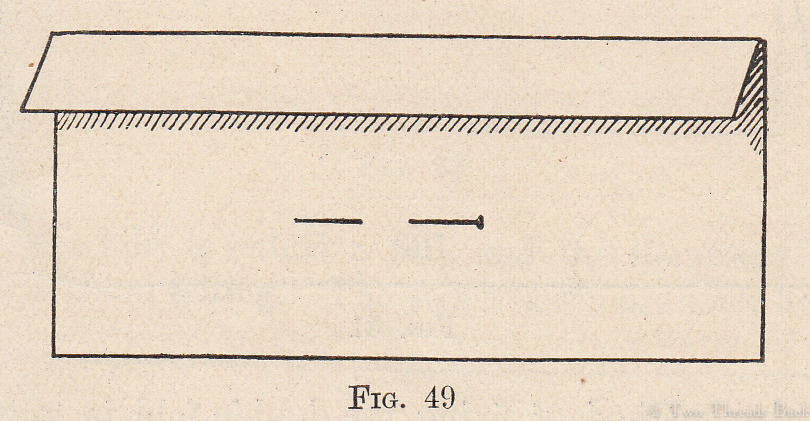
Sure, felling is just a method of joining two pieces of fabric so that the raw edges are enclosed and hemmed down. But there wasn’t only one way to fell a seam: it was that first line of sewing that made the difference.
The first line of sewing joins the two pieces of fabric. The second one (it was always almost always hemming in hand work) fastens down the folded edge. So for the first line,
You could use a running stitch. You could use a backstitch (called stitching in early English texts). You could use a half-backstitch (variation of the above). You could use a very shallow overcasting stitch (called sewing -common earlier, or seaming – common later, in 19th century English texts).
This difference in the first line of stitching made all the difference in understanding period instructions on how to fold it and how to hold it. (Sorry, Kenny.) That’s what gave me real problems when trying to condense my instructions.
Methods that use a running stitch or a backstitch are easier to explain, and they’re the ones most people use today when hand sewing. You place the pieces right sides together and sew. Then spread the work open, fold one edge over to cover the other, and hem it down.
Seaming
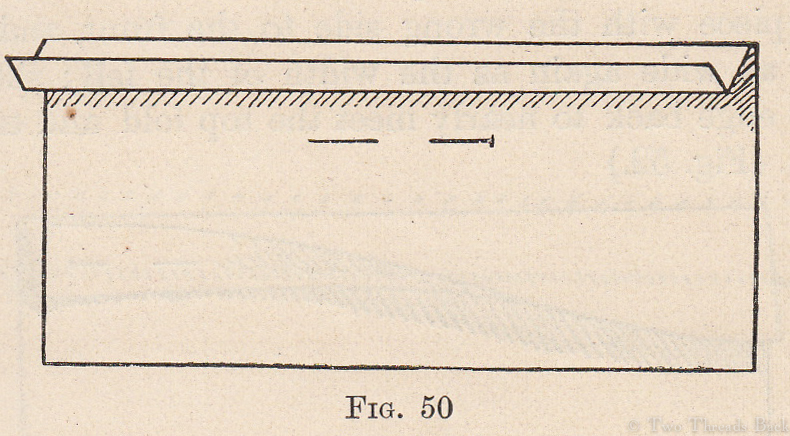
It’s the last method that gets a little tricky, the one that uses seaming (I’ll use that term since that’s what I called it in Plain Needlework and to use “sewing” can be confusing!) for the first line of … sewing. (See what I mean about confusing terms?)
The work held properly for seaming, from a period manual.
Seaming was a sturdy method of joining two pieces that utilized every inch of fabric. When you spread the seam open, the edges look butted together.
Linen used for underclothing early in the century had nice selvages that could be joined this way. Therefore, it’s easy to see how a seamstress would be inclined to use the same stitch if she had to join two “cut” (non-selvage) edges. Because you should never use selvages that have unsightly little holes!
An excerpt, dated 1821:
SECOND CLASS.
Q. How should you fix a seam? – A. I turn one paper down once, and the other once on the right side, and turn it back again the same width to form the fell.
Q. What do you do next? – A. I pin the two pieces together.
Q. What should you do before you fix two selvages together? – A. Examine them, to see if there are any little holes in them.
Q. If there are, should you sew them together? A. No, cut them off, and fix a fell seam.
How do you prepare and hold the fabric if you want to use seaming? Most of the old manuals say the fabric is held wrong sides together and worked on the right side. And that’s how all the illustrations show it. After all, if you’re turning down the edges before you seam them, you don’t want those pesky folded parts in the way while you work, right?
But there are a few sources that say otherwise. A Sewing Course for Teachers advises placing right sides together for seaming, because the slanted bits of thread will then be inside, and the straight bits will be hidden in the grain of the fabric on the right. (See the pics in the Flower Patch post for an example.)
And in that venerable text, The Workwoman’s Guide, A Lady states
The work for sewing is thus prepared: the two selvages are placed together, or if there are no selvages, the raw edge of one piece is turned down once, and the edge of the other piece is turned down double the width, and then half the width is turned back again for the fell. The two pieces are pinned or basted together, with the parts turned down face to face and held firmly between the finger and the thumb…
At first I assumed she meant to place both whole pieces of fabric face to face. But after considering a century’s worth of other sources, I think “A Lady” meant that only the folded down parts are face to face. The two pieces of fabric are actually wrong sides together.
So what was “the rule” back then? I believe that seaming without felling was done either on the right or wrong side of the fabric – assuming there was a difference in the right and wrong sides! And I think seaming for felling was usually done on the right side with the little folds tucked inside. But does it really matter? Maybe I’m the only soul on earth who finds it interesting?
Folding for Felling, the old-fashioned way:
If, however, you also like picayune sewing trivia, below are some images showing the method of folding for felling. I’m really surprised that such consistent, detailed instructions and examples have survived. And very, very grateful!
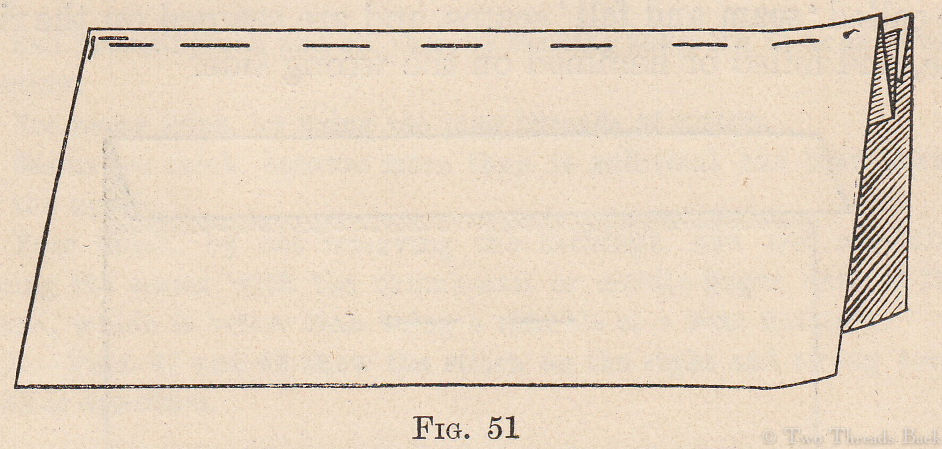
Children learned by first folding paper in preparation for felling. Plain sewing manual, 1821.
A close-up of the folded paper that has come unglued.
Even closer-up! You can just barely see the double fold in the top paper.This 1890s manual illustrates the fold on the first piece.The fold on the second piece.
The pieces aligned and basted together for seaming.
Now, what method do I use? Mostly run-and-fell. But sometimes I use seaming because it’s my favorite stitch to work. I recommend doing what suits your project or suits your fancy. Anyone who sews two left sleeves on a blouse, twice!!, can’t be too snooty about setting standards.
Although some 19th century sewing teachers were! Writing in 1884, Miss Jones insists,
“Run-and-fell is not allowable in plain needlework. It must be called ‘scamp-work.’ If properly done, it takes as long as the seaming and even then is not very secure….”
Tackling this topic helped my muddled mind, and made me decide to simplify that project. Run-and-fell only for that one. I guess that makes me a shameless promoter of scamp-work!
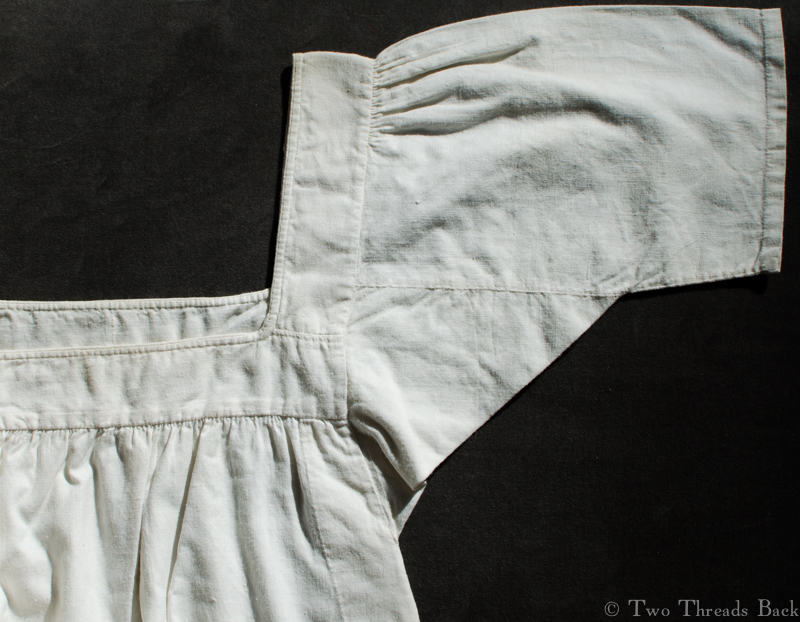
As a follow-up to the previous post – and a helpful comment, thank you! – I’ve tried slipping the sleeve (cuff, undersleeve, engageante?) into the sleeve of a linen shift. Well, three different shifts. Above is the first. Very nice fit!
The next one, below, is an even better fit.
Just about perfect! You’ll notice the sleeve length on this shift, unlike the first one above, extends past the gusset.
The last one I tried just for comparison. It’s obviously a wider sleeve, and I have a feeling that the shift was perhaps of an earlier date, and the sleeve was cut off to fit later fashions. And after looking at a few over the years, I wouldn’t be surprised if that was rather common. Although a shift didn’t require as much work as man’s shirt, the tiny stitches worked on fine linen were very tedious to do, and clothing was valuable!
Sorry Cinderella, it’s not quite right. This last shift is in the original “attic find” condition. Can you tell?
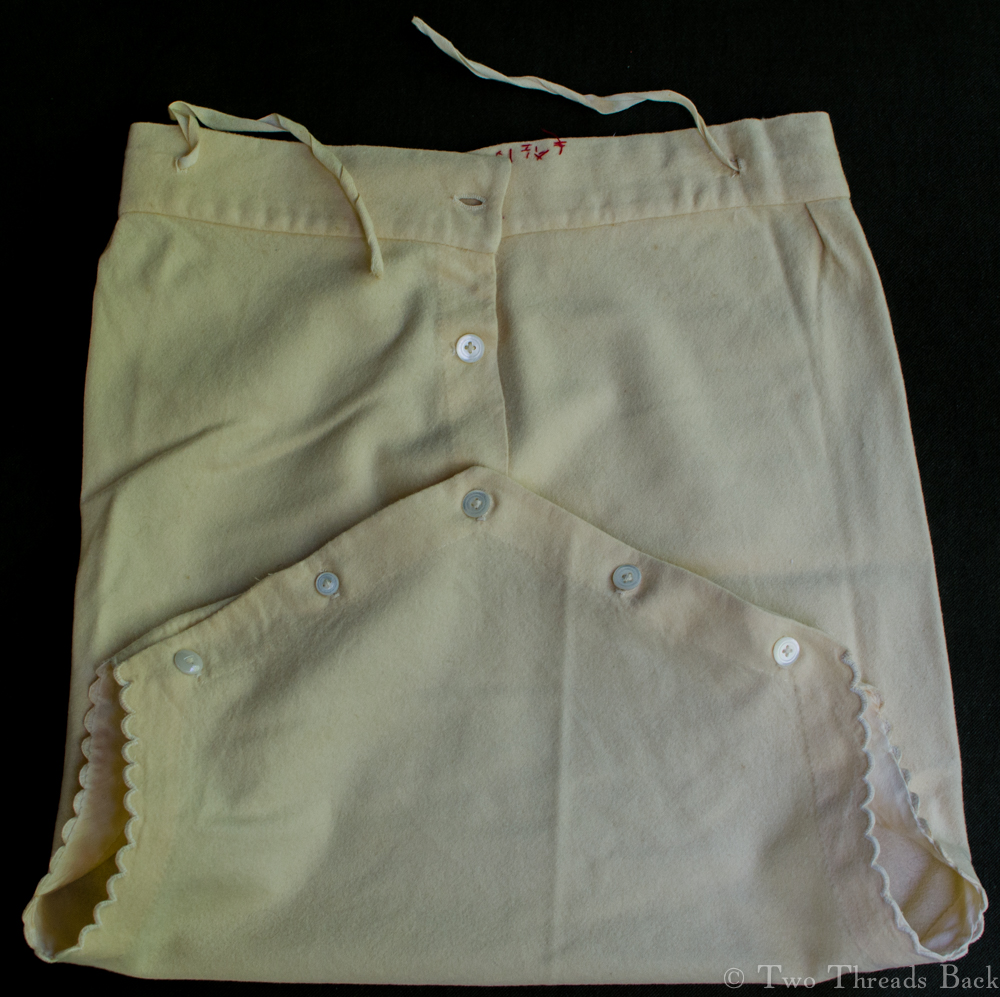
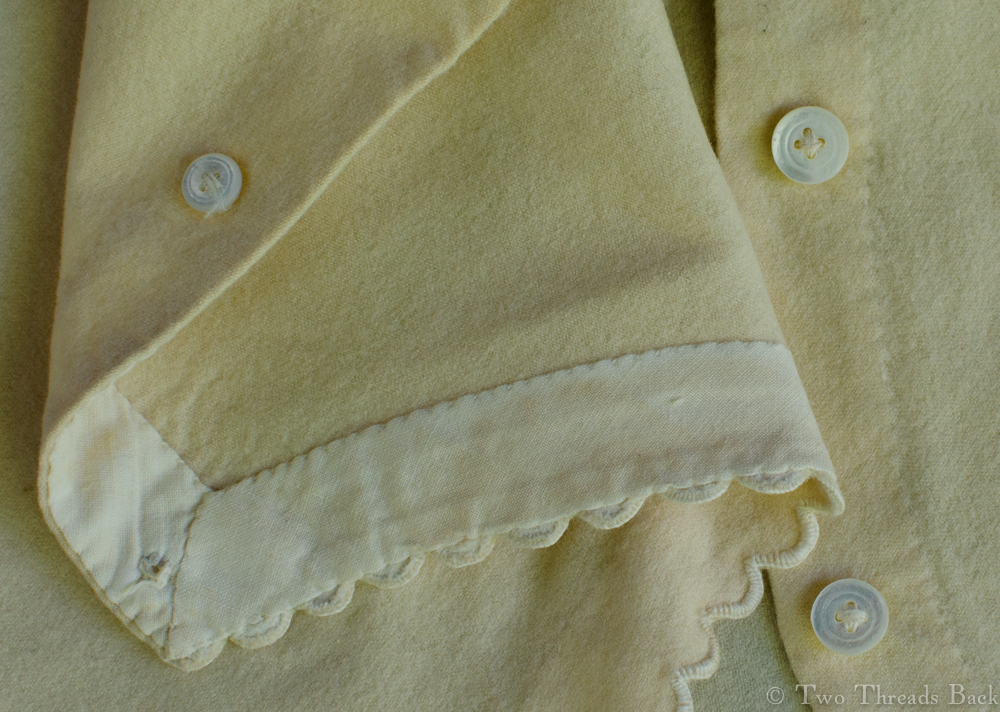
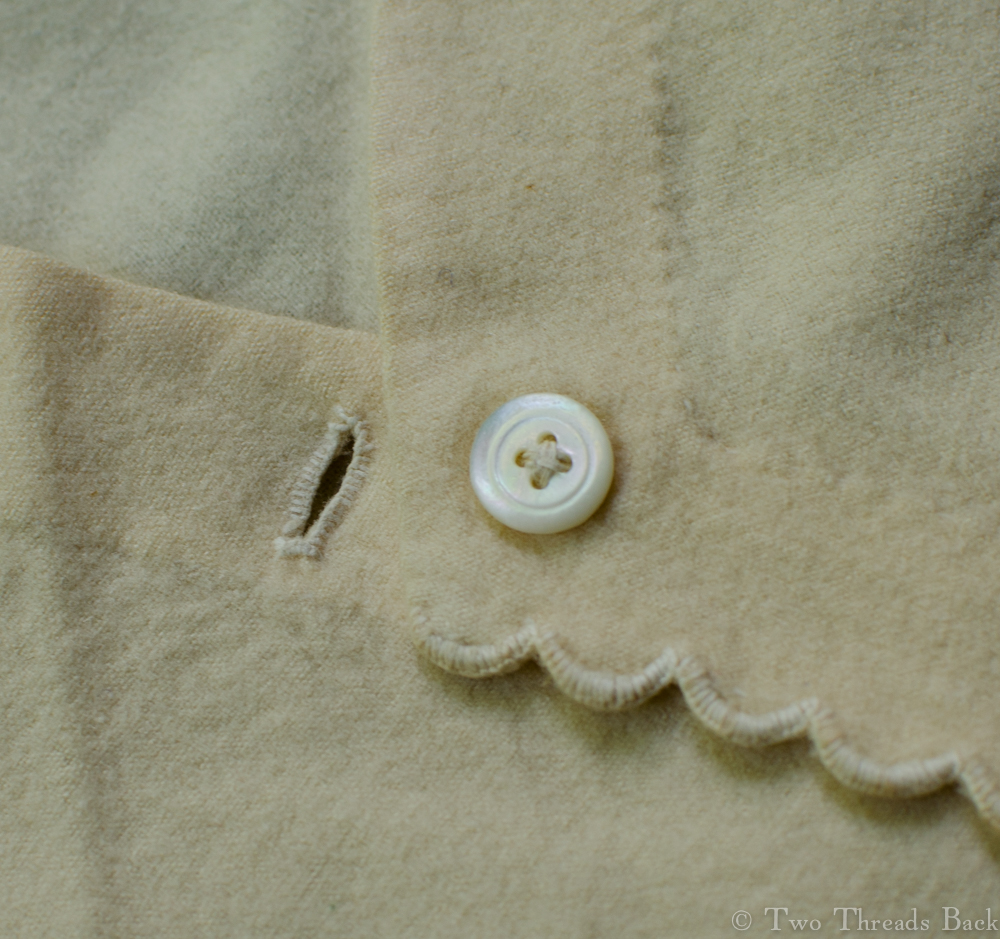
Diaper cover, late 19th century. Plain sewing in flannel! Could those red cotton stitches be laundry marks?
There is an odd Notion enough entertained about Change, and the keeping of Children clean. Some imagine that clean Linnen and fresh Cloaths draw, and rob them of their nourishing Juices. I cannot see that they do any thing more than imbibe a little of that Moisture which their Bodies exhale. Were it as is supposed, it would be of service to them; since they are always too abundantly supplied, and therefore I think they cannot be changed too often, and would have them clean every Day; as it would free them from Stinks and Sournesses, which are not only offensive, but very prejudicial to the tender State of Infancy. – Dr. William Cadogan, 18th century author of An Essay upon Nursing
Plain sewing examples are usually cotton or linen, but here’s one of wool flannel: a baby’s diaper (or napkin) cover. Maybe this one is similar to what Mrs. Bakewell meant in her 1836 Mother’s Practical Guide. “I cannot too strongly recommend the use of a flannel napkin over the diaper for the very young babes, when they are carried out. The chest, too, should be guarded with flannel, especially if there be any constitutional or hereditary predisposition to inflammation.” Wool, the cure for what ails you!
Instead of the herringbone stitch, this has been bound with a cotton facing and trimmed with a blanket stitch in neat scallops. Herringboning, the stitch recommended in period manuals for anchoring seams on heavy material, wouldn’t have been sufficient to secure the edges, considering the laundering required.
Cotton facings, hemmed with tiny stitches.
In the days before modern heating, wool flannel was often part of a baby’s wardrobe. Although warm, it seems like wool would be awfully heavy and itchy if worn close to the skin. Maybe that’s just my modern-day sensibilities? But at least the wearer of this diaper enjoyed the relative comfort of buttons for fastening, rather than pins. And I don’t mean safety pins! Babies in earlier times weren’t always as fortunate as the owner of this diaper. Advice books often warned against pins and the possibility of terrible consequences when they pinned the baby instead of the clothing! William Buchan, writing in 1808:
It would be safer to fix on the clothes of an infant with strings than pins, as these often gall and irritate their tender skins, and occasion convulsions. Instances have been known, where pins were found sticking above half an inch into the body of a child after it had died of convulsion-fits, which, in all probability proceeded from that cause.
Closeup of the button and scalloped trim. Better than straight pins, any day!
Unless the fits resulted from trying to scratch the wooly itches!
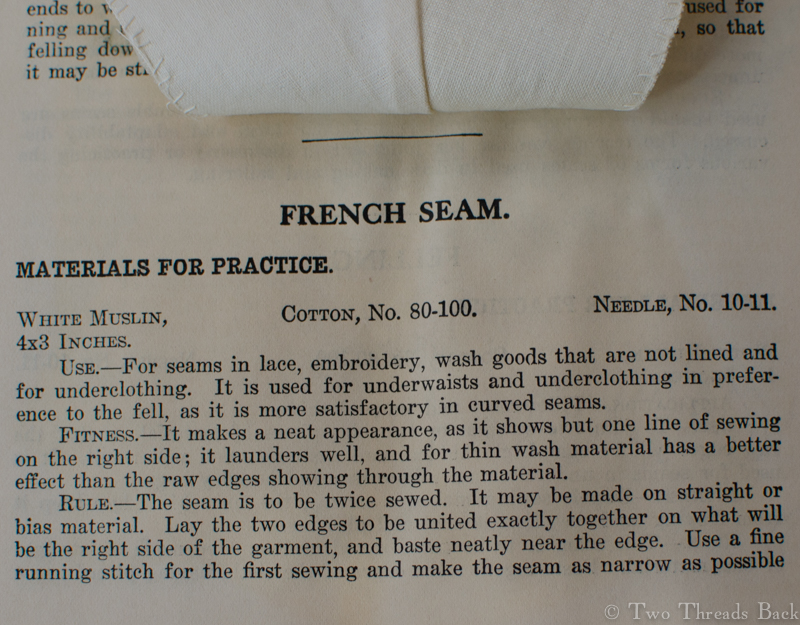
Once upon a time, I thought every seam that was sewn, by hand or machine, had to be finished. By that I mean it could have no raw edges. Raveling? Horrors! Unthinkable. What would happen when the garment was worn? When it was washed? And so I zig-zagged, overcast, or French-seamed every seam so thoroughly that I might as well have used Super Glue.
I also assumed, when I first started to explore the history of hand sewing, that French seams must have been part of the basic sewing repertoire. After all, they didn’t have Super Glue back then, did they?
However, as I studied antique clothing I quickly learned that all seams weren’t finished. The only seams to match my hermetically sealed standard were felled, like those in shirts and shifts, and felling was used because underwear (or family linen, as they called it) had to withstand tortures that would have impressed Vlad the Impaler.
After scrutinizing sewing techniques in antique clothing, it also dawned on me that French seams didn’t show up in anything older than late-nineteenth century. Hmm. So when did French seams become common? I don’t know for sure, but out of all my sewing instruction books, the earliest (definite) explanation of the method I could find appears in a French dressmaking manual, circa 1860s, as shown above. Ah, French!
Perhaps it was used earlier in particular garments, by particular seamstresses, or in particular countries. My experience and resources are pretty limited, so if I come across more information on this stitch, I’ll certainly update.
But by the early 1900s, the French seam was common enough to appear in most sewing manuals. It was well-suited to the ubiquitous sewing machine, sheer waists and dresses yearned for neat seams, and it was soooo easy to do. Or teach. Or learn. And since efficiency was so very, very modern … pourquoi pas?
This sample by Miss Beulah H., early 1900s, shows a bias-cut French seam.
Instructions from Beulah’s book for making the sample…


