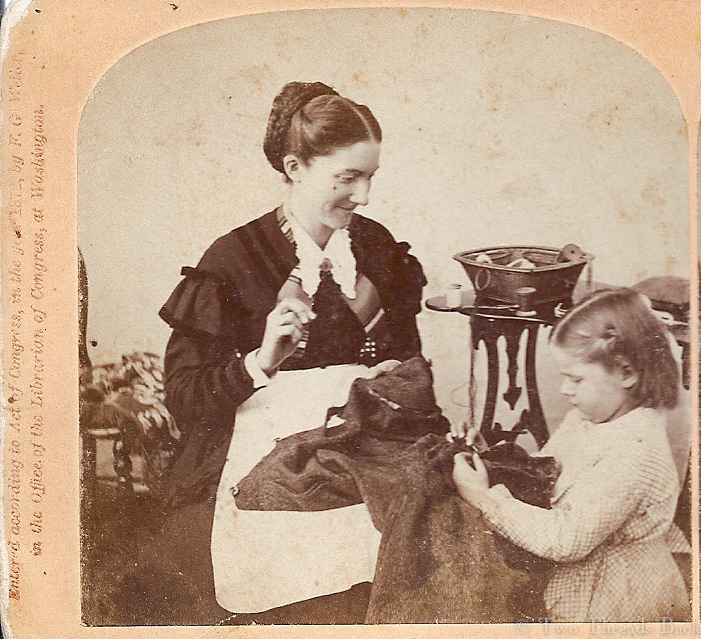
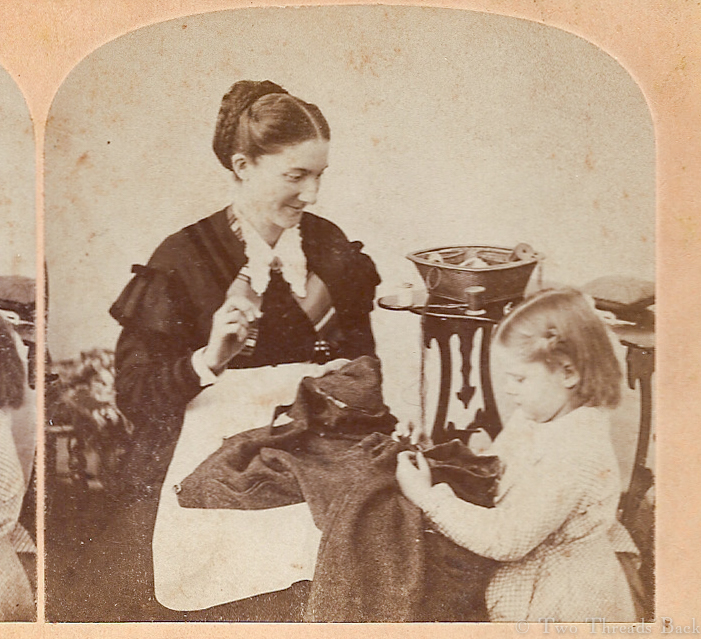
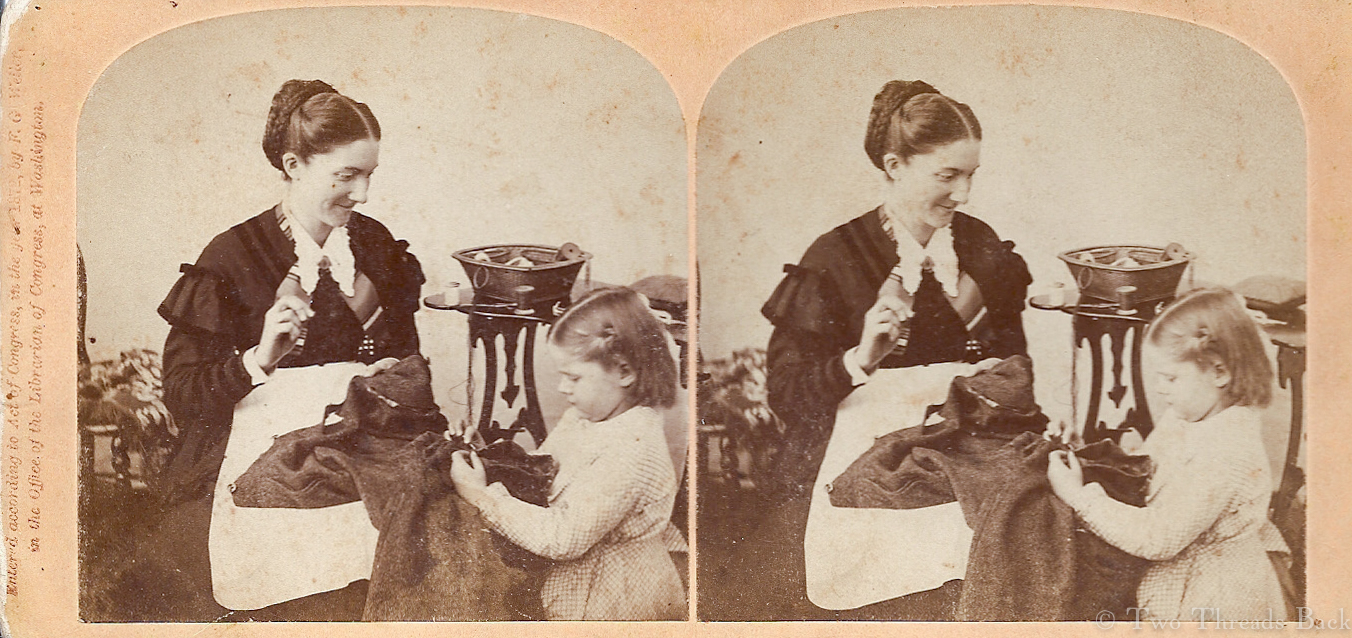
It’s time to jump forward a hundred years from the subject of my last post. Here’s a peek at a pleasing, albeit staged, scene of domestic happiness. I love these old stereoviews because the photographers often took such pains with the props, trying to tell a story. And if the subject is sewing or 19th century domestic life, that makes me very happy!
The photo on the right side, because sometimes they’re slightly different.
In this picture, it looks like Mama is mending Papa’s pants. Her daughter seems barely old enough to hold a needle, but is earnestly attempting to help. Is Mama wearing an apron over her silk dress? It certainly looks like she’s sporting a fashionable chignon. (That late ’60s, early ’70s hairstyle was sometime over-the-top and subject to ridicule.)
She may be seated in a woven cane chair, and she definitely has a sewing basket beside her on the table. It looks like the kind with small pockets fixed to the sides. The little girl’s checked dress may be an apron or pinafore, though I can’t quite tell.
This card is dated 1872, but I’ve seen another version dated 1871. Mama sewing, daughter sewing: seeing double indeed!
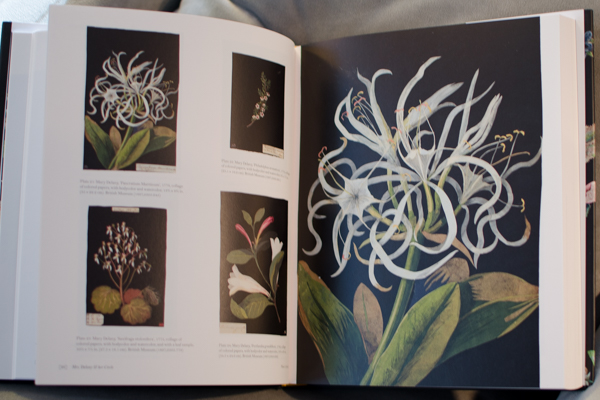
Mrs. Delany & Her Circle, edited by Mark Laird and Alicia Weisberg-Roberts.
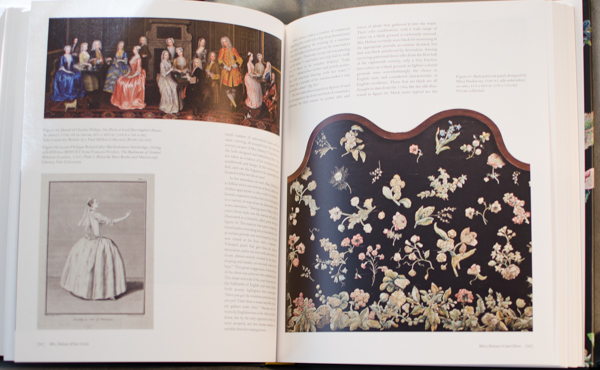
How have I missed this for so long? It’s been reviewed elsewhere – when it was new – but I just can’t resist sharing, even belatedly, whenever I find a gorgeous book.
Published in 2009 to accompany an exhibition at the Yale Center for British Art, it was my Christmas present last month and all I want to do is rave about how brilliant, beautiful, and beguiling Mrs. Delaney & Her Circle is. And not just the book, I think Mrs. Delany herself must have been an astonishing woman.
She can’t be considered a polymath, or even an opsimath (don’t you love that one?), but in an 18th century upper-class lady’s world of art, learning, and taste, it seems like she dabbled in it all – at least, all my favorites! From craftwork to costume, needlework to natural philosophy, her interests included everything beautiful.
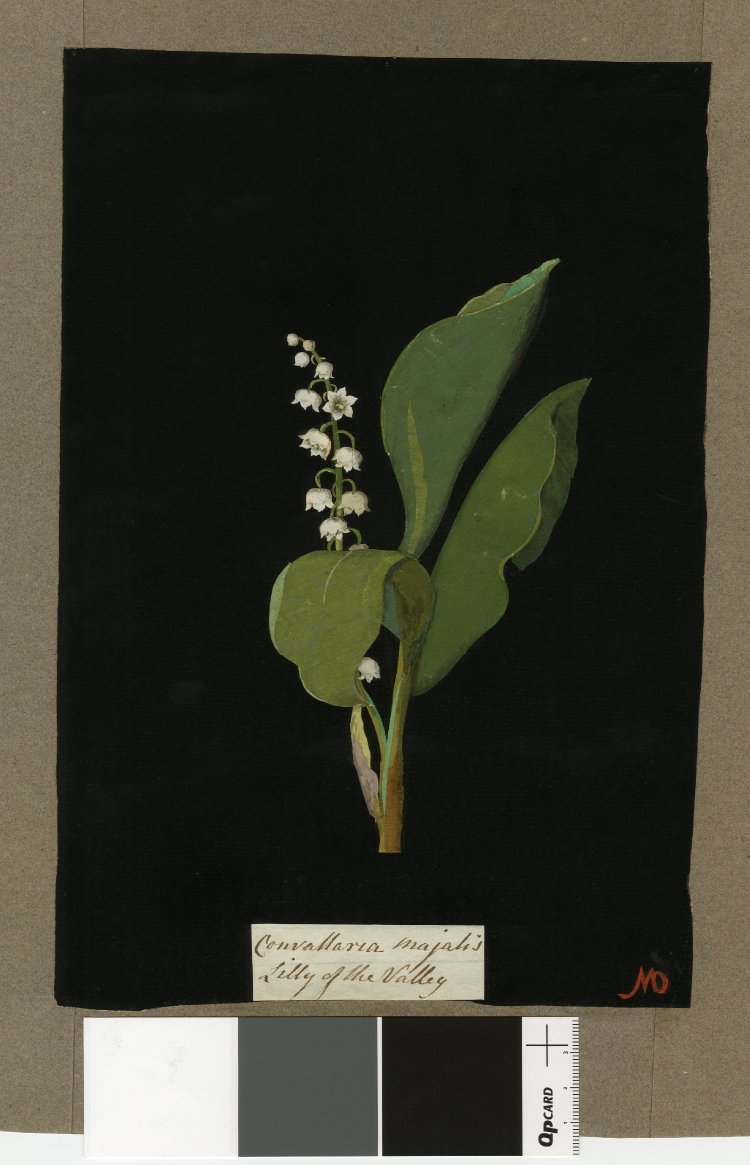
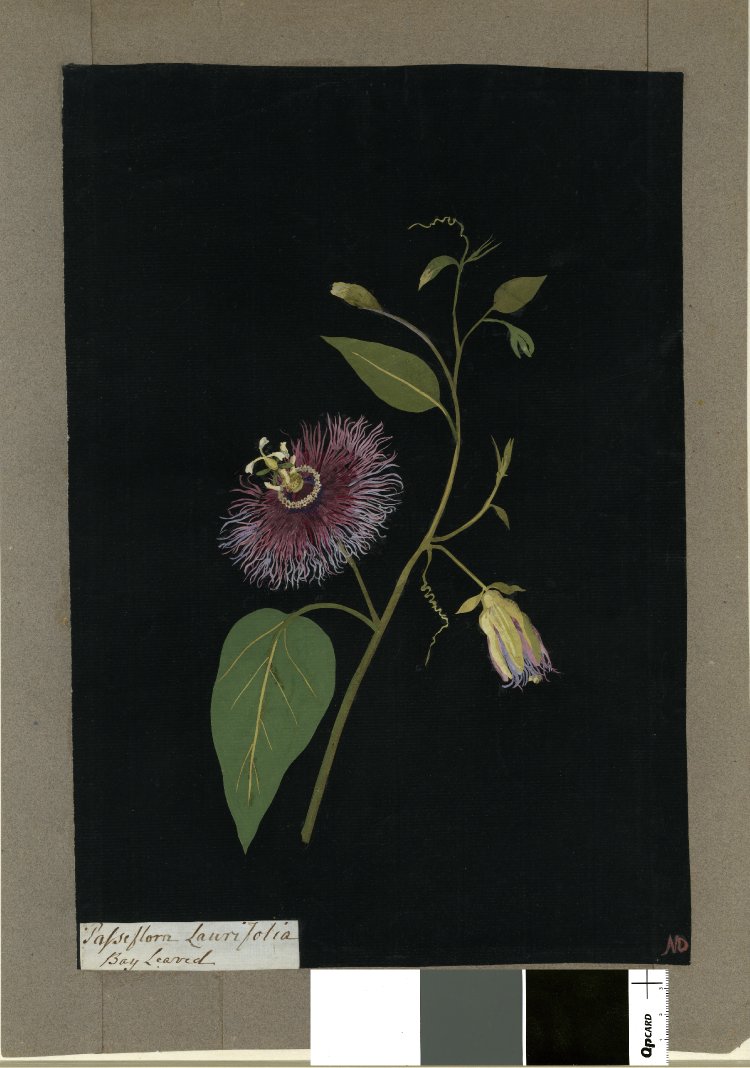
The image on the front cover and first words of the jacket blurb were enough to get my attention. “At the age of seventy-two, Mary Delany, née Mary Granville (1700-1788), embarked upon a series of nearly a thousand botanical collages” – what, she only started her paper flowers at that age? I can still hope?
Indeed, the book is packed with illustrations of her stunning “mosaicks” of botanical beauty. There is a wealth of information on her floral collages. From an experiment in reproducing them, to an explanation of period paper-making techniques, the text answers all questions that come to mind.
But that’s not all. She had many more interests which are covered in detail in the 12 essays, all written by experts in their fields. She was a member of the Bluestocking circle and lived a rich life in a fascinating era, counting as friends some of the most notable figures in art, science, society.
Oh, did I mention The Dress? Mary Delany lavished her black satin court dress with the most exquisite, scrumptious, dazzlingly beautiful floral embroidery I’ve ever seen. There’s a whole essay devoted to it. Other illustrations include workboxes, tools, patterns, fashion plates, cartoons, etchings, prints, shells and shell art…. In all, enough to keep me fascinated for a long time.
The bad news is that the book is out of print. The good news is that the museum bookstore has (or had before Christmas) copies in stock. Whether you find it in a library, or track down this treasure for your own, I think you’ll fall in love. Opsimathematically, I did!
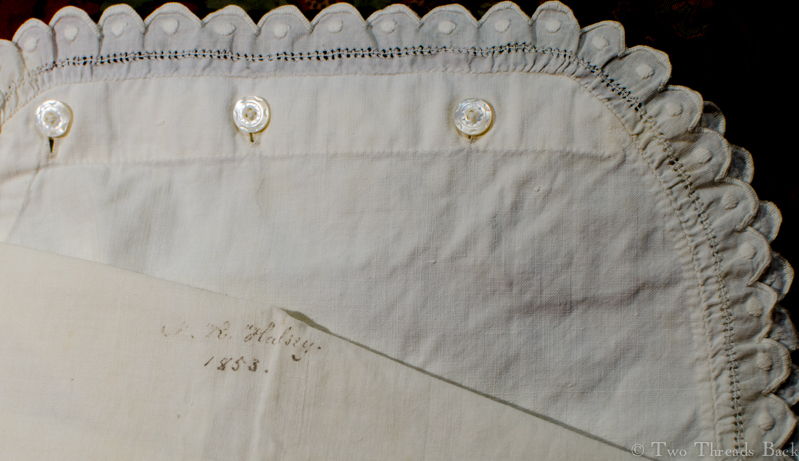
A cotton chemise, unlike either the French or English styles below. I’m going out on a limb here and guessing… American, 1853.
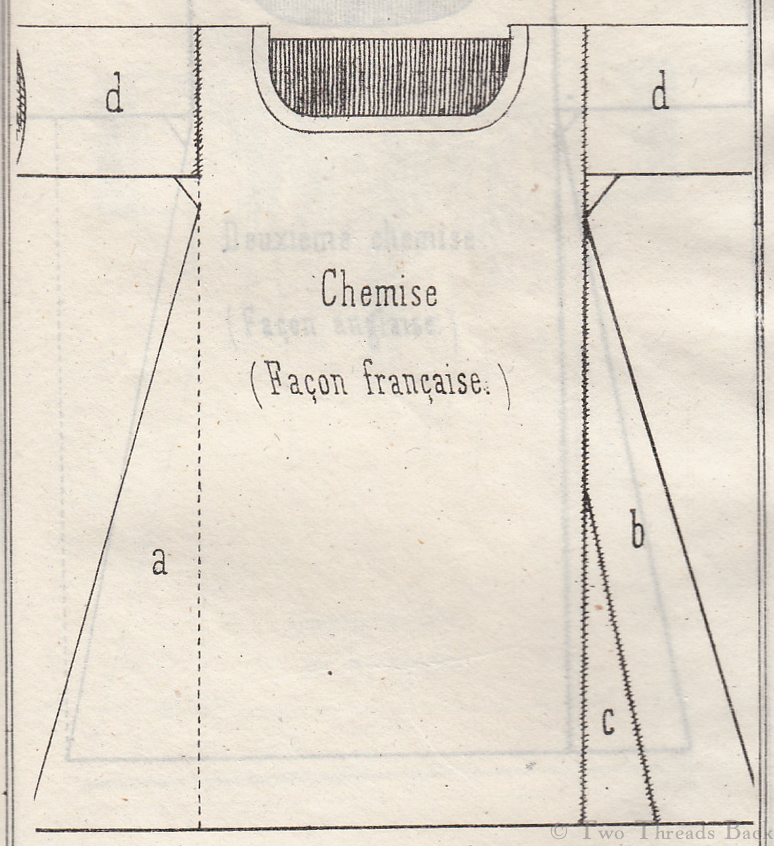
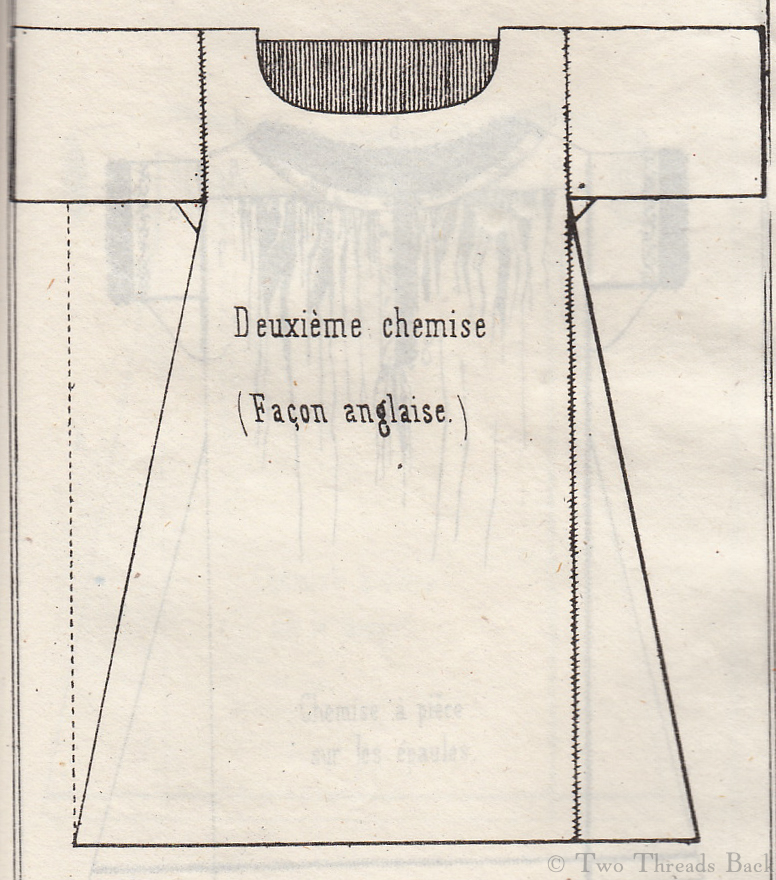
Wouldn’t you know it? Maybe there’s a Murphy’s Law of blogging. Just after proclaiming in my last post that there were no noteworthy distinctions in French and English chemises, I came across the illustrations you see below.
The only difference mentioned in the accompanying text is that the English style is for “skinny persons.” There may be more clues in the cutting directions, but with no knowledge of French, I’ll have to let that pass. The book was published in 1847, and is surprisingly primitive, at least compared to the detailed and beautifully illustrated French magazines of the same period.
However, I still can’t determine that English-made shifts were of one particular pattern, and the French used another. It seems more likely that a lady cut her shift and its gores according to the size of her fabric – and herself! But in the interest of Truth in Blogging, I submit the following:
Chemise Francaise. Of course it looks more complicated – they have a reputation to uphold.Chemise Anglaise. No nonsense, for skinny persons.
Language is a funny thing. I suppose we’re all guilty of following fads in our choice of words, and we all have particular phrases we find irritating or amusing – in other people. I recently came across an example by Jane Austen, written in 1817, just as the polite name of a woman’s undergarment was changing.
So presumably Miss Austen was still wearing shifts, when other ladies were beginning to wear chemises. She wasn’t alone, however, in her annoyance with linguistic affectations. Pantalogia, a New Cabinet Cyclopaedia, Comprehending a Complete Series of Human Genius, Learning, and Industry, Alphabetically Arranged; with a General Dictionary of Arts, Sciences, and Words (1819) has this to say:
CHEMISE, the French word for that article of linen under dress which when worn by men is called a shirt, by women a shift. Some few modern English ladies, with an affected squeamishness of delicacy, restrict the term always so as to denote the article of female dress chemise de femme; but as every one knows what they mean by the expression, and we see no reason why every one should not know what they mean, we recommend the use of the old English term, and the abandonment of the corresponding French word.
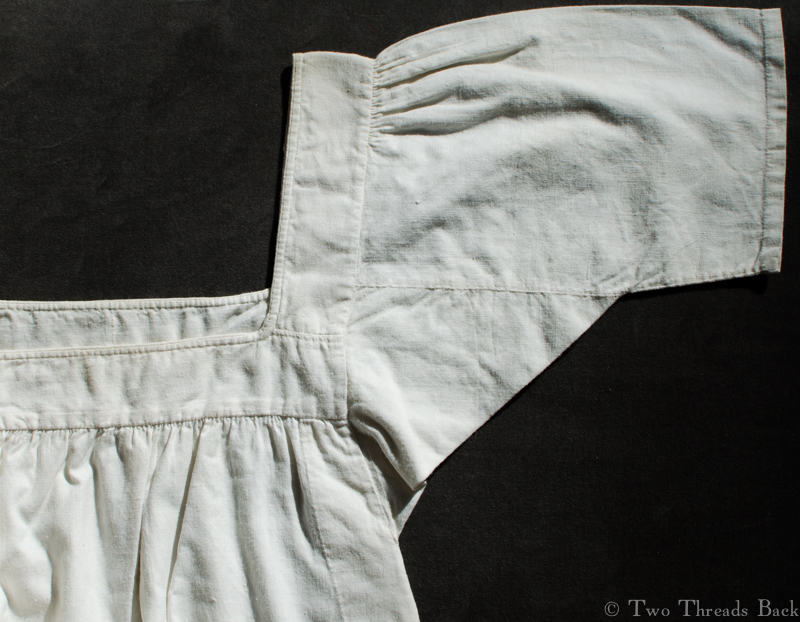
Was there really any difference between a shift and a chemise? Well, yes and no. No, because they both referred to the same lady’s undergarment. Yes, because when the word “shift” was used (up until the early 19th century), the garment was usually made of linen and was simpler in cut. As the word “chemise” became standard, variations in pattern and trimming were increasing and the chemise was more often made of cotton.
So much for the term; now was there any significant difference in the French and English methods of making this garment? I haven’t found anything consistently, unmistakably, irrefutably, definitively identifiable. When I examine an old chemise, whether in a book, online, or in person, I can’t raise an eyebrow knowingly and say, Ah yes, English, 1832.
But with the interest and expertise I see popping up in blogs and books, I wouldn’t be surprised if someone has – or will – come up with a list of distinguishing features.
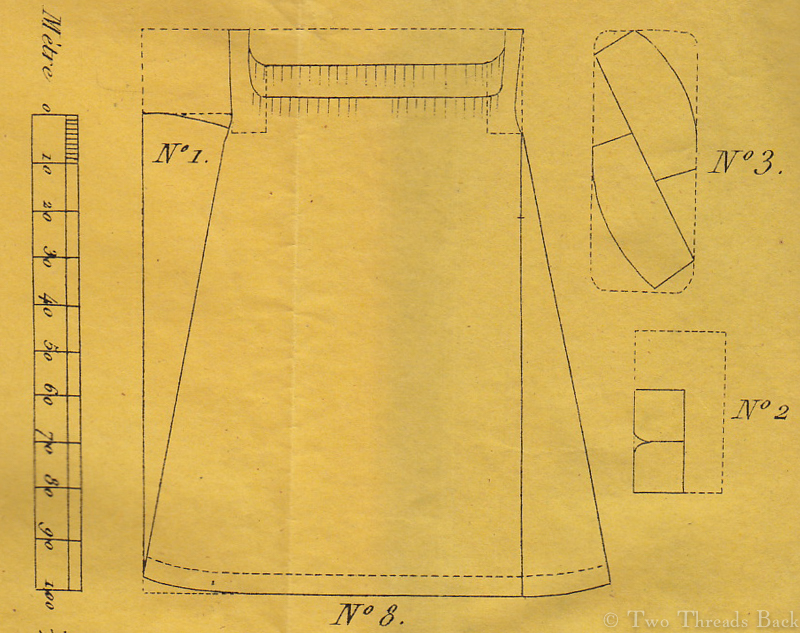
If you are curious (or courageous) and would like to compare for yourself, below is a pattern and description, 1840, from a French periodical. (Please excuse my awkward translation. If you are fluent in French and English, I beg you to let me know and help me correct it!) English patterns and instructions of the same date are available in the Workwoman’s Guide.
A pattern for a lady’s chemise, 1840.
No. 8 is a woman’s chemise. For ten chemises, purchase 25 meters of percale; take off a meter, and cut the rest into ten pieces; fold these pieces into two; on side No. 1, cut the gore that you add to the other side, cut by a thread as shown in No. 2; inside cut two gussets; indent around the neck; this is shown in No. 3; the sleeves are cut on the bias. Gather slightly on top of the arm and hem the bottom with backstitching. The armholes have to be a little curved under the arm. Take the remaining meter, measure a narrow band along the edge, then cut twenty pieces for double shoulder straps; these pieces are indicated by dotted lines; place a narrow piece of tape between the shoulder strap and its lining, there you insert the sleeve and backstitch, and you fold the lining over; gather the top of the chemise, as indicated, and insert a narrow tape of a meter in length; then cover this piece of tape with a band of percale; using backstitching and hemming, then fold under. Mark the chemise over the left gusset.
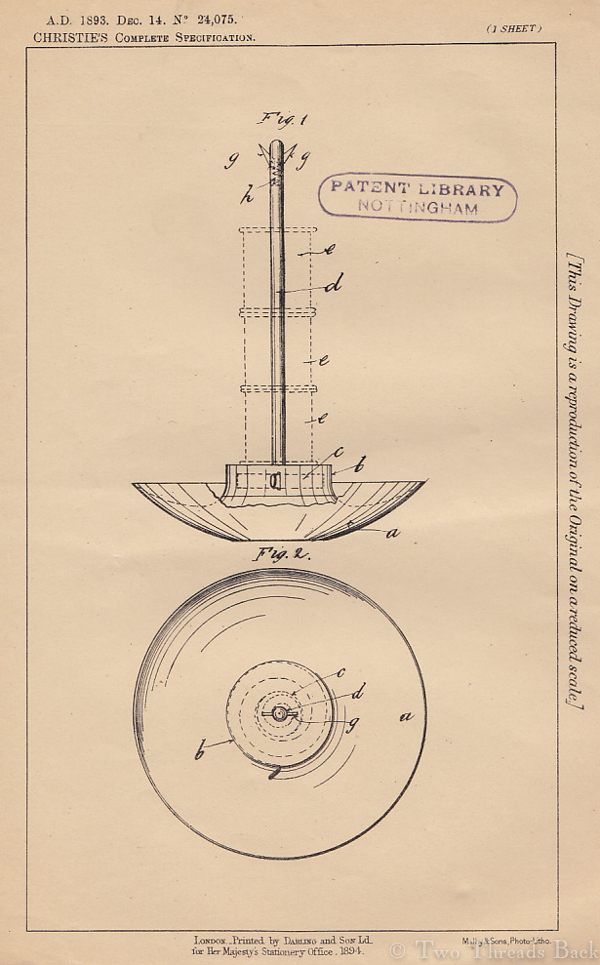
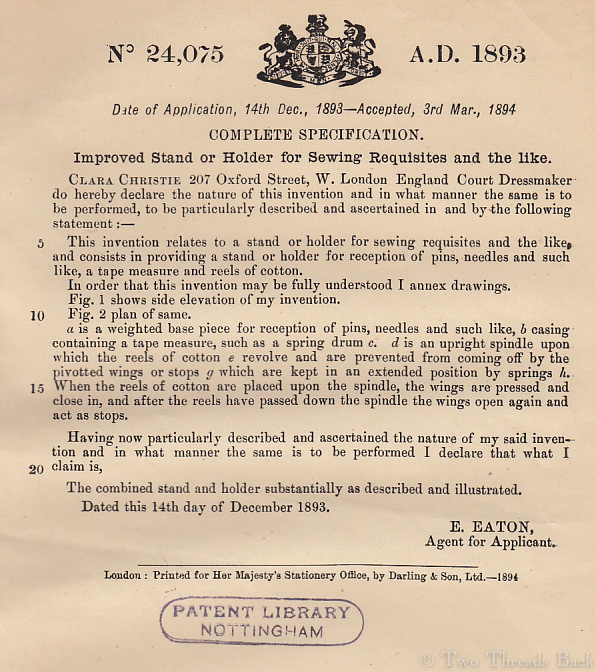
1893 “Improved Stand or Holder for Sewing Requisites and the Like” by Clara Christie, London Court Dressmaker.
Copyright can be horrendously confusing. Most of us who write, sew, craft or create anything strive to be original. Of course, when we historical sewing fanatics are trying to reproduce something very old, whether it’s a pin cushion, a style of writing, or a baby gown, original takes on a whole “‘nother” meaning. We’re trying to be true to the original pin cushion, style of writing, or baby gown. The closer we get to someone else’s original, the greater the achievement!
But what about copyright and patterns? Once upon a time, I sewed things to sell. And occasionally still do. However, I’ve always been terrified of trespassing copyright. For years I’ve heard all sorts of “rules” concerning the use of patterns designed by someone else. You must buy a pattern for every item you make. You must buy a pattern for every five items. You may not sell items made from patterns. You may sell items made from patterns if you buy a license. You may copy a pattern for your own use. You may not copy a pattern for your own use. You may change a pattern X percent and consider it your original. And the list goes on….
I simply avoided the issue by making my own. Rather absurd for someone who collected patterns and squirreled them away (unopened) like acorns before a heavy winter. Or maybe not that surprising. If you’ve read some of my past blogs, you know that I read and write about making things more than I actually do it!
It seems like I may have been overly scrupulous. I recently came across a terrific article on debunking pattern myths, which you can find here, and a follow-up article here. The author makes a clear distinction between selling things made from the pattern (ok) and selling copies you made of the pattern itself (not ok). For even greater detail and Genuine Legal References, see the pages of pattern copyright info here. If you’ve been perplexed by the rules of sewing to sell, you might want to check them out.
I suppose I should follow all that with my own disclaimer: I am not qualified to give professional legal advice (not that anyone ever thought I was). But make no myth-take: do your research and I hope you’ll find you can relax and open those patterns!
Now what about the picture at the beginning of this post? Well, that’s a patent (a cousin of copyright) by Clara Christie for a “Stand or Holder for Sewing Requisites and the like,” which she designed in the 1890s.
It was meant to hold pins and needles in the weighted base, have a tape measure built in, and a spindle for spools of thread. Personally, I think the tape measure is overkill, since it would be pretty awkward to use without making a mess of the pins. But surely as a London Court Dressmaker she knew what she was doing?
As a reward for your fortitude in reading to the end of this post, if you would like to have the patent pages for your own (and live in the US), be the first to write and let me know. I’m cleaning out stuff that needs a new home and will send them to you free!
P.S. To answer a question about the copyright notice on the images on my blog – feel free to pin them, that’s what the button is there for. And to make it official, you may save them for your personal study as well. Want them for something else? Send me an email!
It’s been a while since I added anything to Pharaby’s wardrobe, and with heaps of projects competing for my time I decided to tackle the quickest thing: a busk for her stays. Perhaps that might keep her happy until I have a little more leisure? I figured I could take a damaged “bone” from my stash, trim it to fit, and etch her initial. No problem.
Ha! I think the Spirits of Whales Past saw to it that I paid for my callousness towards history and nature. If you are extremely sensitive to the sacredness either, you may want to skip this post. If your curiosity exceeds your delicacy, here is the process in photos.
The doll stays, pocket sewn in the lining, awaiting a 2-inch long busk.
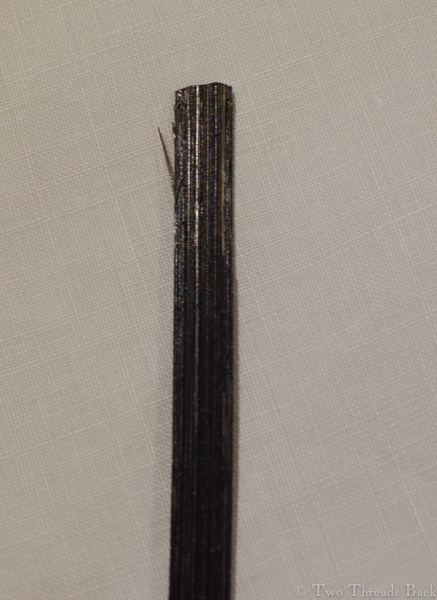
The aged and injured piece of baleen I started with, shredding on one side and blistered on the other.
Now it’s taped in place on the cutting board for a quick trim. Not! After sawing and sawing for a while, it was time for Plan B.
Plan B: I recalled a period domestic guide advising that boning should be soaked in hot water. Here we have baleen soaking. Soaking is not enough.
Or was that boiling water? Here we have baleen soaking in boiling water. It sufficed, barely.
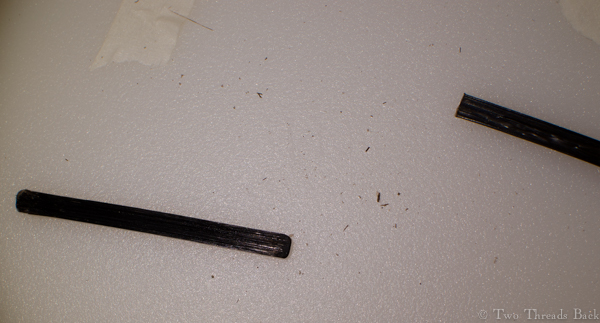
Success at last! And for the final touch, a little filing to smooth the edges. What, no etching of her initial? A verse, a heart? After a little discussion, we decided to wait until her sailor sweetheart returns from the sea and let him do it. The busk will keep her stays put for now.
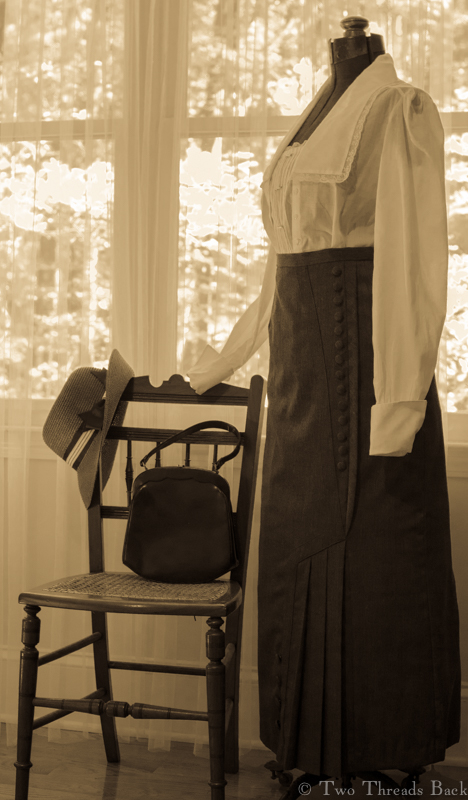
A cautious venture into costuming by someone who doesn’t do costumes.
As much as I adore historic (and historical) costume, and as much as I loved playing dress-up when I was a child, I confess that I haven’t dressed in costume myself. It’s not that I haven’t wanted to, at least a little. But I lacked Means, Motive, and Opportunity. It can cost an awful lot, I’m not much of a seamstress, and I’ve had nowhere to wear it.
Last month, however, I planned to attend a Heritage Day celebration and dinner-on-the-grounds, where everyone was invited to dress in clothing from anytime during the past 175 years. Finally – Motive and Opportunity!
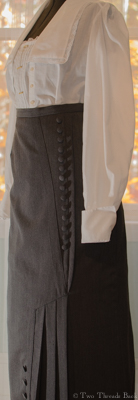
The modern skirt, way beyond my skill level.
A view from the back, with lots of pretty pleats.
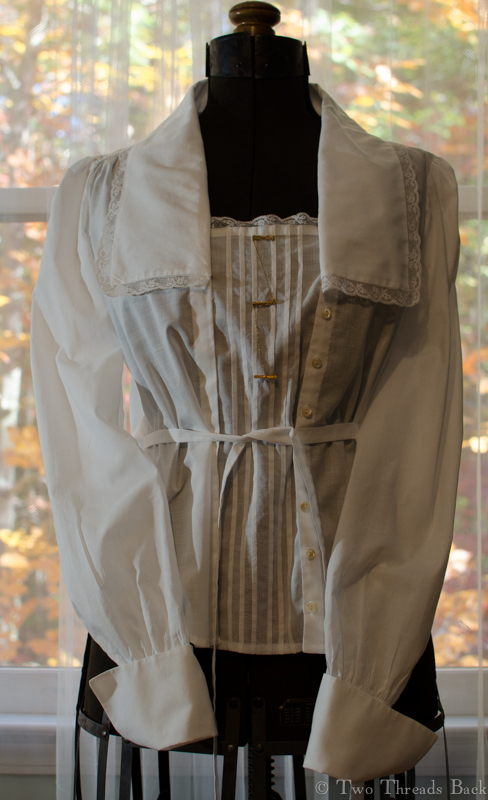
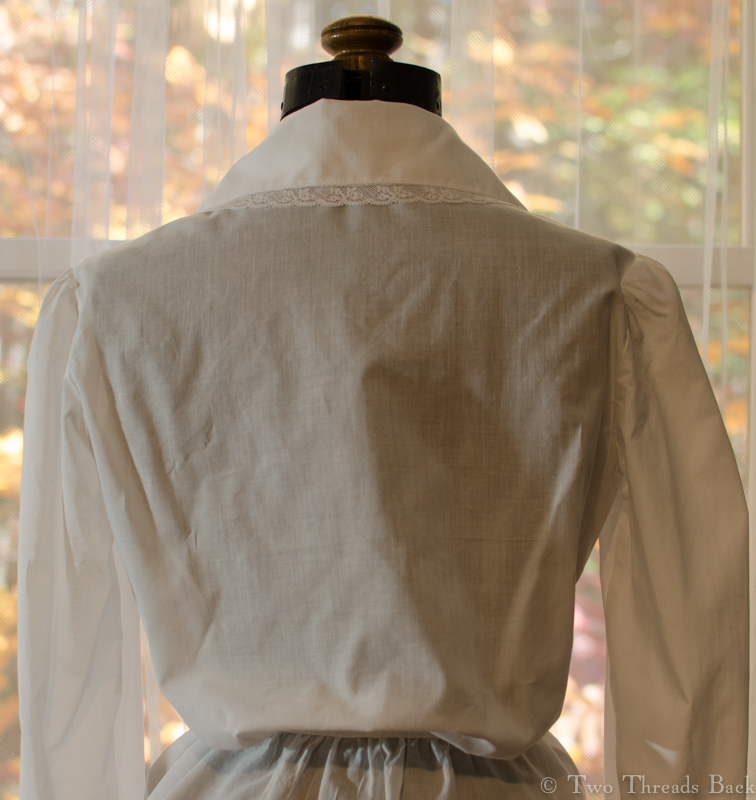
I solved the Means problem by using stuff I already had: a modern skirt which looked somewhat appropriate for the 1910s, the classic “Armistice Blouse” Folkwear pattern, and a good supply of white muslin to make it.
The last ingredient I needed was persistence. And it took some, seriously. While an ordinary seamstress can sew that shirt in an afternoon, it took me a whole weekend, not counting the hand finishing. And I even put the arms in the right way, first time! Maybe I could sew faster if I sewed more often?
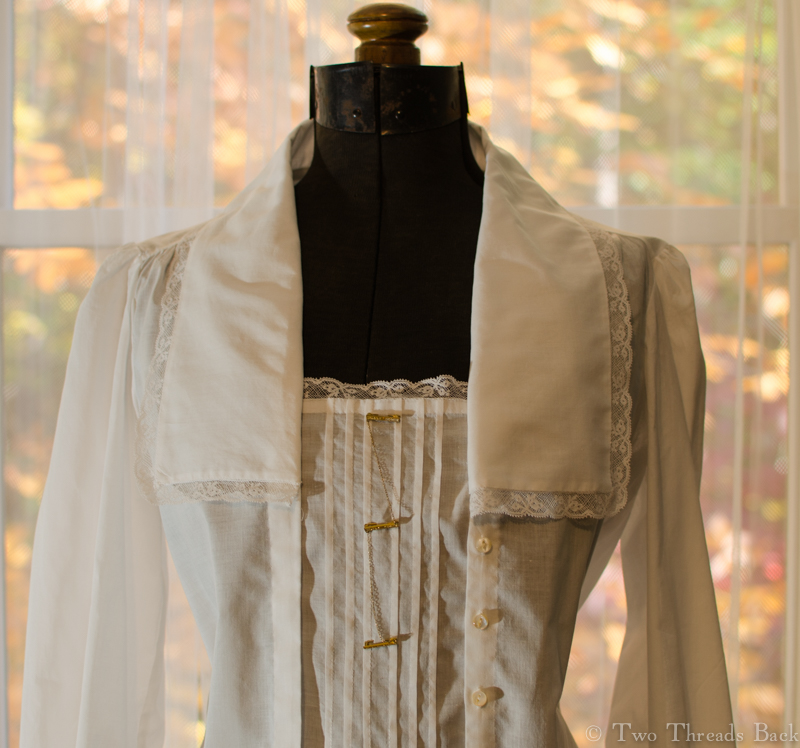
The fit was nice, the collar lay smoothly, and the tucked front went together easily. The cuffs were the only disappointment. I didn’t like the way they looked when buttoned and turned back, because there was no allowance for the overlap in the pattern. Removing the lace trim helped, but if I ever make another one, I’ll have to fiddle with the cuffs.
Martha Mary, a dress form born in 1916, was perfect for modeling the shirtwaist.
The pattern is easy to adapt to different trimmings, but I wanted to keep it simple so that I could wear a little lingerie pin set (see my Etsy store) on the vestee.
A closer view, showing the triple chain set of lingerie pins on the front.
Tiny bar pins were very popular in the early 1900s, and went by many different names: baby pins, cuff, collar, waist, lace, lingerie pins, etc. I think most people now use them for dolls or christening gowns, but I’d always wanted to try them out on a shirtwaist.
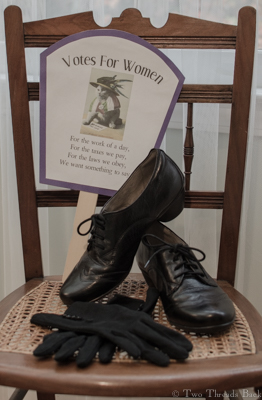
With a hat, a vintage handbag (or pocketbook, as my grandmother would have said), gloves, and black oxfords, I was all set!
A nice plain back: my skill level.
Of course if you noticed the blog title, you can guess where this is going. I didn’t get to wear my costume as planned. Between the weather forecast and volunteering to help with food, all this work wasn’t going to work. Too dressy. Did I let it spoil the day? No way! I transferred the accessories to a more “picnic-y” vintage-looking dress (that I didn’t sew), and had a wonderful time. I’ll save this outfit for another day. Minus the hat and gloves, it would probably pass unnoticed in a room of gray business suits and white shirts!
Dinner on the grounds in the South requires a hand fan. I couldn’t resist a chance to speak for the ladies.
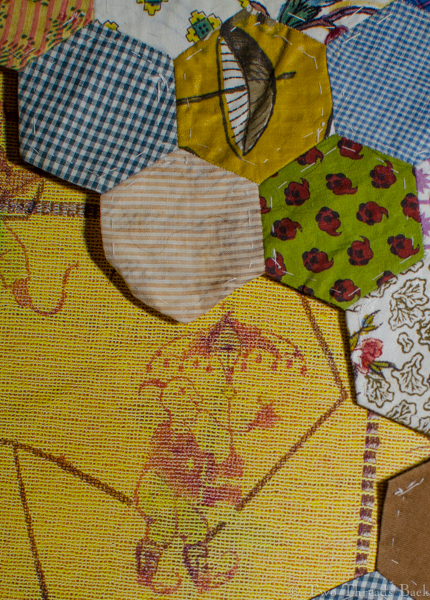
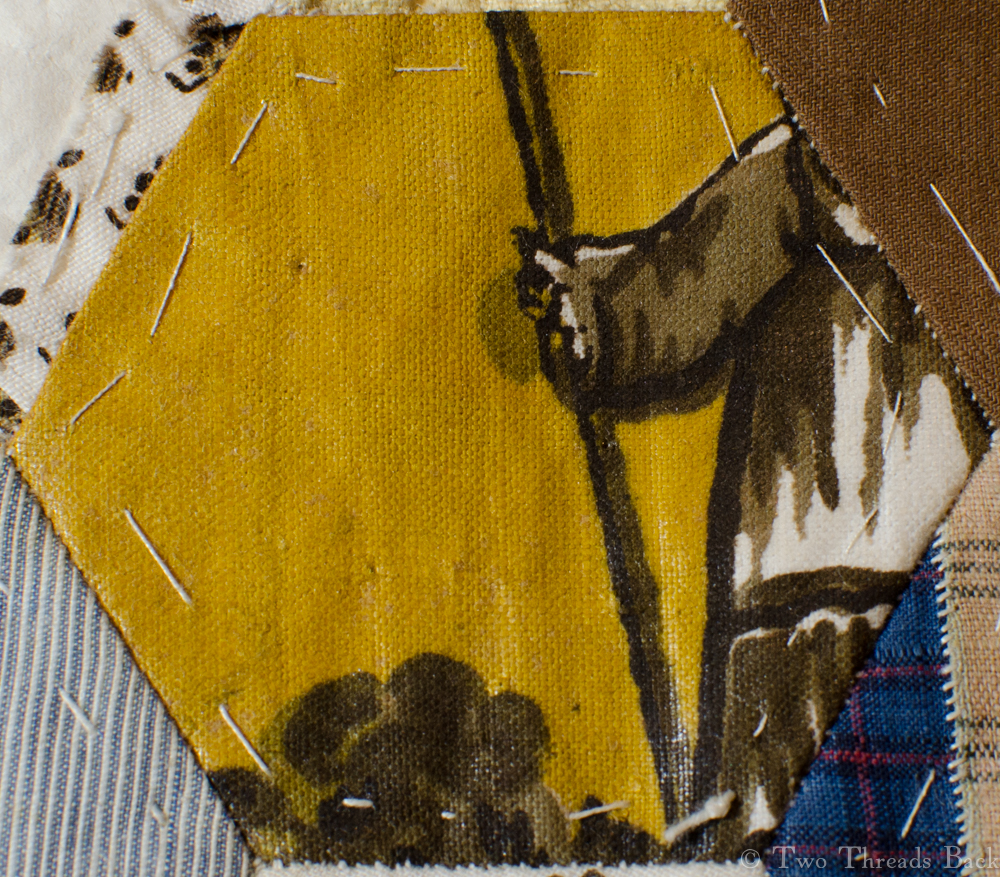
That “aha” moment, when a photo in a book bears a resemblance to a quilt patch.
It might be a stretch, but these Flower Patches of yellow, white, and brown reminded me of a photo I’d seen in a costume history book. I just couldn’t recall where! All I could remember was that it was very yellow and had something to do with parasols and a theme exotic to western eyes, like something from the “Orient.”
Finally, I found this illustration from Fashioning Fashion: European Dress in Detail, 1700-1915, by Sharon Sadako Takeda. (Fabulous book!) It’s definitely yellow. And the pattern is certainly exotic. The quilt fabric, however, is heavily glazed, and I have no idea whether it was used for apparel or furnishings. I re-read the section on yellow dyes in Susan Greene’s Wearable Prints hoping to identify the type, but decided I’m too inexperienced for that.
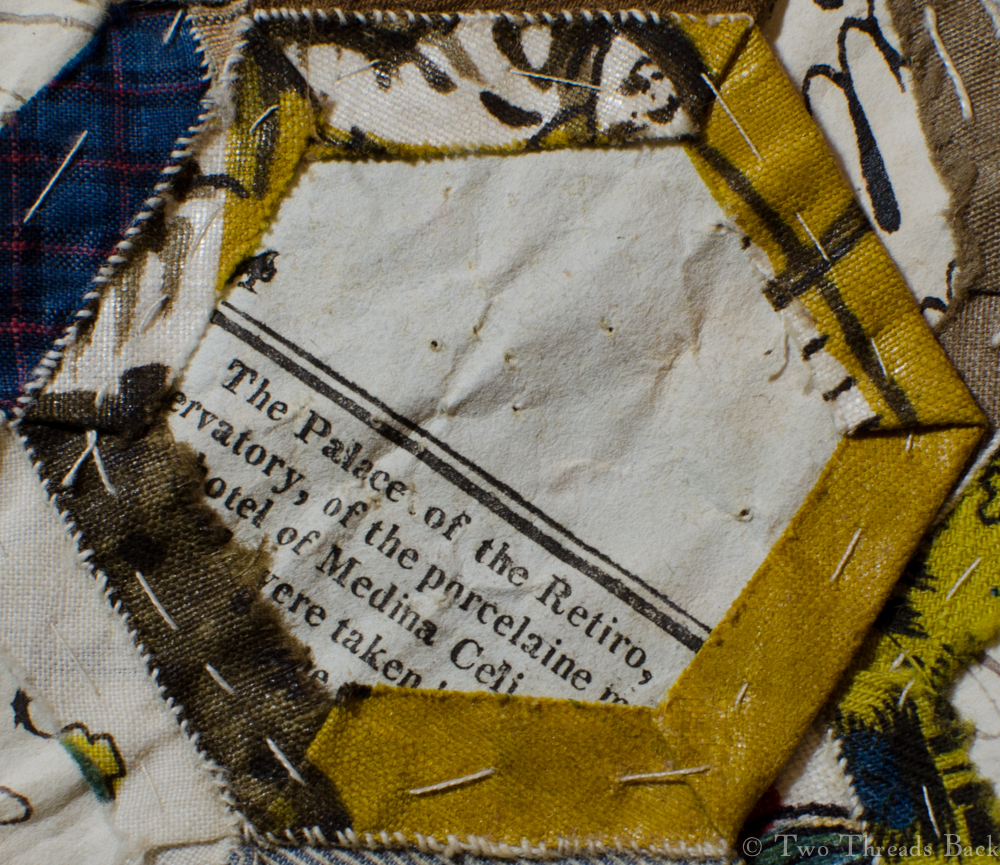
Back of the patch with a snippet of text, perhaps from the “Something Register.”
As for date, the little bit of text printed on the back of one of the pieces was an enticing clue. I was surprised to see how many early publications appeared after a keyword search. Even after I filtered the results by spelling and phrasing, there were way too many to pin it down. And I found that many publishers “borrowed” and reprinted much more often than I would have expected – even for that era. But I did get it narrowed to circa 1808 or ’09, the British Register, Political Register, Annual Register, Literary Register, Cobbett’s Register…. At that point, I guess it registered with me that the exact source would remain uncertain.
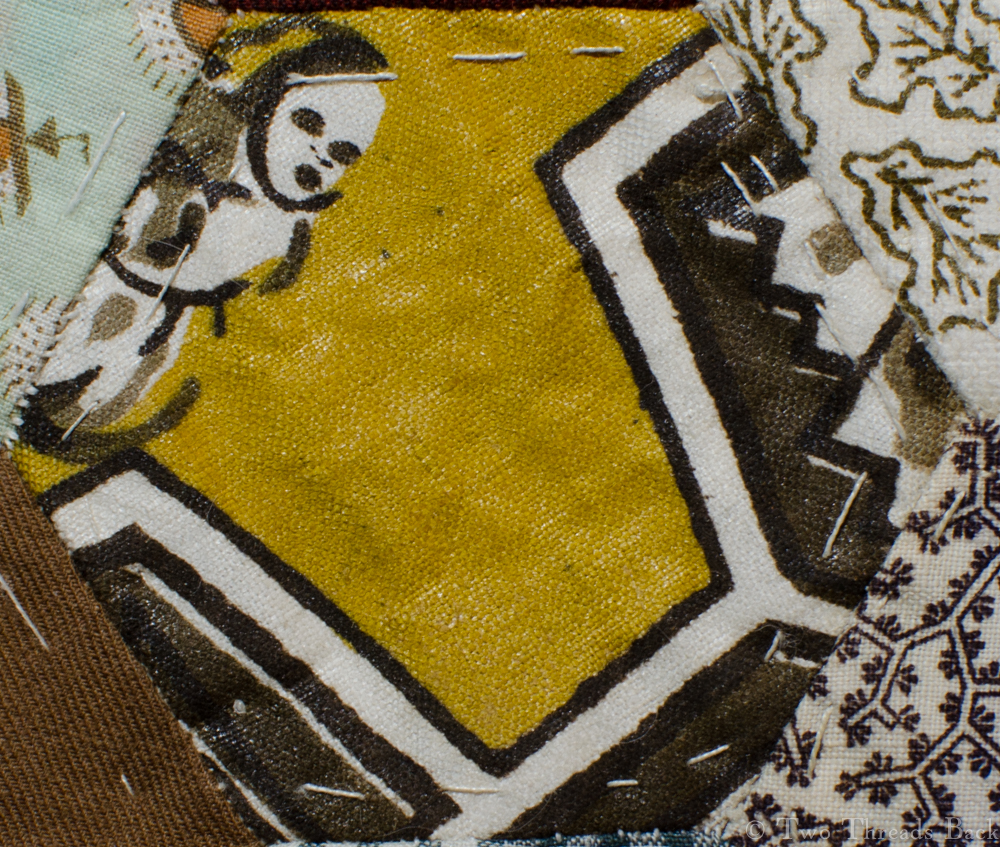
The right side of the patch showing an arm holding a – parasol?
This piece shows a person’s face.
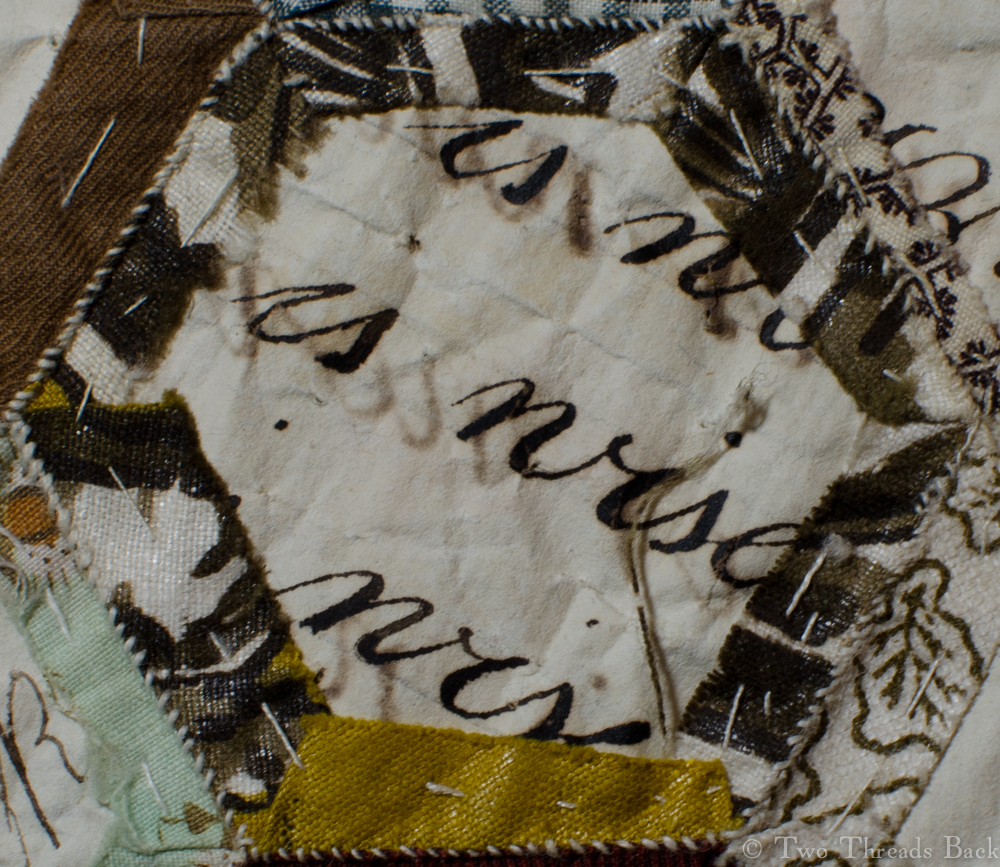
The reverse of the patch above, with writing from a copybook.
A patch with a parasol.
And the back of the patch with a parasol, also with copybook writing.