“About 1849.” Except for the owner’s name, that’s really all I know about the history of this particular little sewing album. It’s bound with marbled paper card stock, edged with silk ribbon, and the colorful pages have the feel (and unfortunately the quality!) of children’s construction paper. Written inside the front cover is “made about 1849 by Mary M. Quiston, later Mrs. Reid, later Mrs. Porter.” (The “M. Quiston” might be “McQuiston.”)
Samplers of cross stitch (marking), embroidery, or darning skills have a long history in Britain, America, and Europe, but the popularity of books containing specimens of plain sewing stitches began in England in the 1810s. They were developed as part of the “monitorial” education system where pupils who had mastered a skill instructed the ones who were just learning it.
This system of “mutual education” was originally applied to basic reading, writing, and arithmetic, then to plain needlework since it was an essential part of female education. Understanding sewing instruction techniques was much easier if you had a small sample to see. Books with samples of hemming, stitching, seaming, marking, etc., were originally intended to help a teacher follow “the system” in her classroom, but also developed into treasured collections preserved by the girls who had worked them in order to demonstrate their accomplishments.
This is one of two caps included in the 1816 British and Foreign School Society manual, a book intended as a guide for educators who were using their monitorial system. It’s attached to the page so I can’t fold it out to show it well, but there’s a tiny number “1” marked in red cotton barely visible on the left. The other cap is marked (surprise!) “2.”
The earliest books might include a miniature shirt, cap, or apron, but it wasn’t long before they added other items like stockings, sleeves, dresses, trims, etc. to the classes. Educators appreciated the savings in time and expense that using small samples offered (and heaven knows charity schools needed to economize!) but maybe they had another reason as well: it was fun making tiny garments that were just like doll clothes! Here are some of my favorite pages from Mary’s book.
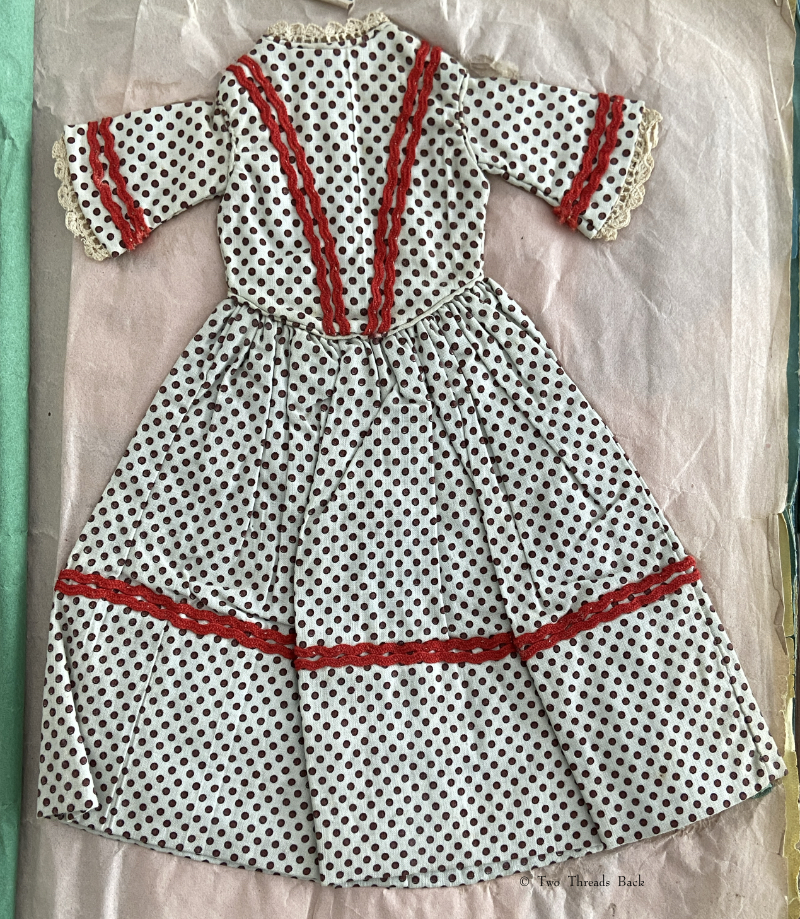
This dress is a simpler style than the sheer one above and it’s made of printed cotton.
Mary sewed this child’s dress with nine tucks in the skirt, gauged gathers, and trim she (probably) made herself.
We can’t forget the MOST important garment in the Plain Sewing repertoire: The Shirt. No course in plain sewing was complete without this accomplishment!
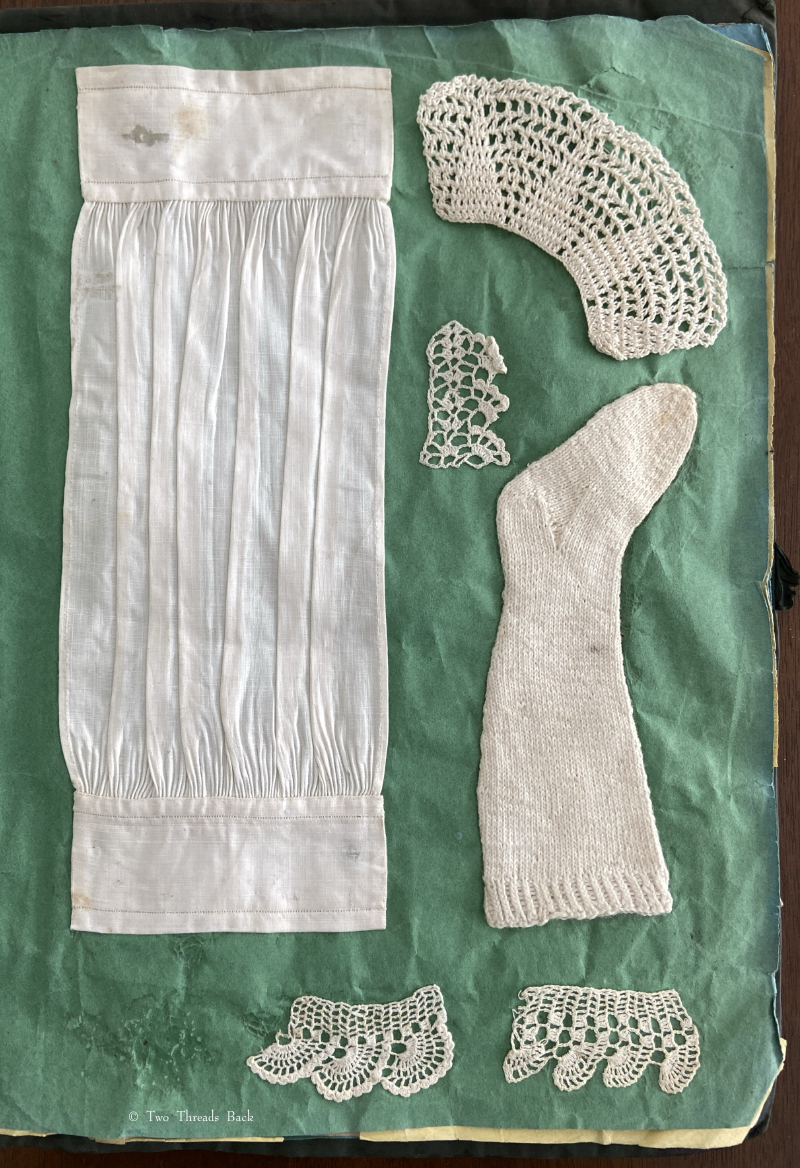
Here’s an example of the practice cuffs or wristbands that would have been worked before she advanced to making the above shirt. Knitting was also an essential needlework skill for women, and most 19th C sample albums included examples. There was a single full-sized stocking tucked into the book also.
Plain and fancy! Mary did all the hemming, seaming, and making buttonholes in her earliest lessons, but she obviously got to learn some fancywork as well. If you get a thrill looking at daguerreotypes of that time (Pinterest is sooo addictive) you might recognize the vandyke collar pattern that was so popular then.
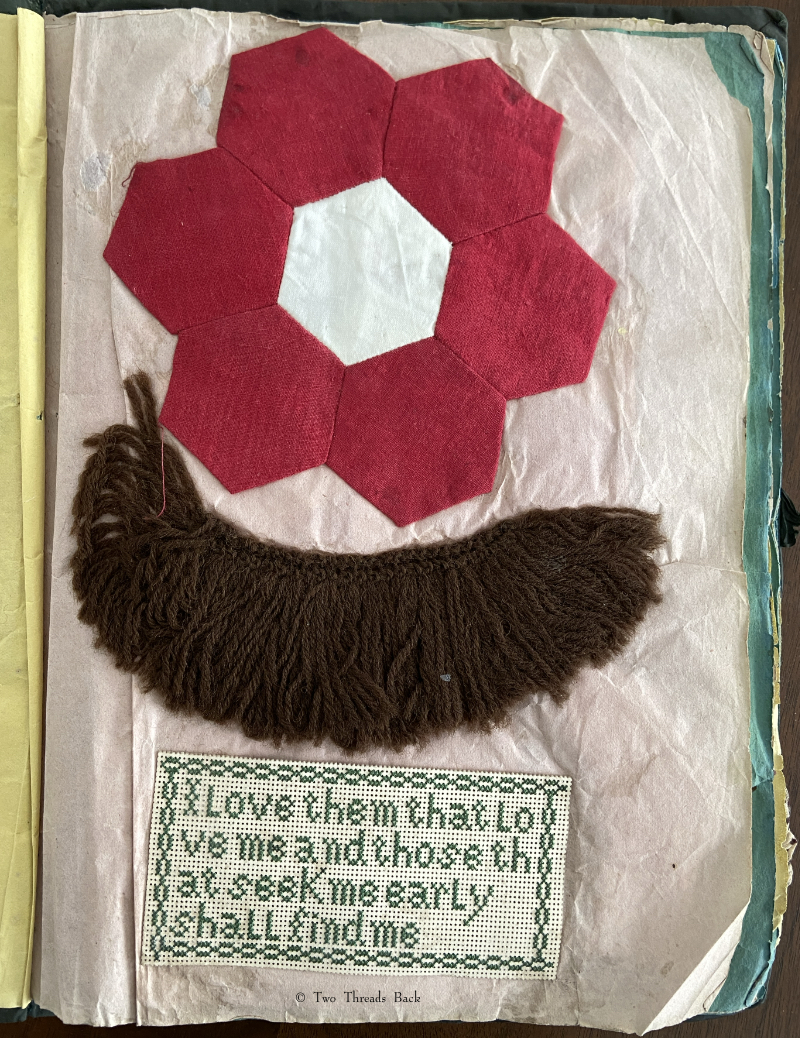
Nope, it’s not a walrus mustache. It’s some pretty (or not!) wool trim, useful for Victorians who didn’t know the meaning of restraint in decor. Mary also made a hexagon quilt patch and worked a scripture verse on punched paper. I don’t understand why 19th C needle workers seem so untroubled by words that run out of roo– m. Why???
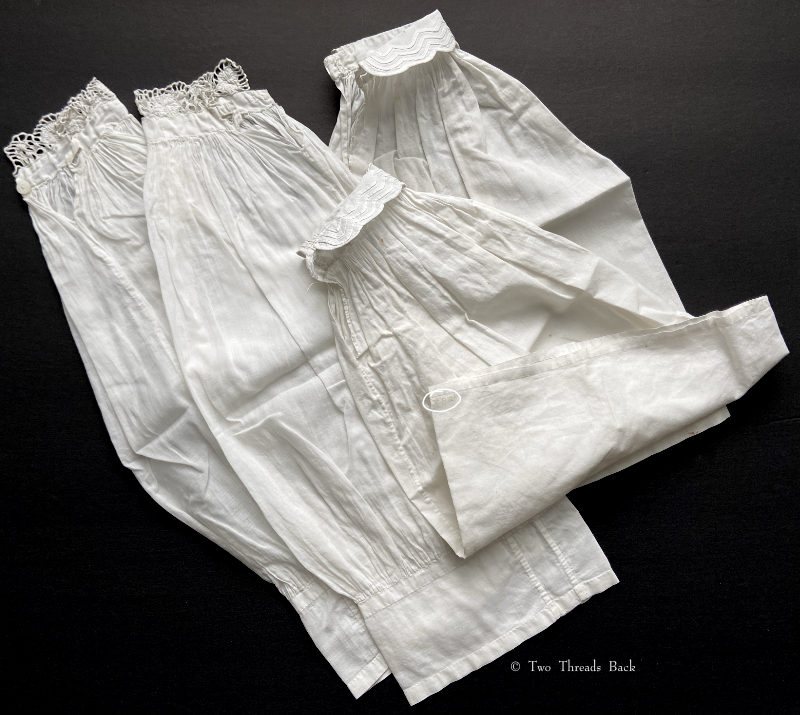
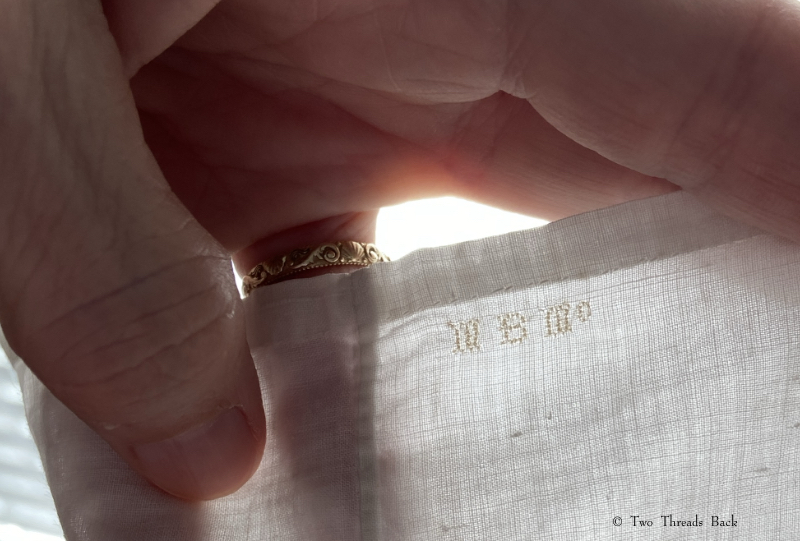
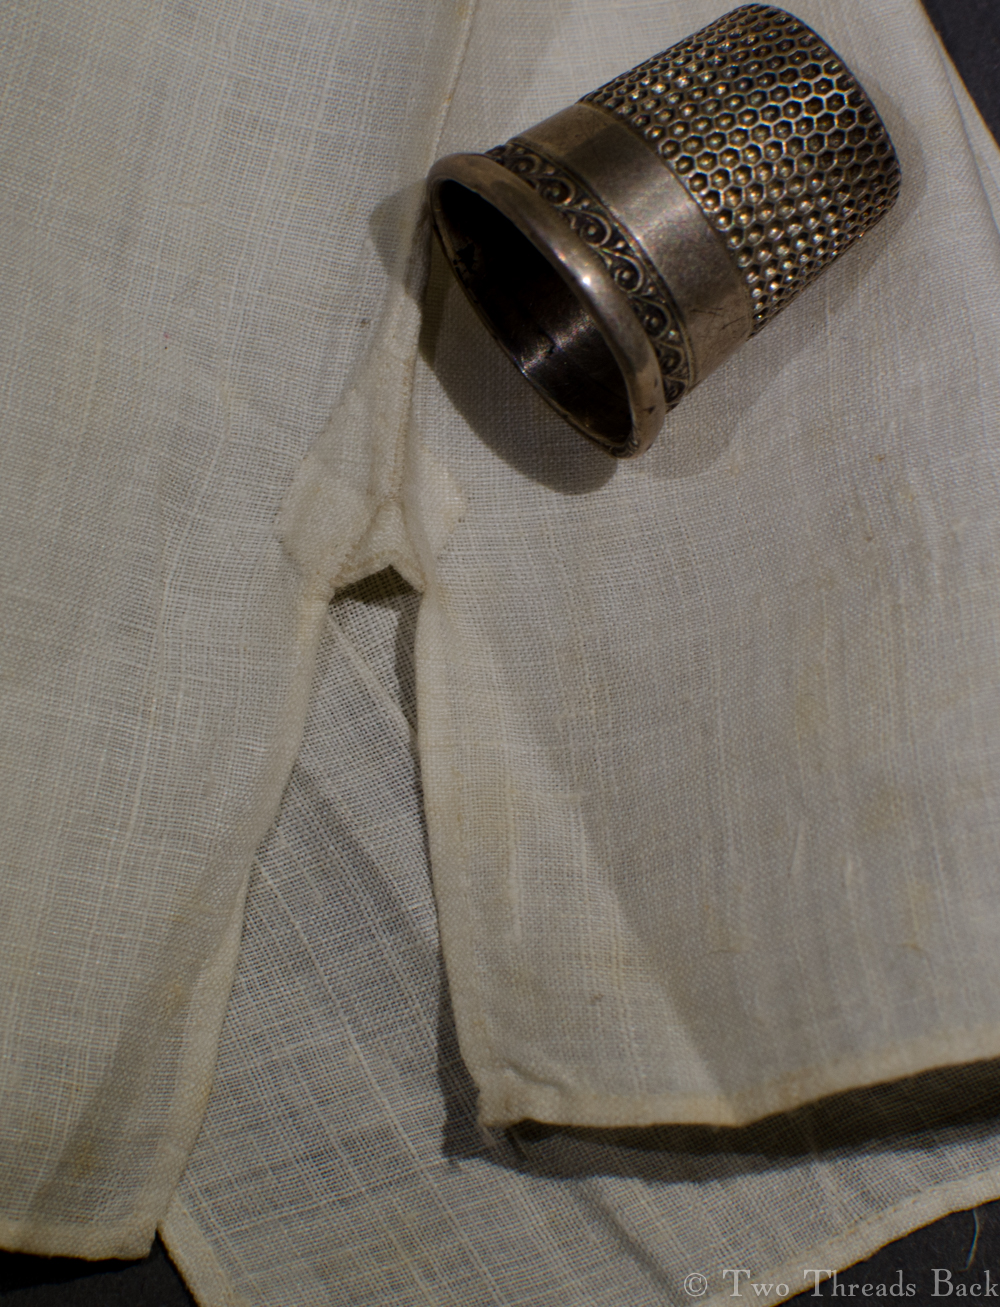
Two pairs of undersleeves were kept with the book. I assume they were Mary’s work because they have her initials marked in cross stitch. I’ve circled them in the photo to show how small they are. The sleeves show wear, so I don’t know if they were part of her sewing instruction or later work that stayed with her album.
The marked initials are less than 4mm tall. I never cease to be amazed at the tiny stitches they could make. The letters look like M B Mc to me. McQuiston?
I wish I knew more about Mary. How old was she when she learned to sew? Did she have daughters who wanted to take the dresses for their dolls? I would have! Did she use her skills for the rest of her life, or pack them away, back “around 1849”?
Sewing instruction manual belonging to Miss Peacocke, 1832. She conquered Sleeve Gussets for a Shift.
Tutorials aren’t usually a feature of this plain sewing blog, but I set out the steps for someone who needed help with sleeve gussets, and thought I’d share for anyone who flirts with insanity when inserting them for dolls or costume. I like pictures in sequence best – except maybe when assembling anything from Ikea!
A gusset is a little piece of fabric inserted to reinforce or to increase the ease of movement in garments like shirts and shifts – you can see in the pictures how it gives more room under the arm. They were used up until mid-19th-century-ish when fashion, fitted patterns, and sewing machines made them pretty much obsolete, though some sewing classes included directions for small ones at garment openings into the 20th century.
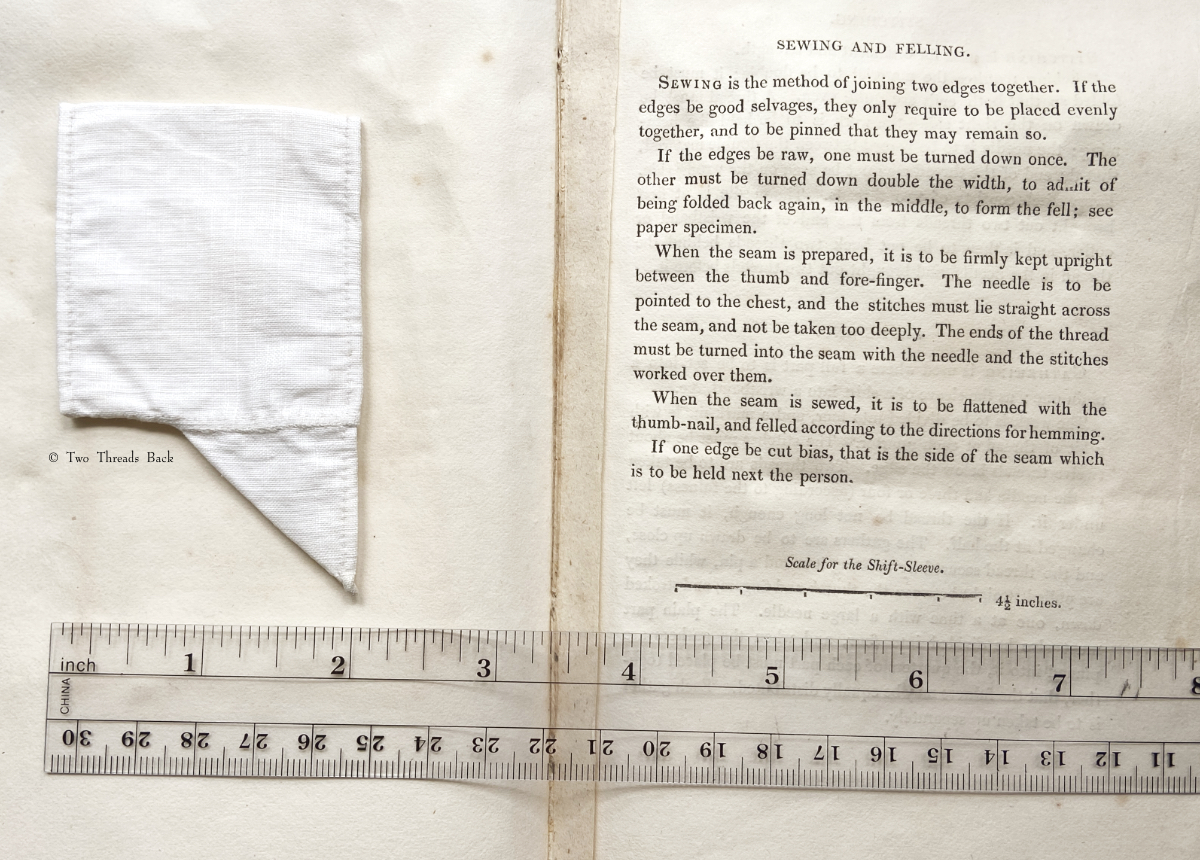
Plain sewing projects might include a sample sleeve gusset, because they used basic stitches like hemming, felling, and sewing/seaming1. A miniature size was practical, saving both time and material; the ones pictured here were pasted in books meant as guides for sewing teachers.
Closeup look at another specimen. It’s also been hemmed on the side that would be inserted into the body of the garment, but that’s only for extra hemming practice and tidiness of the specimen.
So just how hard can it be to sew straight seams on a little square? Well, if you want all the edges to be neatly enclosed, lie flat, and the right size when finished, it can be a pain in the armpit! The following sequence shows the “sew-and-fell” method, replicating the miniature specimens above. I’ve seen other methods – and I have some examples – but this one set the standard for fine needlework.
Note: In 19th century manuals, the deeper double fold for felling was always completed before any sewing was done. See pics Fig. 50 and 51 here. That’s difficult to illustrate in a photo sequence, so I’ve made the second fold after the seaming is done.I’ve used a coarse cotton printed on one side, contrasting thread, and big stitches (ha!) so that it’s easier to see.
Above: The sleeve piece is on the left, the gusset on the top right, and a finished gusseted sleeve on the bottom right.
Above: Fold the sleeve edge down to the desired width of the seam. Crease the gusset diagonally and then fold it down twice as deep as the sleeve.
Above: Place the sleeve and gusset wrong sides together and then seam together, stopping just short of the end, since that side will be folded next.
Above: This is the same step as above, viewed from the side. You can see that the gusset side fold is twice as deep as the sleeve side fold. (It should already be folded back again, ready for felling, if you want to do it exactlyas they taught it.)
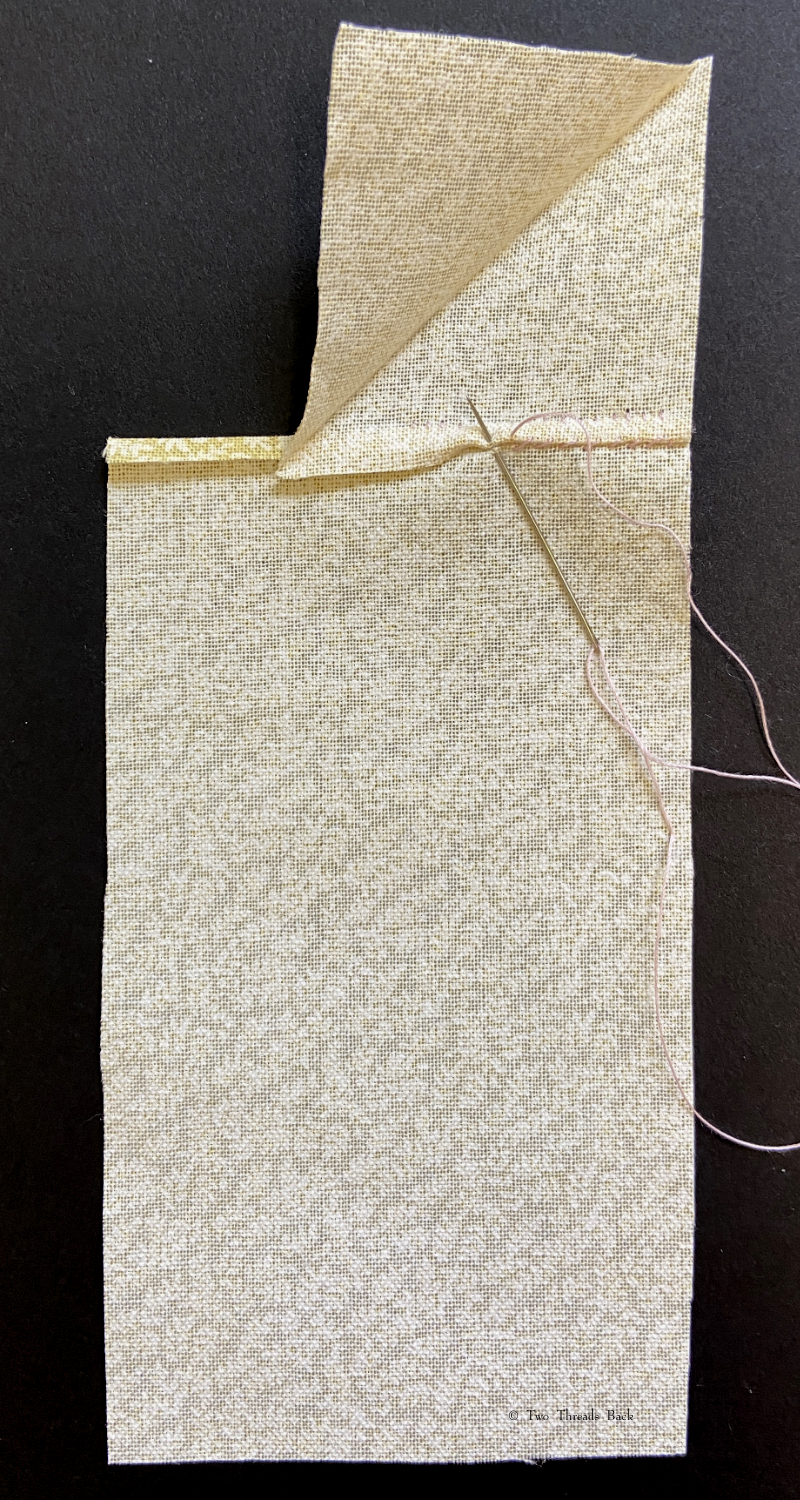
Above: Fold/fell the gusset edge down over the sleeve edge. WARNING: OPTICAL ILLUSION! Sometimes the gusset crease in this photo appears to be folded back onto the right side instead of forward onto the wrong side. It’s all in how your eye first perceives the image. It’s actually folding forward toward the needle.
Above: Next, fold the adjoining edge of the gusset – this time it’s the gusset’s turn to be the narrower fold! (You can see why the stitching wasn’t taken all the way to the edge earlier.) Fold the bottom edge of the sleeve twice as deep. Then with a little twist, bring corner A down to meet corner B, fold to fold.
Above: Now seam the gusset and sleeve together, and keep on going past the end of the gusset, seaming the rest of the sleeve together.
Above: A view of the inside, looking up into the sleeve from the gusset opening, before the sleeve edge is felled down over the gusset edge.
Finally, fell the sleeve edge over the gusset and keep on going, all the way to the end of the sleeve. This photo is peeking inside the sleeve, to give perspective. Of course when you’re actually SEWING it, you’ll need to turn the sleeve inside out!
The author of The Workwoman’s Guide (1838) may have been a little impatient with gusseting herself. She suggests simply hemming the gusset evenly all around, hemming the sleeve where it will be inserted, and then seaming the two together. I’ve done that myself! As long as the work is neat….
Gussets – Much depends upon the nicety of the putting in and finishing off, but when well accomplished they have a peculiar charm to a good needlewoman.
Personally, I find peculiarcharm in just finishing one with my good humor intact. I’ll save the appreciation of niceties for those glorious gussets worked long ago.
1 Terms used for stitches differ according to time and place. The stitch I’m referring to here, a very shallow overcasting used to “butt” two pieces of fabric together, was called seaming or sewing. The term sewing was more common in the first part of the 19th century in English and Irish manuals. Seaming was more popular later. There are no early American sewing manuals, but in the U.S. over-and-over stitch was frequently used by mid-century and then overhanding was popular later (as distinct from overcasting which was a wider stitch used to prevent edge raveling). I usually call the stitch seaming because calling it sewing would be really confusing (even more than this footnote!) and over-and-over stitch is too wordy to verbify!
Who doesn’t love to watch a magic trick? I think they can be a lot of fun, at least as long as I’m not the volunteer from the audience. Especially for this trick!
1784
To pull off any Perfon’s Shirt without undreffing him or having Occafion for a Confederate.
This trick requires only dexterity, and nevertheless when I performed it at the Theater-Royal in the Hay-Market everybody imagined that the person whom I had tricked out of his shirt was in a confederacy with me.
The means of performing this trick are the following, only observing that the cloaths of the person whose shirt is to be pulled off be wide and easy.
Begin by making him pull off his stock, and unbuttoning his shirt at the neck and sleeves, afterwards tye a little string in the button-hole of the left sleeve; then, passing your hand behind his back, pull the shirt out of his breaches, and slip it over his head, then pulling it out before in the same manner, you will leave it on his stomach; after that go to the right hand, and pull the sleeve down so as to have it all out of the arm; the shirt being then all of a heap, as well in the right sleeve as before the stomach, you are to make use of the little string fastened to the button-hole of the left sleeve, to get back the sleeve that must have slipped up, and to pull the whole shirt out that way.
To hide your way of operating from the person whom you unshirt and from the assembly, you may cover his head with a lady’s cloak, holding a corner of it in your teeth.
In order to be more at your ease, you may mount on a chair, and do the whole operation under the cloak. Such are the means I used when I performed publicly this trick.
–PHYSICAL AMUSEMENTS and DIVERTING EXPERIMENTS, 1784
That kind of describes what it feels like when I’ve tried to change clothes in the car. Actually, I think this trick would require a good bit of dexterity, as well as a few practice runs. But still not as much as was required to make this little boy’s shirt. A lot of stitches went into it; decorative backstitching on the collar and cuffs measures about 32 per inch. The simple hemming was 12-14 stitches per inch and seaming (like shallow overcasting) was up to 20 per inch!
A small boy’s shirt, early 19th century. The fineness of all the plain sewing I try to photograph is hard to convey, since close-up shots make the materials seem coarser. But in a more scaled shot, it’s hard to see the dainty stitching. Maybe this one where I’m holding it adds perspective. It would fit a 4 or 5 year old.
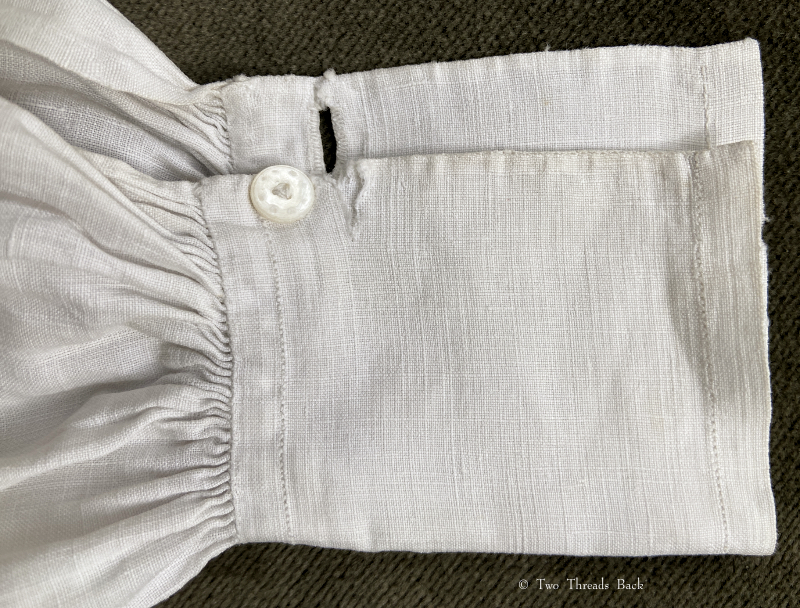
He did get some wear out of it! There are several mends and worn spots, like on the wristband here. So this buttonhole is where the conjurer would attach the string!
The boy’s shirt is made like a man’s shirt. There were 20 parts in a “gentleman’s” shirt:
The body, two sleeves, two wristbands, two binders, two shoulder-straps, one collar, two sleeve-gussets, two neck gussets, two side-gussets, two wrist gussets, one for the bosom, and the frill.
This one, however, was made with without the shoulder straps (a strip of linen along each shoulder), binders (lining next to the armscye), wrist gussets, or a “bosom gusset.” It did have a frill and an inserted pleated front made out of finer linen
It was interesting to see that the two separate ruffles were both sewn to the wearer’s left side, and hemmed folded in the same direction, making them look correctly worn when both are folded over toward the right and exposing the pearl buttons. On all the other shirts I have or have seen, the ruffles are hemmed with each side’s hem folded inward toward the front opening.
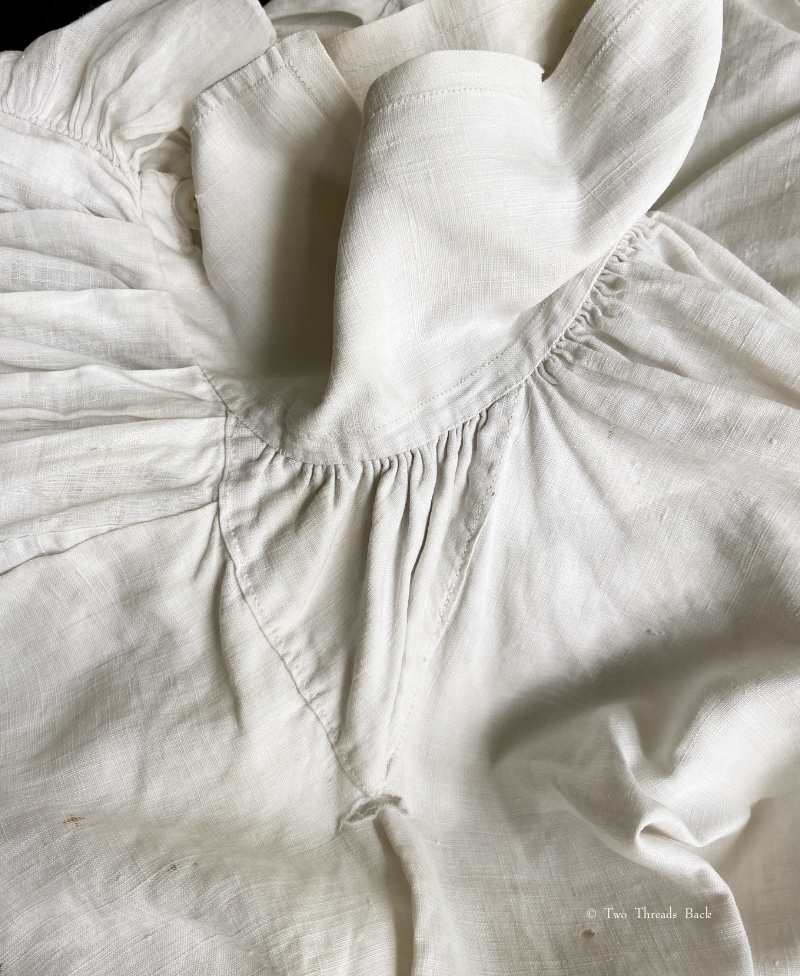
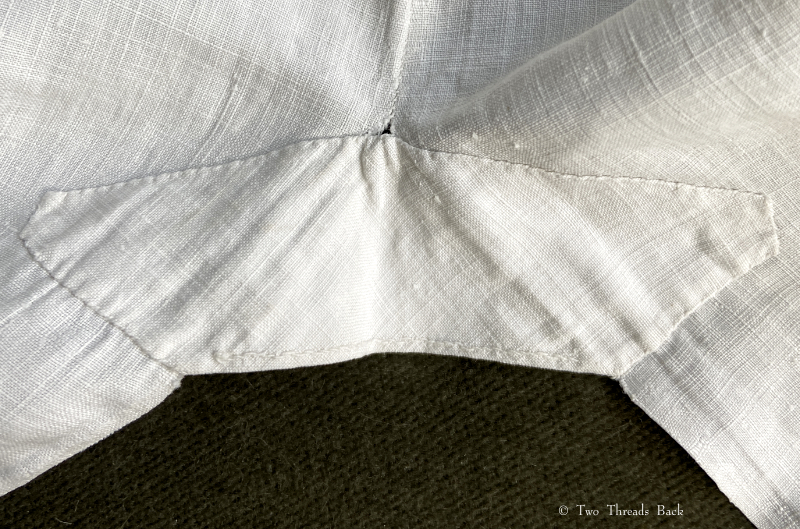
This is the neck gusset next to the collar, and the tear at the point along the shoulder gives a hint why most shirts needed the reinforcement of “shoulder straps.” Perhaps more for strength when tugged than for abrasion!
Bet the little guy couldn’t wait to unbutton his collar – it measures barely over 10 inches when buttoned!
The neatly sewn underarm gusset.
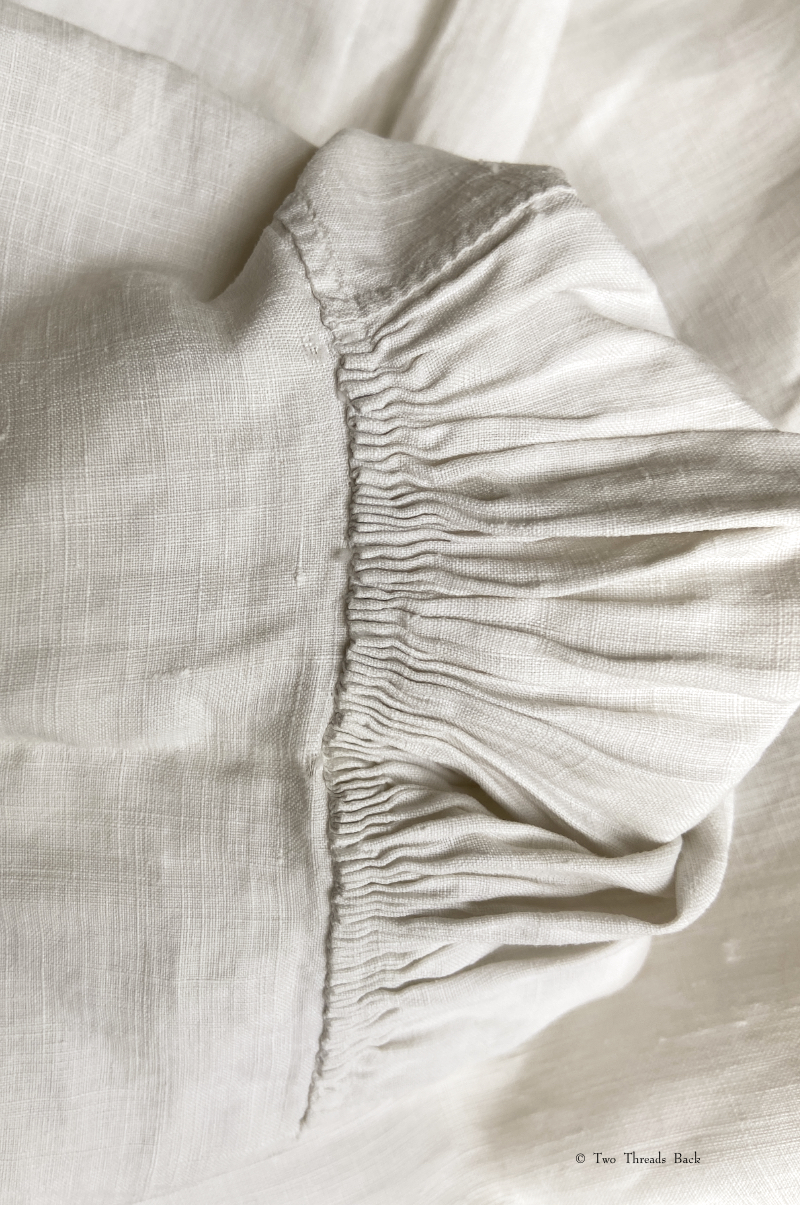
Inside view of the sleeve gathers at the shoulder. These aren’t usually visible in surviving shirts, because they are hidden inside “binders” which weren’t used on this one. The other shoulder has two coarsely-mended vertical tears, one at the same point on the gusset.
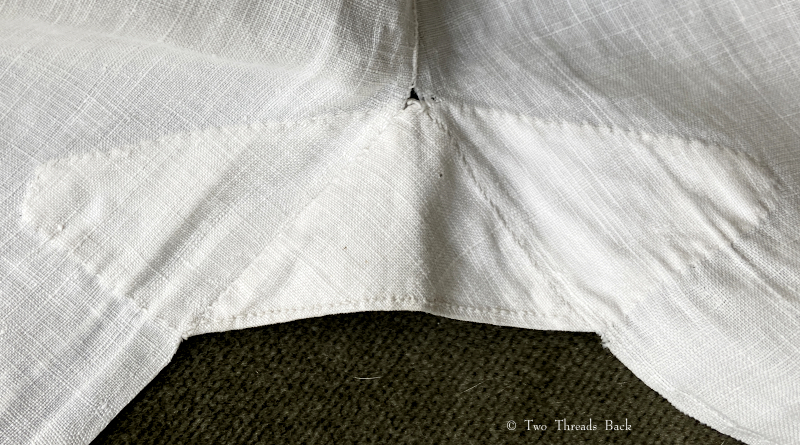
Side gusset exterior.
Side gusset interior.
A peek inside the the shirt front, which had 4 pleats on each side of the front opening. A narrow strip of linen covers the bottom edge.
The SHIRT TRICK was republished in other books over the following decades. It even showed up as late as 1870, but by that time the cut of a man’s shirt was more fitted and complex, and I doubt the stunt would work as easily. Maybe the little fellow who wore this had a copy of the The Boy’s Own Book (1828) and had a go at it? I can’t imagine the maker would have appreciated seeing her work handled so roughly and the “person who was unshirted” might have had to conjure up an explanation!
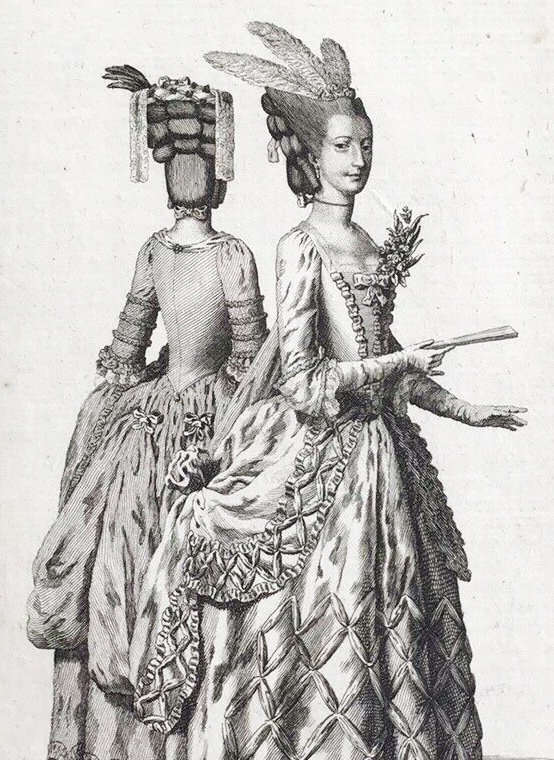
I know what lappets are, costumely speaking, and with regard to women’s millinery. They’re those long, lacy, streamer things that hang down from a headdress. The fanciest ones were made of fine lace and could be terribly expensive. They were popular in the 18th century but seemed to fade by 1800 when the classical look was in vogue, and then regained favor, at least with “mature” ladies, in the middle to late 19th century. Early ones were usually found in pairs, or occasionally joined slightly shaped in the middle, while 19th century ones could be . . . more creative.
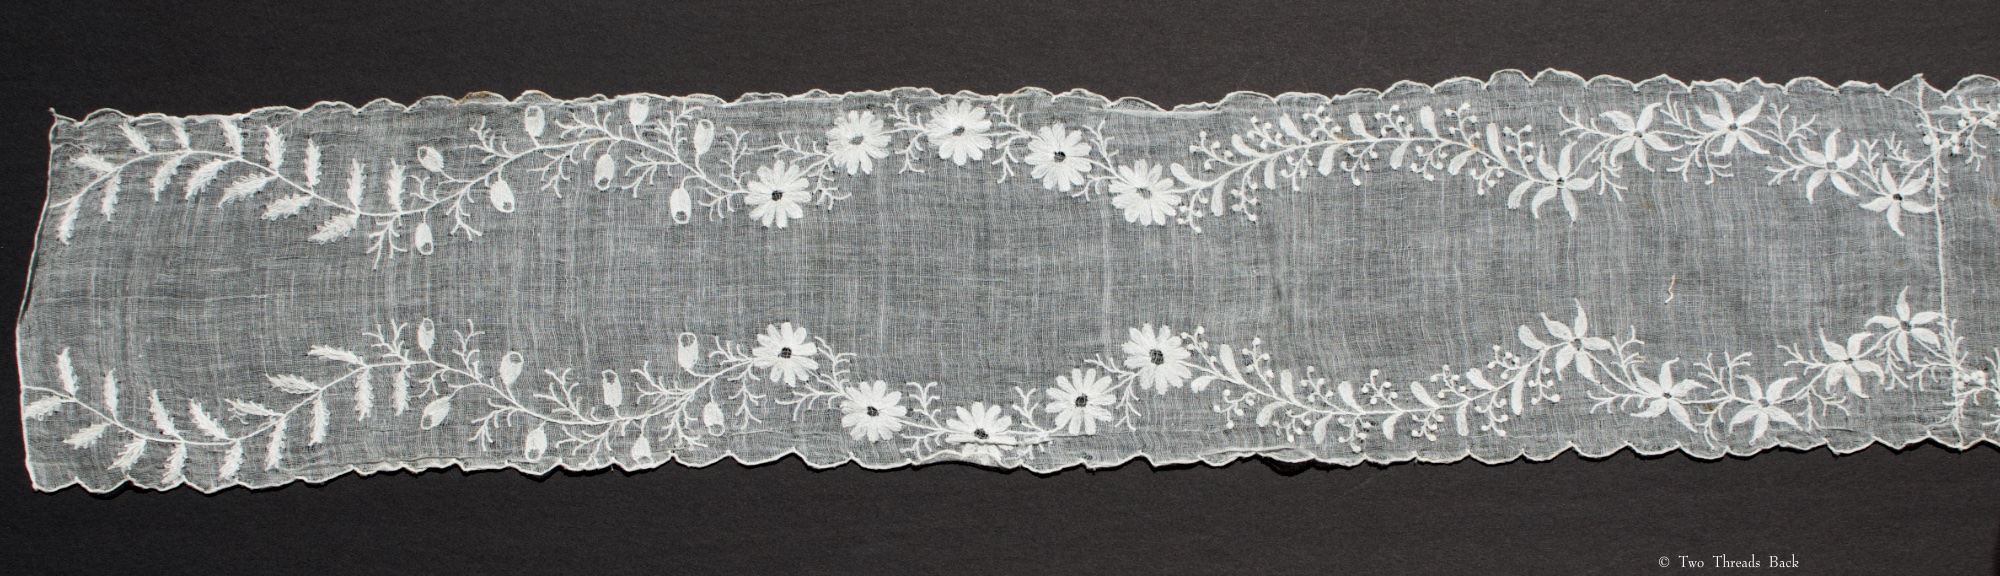
But what have I got here? Two different long strips of fine white muslin, neatly (but probably not professionally) embroidered with whitework. Are they one-piece lappets, or something else?
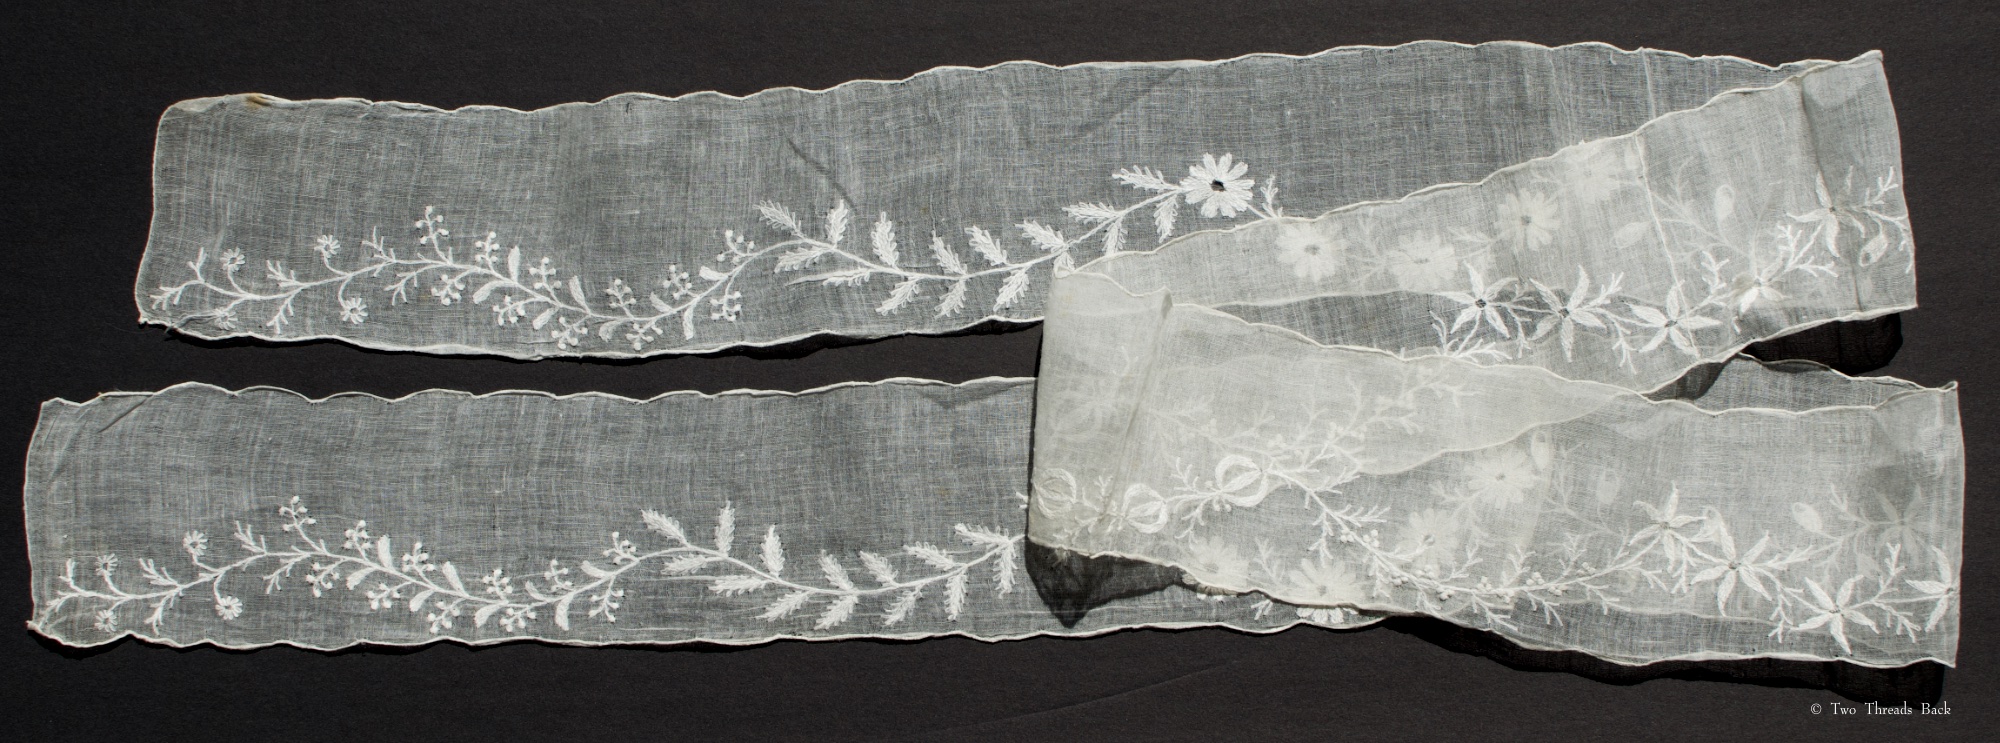
They appear to date to the late 1700s or early 1800s, judging by the materials and floral patterns. One is 58″ x 4″ and the other is 63″ x 3.” The design on the wider one is mirrored on both edges, while the other is worked along one edge only. All edges are scalloped, and there’s a join on both at 20 inches (not the middle) from one end which the embroidery carries right across. Found together + like patterns + like materials = same maker? The design was embroidered to fit, which indicates they weren’t cut from another garment. They seem too fragile for a sash and too narrow for a scarf.
So how in the world would you wear them? It seems like draping across the top of your head would be a bit awkward.
The most fabulous book on accessories of this era is Heather Toomer’s Embroidered with White, and I searched it for clues. It has beautiful photos of lappets. In pairs. With dense embroidery. Sigh. In her book on the next time period (just as brilliant), lappets appear as extensions of other accessories, such as fichus and pelerines. So I’m still wondering what these were for. Help!
The fabric is joined about 20″ from one end (not centered) on both pieces.
The darning is finer than the embroidery!
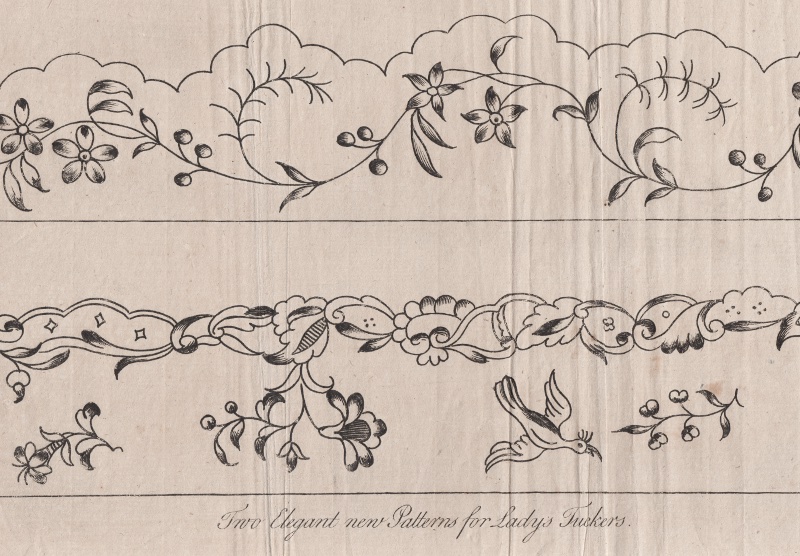
While on the subject of long narrow textiles, I’ll present my next puzzle: tuckers. I’m wandering into dangerous territory when discoursing on 18th century costume, since I know so little. However, I had no trouble finding period references to tuckers. Their wearing location on female anatomy guaranteed attention, one way or another.
Tuckers, as defined in 18th century dictionaries:
TUCKER, tuk’-ur. f. A small piece of linen that shades the breasts of women.
-A Slip of Linen or Lace, pinned along the Top of Women’s Stays -A border of linen or lace on the bosom of a shift -A fine piece of lace, cambrick, &c. pinned or sewed round the neck of a woman’s shift, gown -A shred of linen &c., about the neck of a woman’s shift -A slip of fine linnen, run in a small kind of ruffle, around the uppermost verge of the women’s stays -A strip or ornament of linen worn by women at the uppermost verge of the stays
Then we have Garsault’s 1771 L’art de la lingère, where I’m up to my tucker in speculation:
Tour de gorge en mousseline festonnée. Il se fait d’une aune de long sur un seizieme de large. Painfully translated: Scalloped muslin tucker. It is made one [≈yard] long by one sixteenth wide. A 1788 French-English dictionary defines “tour de gorge” as “tucker,” and “tour de dentelle” as a lace tucker.
This post is already too long to include Joseph Addison’s slightly naughty essay on the tucker – although if you’re curious, you can find one of many reprints here.
There’s no lack of period illustrations of tuckers, but it’s the logistics that have me baffled. Sure, you can tuck a straight band of fabric around the top of your stays – but then all but a few inches in front is hidden under a gown. You can tuck a straight length around the neckline of your gown – but then you have to negotiate the curves, and my mystery pieces seem awfully wide to do it without looking rumpled.
A Lady’s Maid Soaping Linen c.1765-82 Henry Robert Morland 1716-1797 CC-BY-NC-ND 3.0 I don’t presume to know if she wearing a “separate” tucker, or if that’s trimming on her shift. Or neither. But it’s a good illustration of the trickiness of turning corners!
A Laundry Maid Ironing c.1765-82 Henry Robert Morland 1716-1797 CC-BY-NC-ND 3.0 Her frill seems to be a little fuller.
Many paintings show gathered ruffles at the neckline, whether lace or embroidery, although the Lady’s Maid Soaping doesn’t look very frilly. Of course you could always adorn your own tucker, if you were good with a needle.
A pretty pattern from 1772.
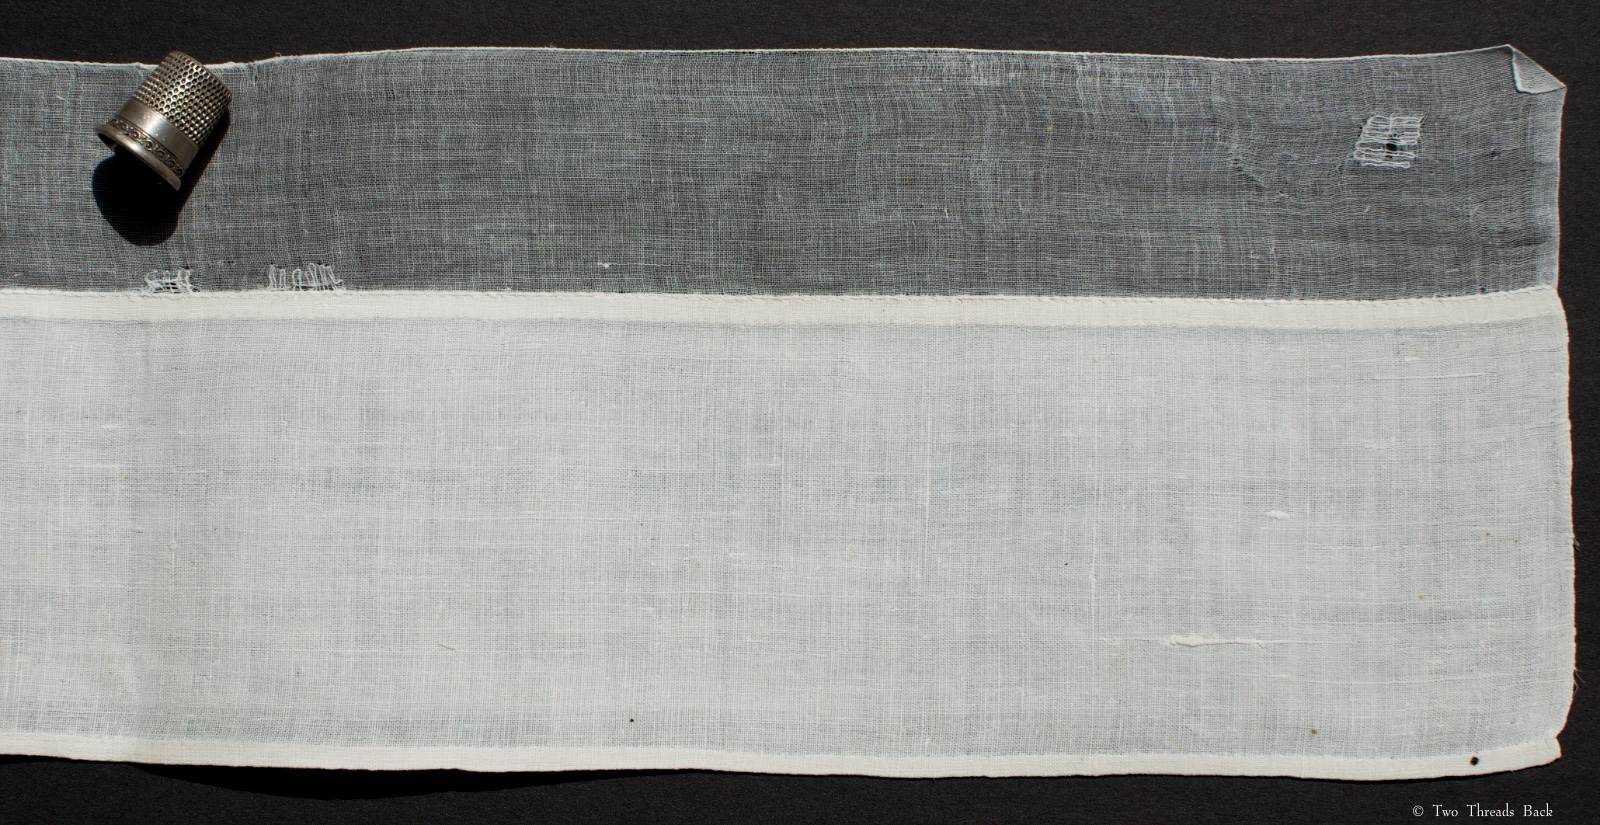
Now here are the four long strips of linen that perplex me, ornamented along one edge, all owned by a woman who lived from 1760-1805, in France. They measure a bit over 40″ long and the linen is @3.5″ wide. If they’re not tuckers, what the heck are they and how did she wear them? Maybe they were part of a headdress. Folk costume. Dresser scarf. Tourniquet with feminine flair.
A closeup of the careful mending. The darns are as fine as the other plain sewing.
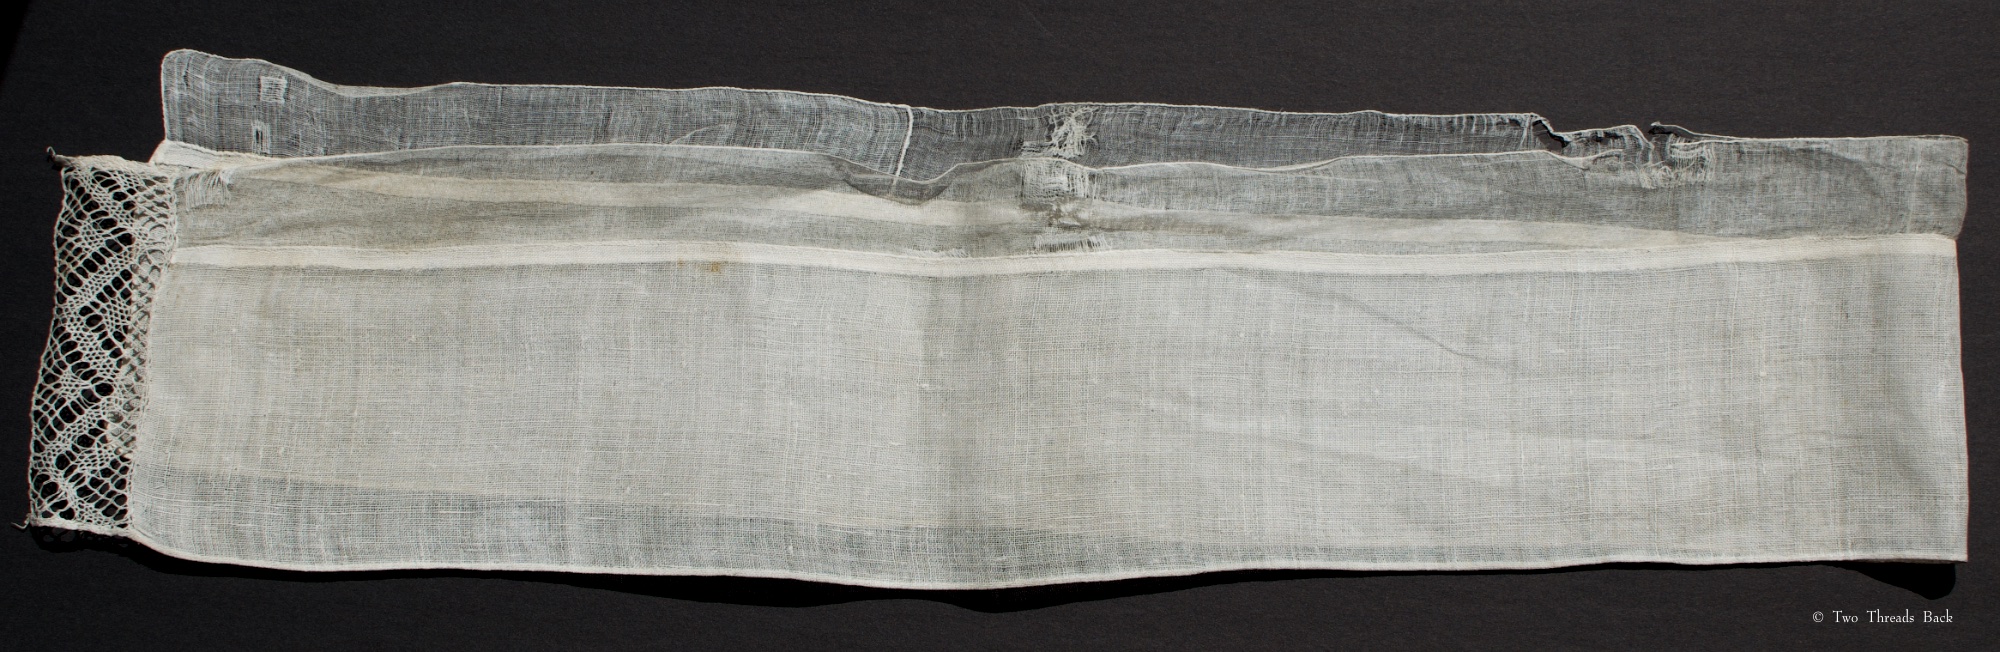
There’s a bit of lace on one end only, and a cambric border on one edge. You can see there’s also a good bit of wear.
This one is in better shape, has lace along the edge, no trim on the ends. And her “marked” monogram.
A beautifully simple one, marked with both initials, although the cambric trim on this one didn’t fare so well.
I’ve called these pieces lappets and tuckers, but I truly don’t know. Research didn’t settle anything for me this time, so any help is welcome. Maybe someday in the future our descendants will ask the same questions about our garments. I know I’ve shopped for workout clothes and been just as confounded – these strappy scraps of spandex go how?!
Yesterday a friend sent me a link to the most exciting news I’ve seen all year. Mr. Darcy’s Shirt is coming to the U.S.! Yes, you can forget Tutankhamun’s treasures or the Beauty of Xiaohe. Mr. Darcy’s shirt outranks them all.
Who can forget the (totally not in the book) scene from the 1995 Pride and Prejudice film where Mr. Darcy rises from the lake at Pemberley after his swim, only to run into the startled and stunned Miss Elizabeth Bennett? Be still my heart.
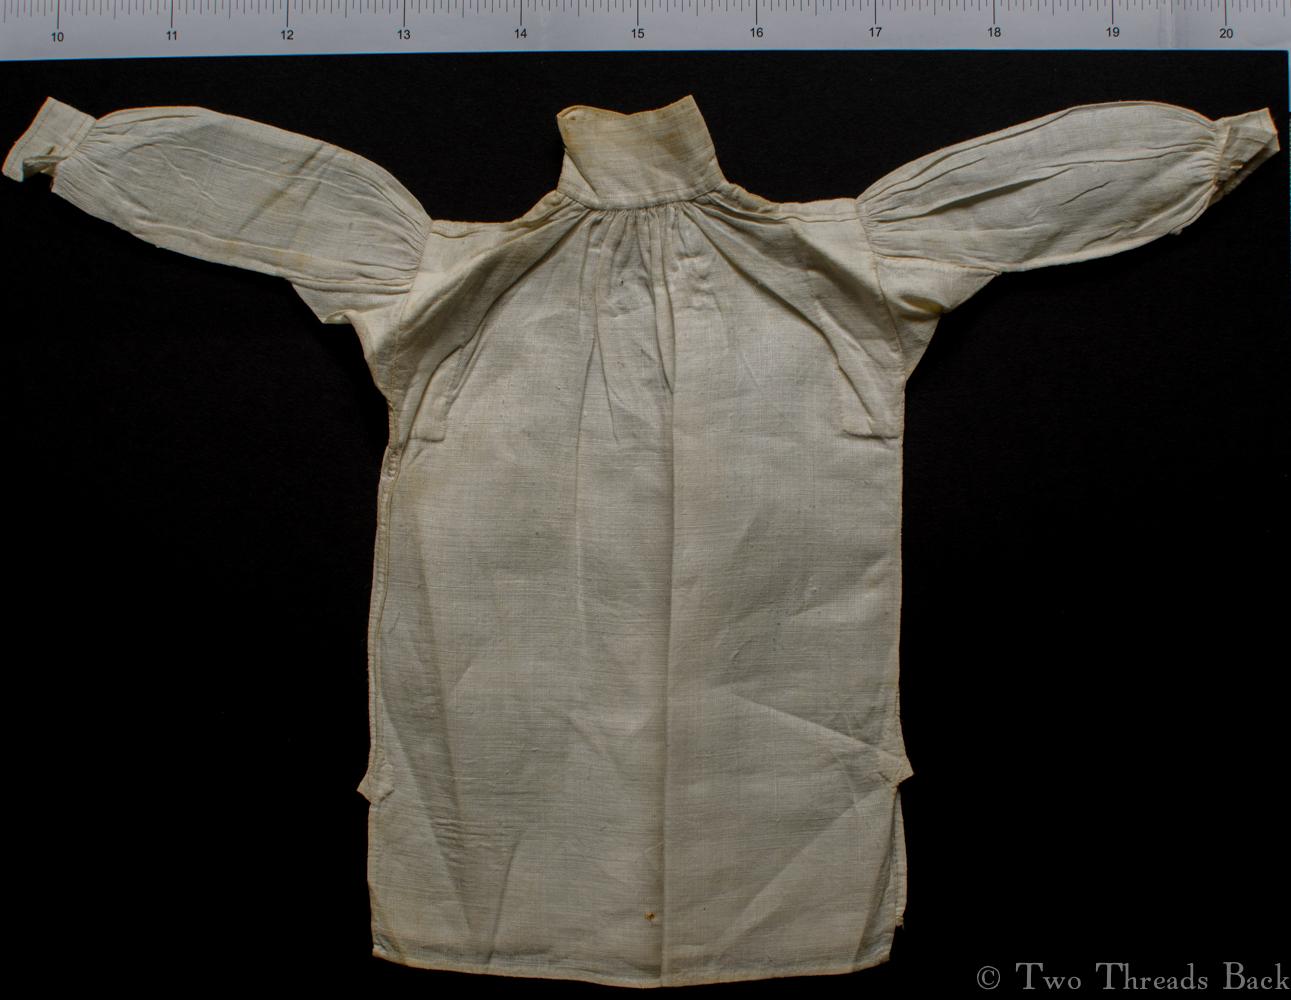
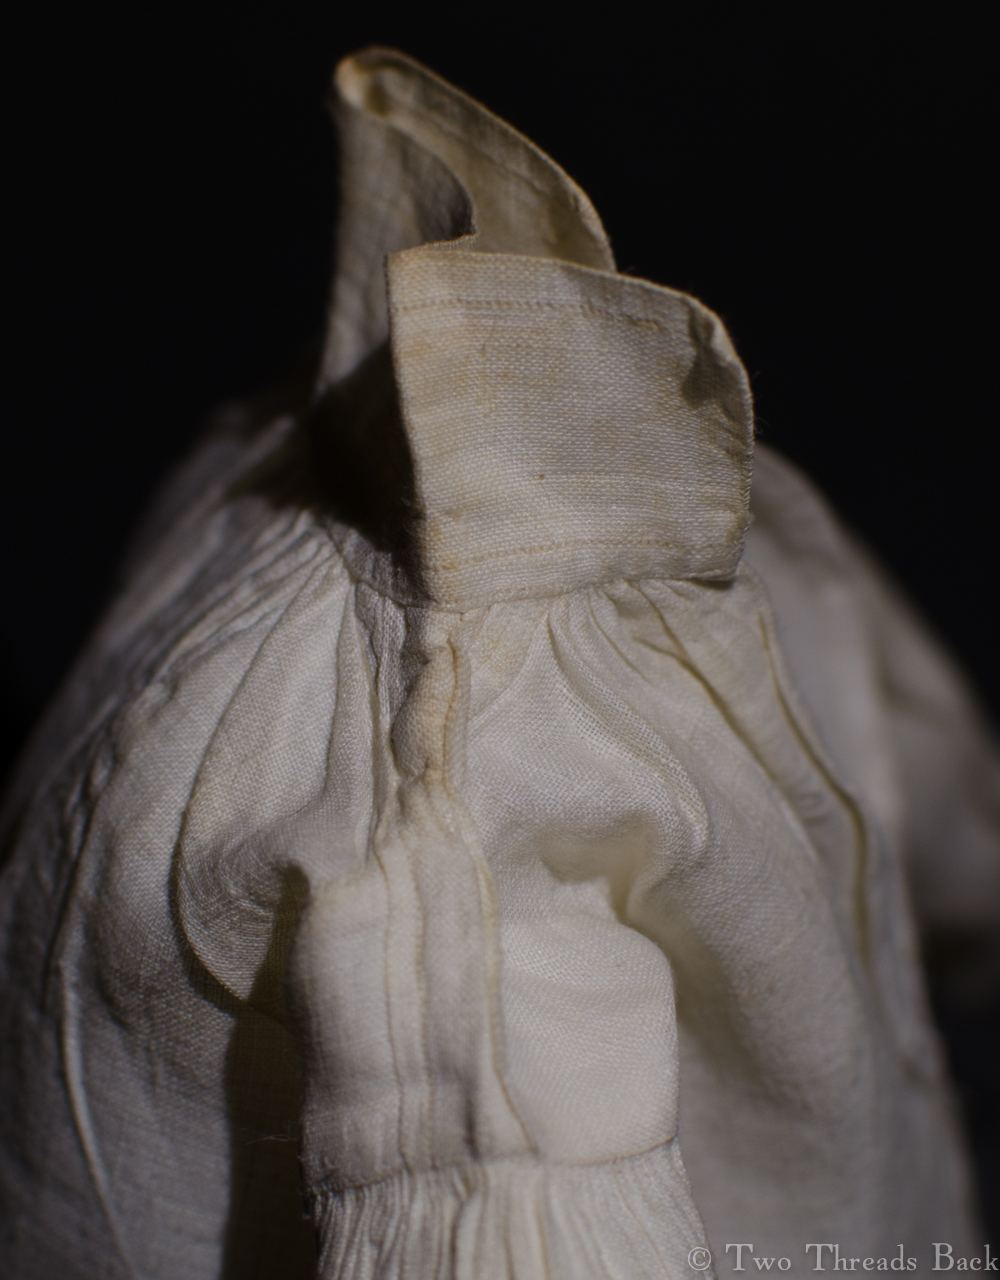
Unfortunately I won’t get to see the celebrity shirt on display, so I’ll have to content myself with a miniature version. This is a tiny “sampler” shirt dated 1838, very much like the square-cut linen one that embarrassed the soggy Colin Firth and melted the rest of us.
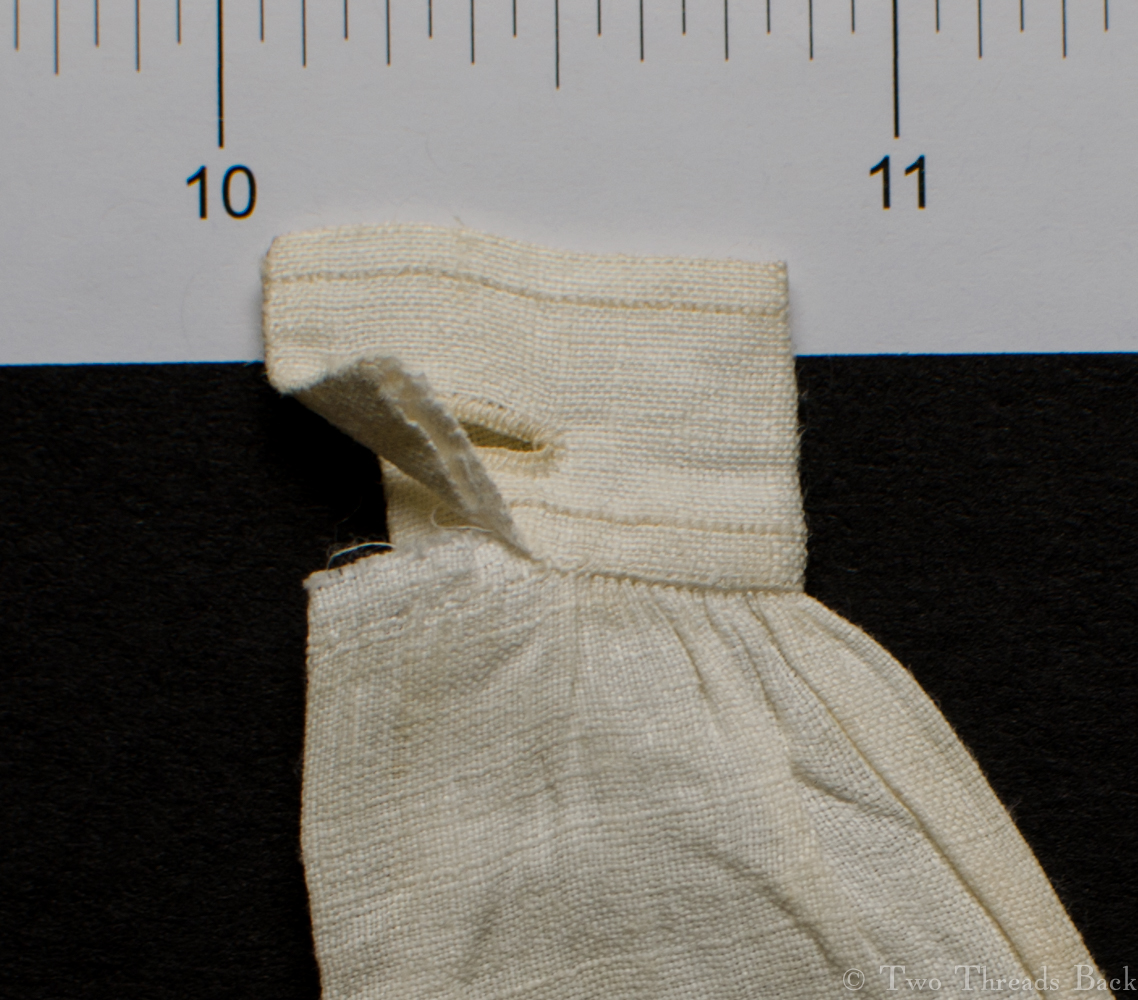
It measures 7 inches from the top of the tall collar to the hem. The cuff is 1 and 3/8 by 1/2 inch. The backstitches per inch are so small that I cannot count them. There are microscopic gussets on the collar, the sleeve openings at the wrists, and the side flaps. Oh, and of course there are the underarm gussets that are a whopping 1 inch long.
The back – notice the “binders” which line the armscyes inside the shirt.
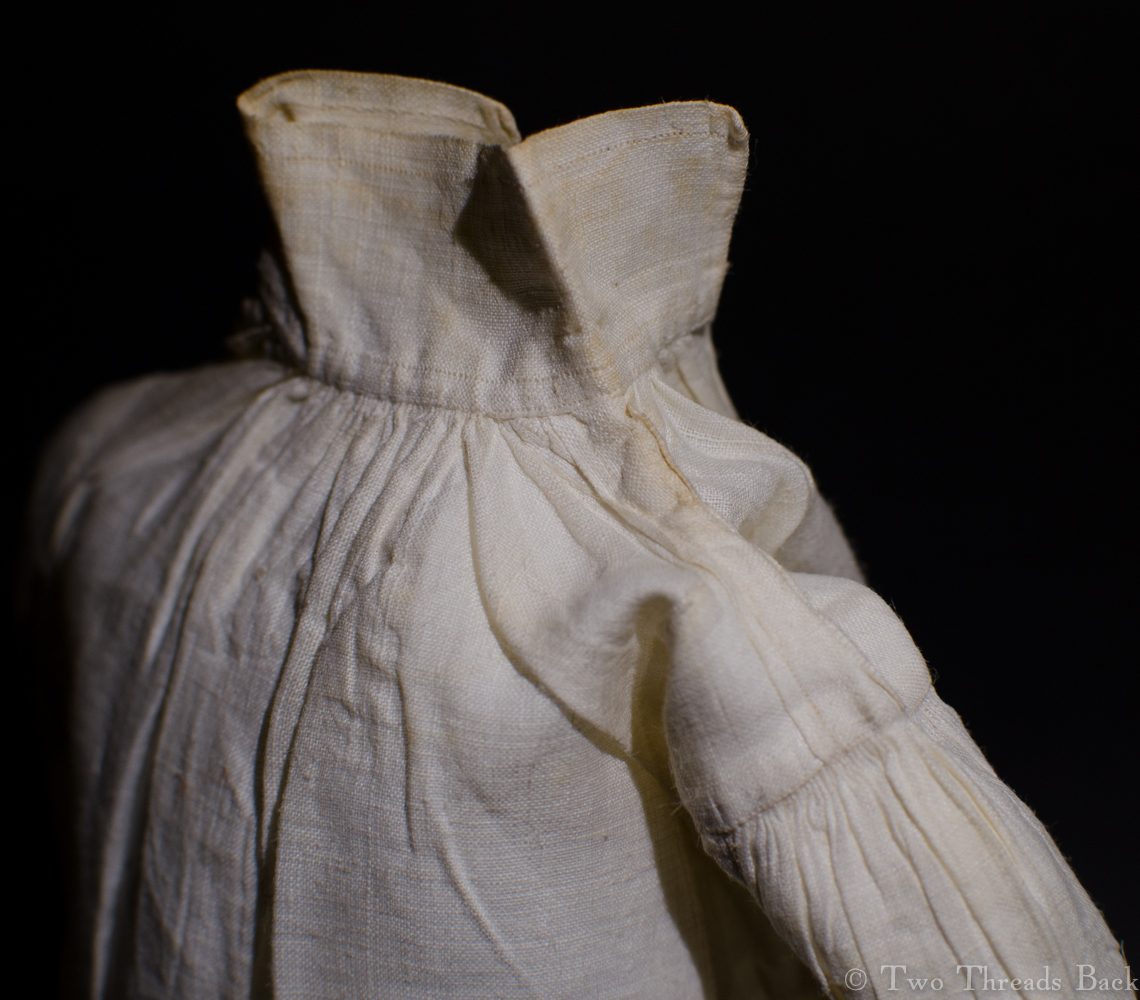
Here you can see the tiny collar gusset, over which the “shoulder strap” lies.
A view of the shoulder strap which is backstitched on both edges.
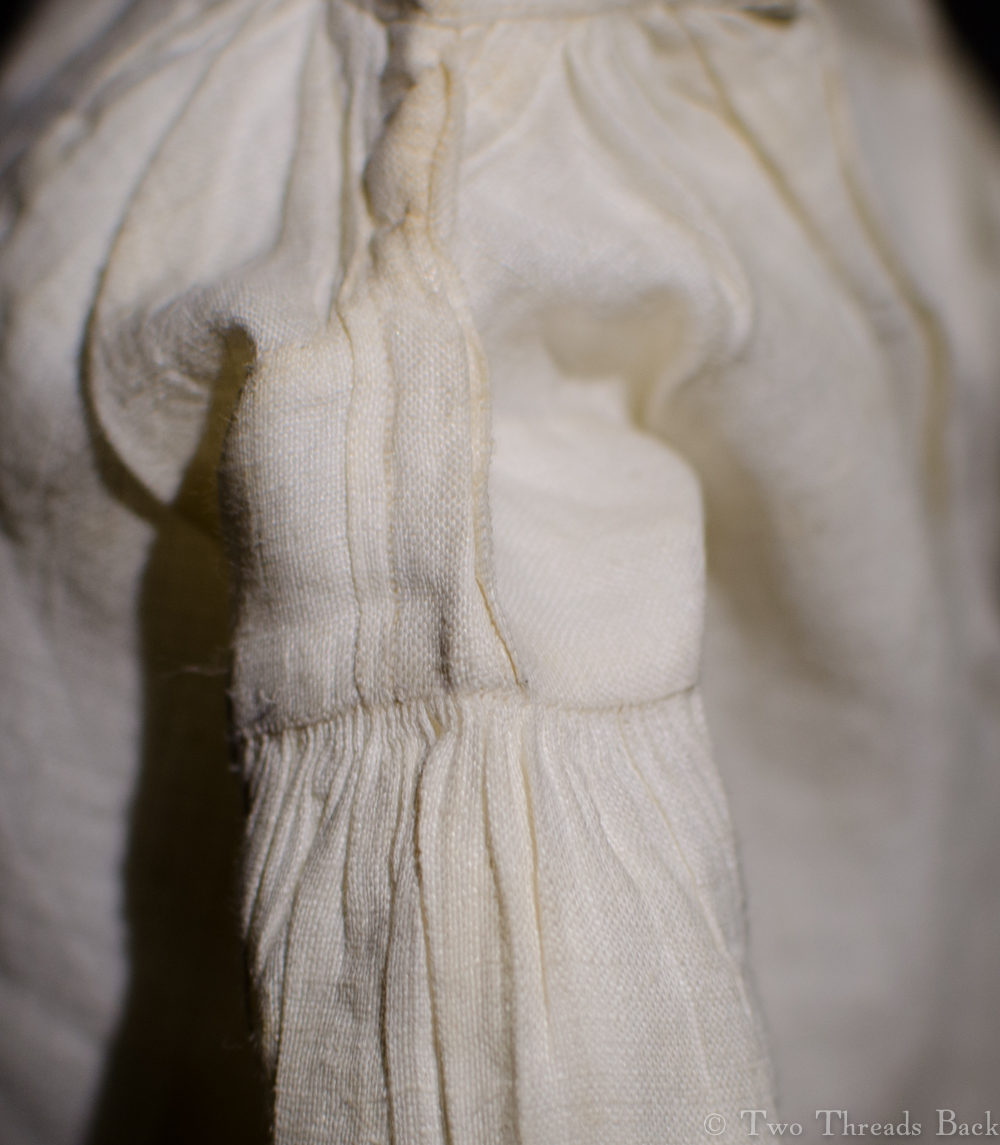
The sleeves are set into the body with gathering and stroking.
You can barely see the diminutive gusset at the end of the sleeve opening. Its purpose was to allow ease, so the shirt would be less likely to tear at that joined seam.
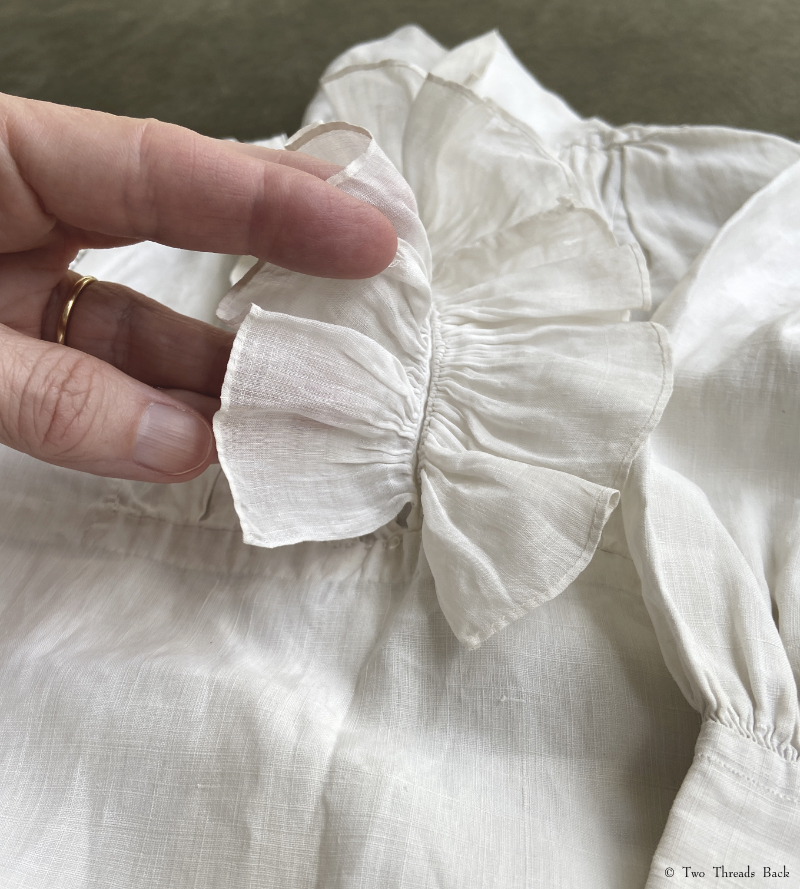
This cuff has come unstitched, and you can see how tiny the sewn gathers are.
Here is a view of the gusset for the side flaps of the shirt, also meant to reduce tearing and the seam.
Colin Firth in a wet linen shirt, or a sampler made by tiny fingers in days long gone? I don’t know which one makes my heart beat faster: the man-sized or the miniature. But who would shrink from a closer examination of either?
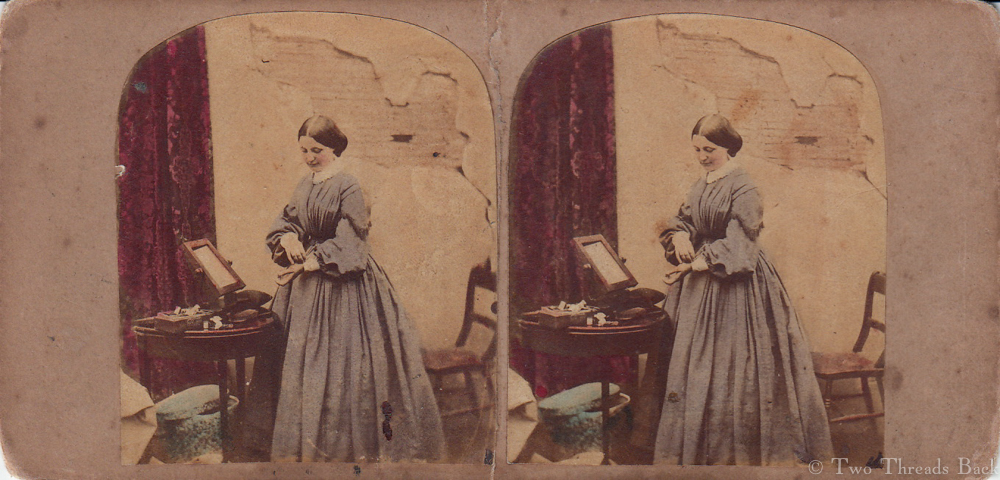
PIN MONEY – money allowed by a man to his wife to spend for her own personal comforts. When pin money is given to, but not spent by the wife, on his death it belongs to his estate. ~A Law Dictionary: Adapted to the Constitution and Laws of the United States, 1843. (You may detect some irony here.)
Most of us are familiar with the important social justice issues of the 19th century, causes like abolition and child labor. But there was another one that became quite fashionable to champion: the plight of workers who fashioned fashions. Women who worked as seamstresses, dressmakers, and milliners were vulnerable to exploitation, and as the pathos and romance of their situation caught public fancy, there was a flurry of response in literature, art, “committees,” laws, private philanthropy and even investigative journalism.
The seamstress who sewed shirts was the poster-child for the cause; you can see one period image I used in a post a few years ago here. Shirt-making was tedious and poorly paid, but the pattern was simple and most of the women who could sew knew how to make one. There was also a steady market for the product, at least until the sewing machine and mass production made hand sewn shirts obsolete.
Dressmaking was different. It required greater skill and was more susceptible to the whim of the patron (and employer if a woman worked for a dressmaking establishment) and vagaries of the trade. But it retained some shreds of respectability as a way to earn a living for those women who were not born to the working class, and yet found themselves with no means of support.
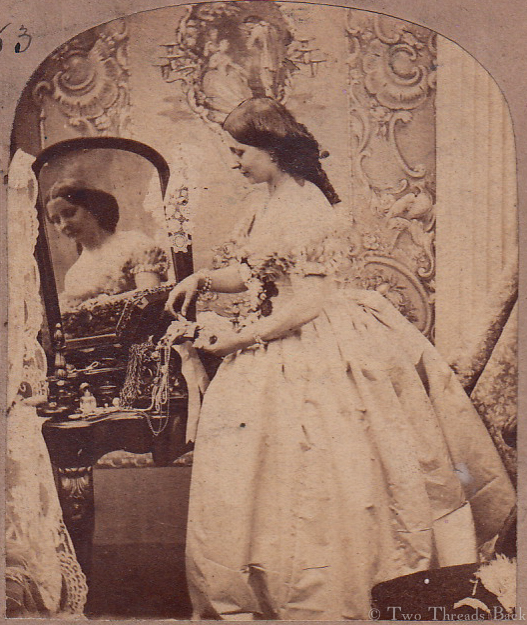
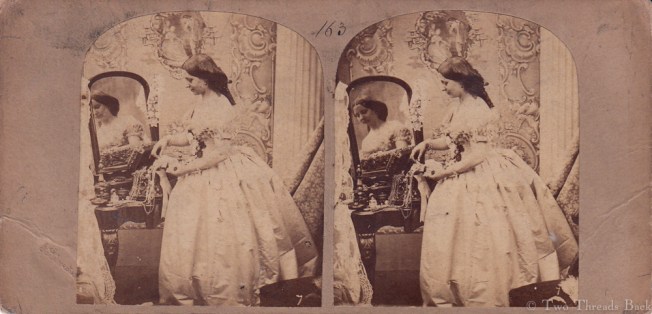
The images here are from a set of stereoviews, the one above titled “Pin Money,” with the model carelessly displaying her wealth of finery. The other is called “Needle Money,” implying that the plainly dressed lady in shabby surroundings must be earning her bread with her needle.
Apparently public sympathy didn’t quite translate into action – or not enough to bring about significant change. A decade or two after Thomas Hood’s famous poem The Song of the Shirt appeared, the image of the genteel but impoverished worker persisted. The poem below was by Francis Charles Weeden, c1860s. It was republished with the explanation:
* These two poems are printed, as written by the author, in juxtaposition, to make the contrast more striking.
I haven’t copied the whole poem, since the point and tone are pretty obvious. Victoria was reigning, but so was sentimentality!
Many bloggers have covered the subject, so if you’re interested try a search for “song of the shirt” – it will get you started. If you prefer the old-fashioned-read-a-book way, try The Ghost in the Looking Glass, by Christina Walker – not recent, but fascinating!
The Dorset Button! Not the more common flat disk with thread spokes, but a “high top,” a tiny sphere wrapped in a spider’s web of thread. I mentioned in the Love Shirt post that I would explain how I made the buttons for the shirt – a non-documented, unauthenticated version for the directionally challenged: me. Believe me, before I finished the trial button, it did look more like a Dorset Knot. But I persevered.
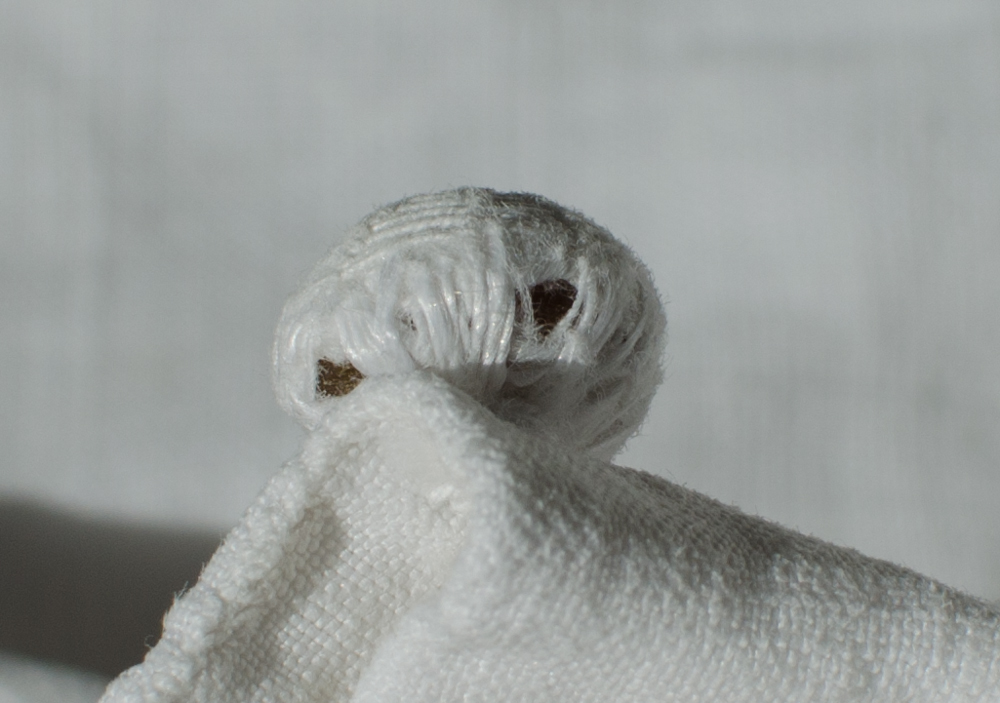
The originals I wanted to copy are pictured above. They seemed to be stuffed with a kind of fiber, but the base was a black substance with a greenish-yellow cast and waxy look. It had puzzled me for years. Then after reading more about Dorset knob buttons, I realized the material must be horn.
You can see the horn button base on the original.
I didn’t have horn buttons, so I used shell instead, about 1 cm in diameter. I cut a little square of linen, about 3.5 cm, and on that I traced and cut out a circle larger than the button. The scraps served as stuffing for the knob. Waste not, want not.
Next I ran a gathering stitch around the circle, put the scraps in the center with the flat button on top, pulled the gathers tight, and stitched them closed. Voilà! The mold!
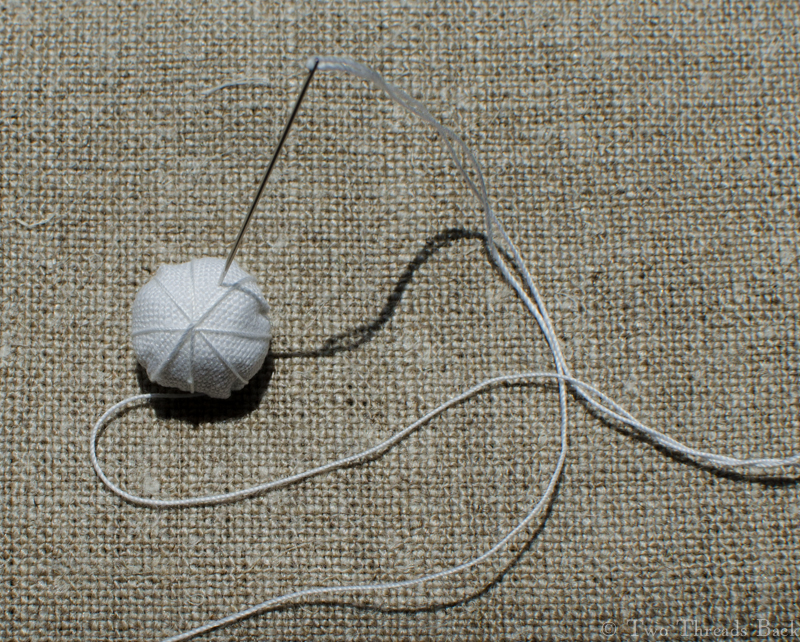
Then I wrapped thread around the button in a compass rose pattern and anchored it. Beginning at the top, I circumnavigated the button, taking a backstitch around each “spoke” and moving on to the next. It was a bit fiddly, having to smush the lumpiness of the mold and realign the spokes as I worked toward the base.
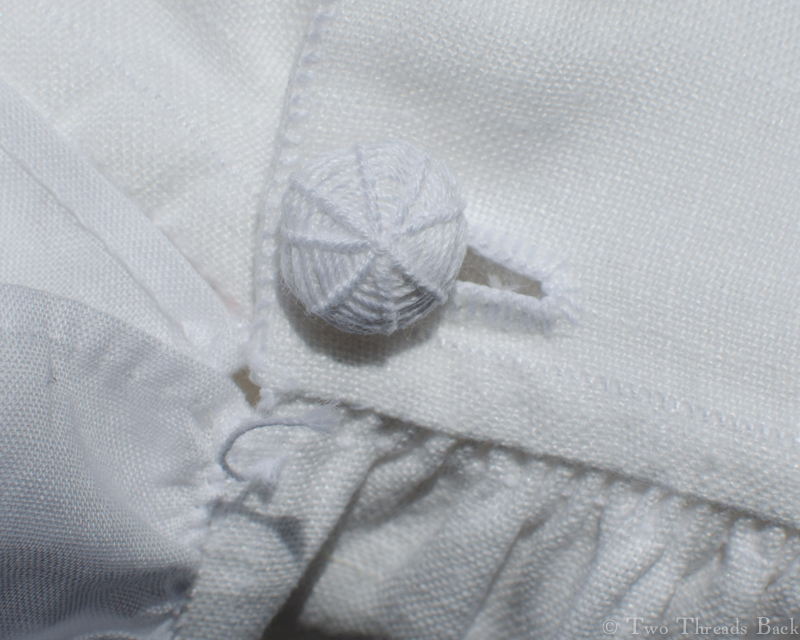
Once I had made a final pass around the base, I took a few stitches to anchor it all. And then I had to make four more.
For those who like pictures better, see below. For those who want a more authentic method, there is a lot of serious research available online now. And for everyone else… well, there’s always velcro.
Stuffed and gathered.
Thread laced in spokes around the mold.
Circumnavigating the globe: backstitching around each spoke before going on to the next. Or back one, forward two.
Ta da! After ten grueling years (ok, I don’t really know how long, but it has been years) I finally finished a 19th century gentleman’s square-cut shirt of fine linen. Complete with all twenty parts, including the frill. And Dorset knob buttons.
Where did the name come from? Well, a long time ago a friend and I (I miss you, Janet!) were studying one of these shirts, one that had a heart-bit (see that blog). We reached frantically for our vinaigrettes, trying not to swoon on the artifact, as visions of Mr. Darcy flitted around the room. Somehow we started calling that handsome relic The Love Shirt. So it has been to me, ever since. And I wanted to make one myself.
That type of linen is impossible to find nowadays. However, a dear friend (thanks, Dianne!) provided the closest thing possible, and with a pattern from an 1820 book, I commenced.
Darned little gussets, all the work I did backstitching was mostly hidden when assembled. Having since acquired some cobwebby 100-year-old linen lawn, I intend to replace the muslin ruffles, this time hemming them the right direction. If there’s a harder way to do anything, I’ll find it.
Unfortunately I have a memory like Dory, so every time I put away the project for a spell, I’d have to practically learn how to do the next step all over. A 19th century seamstress would have been appalled to see me.
Um, do I sew both ends of XYZ before I ABC? Do I cut or fold first? Did I sew the sleeve on backwards? Oops. Front and back are the same before the collar goes on, right? Not if you hemmed them first. Oh right, I was supposed to check that I was putting the slit in the front. Well… I’ll just cut the back shorter and make it be the front. And my g-g-g-g-great-grandmother could make one of these in a day or so? How embarrassing.
I did learn a lot. I learned how hard it is to backstitch over two threads without going blind. I learned that there is NO not-shiny sewing thread available today. I learned that linen thread breaks, other people’s buttonholes always look nicer than mine, knots are usually unnecessary, even poor work looks better when ironed, and a drawn thread is no guarantee you’ll sew a straight line. I learned that you had to love your man, or love survival to make one of these. And I learned how to make Dorset knob buttons, my own way! Maybe I’ll write about that next time.
You can see the backstitching that nearly blinded me. And you can see the gauging thread I used to hold the stroked gathers in place. I’m going to leave it there a loooong time.