“About 1849.” Except for the owner’s name, that’s really all I know about the history of this particular little sewing album. It’s bound with marbled paper card stock, edged with silk ribbon, and the colorful pages have the feel (and unfortunately the quality!) of children’s construction paper. Written inside the front cover is “made about 1849 by Mary M. Quiston, later Mrs. Reid, later Mrs. Porter.” (The “M. Quiston” might be “McQuiston.”)
Samplers of cross stitch (marking), embroidery, or darning skills have a long history in Britain, America, and Europe, but the popularity of books containing specimens of plain sewing stitches began in England in the 1810s. They were developed as part of the “monitorial” education system where pupils who had mastered a skill instructed the ones who were just learning it.
This system of “mutual education” was originally applied to basic reading, writing, and arithmetic, then to plain needlework since it was an essential part of female education. Understanding sewing instruction techniques was much easier if you had a small sample to see. Books with samples of hemming, stitching, seaming, marking, etc., were originally intended to help a teacher follow “the system” in her classroom, but also developed into treasured collections preserved by the girls who had worked them in order to demonstrate their accomplishments.
This is one of two caps included in the 1816 British and Foreign School Society manual, a book intended as a guide for educators who were using their monitorial system. It’s attached to the page so I can’t fold it out to show it well, but there’s a tiny number “1” marked in red cotton barely visible on the left. The other cap is marked (surprise!) “2.”
The earliest books might include a miniature shirt, cap, or apron, but it wasn’t long before they added other items like stockings, sleeves, dresses, trims, etc. to the classes. Educators appreciated the savings in time and expense that using small samples offered (and heaven knows charity schools needed to economize!) but maybe they had another reason as well: it was fun making tiny garments that were just like doll clothes! Here are some of my favorite pages from Mary’s book.
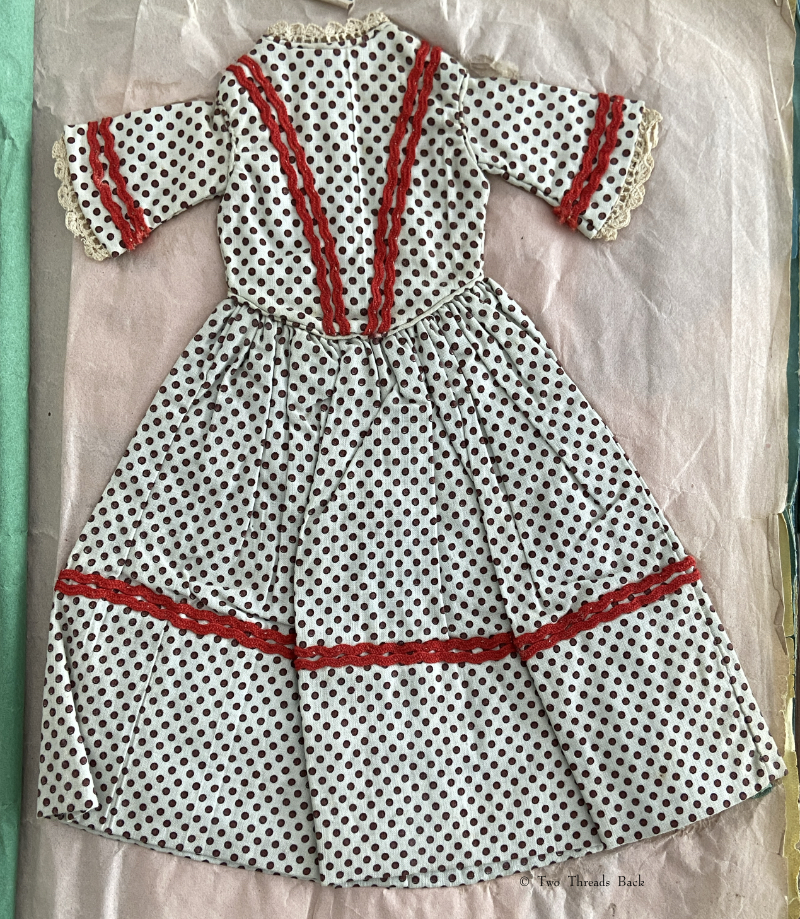
This dress is a simpler style than the sheer one above and it’s made of printed cotton.
Mary sewed this child’s dress with nine tucks in the skirt, gauged gathers, and trim she (probably) made herself.
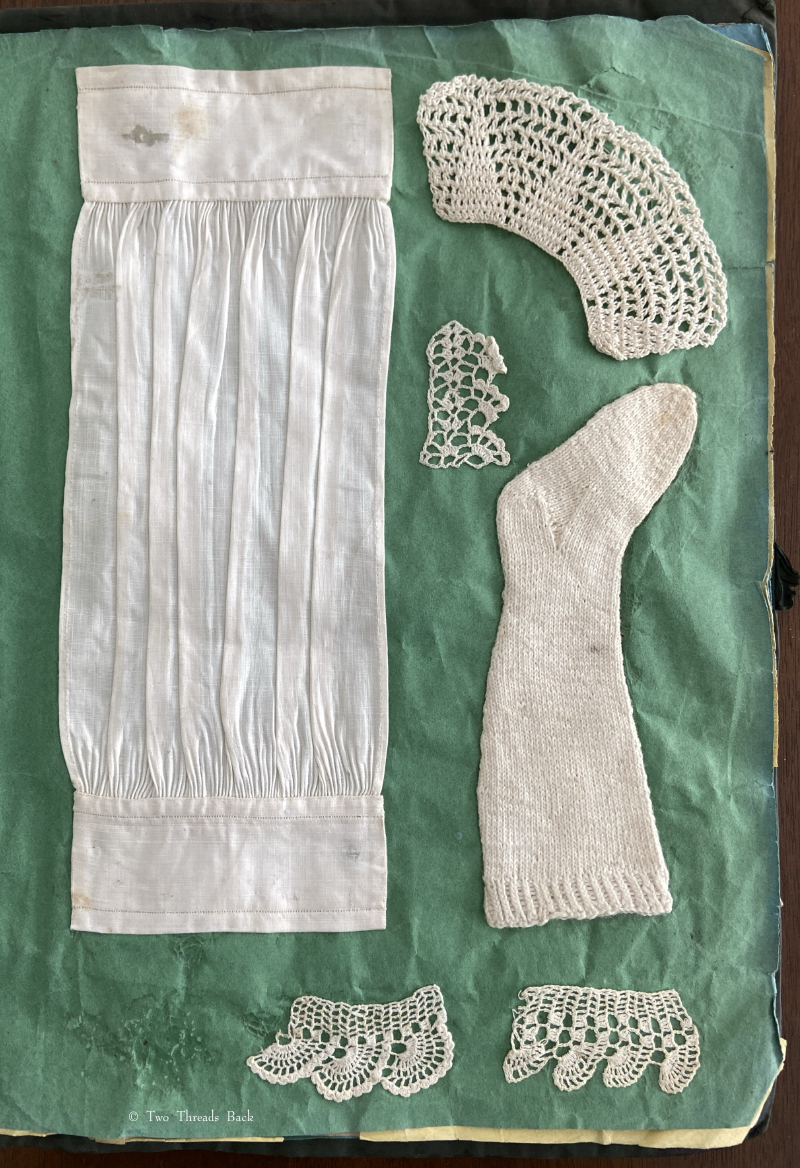
We can’t forget the MOST important garment in the Plain Sewing repertoire: The Shirt. No course in plain sewing was complete without this accomplishment!
Here’s an example of the practice cuffs or wristbands that would have been worked before she advanced to making the above shirt. Knitting was also an essential needlework skill for women, and most 19th C sample albums included examples. There was a single full-sized stocking tucked into the book also.
Plain and fancy! Mary did all the hemming, seaming, and making buttonholes in her earliest lessons, but she obviously got to learn some fancywork as well. If you get a thrill looking at daguerreotypes of that time (Pinterest is sooo addictive) you might recognize the vandyke collar pattern that was so popular then.
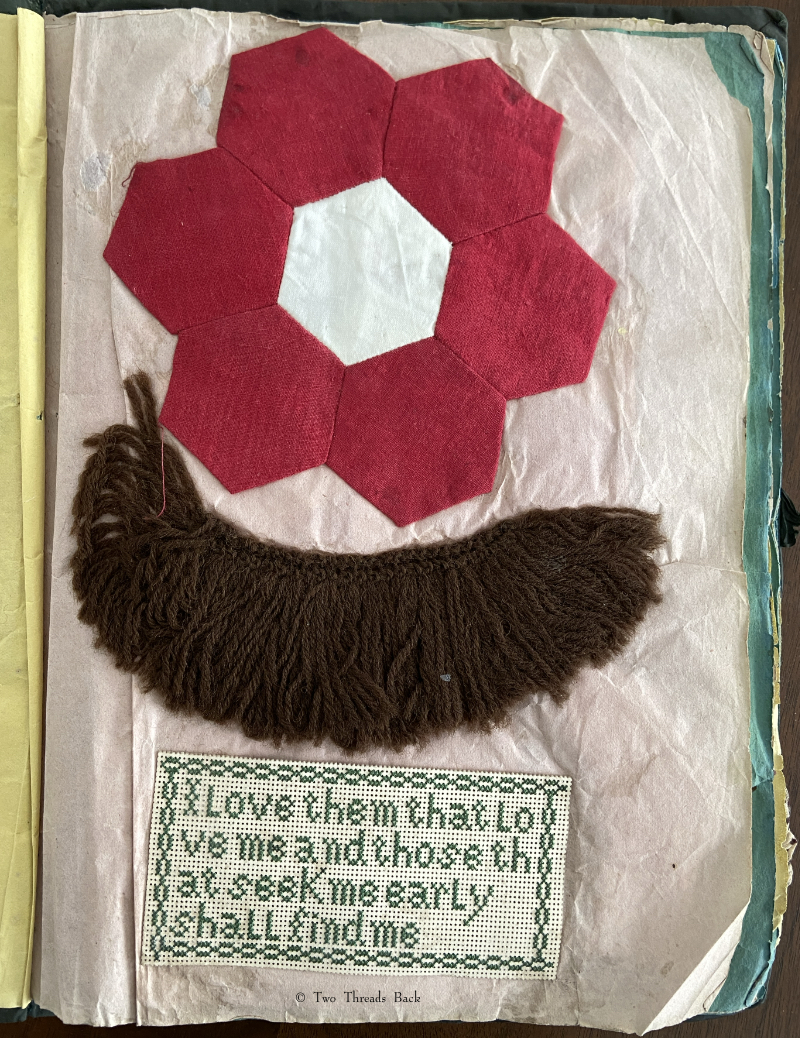
Nope, it’s not a walrus mustache. It’s some pretty (or not!) wool trim, useful for Victorians who didn’t know the meaning of restraint in decor. Mary also made a hexagon quilt patch and worked a scripture verse on punched paper. I don’t understand why 19th C needle workers seem so untroubled by words that run out of roo– m. Why???
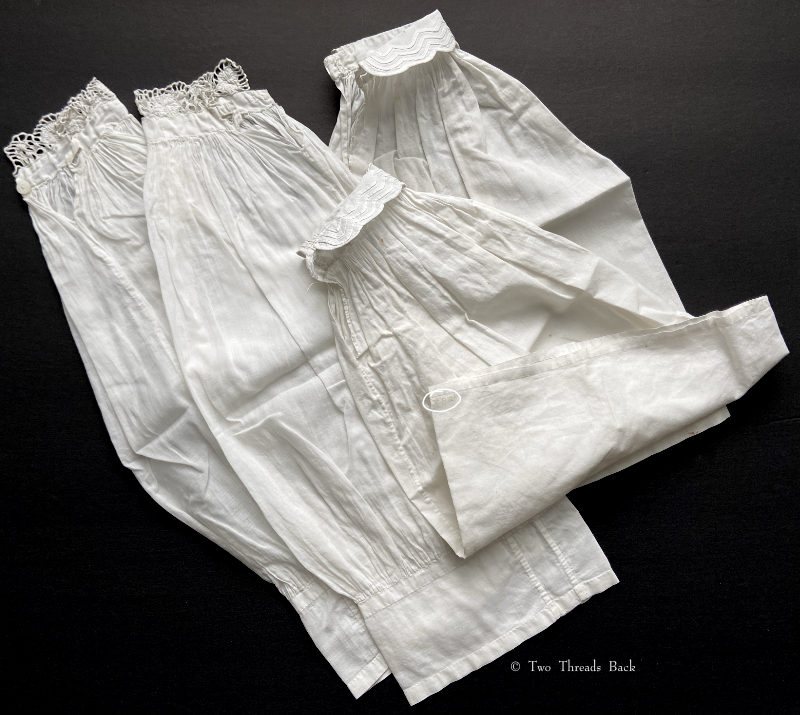
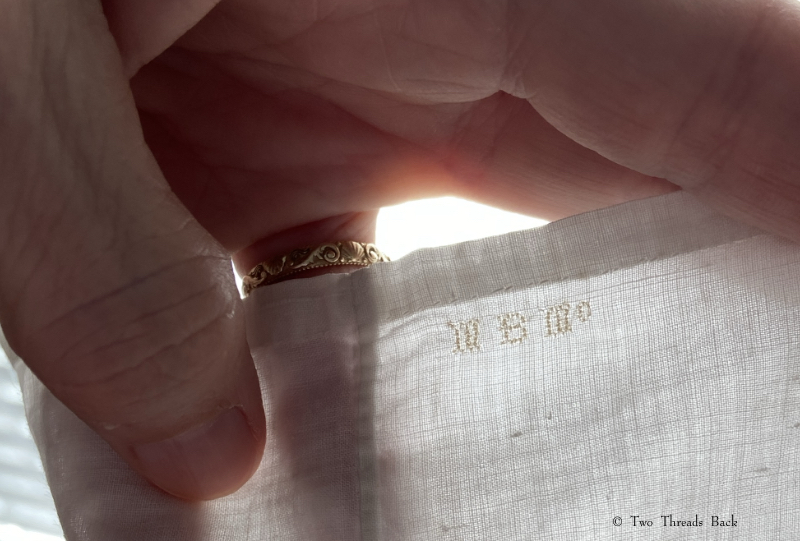
Two pairs of undersleeves were kept with the book. I assume they were Mary’s work because they have her initials marked in cross stitch. I’ve circled them in the photo to show how small they are. The sleeves show wear, so I don’t know if they were part of her sewing instruction or later work that stayed with her album.
The marked initials are less than 4mm tall. I never cease to be amazed at the tiny stitches they could make. The letters look like M B Mc to me. McQuiston?
I wish I knew more about Mary. How old was she when she learned to sew? Did she have daughters who wanted to take the dresses for their dolls? I would have! Did she use her skills for the rest of her life, or pack them away, back “around 1849”?
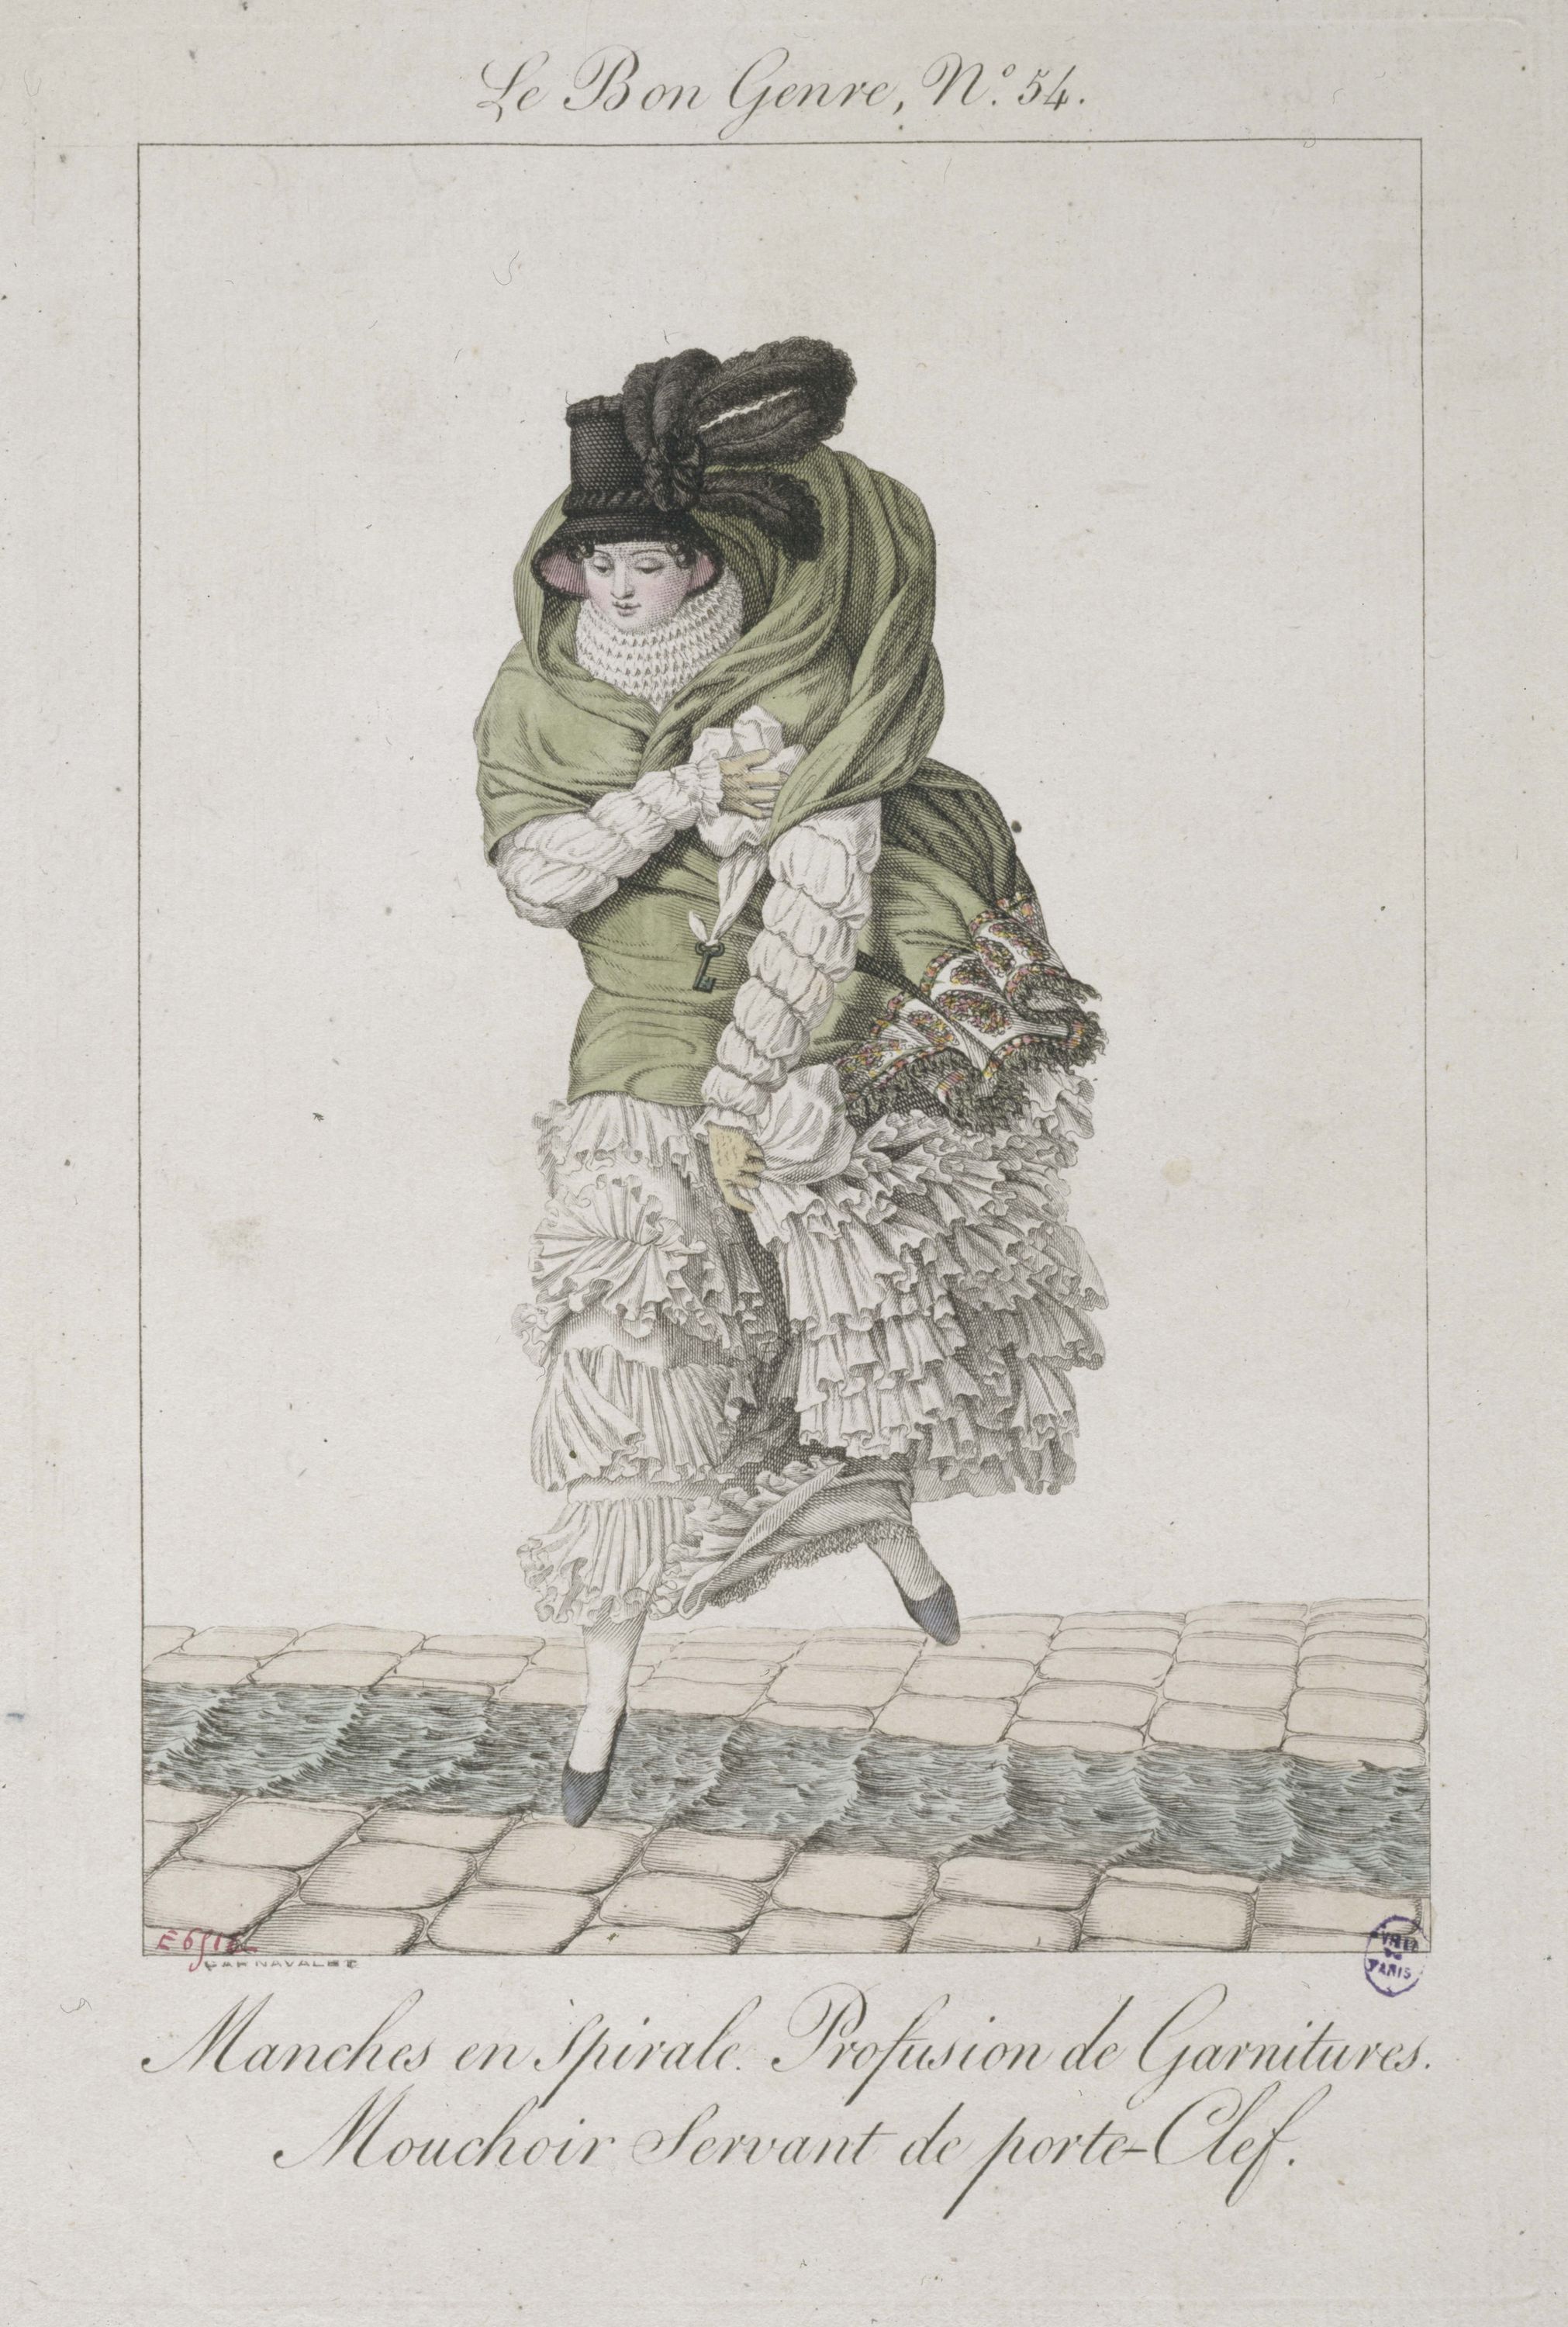
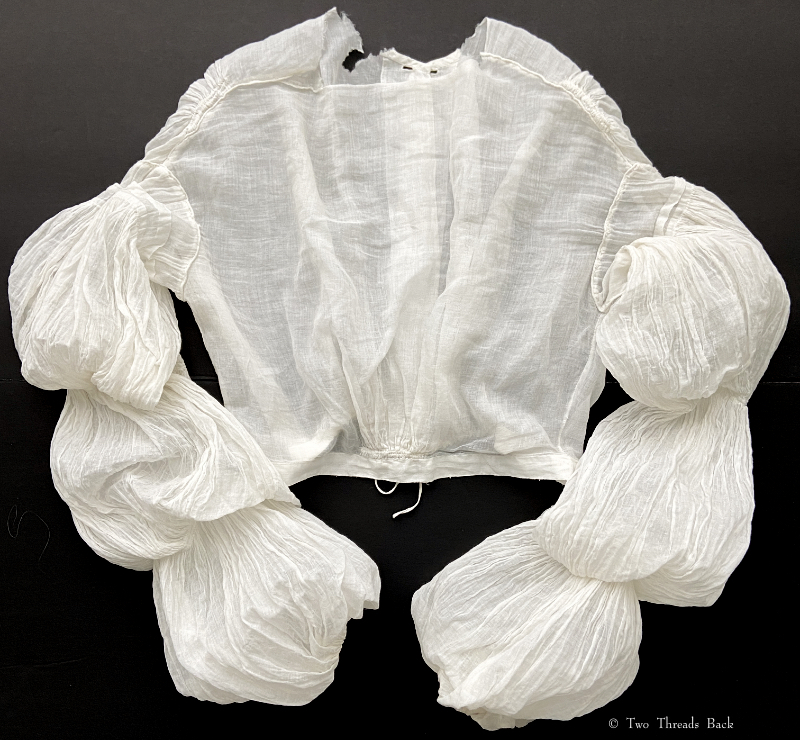
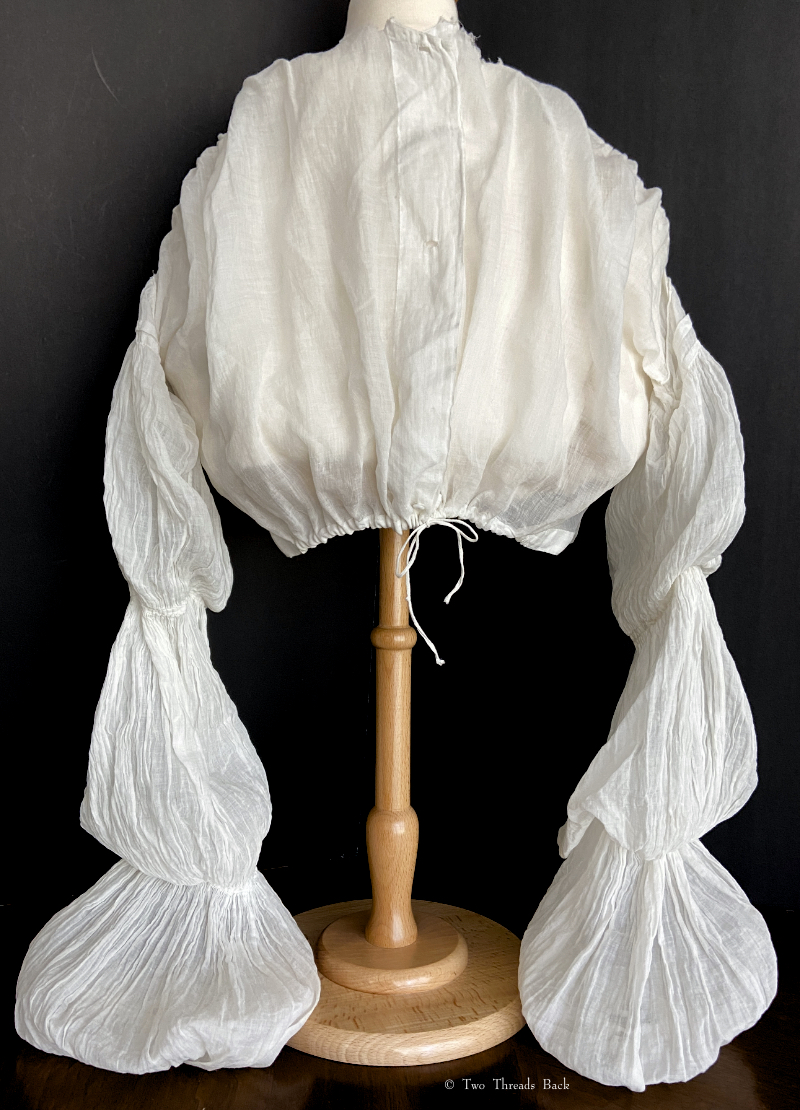
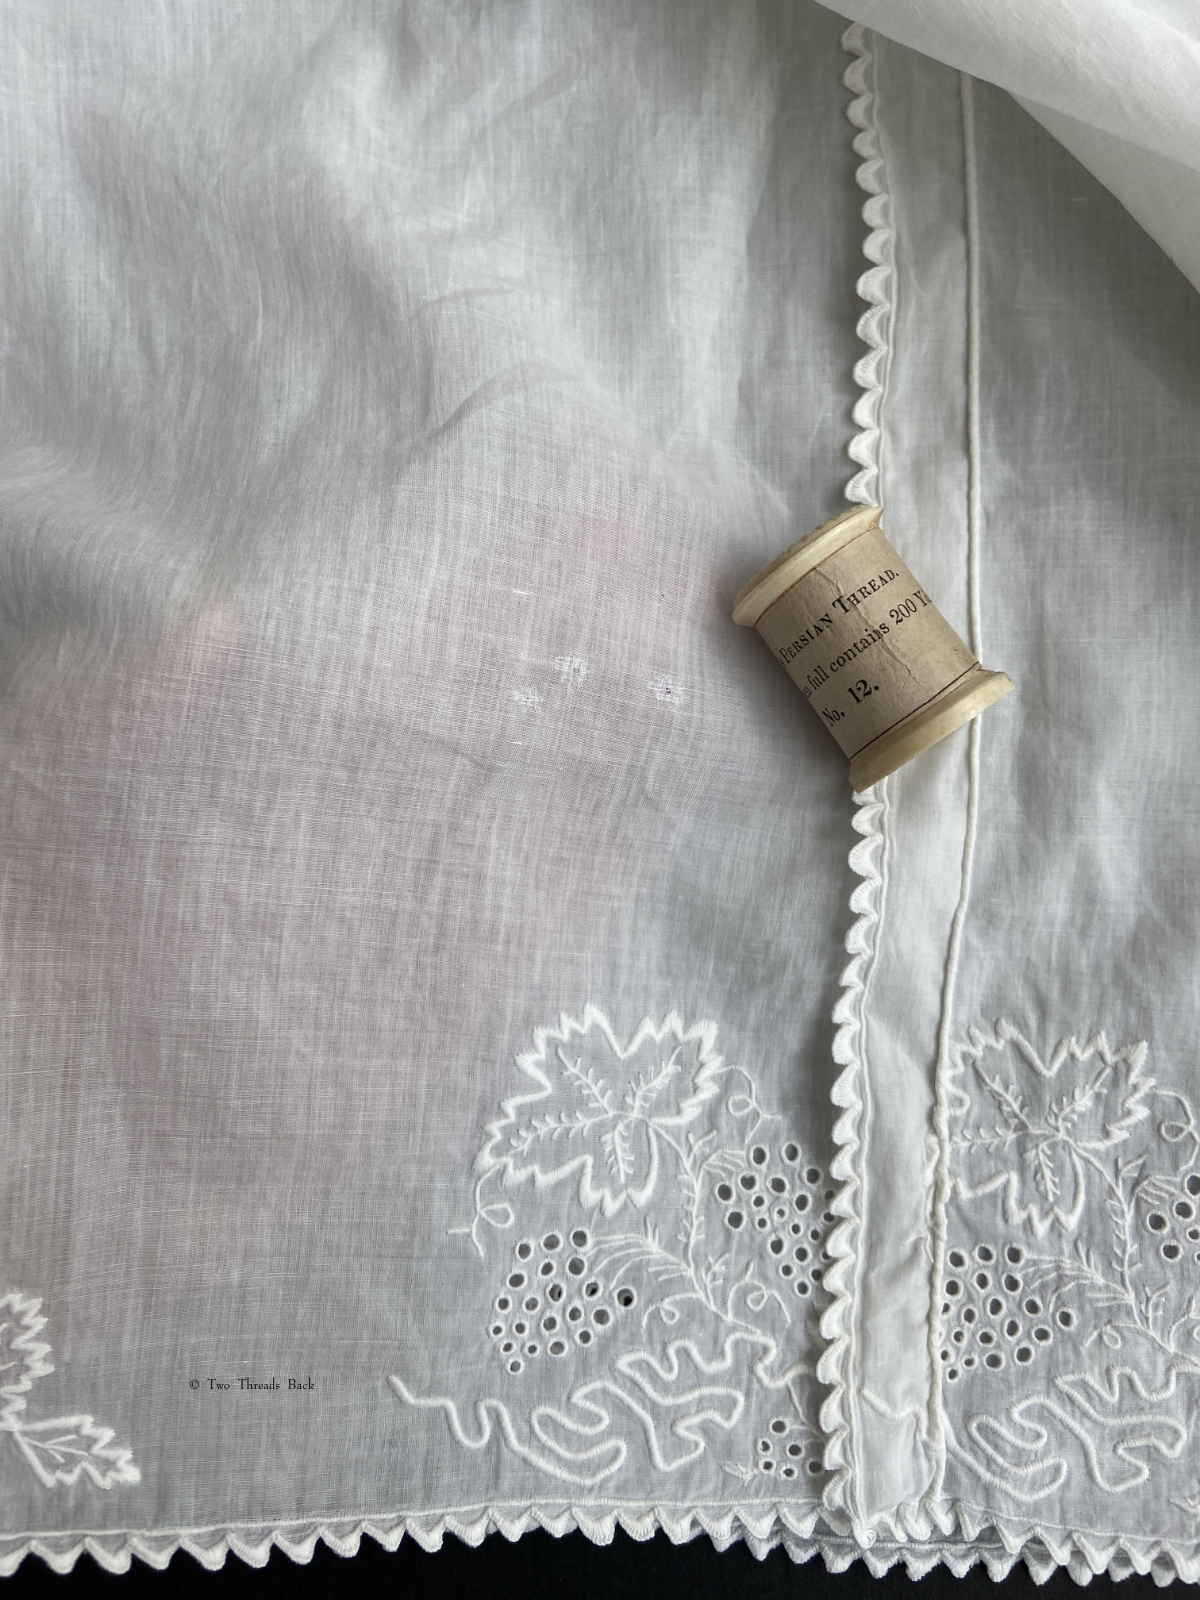
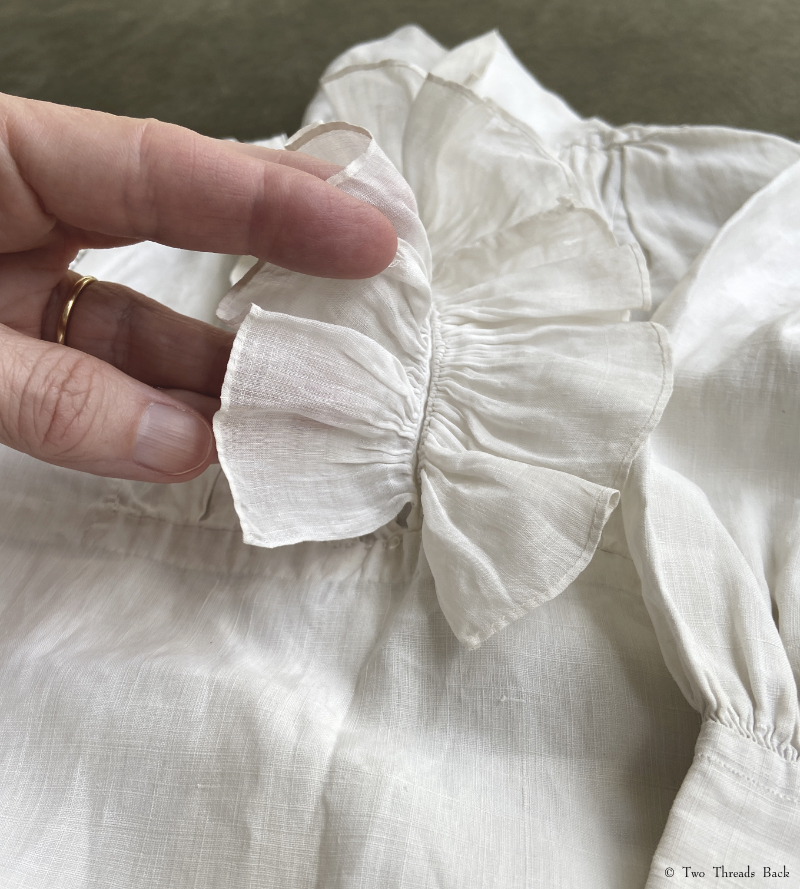
What happens when classical simplicity meets feminine extravagance? Well, here’s a dainty survivor from long ago, with a feature quite fashionable in its day – sooo very “Regency.” The sleeves remind me of a three-scoop ice cream cone! They’re called by various names today, but I can find no specific period name for them. Like other fashions that tend toward “profusion,” they were subject to satire.
Enough fluff, do you think? Le Bon Genre numéro 54 : Manches en Spirales, Profusion de Garnitures, 1812″. Paris, Musée Carnavalet.CC0
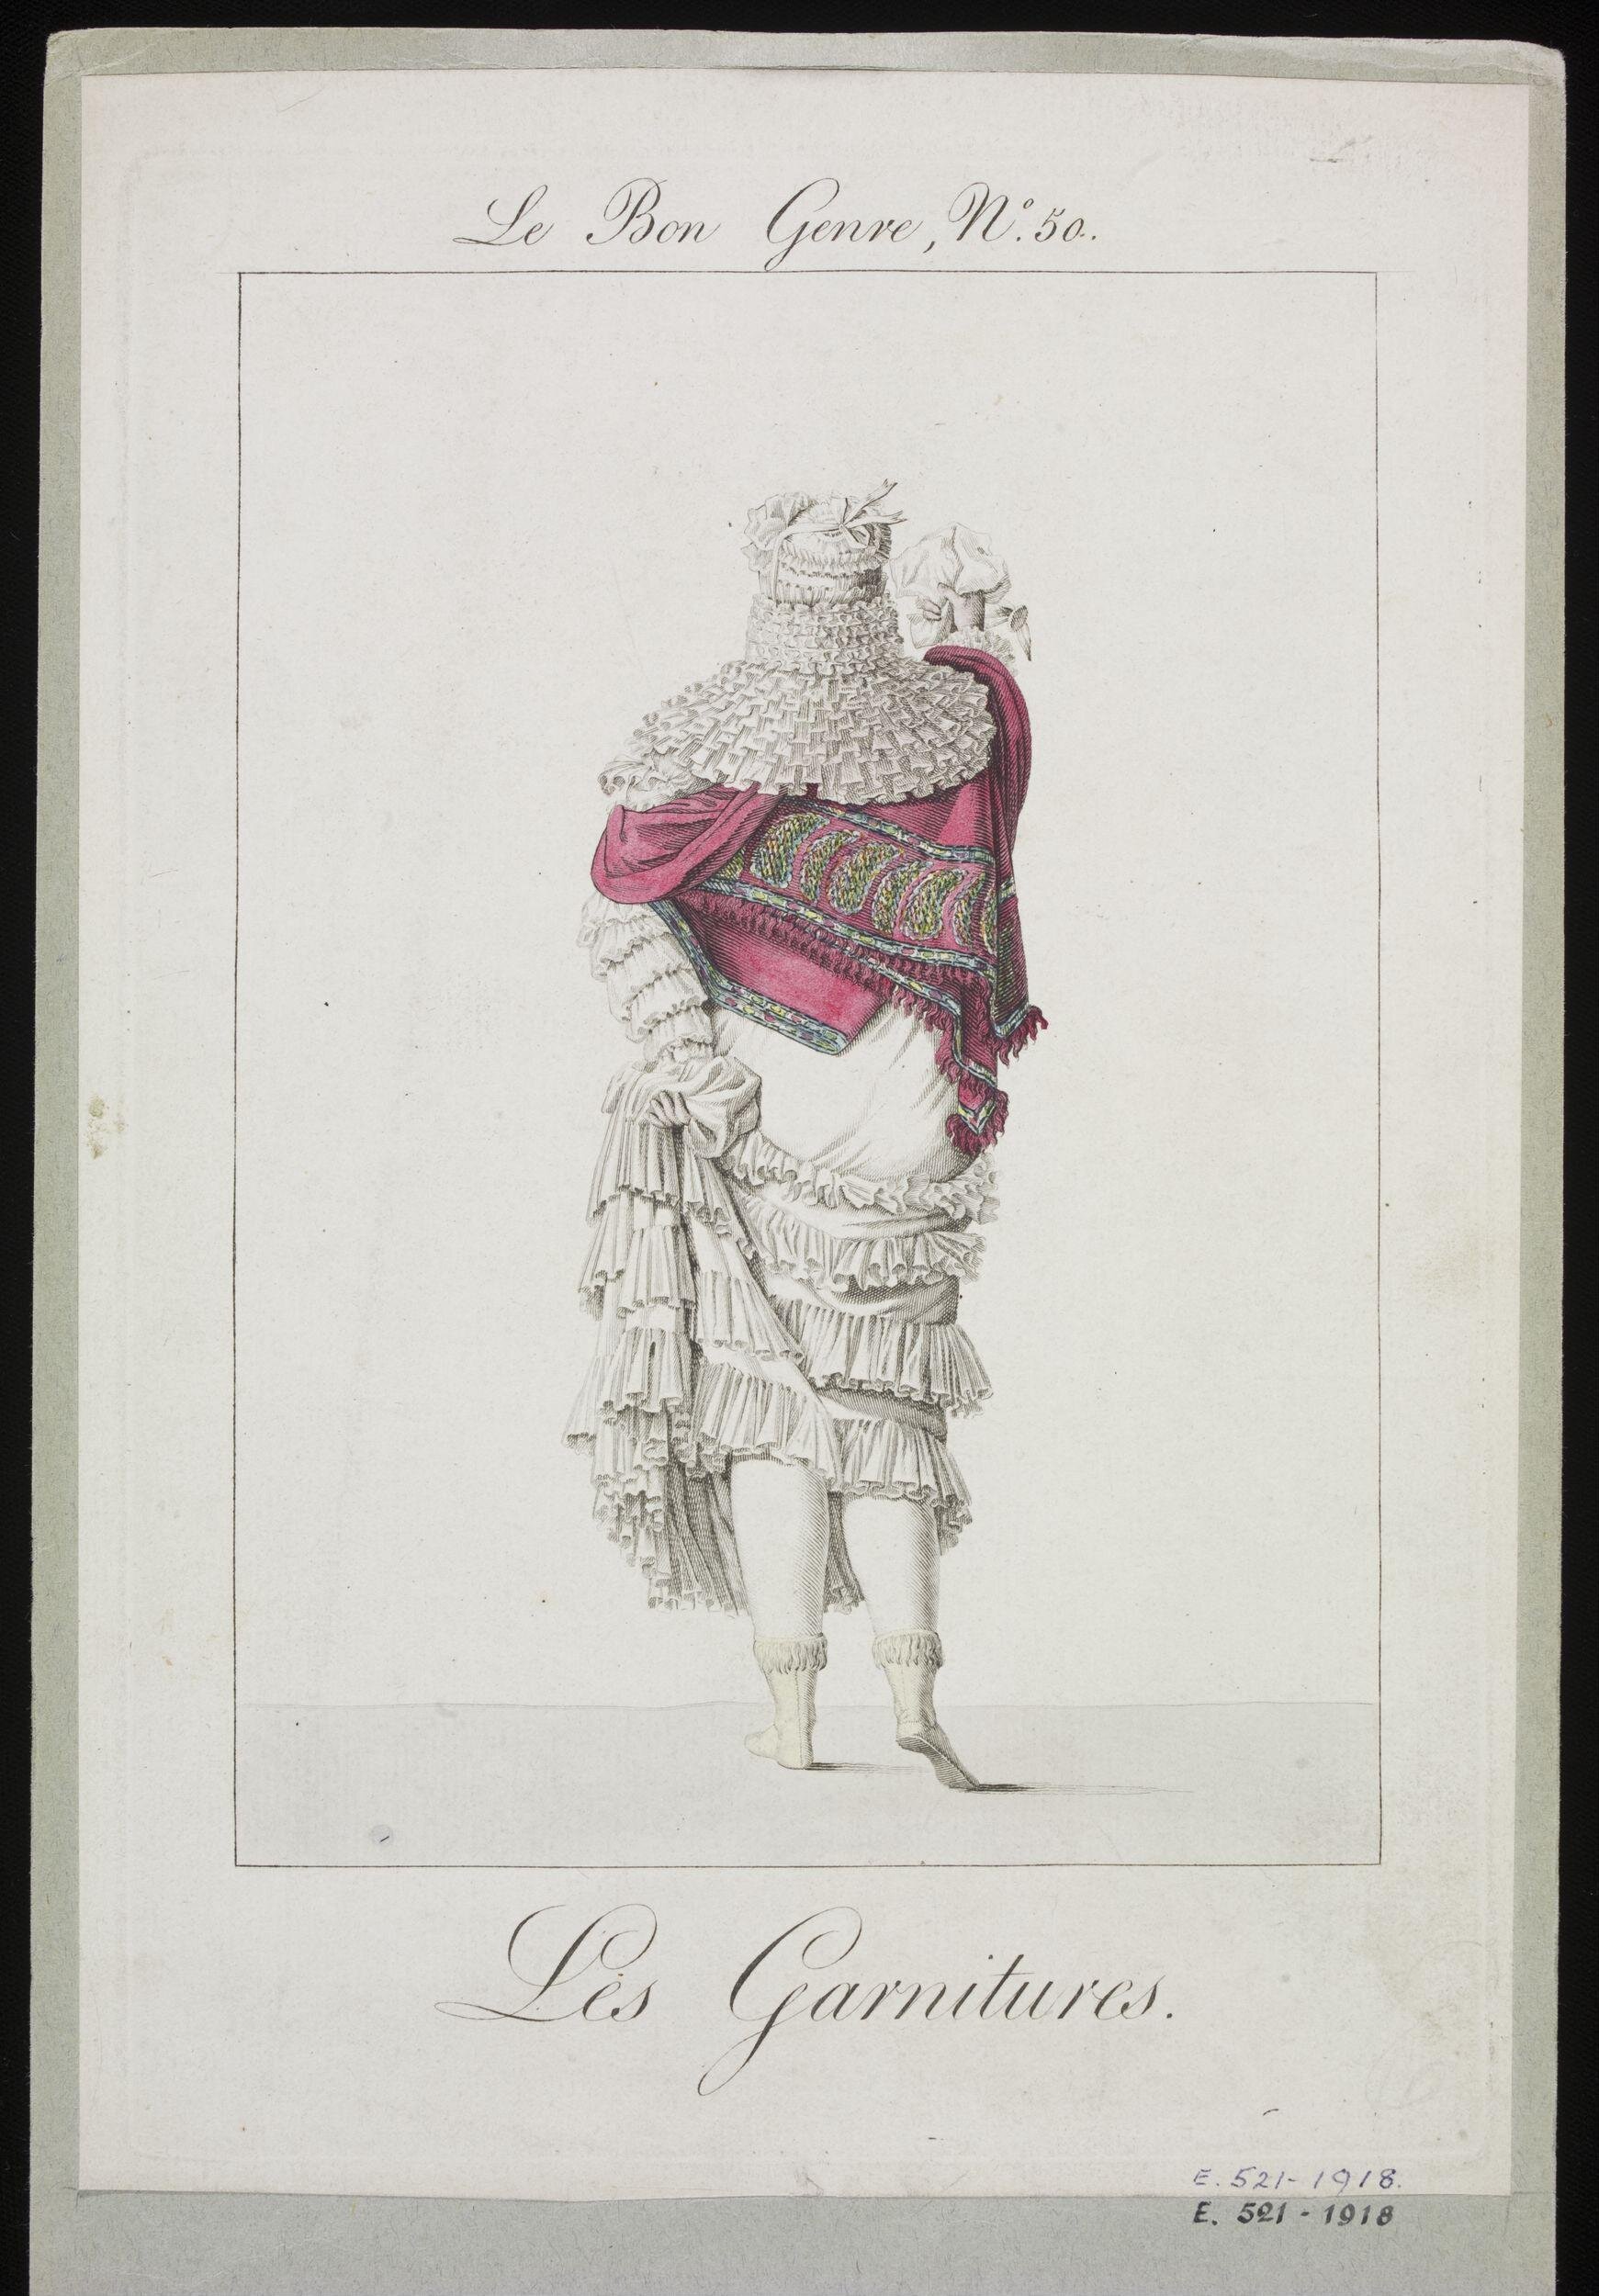
Revealing and concealing – and quite a few scoops of ice cream! “Le Bon Genre, N°50. Les Garnitures. G.10779″ by Anonyme, graveur. CC0 1.0.
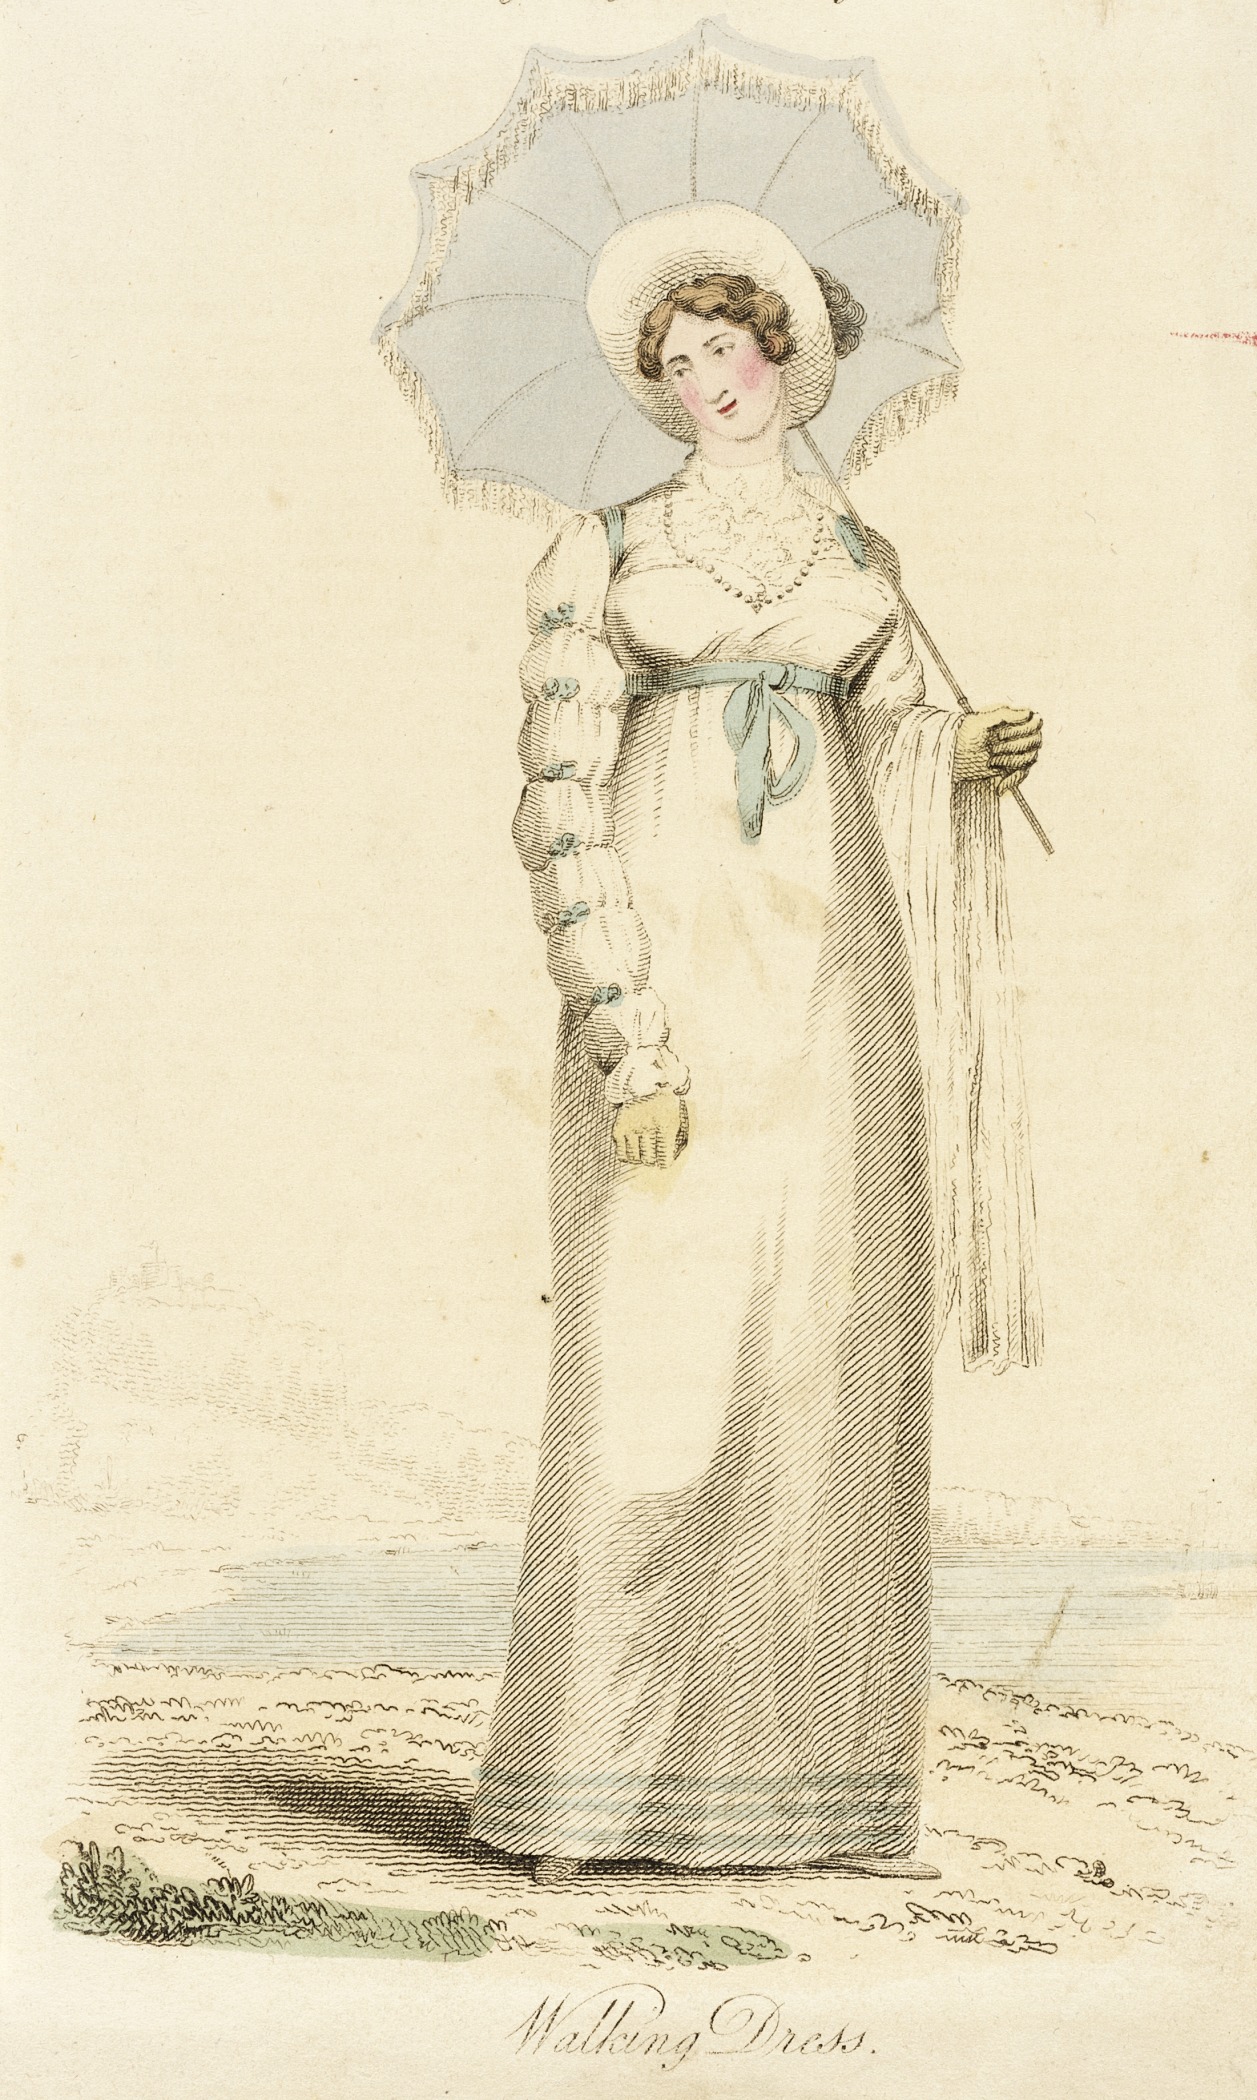
And a lot of scoops on this one as well! It’s not satire, but a fashion plate. “Morning Walking-Dress: A round robe dress of white figured muslin, with worked bosom, made high on the neck–vandyked collar of lace–long sleeves, made full, and drawn across in five or six divisions–to tie in small bows of light blue ribbon:–the robe trimmed at the feet with a triple row of light blue ribbon: the shoulder-straps and bracer, ribbon of the same color.”The Lady’s Magazine, August, 1814. www. lacma.org
Sadly, the bodice has lost its collar, possibly removed for use in another garment. It may have lost something else, too! It could have been worn as a habit-shirt/tucker/chemisette, but there are signs that it was originally attached to a skirt.
A lot of the fashion plates I’ve seen depicting these multi-puffed sleeves are c.1810-15, but I’m not knowledgeable enough to date this one with any certainty. I am, however, always wildly curious to see how unusual styles were contrived and constructed. How did they make the puffs puff? It was fun to peek inside and see.
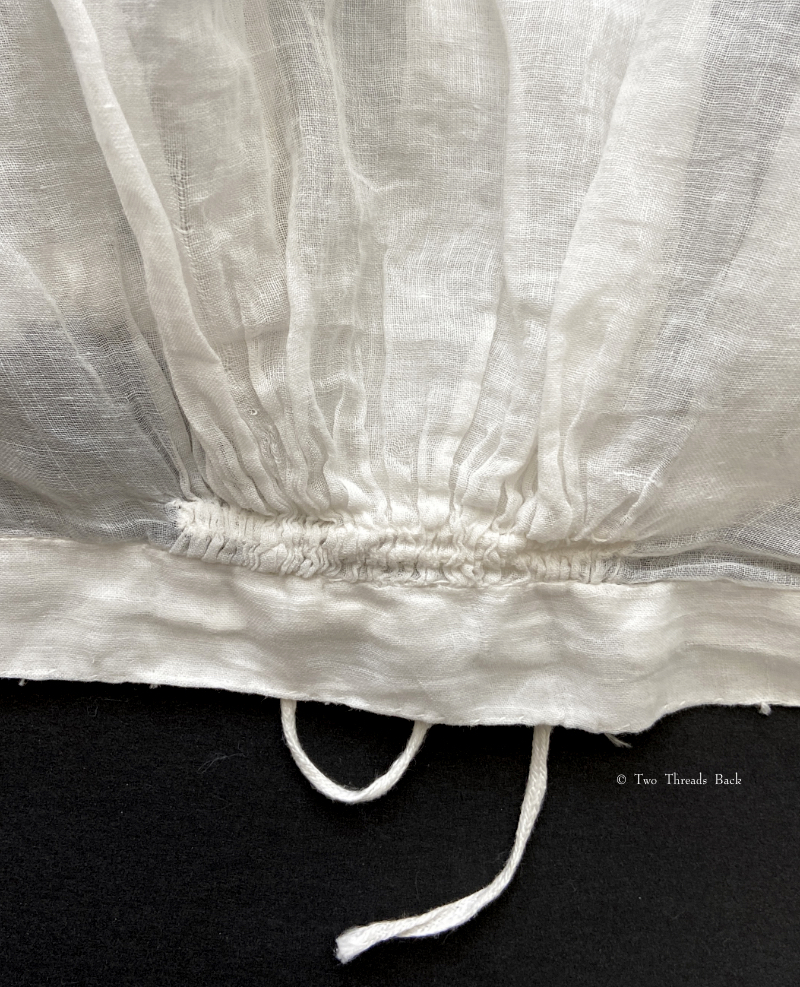
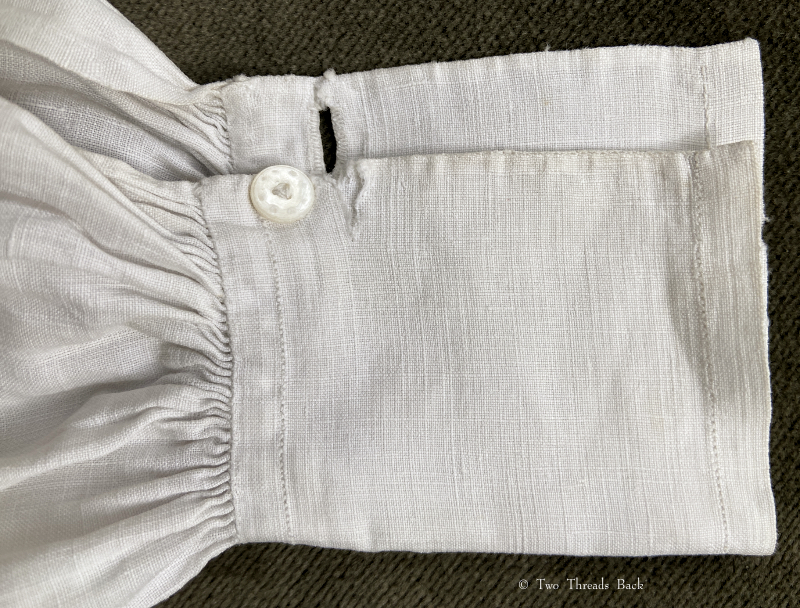
The bodice itself is simple enough. It opens in the front, with two double buttonholes at the top for linked buttons, and one glass button (original?) at the bottom. There are adjustable gathering tapes at the “waist” front and at the wrists. There’s piping at the shoulders and a single tuck on the upper arms. (I forgot to fold it down for the photo.) There are gathers on the shoulders and at the center back. Each puffed “scoop” is gathered to a narrow band made out of the same fabric. It’s not one long, full sleeve piece gathered or tied at intervals.
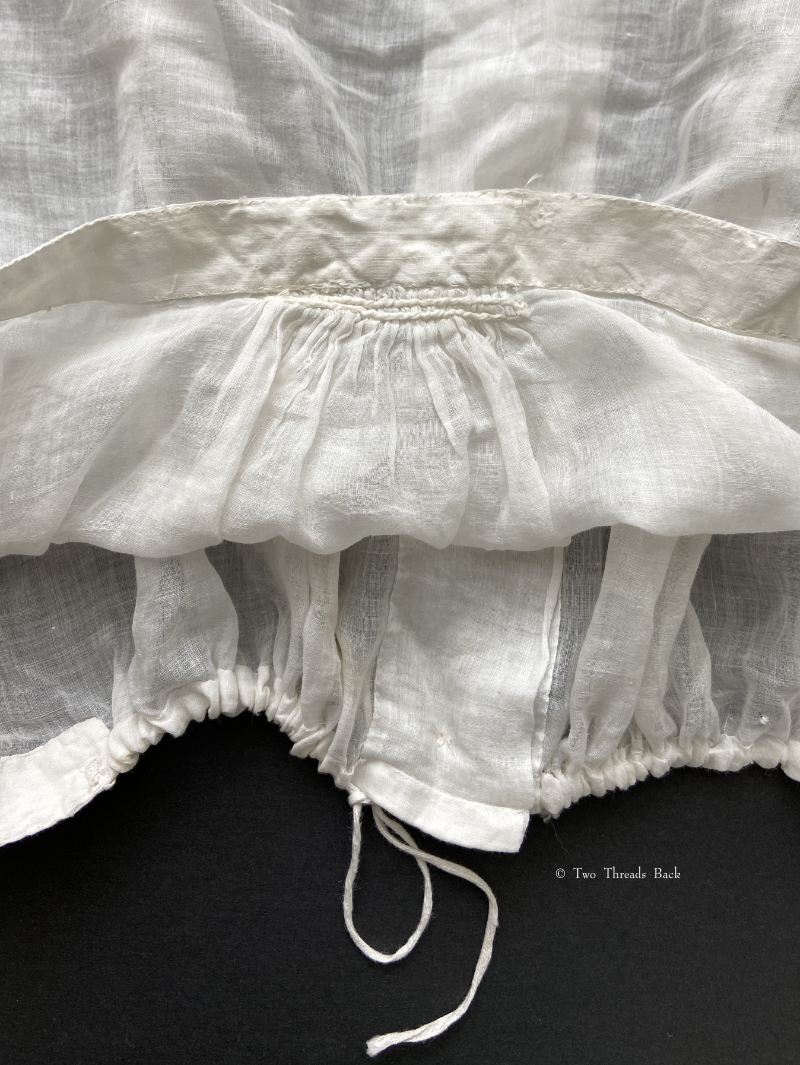
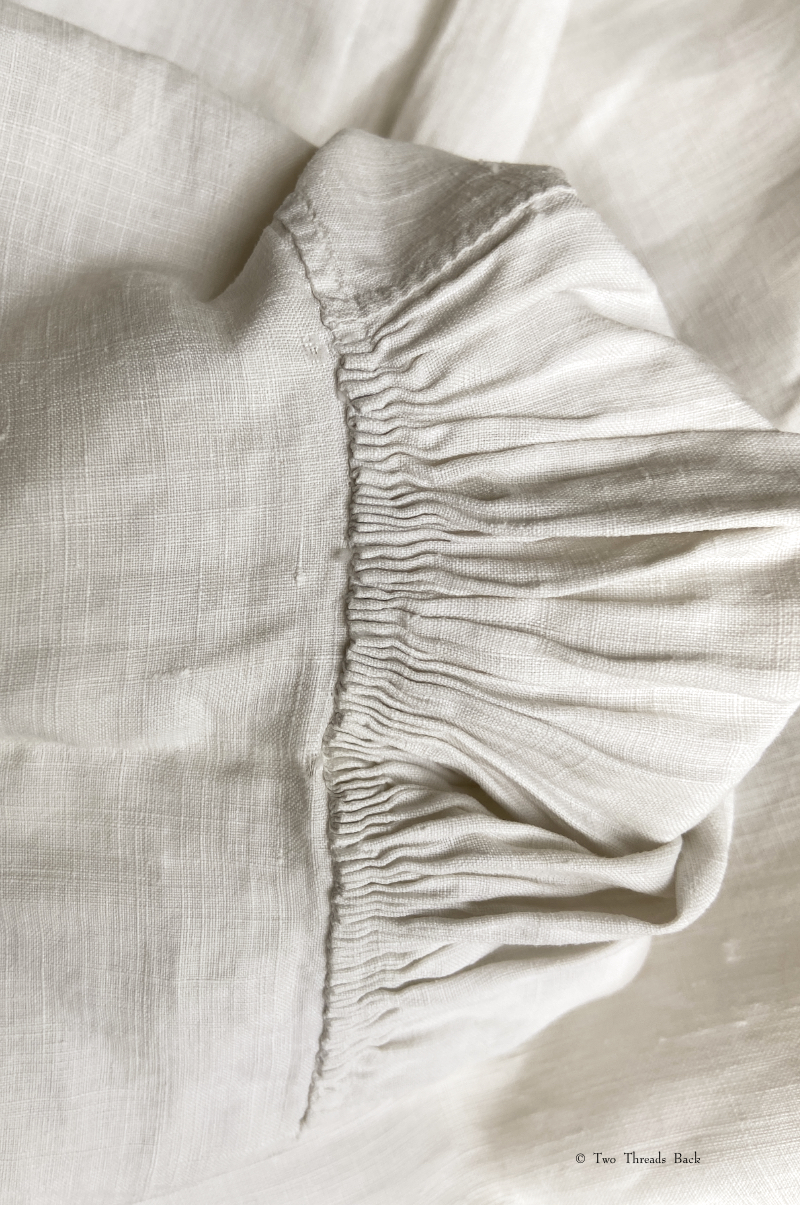
Here’s my chance to slip in plain sewing stitches: the view from inside shows the backstitching that was used to attach the sleeve, the overcasting that prevented raveling, and the whipped gathers that attached the fullness to the plain band. (Click the image above and below for a larger view.)
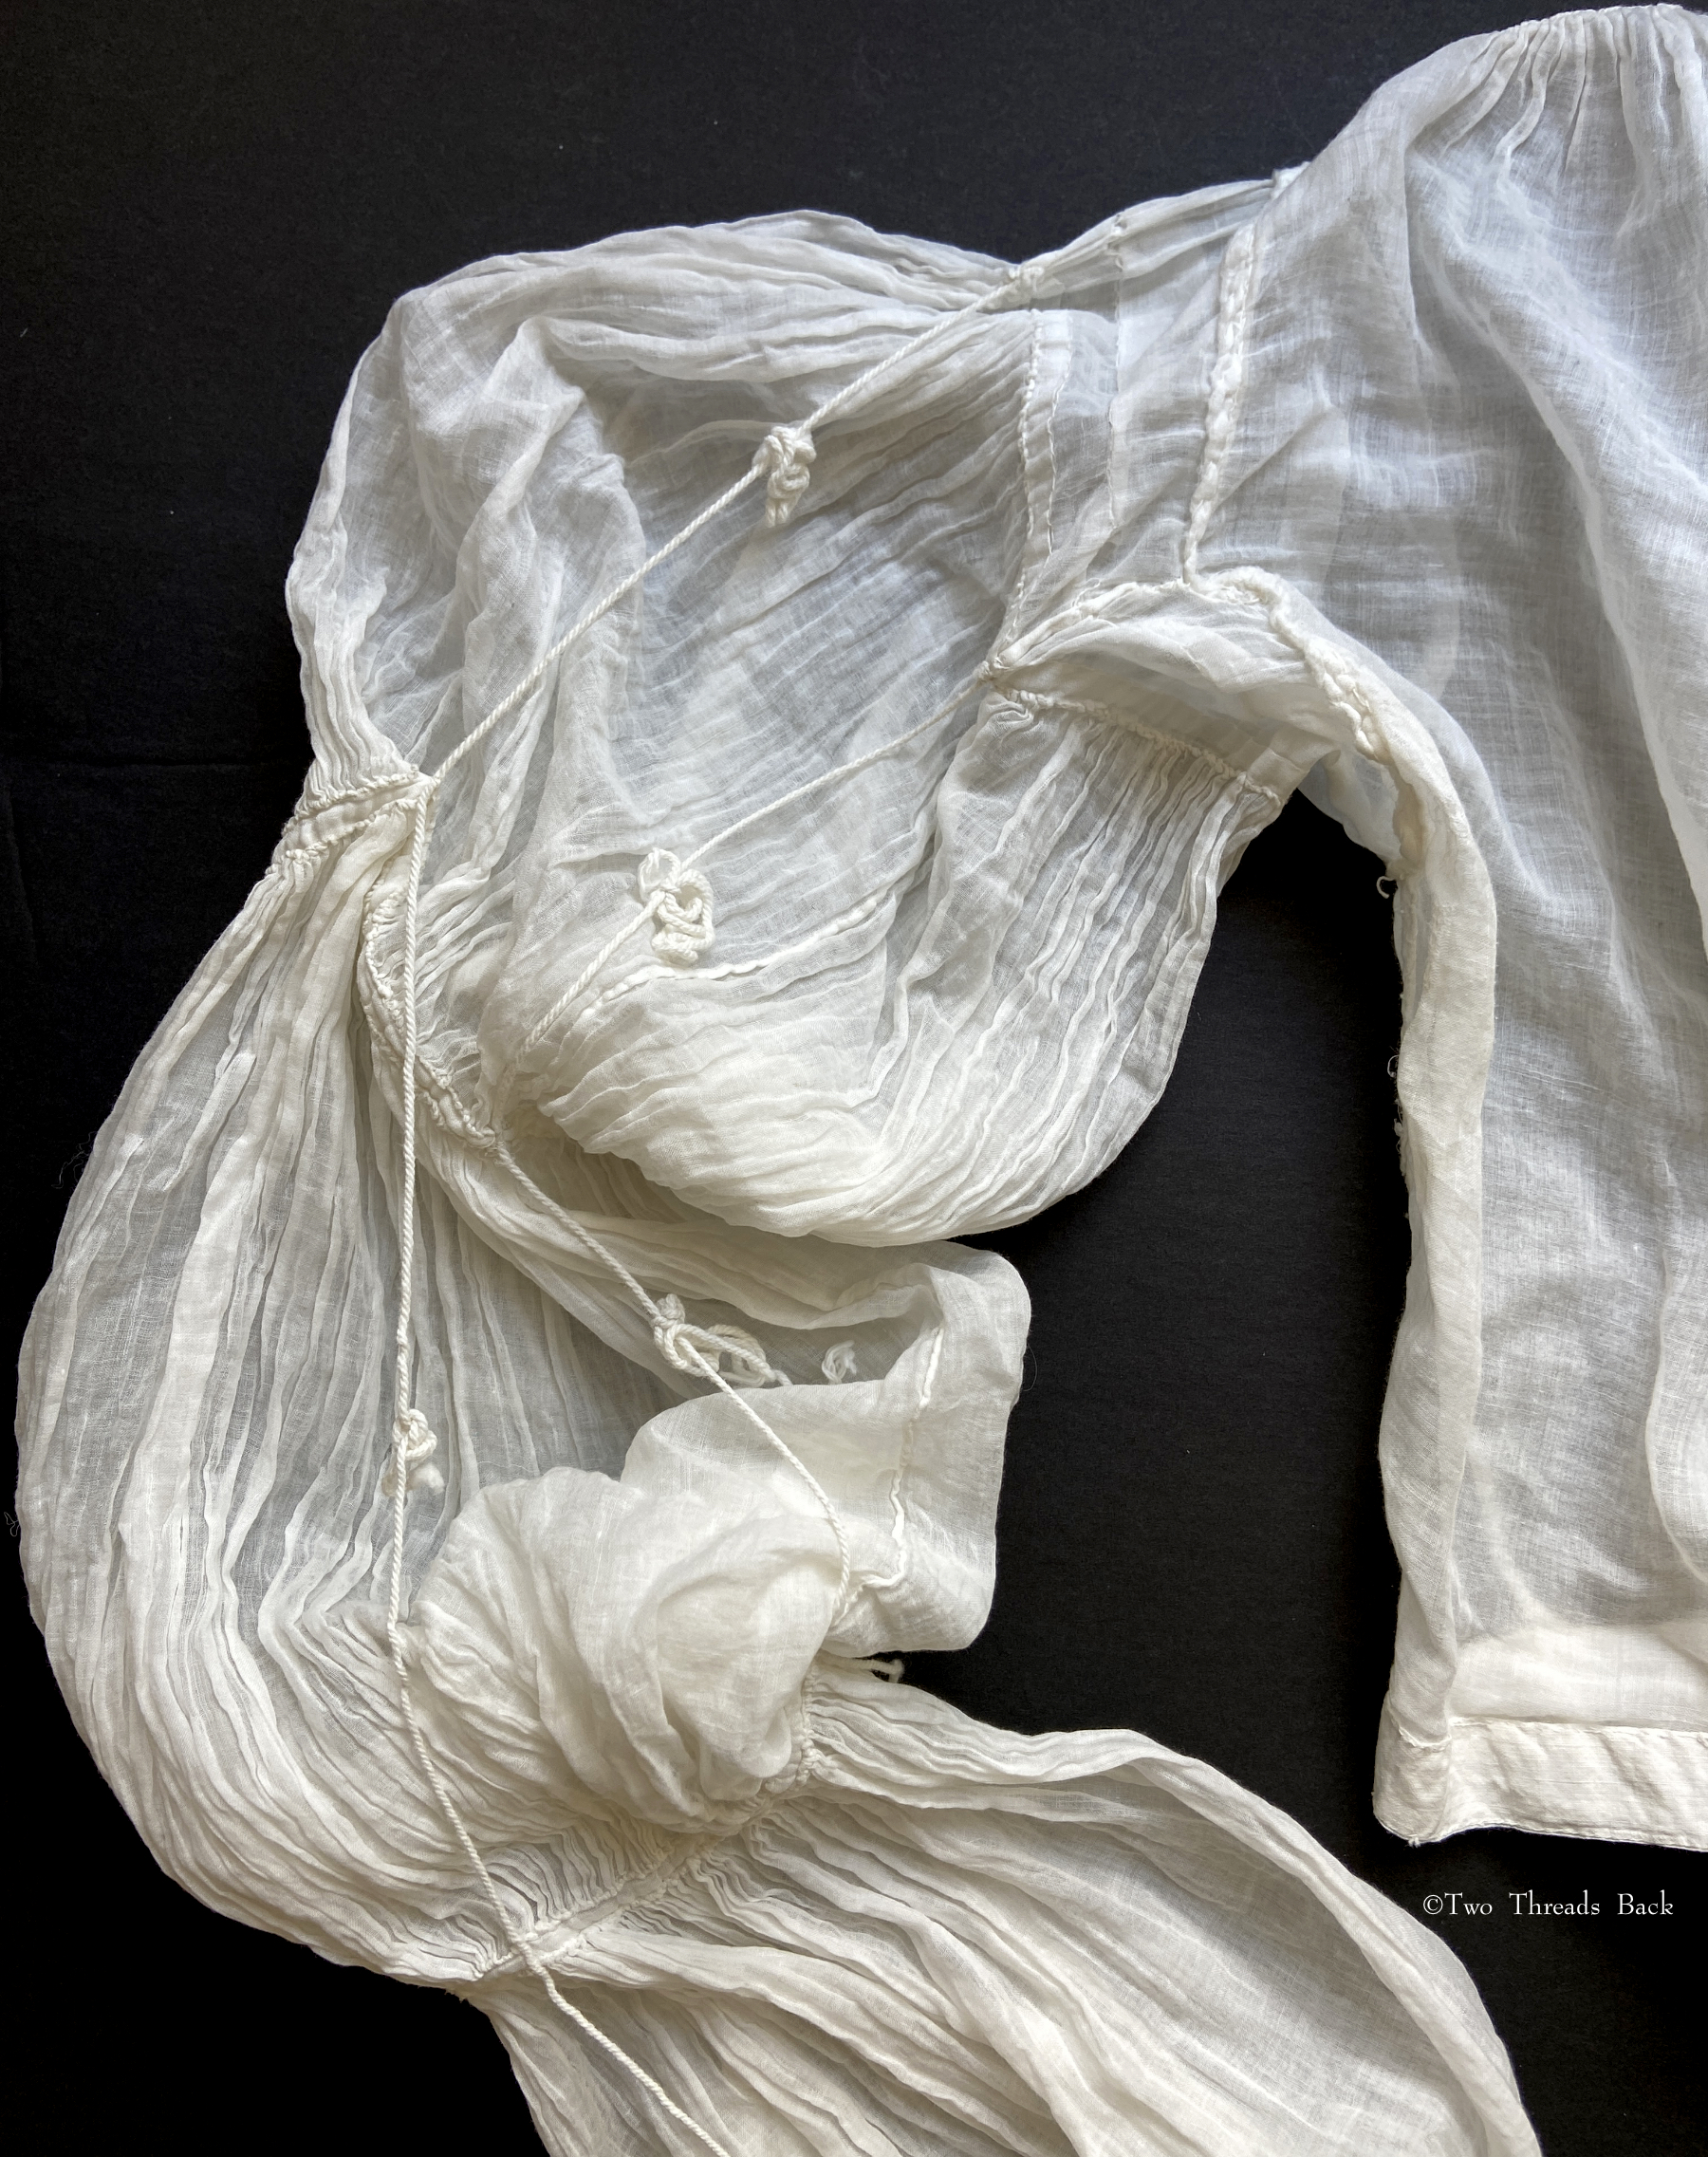
And now the most curious part: the puffs are held in place with tacked-on cord! It looks just like any cotton string you can buy today. Can you imagine the effort of getting the lengths all set and the placement just right? I imagine it felt a little awkward to wear, too.
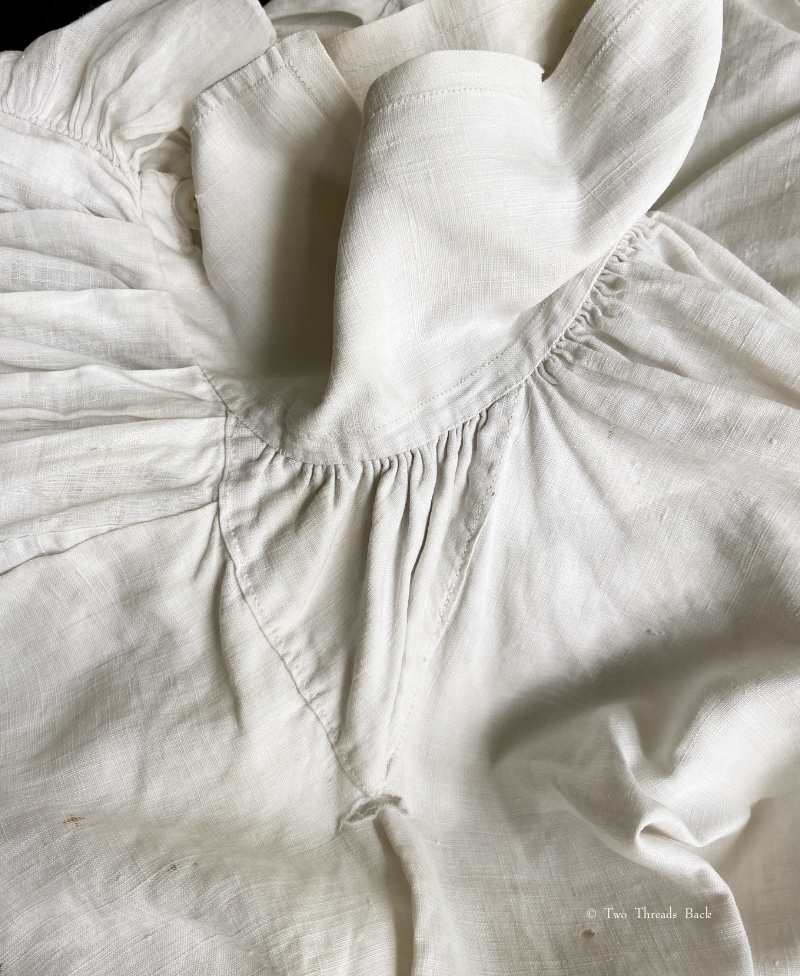
The fullness of the back is gathered and tucked in between a linen tape and the dress fabric, and then sewn to a cord on the inside to hold the gathers in place.
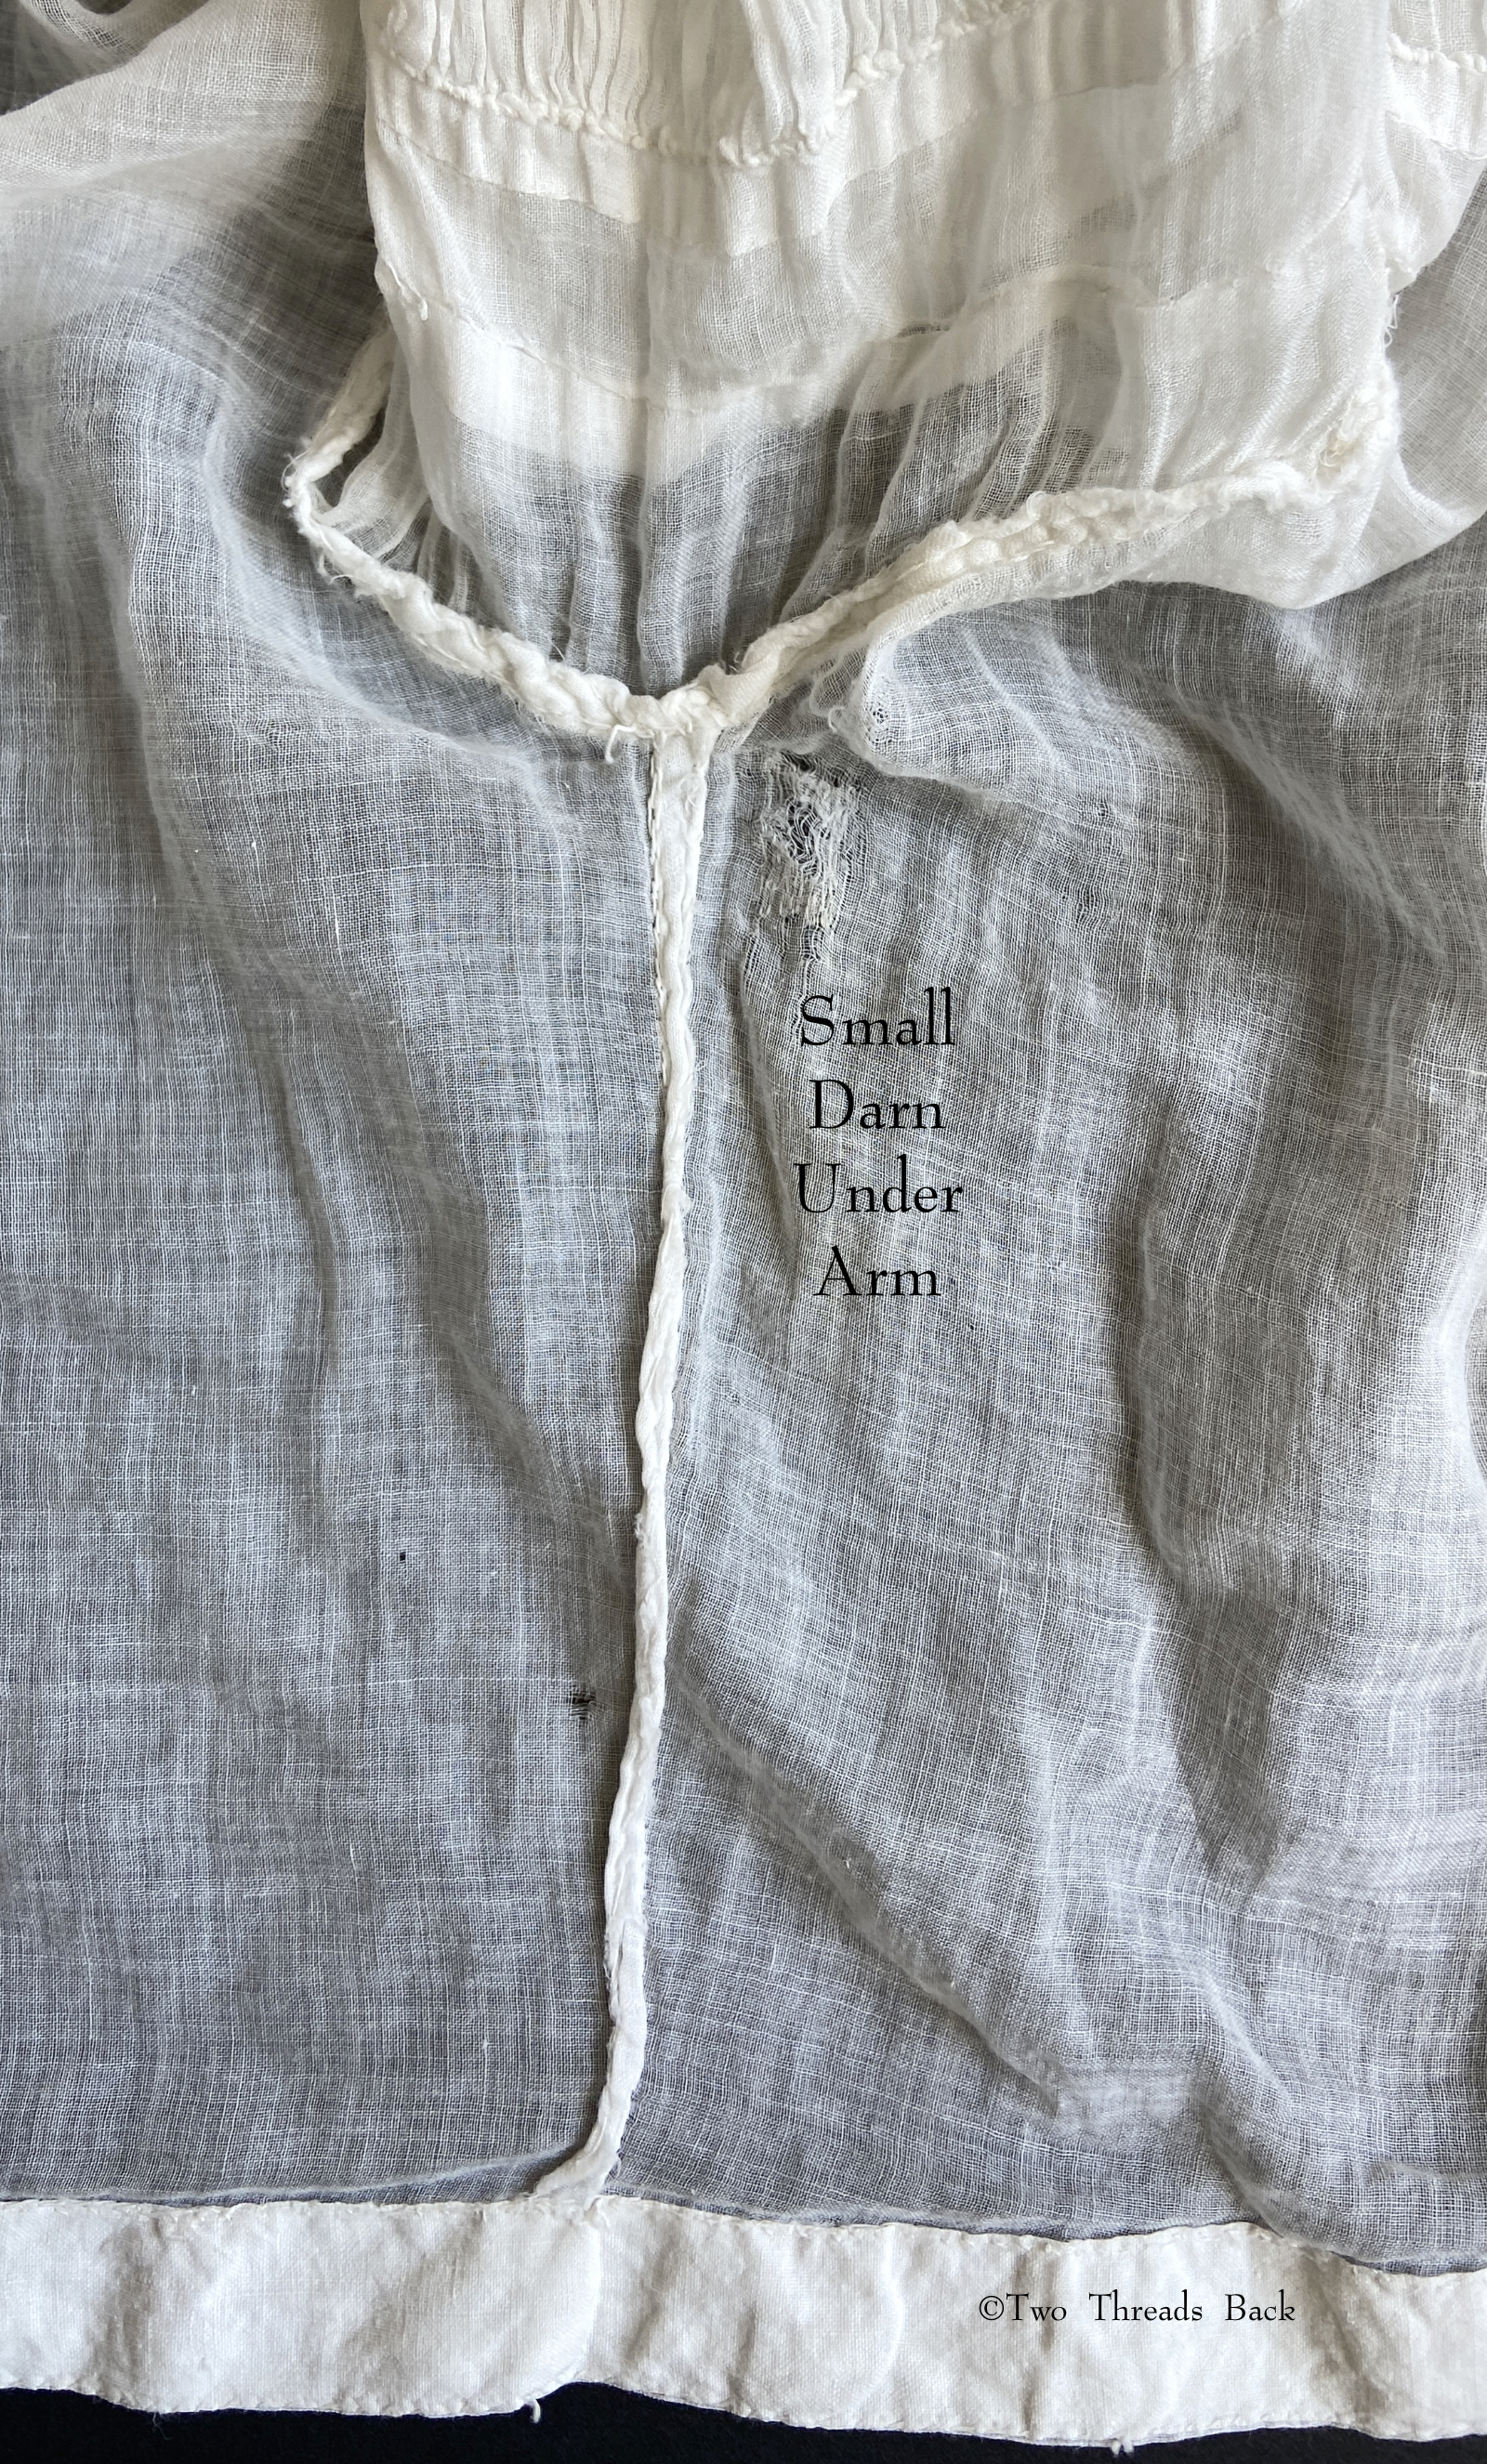
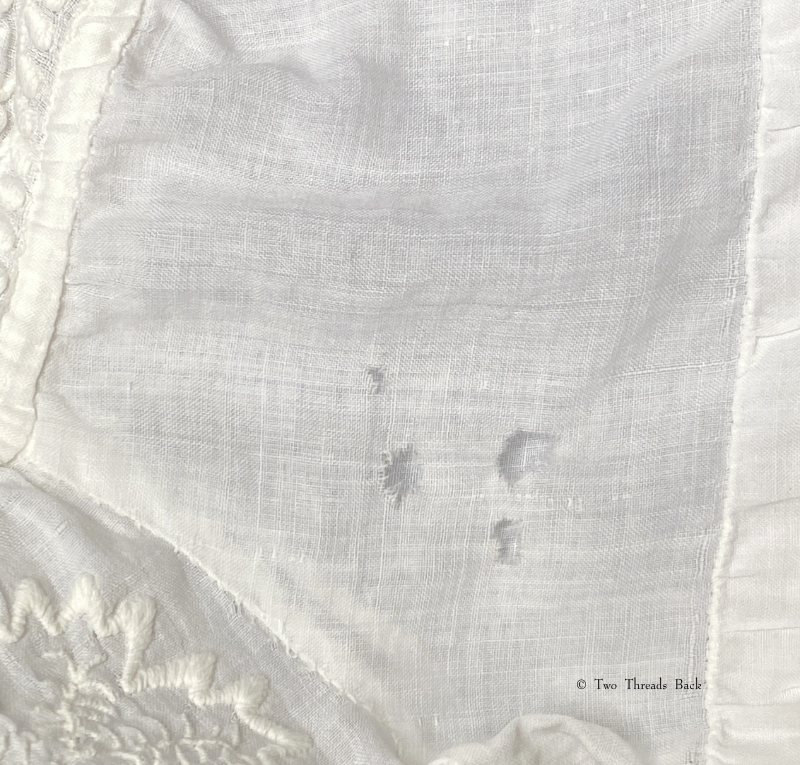
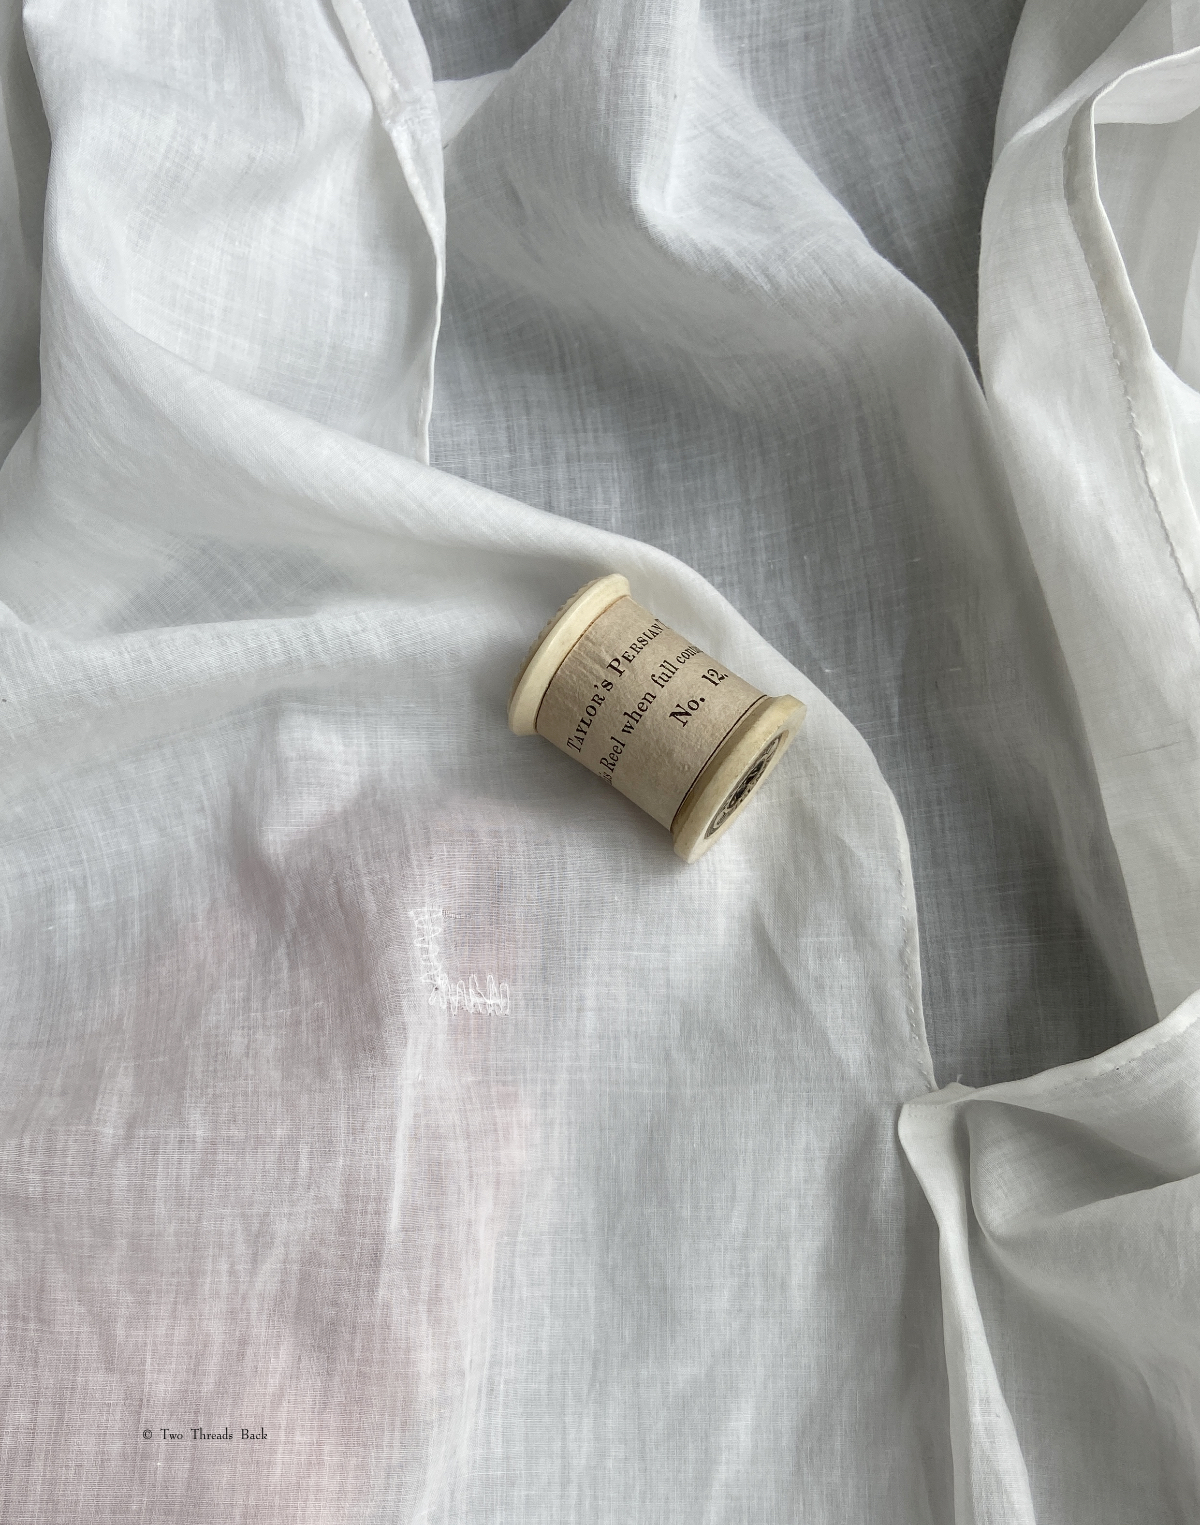
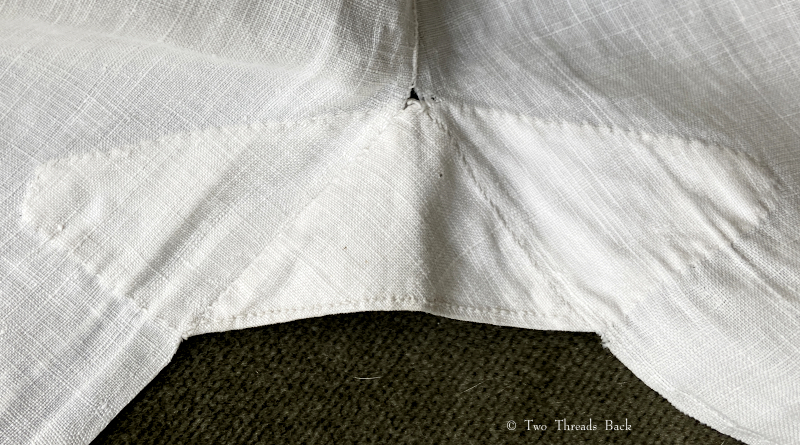
One tiny, beautifully worked darn is hidden under the arm. It’s easy to see how vulnerable these fine fabrics were to damage. Even in its youth, the muslin was fragile and the lightest pull or snag could mean disaster. Not to mention laundering, which could have been as hazardous as wearing!
A perfect darn. Click for a closer view.
So there you have it, inside and out. I wish I knew the history – I’ve seen pictures of this same bodice on the internet, so I know it’s been through other hands. But alas, I may never learn its story. I also wonder whether the gown was worn starched so that the puffs would be full, or whether they were allowed to droop gracefully. Because of the sleeves’ crepe-like texture, and no trace of starch, I vote for drooping. Although when posed on the mannequin, gravity makes it look like the ice cream is melting. But then gravity eventually does that to us all!
I’ve heard the old adage “a stitch in time saves nine” since I was a child, but I think I was an adult before the light clicked on. It made no sense to me: saves nine what? My ten year-old self thought it was silly. My grown-up self got the point, but still thought it was silly.
A few decades later, I can almost appreciate it ‘as written’. According to Thomas Fuller in 1732,
Because Verses are easier got by heart, and stick faster in the Memory than Prose; and because the ordinary People use to be much taken, with the clinking of Syllables; many of our Proverbs are so form’d, and very often put into false Rhymes; as, A Stitch in time, may save nine…. This little Artifice, I imagine, was contriv’d purposely to make the Sense abide the longer in the Memory, by reason of its Oddness and Archness.
Of course it means that attending to a problem now will save you many times the work later. When clothing or linens need mending, it’s better to do it before the damage gets worse. In the 19th century, mending and darning could take as much time as making and were an important part of plain sewing since the pile of work never diminished. Period fiction rang true, as in this excerpt from The Christian World Magazine, 1869:
I have so much to do – there are so many little ones, and mamma is so very often poorly. And the fact is, we are not rich. I have to make and to mend, and to turn, and to return, and so we never come to an end of the sewing. I sometimes speculate on the foot of a stocking, and wonder whether there is half an inch of the original fabric left in it! One darns it first quite neatly, and then one darns the darns, not quite so neatly, of course; and lastly, one cobbles as well as one can the darned darns, till it becomes quite a work of art, I assure you.”
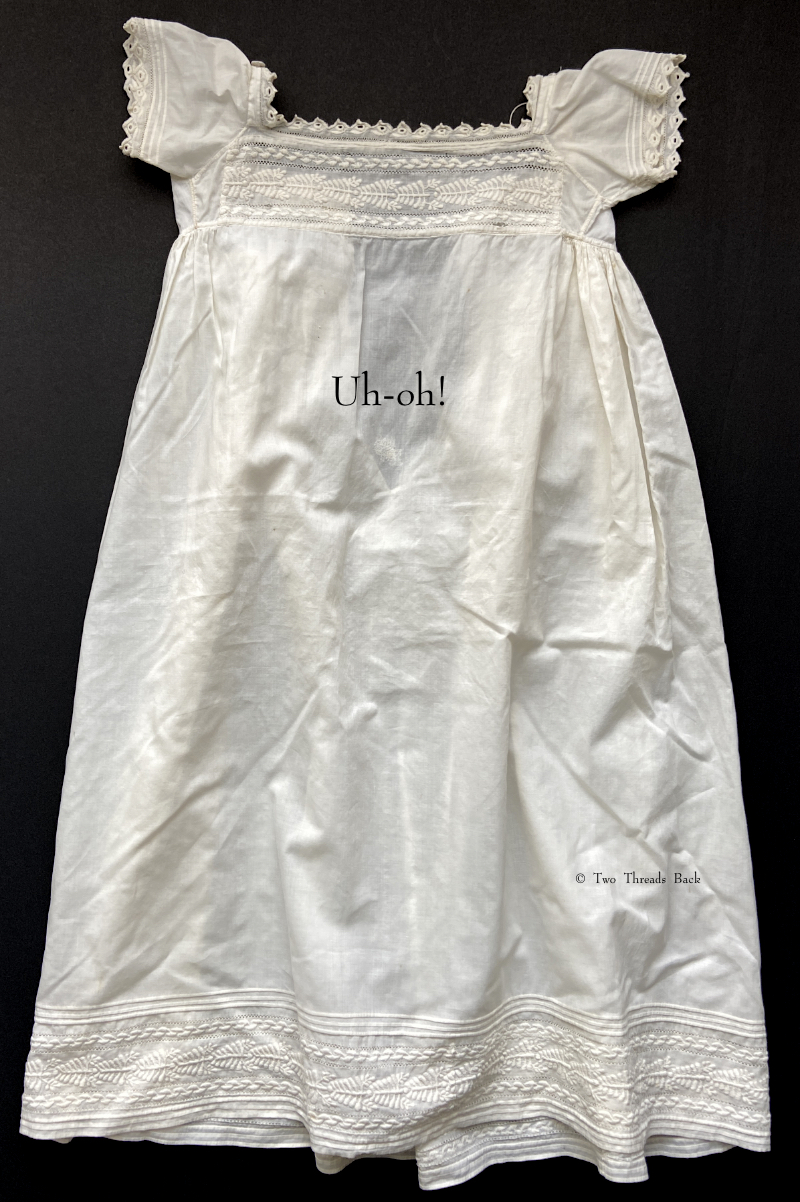
Lots of quick and clumsy patching abounded (by necessity I’m sure!), but I’m amazed at the delicate repairs you can find in finer clothing (examples here, here, and here). One day last summer, I temporarily lost my mind and decided to try it myself on a baby gown in need of repair. Before starting, I looked at a similar gown with a neat mend to see how they’d accomplished it. It had a 3/4″ darn right in the center front.
Can you spot the period mend on this c. 1810 infant gown? Front and center. It’s right below the “Uh-oh!”
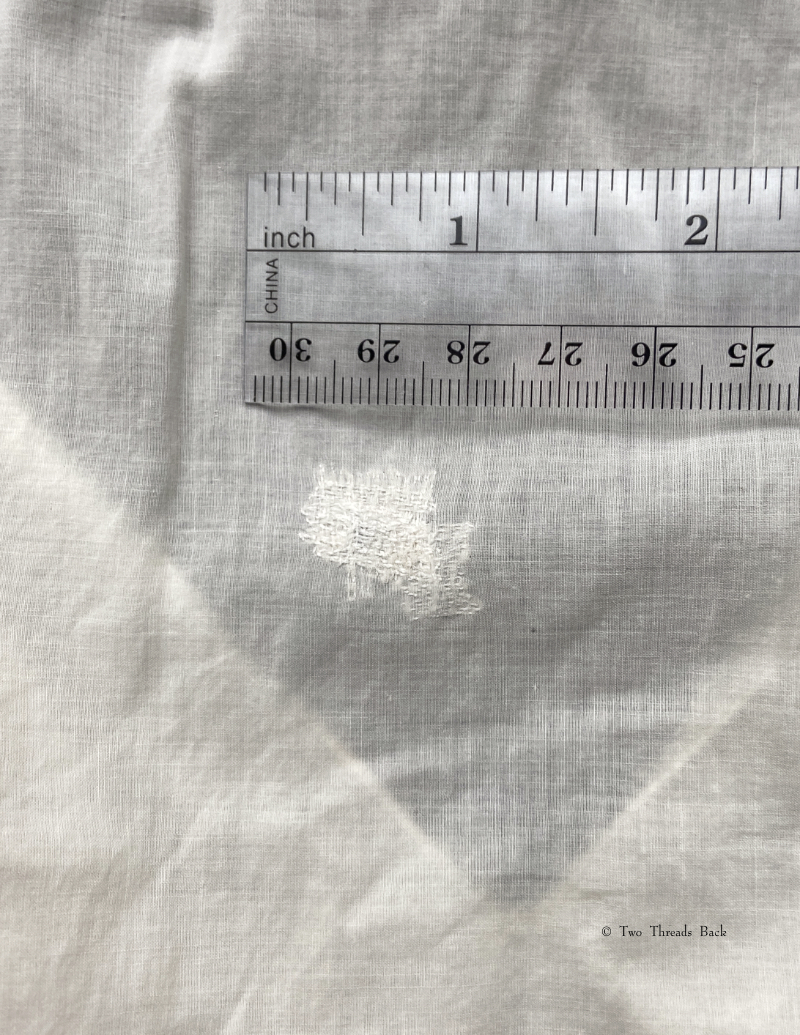
Here’s a closer view of the darning.
The one I wanted to repair had eraser-tip size holes on one sleeve and a tear at the back opening. My first problem was finding thread to darn with. Even the finest cotton thread I had looked wrong – too white, too glossy, too thick. So I raided a bag of “damaged beyond saving” muslin scraps and used the closest color and weight match, pulling threads from the fabric itself, trying to get strands long enough to use. I reviewed old sewing manuals for directions, but since I was being adventurous anyway, decided “Never mind manoeuvres, always go at them!”
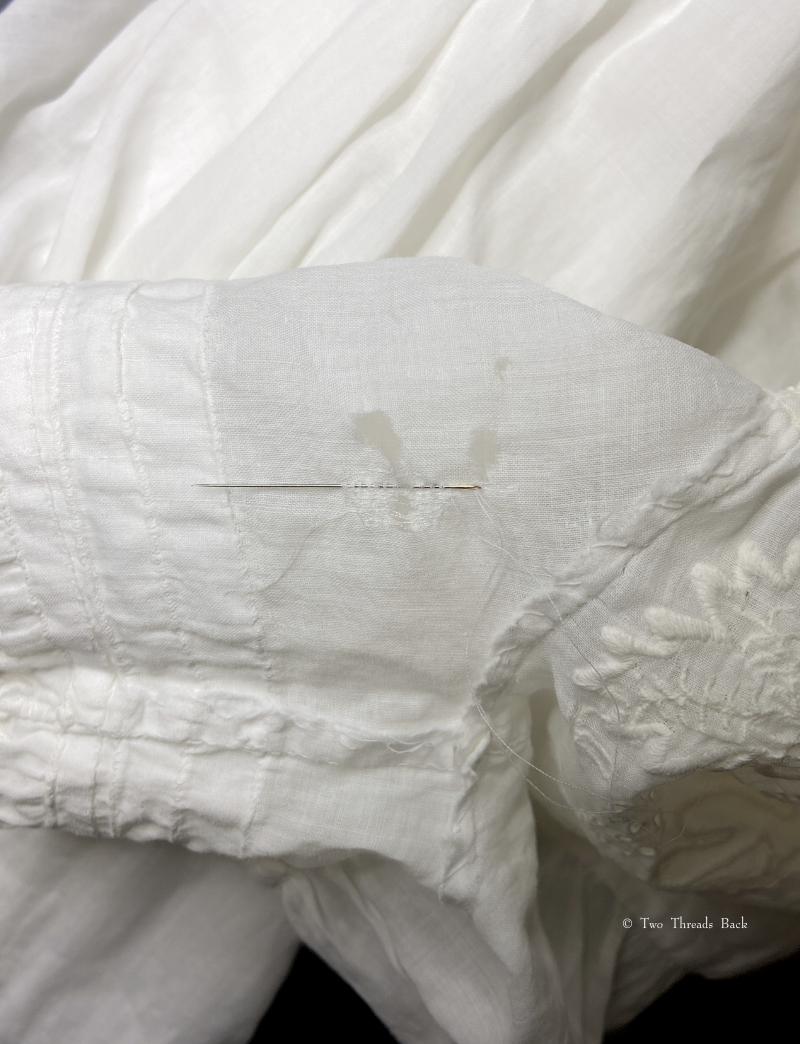
Here you can see the holes on the front of the left sleeve. It was a daunting task for a first try. But how could I make it any worse?
I worked from the inside to keep it less visible on the outside.
No more holes!
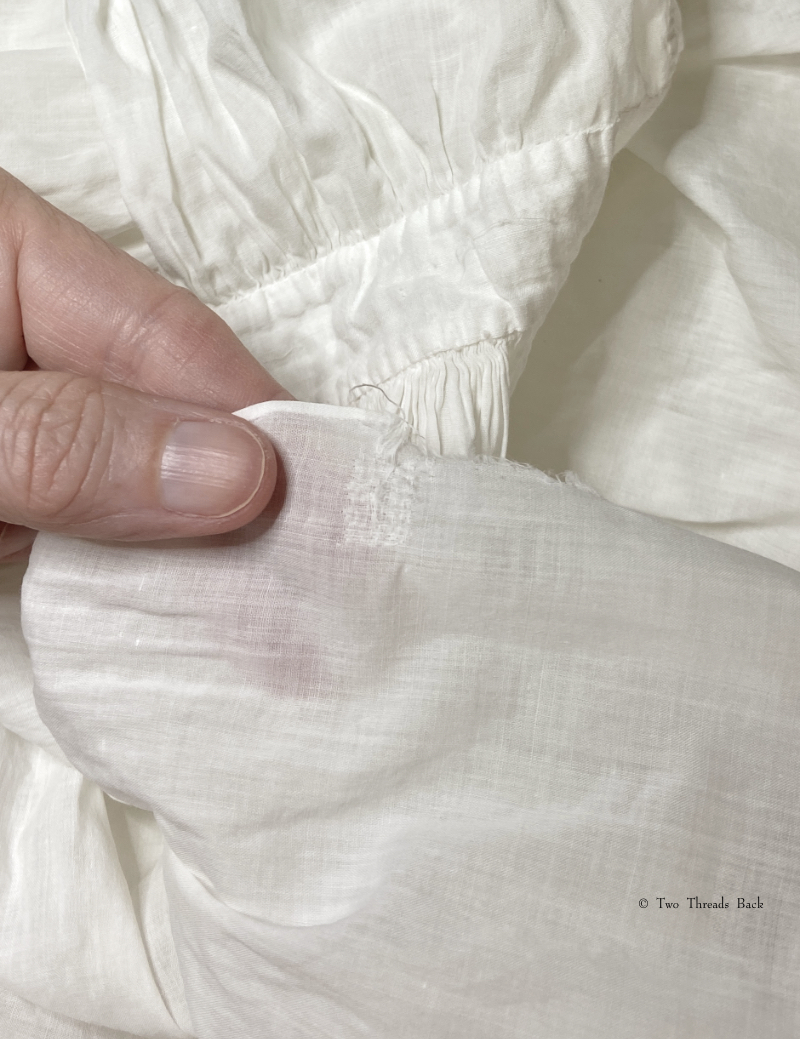
The tear on the back was a little easier because it was straight along the weft. And I’d had a little practice by then!
By this time I was actually having fun with these tedious tiny stitches and went looking for more. I found a couple of pin sized holes and Saved Nine again!
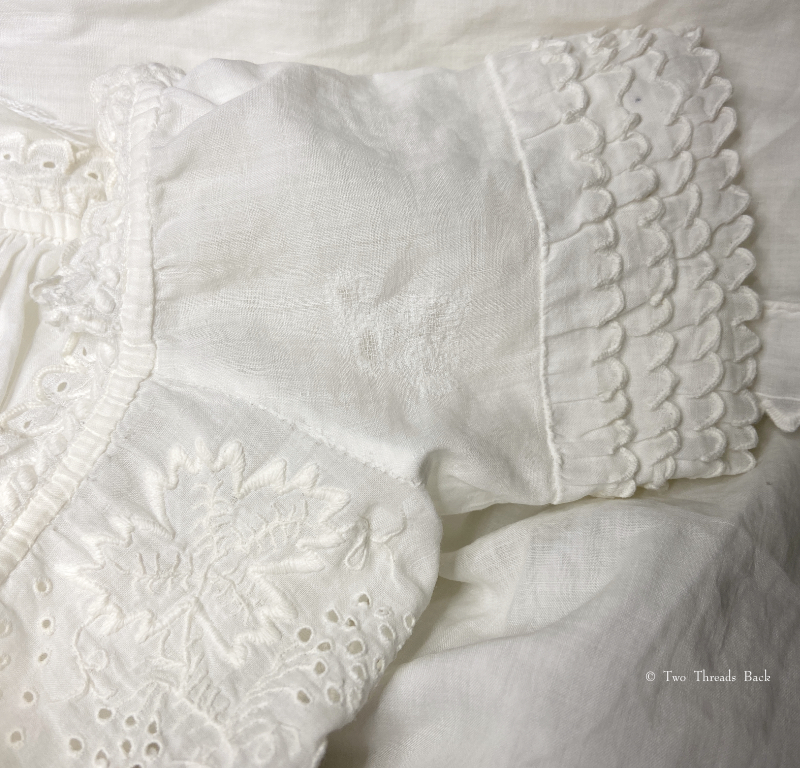
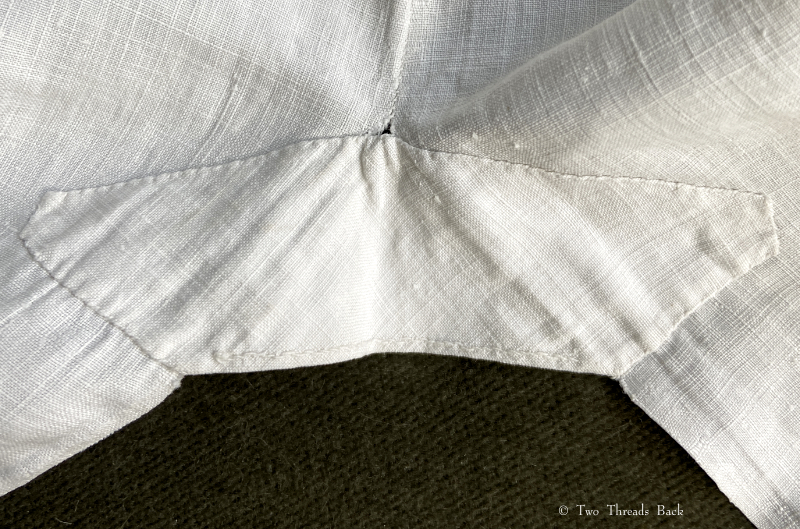
The gown did have one period repair: a three-cornered or “hedge” tear. (At least that’s what it’s called in late 19th century manuals. I only found one earlier reference to hedge tear, 1850s.) I can’t take credit for this darn, darn it. It was neatly done, and I didn’t even discover it until I was part way through my own mending!
A nicely darned tear, done in the gown’s younger days.
All in all, I was pretty satisfied with the results. They wouldn’t stand professional scrutiny, but they work for my purpose and were way more fun than I expected. I’d like to do more. But wait. Does that mean I do or don’t want to Save Nine?
Sewing instruction manual belonging to Miss Peacocke, 1832. She conquered Sleeve Gussets for a Shift.
Tutorials aren’t usually a feature of this plain sewing blog, but I set out the steps for someone who needed help with sleeve gussets, and thought I’d share for anyone who flirts with insanity when inserting them for dolls or costume. I like pictures in sequence best – except maybe when assembling anything from Ikea!
A gusset is a little piece of fabric inserted to reinforce or to increase the ease of movement in garments like shirts and shifts – you can see in the pictures how it gives more room under the arm. They were used up until mid-19th-century-ish when fashion, fitted patterns, and sewing machines made them pretty much obsolete, though some sewing classes included directions for small ones at garment openings into the 20th century.
Plain sewing projects might include a sample sleeve gusset, because they used basic stitches like hemming, felling, and sewing/seaming1. A miniature size was practical, saving both time and material; the ones pictured here were pasted in books meant as guides for sewing teachers.
Closeup look at another specimen. It’s also been hemmed on the side that would be inserted into the body of the garment, but that’s only for extra hemming practice and tidiness of the specimen.
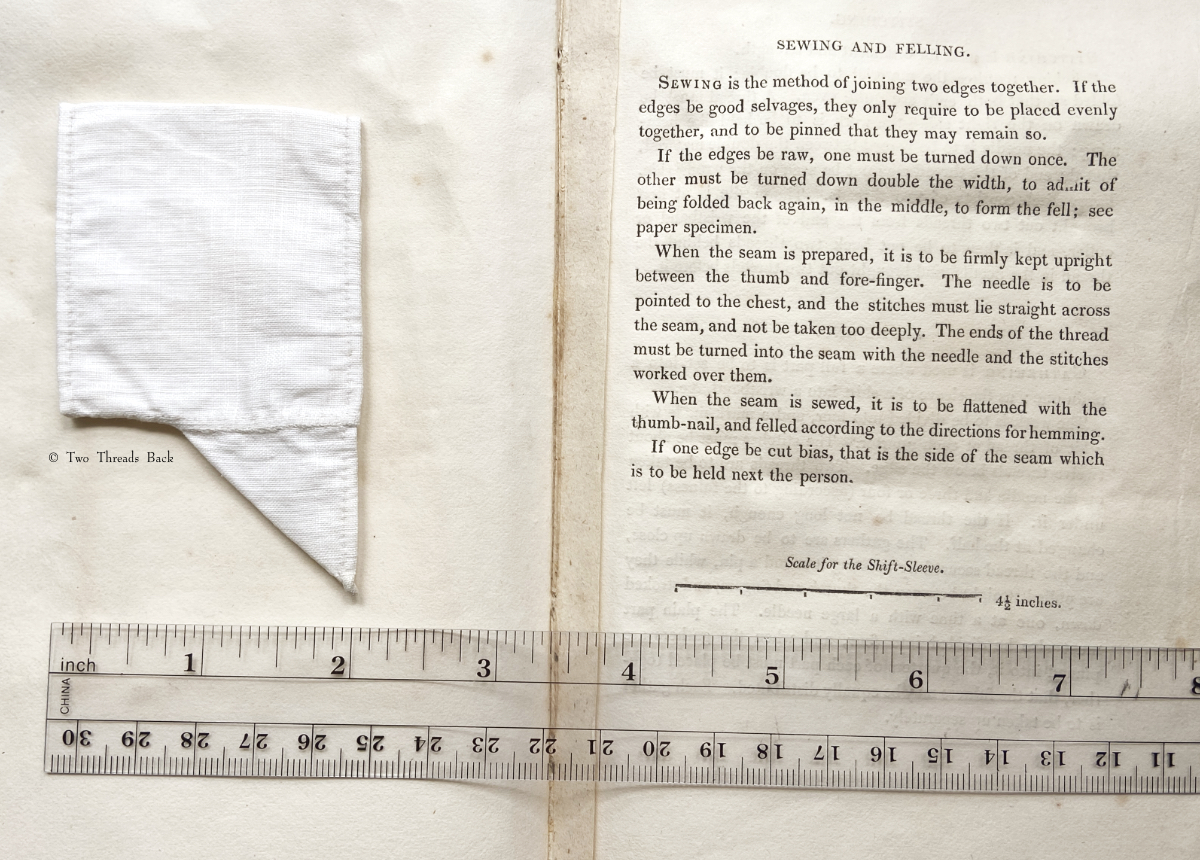
So just how hard can it be to sew straight seams on a little square? Well, if you want all the edges to be neatly enclosed, lie flat, and the right size when finished, it can be a pain in the armpit! The following sequence shows the “sew-and-fell” method, replicating the miniature specimens above. I’ve seen other methods – and I have some examples – but this one set the standard for fine needlework.
Note: In 19th century manuals, the deeper double fold for felling was always completed before any sewing was done. See pics Fig. 50 and 51 here. That’s difficult to illustrate in a photo sequence, so I’ve made the second fold after the seaming is done.I’ve used a coarse cotton printed on one side, contrasting thread, and big stitches (ha!) so that it’s easier to see.
Above: The sleeve piece is on the left, the gusset on the top right, and a finished gusseted sleeve on the bottom right.
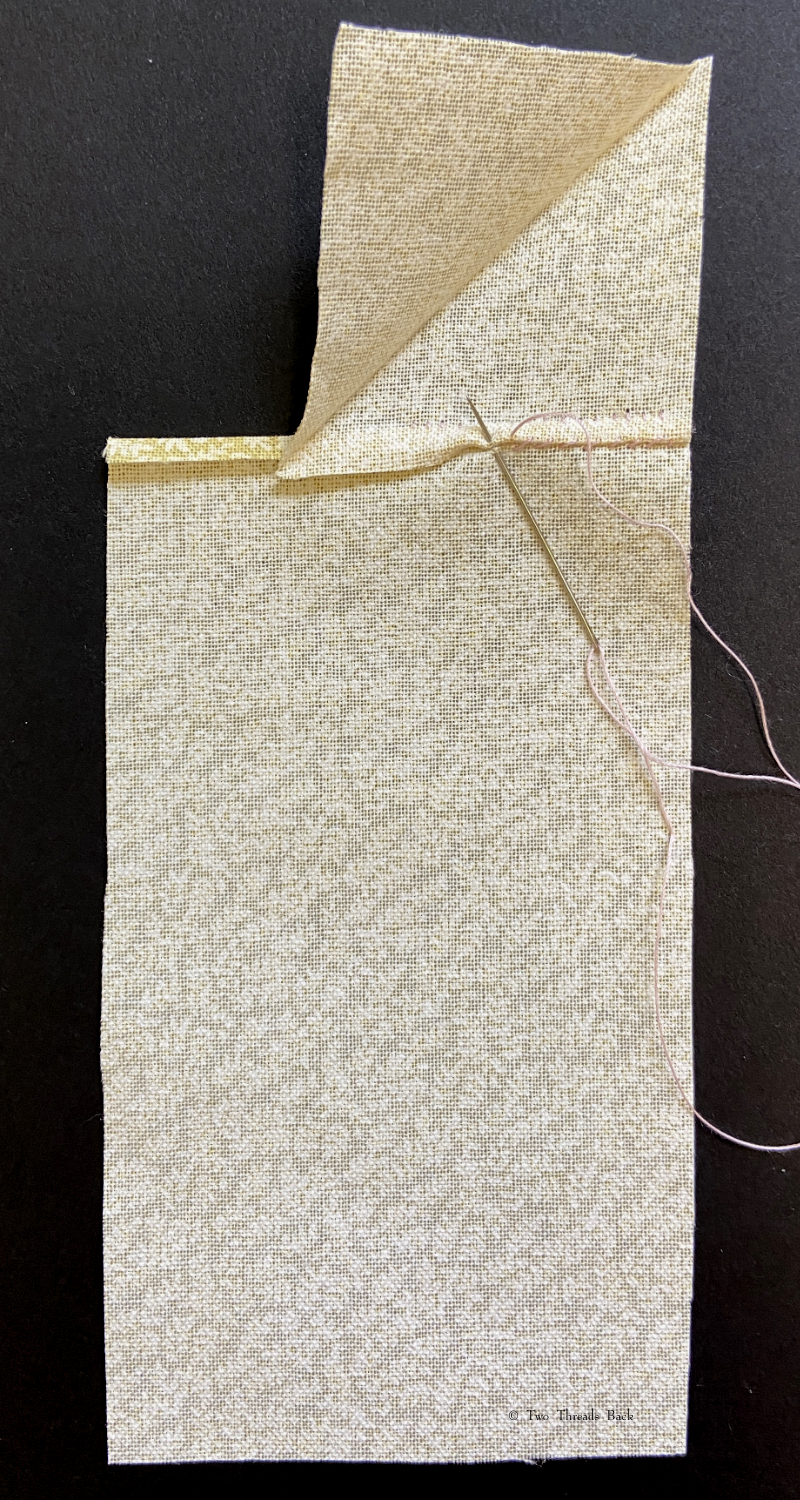
Above: Fold the sleeve edge down to the desired width of the seam. Crease the gusset diagonally and then fold it down twice as deep as the sleeve.
Above: Place the sleeve and gusset wrong sides together and then seam together, stopping just short of the end, since that side will be folded next.
Above: This is the same step as above, viewed from the side. You can see that the gusset side fold is twice as deep as the sleeve side fold. (It should already be folded back again, ready for felling, if you want to do it exactlyas they taught it.)
Above: Fold/fell the gusset edge down over the sleeve edge. WARNING: OPTICAL ILLUSION! Sometimes the gusset crease in this photo appears to be folded back onto the right side instead of forward onto the wrong side. It’s all in how your eye first perceives the image. It’s actually folding forward toward the needle.
Above: Next, fold the adjoining edge of the gusset – this time it’s the gusset’s turn to be the narrower fold! (You can see why the stitching wasn’t taken all the way to the edge earlier.) Fold the bottom edge of the sleeve twice as deep. Then with a little twist, bring corner A down to meet corner B, fold to fold.
Above: Now seam the gusset and sleeve together, and keep on going past the end of the gusset, seaming the rest of the sleeve together.
Above: A view of the inside, looking up into the sleeve from the gusset opening, before the sleeve edge is felled down over the gusset edge.
Finally, fell the sleeve edge over the gusset and keep on going, all the way to the end of the sleeve. This photo is peeking inside the sleeve, to give perspective. Of course when you’re actually SEWING it, you’ll need to turn the sleeve inside out!
The author of The Workwoman’s Guide (1838) may have been a little impatient with gusseting herself. She suggests simply hemming the gusset evenly all around, hemming the sleeve where it will be inserted, and then seaming the two together. I’ve done that myself! As long as the work is neat….
Gussets – Much depends upon the nicety of the putting in and finishing off, but when well accomplished they have a peculiar charm to a good needlewoman.
Personally, I find peculiarcharm in just finishing one with my good humor intact. I’ll save the appreciation of niceties for those glorious gussets worked long ago.
1 Terms used for stitches differ according to time and place. The stitch I’m referring to here, a very shallow overcasting used to “butt” two pieces of fabric together, was called seaming or sewing. The term sewing was more common in the first part of the 19th century in English and Irish manuals. Seaming was more popular later. There are no early American sewing manuals, but in the U.S. over-and-over stitch was frequently used by mid-century and then overhanding was popular later (as distinct from overcasting which was a wider stitch used to prevent edge raveling). I usually call the stitch seaming because calling it sewing would be really confusing (even more than this footnote!) and over-and-over stitch is too wordy to verbify!
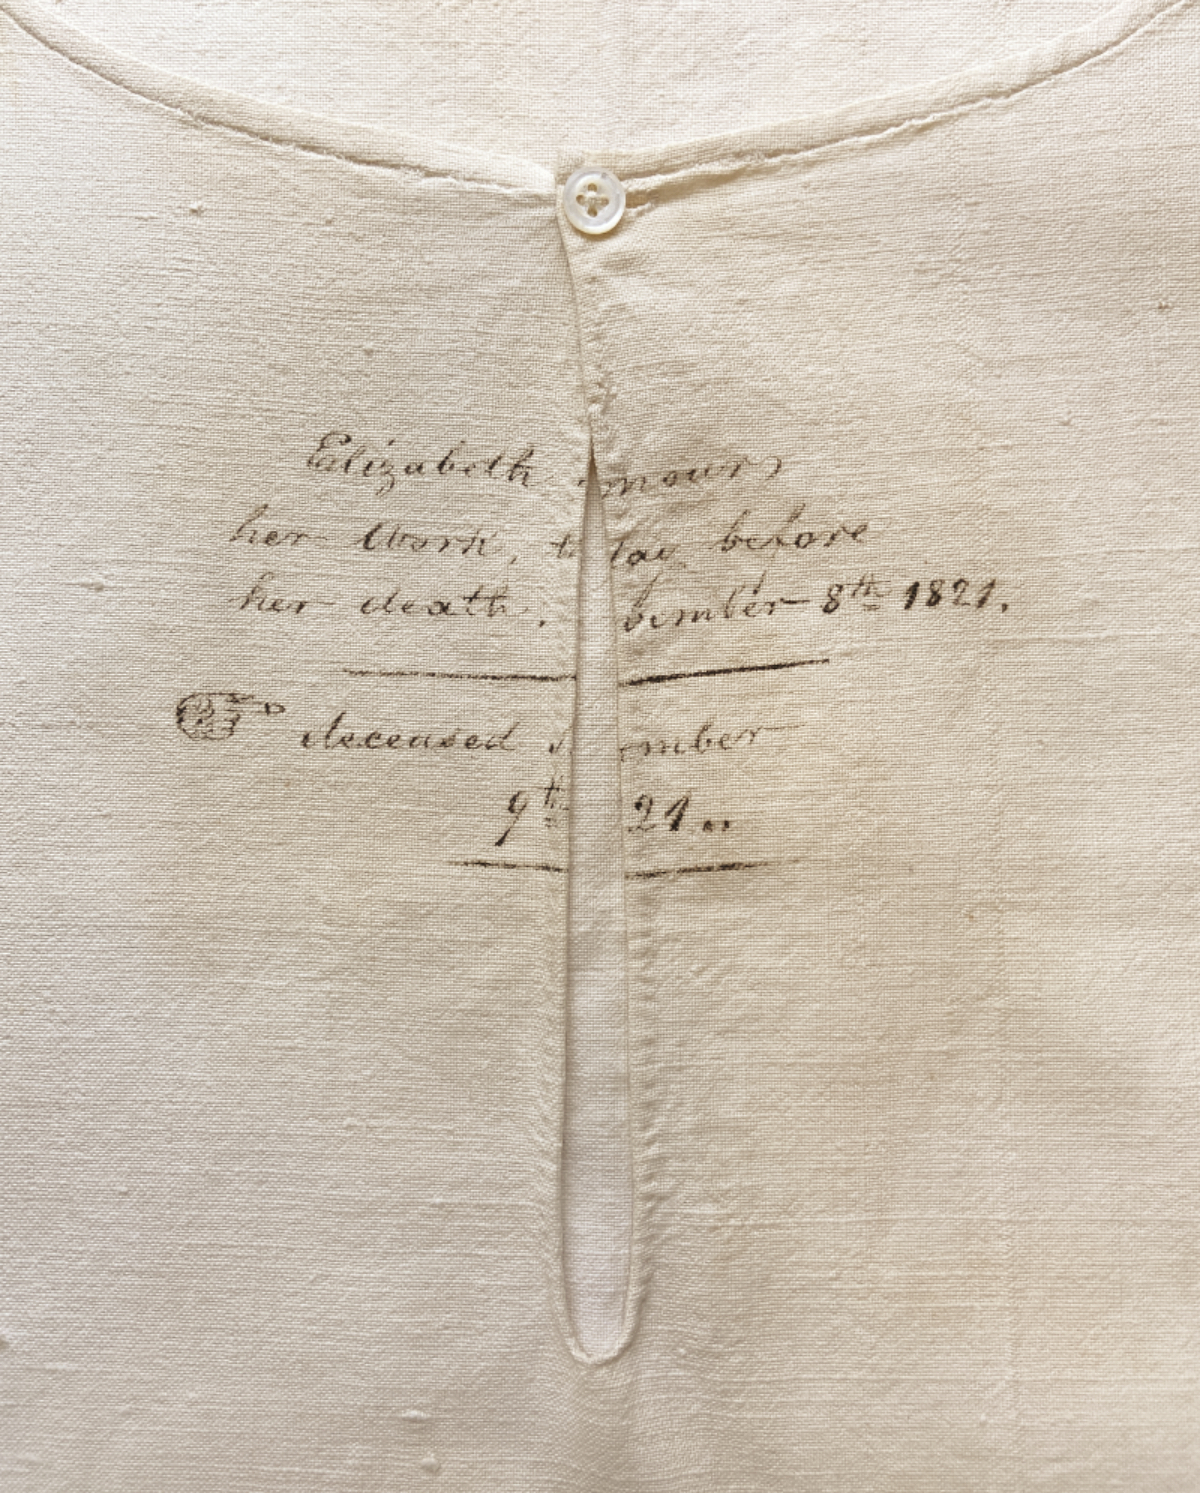
Elizabeth Armour, her work, the day before her death. November 8th, 1821. deceased November 9th, 1821.
Most of the time we never know who wore the antique clothing that we preserve and study, much less who made it and when. So it’s thrilling to find a piece with a story that connects us to a life lived long ago. Her name makes her real.
Shifts and chemises follow closely behind men’s shirts as prime examples of plain sewing. This rare linen shift has its provenance inscribed in ink across the heart. Not only does it give the name of the maker, Elizabeth Armour, but it tells when she made it, November 8, 1821, and when she died – the next day.
Occasionally notes are found attached to clothing, usually intended for family members to pass down, or perhaps when donated to museums. But I’d never seen one quite like this! How could I help but try to find out more about Elizabeth?
Elizabeth Armour’s plain shift, still in excellent condition.
Thanks to the wealth of genealogical data available online now, it was easy to search for a woman with that name and date of death. What a thrill to find her! Of course, I can’t be positive it’s the same person, but the odds seem pretty good.
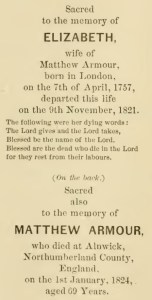
Transcript of Elizabeth’s gravestone.
Elizabeth, wife of Matthew Armour, was born in London on April 7, 1757, and died on November 9th, 1821 in Philadelphia. She was buried there in Christ Church and St. Peter’s Churchyard on November 11, 1821. Her name was entered in the register of burials as “Eliza. Armor.” I don’t know whether the gravestone still exists, but at least a record of it does:
The following were her dying words: The Lord gives and the Lord takes, Blessed be the name of the Lord. Blessed are the dead who die in the Lord for they rest from their labours.
Who was Elizabeth and what was her life like? I found traces. Elizabeth Nesbet married Matthew Armour in the City of London at the church of St. Andrew Holborn on July 2, 1780. She next appeared as the mother of Susannah Nesbitt Armour who was christened at Christ Church and St. Peter’s in Philadelphia on July 3, 1785.
Wait, Philadelphia? 1785? It bargles (as my daughter used to say) the mind! More American history than I can even begin to explore. I suppose there are so many books, essays, and dissertations written on that place and time that they would collectively collapse my little local library. Even the church the Armours attended has a past so rich it makes me dizzy. Benjamin Franklin, George Washington, Betsy Ross, and many of the signers of the Declaration of Independence attended, all during the years the Armours were worshiping there as well.
In 1788, son William was born. Matthew appears on various records during those years as a house carpenter. If there were other children besides Susan and William, I didn’t find a record of them. We know the hazards of illness and accidents in those days, but in 1793 a yellow fever epidemic (here’s a compelling read) struck Philadelphia killing 5,000 of the 45,000 residents, and caused another 17,000 to abandon the city. It struck again in 1797, ’98, and ’99. Did it touch the Armours or their kin? I doubt I’ll ever know.
Matthew continues to appear in the early 1800s on tax, census, or manifest records (he made trips to England) as a carpenter. The family moved several times within the city through the years, and siblings Susan (as she was known) and William apparently never married, but kept house together and owned a dry goods store. In an 1811 affadavit sworn as a super cargo, William (at age 22) states he was 5’9″, fair complexion, blue eyes, with 3 scars on his left forefinger! There’s something eerie about knowing 200-year-old personal details like that. But perhaps no more than slipping my hand in the sleeve of Elizabeth’s chemise?
Elizabeth may have been ailing by 1821, since the cause of death was “dropsy.” We know what she was doing in the days before her death because of the inscription on her shift. More poignantly, we know how much her handwork meant to someone, probably her daughter Susan. I understand how that feels; I have handmade treasures from my late parents that move me to tears when I hold them.
Philadelphia, Nov. 9th, 1821 Died this day of Dropsy Elizabeth Armour aged 64 years.
Matthew returned to England sometime after Elizabeth’s death, where he died at Alnwick on January 1, 1824, aged 69. In 1830, Susan and William’s cousin, Martha Cheesman (b.1818), came from England to live with them in Philadelphia. William died in 1851, and Susan in 1857. She left an estate of $15,000 with bequests to Christ Church Hospital, the Northern Home for Friendless Children, her nieces, and the remainder to her “cousin Martha Cheeseman.” That was a lot of money for the time. It seems that the dry goods business was very profitable! I was getting a little lost and weary of genealogical research at this point, so I let the trail end with cousin Martha’s death in 1906. Perhaps the shift had been left in her care?
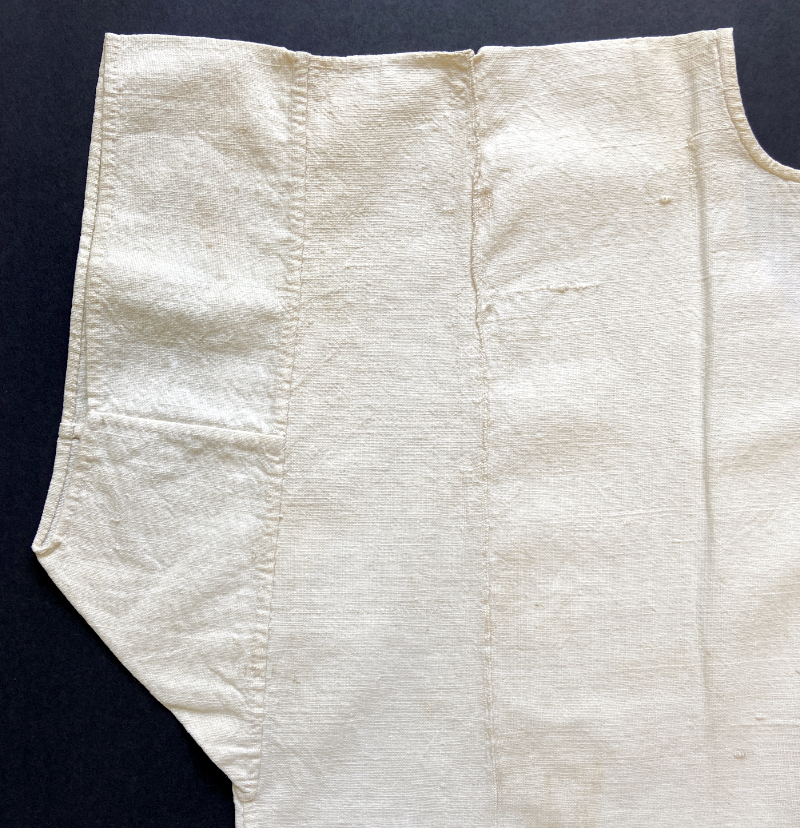
The shift is very simple. The linen is homespun and sewn with linen thread. The economic impact of the War of 1812 and then the Panic of 1819 meant times were still hard, so perhaps homespun was a necessity. The stitching is neat and even, but not particularly fine. The fabric was of insufficient width and so another piece was seamed to it to make the full width of the body, and then folded at the shoulder.
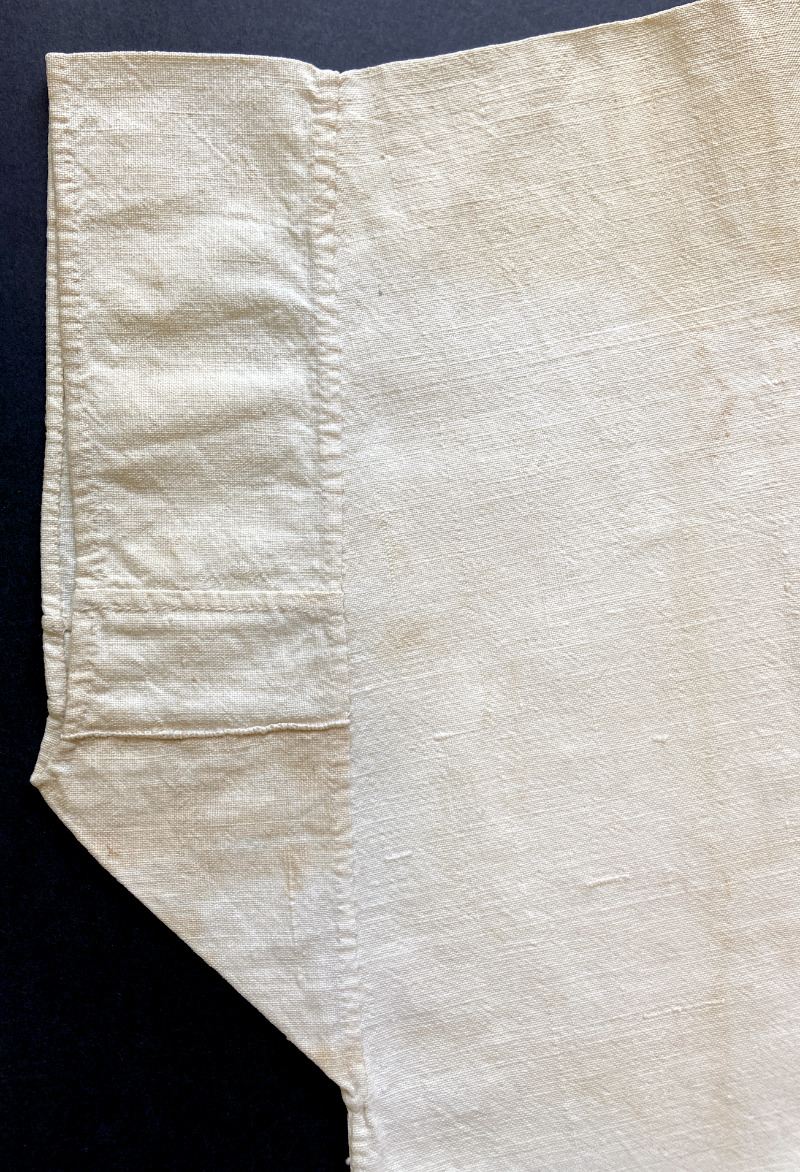
Left sleeve viewed from the back. You can also see the seamed join where fabric was added to a selvedge to make it wide enough.
The sleeves are short, and the right one is pieced. There are gussets under the arms with a small curve at the bottom. It angles slightly wider toward the hem, but has no gores. The seamed join was sewn from the outside, and because the materials were a bit coarse and the stitches a bit deep, it makes a slight ridge. I can see why it’s positioned on the outside, since it would be rather uncomfortable against the body. The inscription was made before the slit was cut for the opening, because the writing is folded under where it’s hemmed. I don’t know if Elizabeth made the shift for herself, her daughter, or a servant, but it could be considered a “comfortable” size more than a petite one.
The right sleeve is pieced, using every scrap of fabric. The left one is whole.
A view of the narrow hem and join. You can see how she “seamed” (narrow overcasting) with wrong sides together. It should make a flat, nearly invisible seam, but the linen and thread are coarse and she took the stitches rather deep.
Elizabeth Armour, maker of the shift, lived from 1757 until 1821 in England and America, through the years of the founding of the United States in a city where the most radical historical events were occurring. And what serendipity! She was there when JOSEPH LANCASTER was living (briefly) in Philadelphia! She learned plain sewing in 18th century England, and was able to make a thrifty shift of homespun linen using a minimum of fabric, in the “old” fashion – just as styles were about to change from “shifts to chemises.”
The majority plain needlework I’ve seen (or drooled over) through the years, whether manuals, samplers, or items of clothing, has been from England, and the rest from here in the U.S. It’s truly remarkable to find “threads” from England, America, world-changing history, endearing family sentiment, Joseph Lancaster, and plain needlework all sewn together with a story in this shift. I’m awed.
Who doesn’t love to watch a magic trick? I think they can be a lot of fun, at least as long as I’m not the volunteer from the audience. Especially for this trick!
1784
To pull off any Perfon’s Shirt without undreffing him or having Occafion for a Confederate.
This trick requires only dexterity, and nevertheless when I performed it at the Theater-Royal in the Hay-Market everybody imagined that the person whom I had tricked out of his shirt was in a confederacy with me.
The means of performing this trick are the following, only observing that the cloaths of the person whose shirt is to be pulled off be wide and easy.
Begin by making him pull off his stock, and unbuttoning his shirt at the neck and sleeves, afterwards tye a little string in the button-hole of the left sleeve; then, passing your hand behind his back, pull the shirt out of his breaches, and slip it over his head, then pulling it out before in the same manner, you will leave it on his stomach; after that go to the right hand, and pull the sleeve down so as to have it all out of the arm; the shirt being then all of a heap, as well in the right sleeve as before the stomach, you are to make use of the little string fastened to the button-hole of the left sleeve, to get back the sleeve that must have slipped up, and to pull the whole shirt out that way.
To hide your way of operating from the person whom you unshirt and from the assembly, you may cover his head with a lady’s cloak, holding a corner of it in your teeth.
In order to be more at your ease, you may mount on a chair, and do the whole operation under the cloak. Such are the means I used when I performed publicly this trick.
–PHYSICAL AMUSEMENTS and DIVERTING EXPERIMENTS, 1784
That kind of describes what it feels like when I’ve tried to change clothes in the car. Actually, I think this trick would require a good bit of dexterity, as well as a few practice runs. But still not as much as was required to make this little boy’s shirt. A lot of stitches went into it; decorative backstitching on the collar and cuffs measures about 32 per inch. The simple hemming was 12-14 stitches per inch and seaming (like shallow overcasting) was up to 20 per inch!
A small boy’s shirt, early 19th century. The fineness of all the plain sewing I try to photograph is hard to convey, since close-up shots make the materials seem coarser. But in a more scaled shot, it’s hard to see the dainty stitching. Maybe this one where I’m holding it adds perspective. It would fit a 4 or 5 year old.
He did get some wear out of it! There are several mends and worn spots, like on the wristband here. So this buttonhole is where the conjurer would attach the string!
The boy’s shirt is made like a man’s shirt. There were 20 parts in a “gentleman’s” shirt:
The body, two sleeves, two wristbands, two binders, two shoulder-straps, one collar, two sleeve-gussets, two neck gussets, two side-gussets, two wrist gussets, one for the bosom, and the frill.
This one, however, was made with without the shoulder straps (a strip of linen along each shoulder), binders (lining next to the armscye), wrist gussets, or a “bosom gusset.” It did have a frill and an inserted pleated front made out of finer linen
It was interesting to see that the two separate ruffles were both sewn to the wearer’s left side, and hemmed folded in the same direction, making them look correctly worn when both are folded over toward the right and exposing the pearl buttons. On all the other shirts I have or have seen, the ruffles are hemmed with each side’s hem folded inward toward the front opening.
This is the neck gusset next to the collar, and the tear at the point along the shoulder gives a hint why most shirts needed the reinforcement of “shoulder straps.” Perhaps more for strength when tugged than for abrasion!
Bet the little guy couldn’t wait to unbutton his collar – it measures barely over 10 inches when buttoned!
The neatly sewn underarm gusset.
Inside view of the sleeve gathers at the shoulder. These aren’t usually visible in surviving shirts, because they are hidden inside “binders” which weren’t used on this one. The other shoulder has two coarsely-mended vertical tears, one at the same point on the gusset.
Side gusset exterior.
Side gusset interior.
A peek inside the the shirt front, which had 4 pleats on each side of the front opening. A narrow strip of linen covers the bottom edge.
The SHIRT TRICK was republished in other books over the following decades. It even showed up as late as 1870, but by that time the cut of a man’s shirt was more fitted and complex, and I doubt the stunt would work as easily. Maybe the little fellow who wore this had a copy of the The Boy’s Own Book (1828) and had a go at it? I can’t imagine the maker would have appreciated seeing her work handled so roughly and the “person who was unshirted” might have had to conjure up an explanation!
Click to enlarge and see the decorative dot in the center of each diamond.
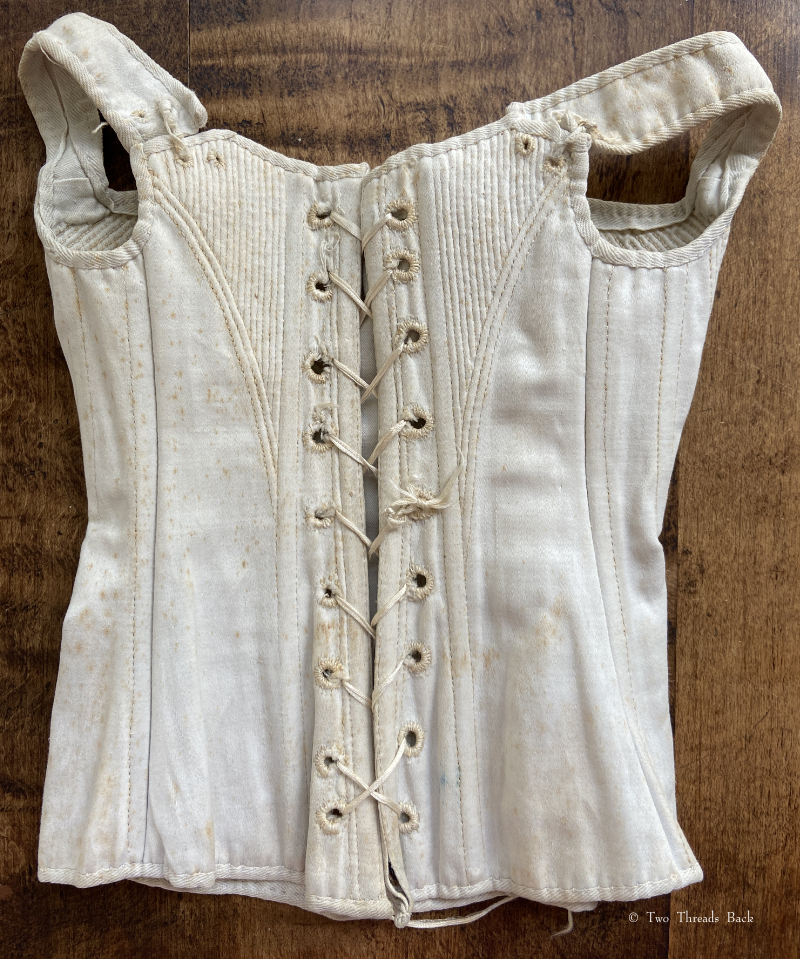
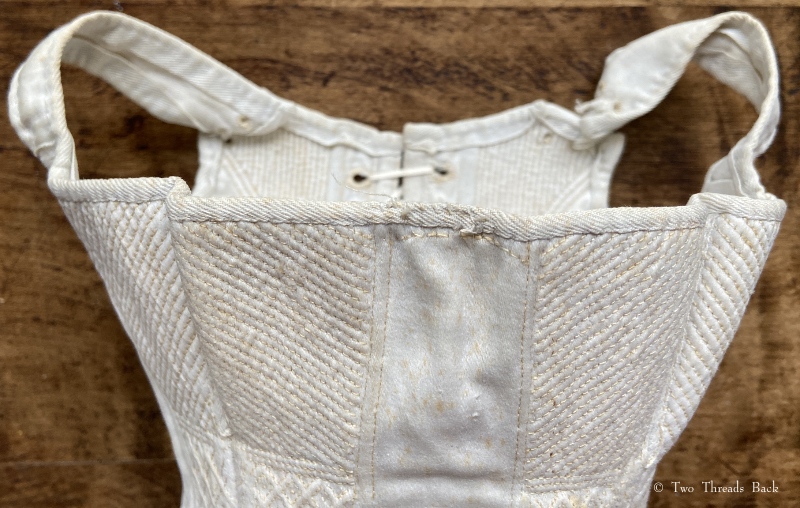
Not only do I have a weakness for plain sewing, but for miniature things as well. Tiny garments like doll clothes, or the samples that girls made when they were learning to sew are irresistable! That’s why I was thrilled to find this half-size treasure from – can it be the 1820s? At first I thought it must have been made for a doll, but it would have required a pretty large little lady for that time, and the incredible detail seems extreme for a doll. Maybe it was a shop model, or sent from a corset-maker to a client as a style sample? It’s certainly a puzzle, so I’d welcome any expertise!
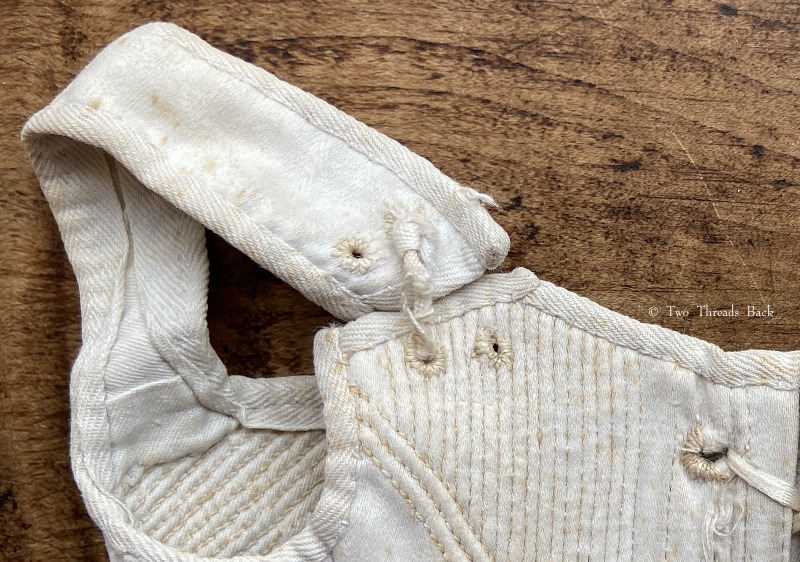
Signs the lacing was pulled too tight…hmm…
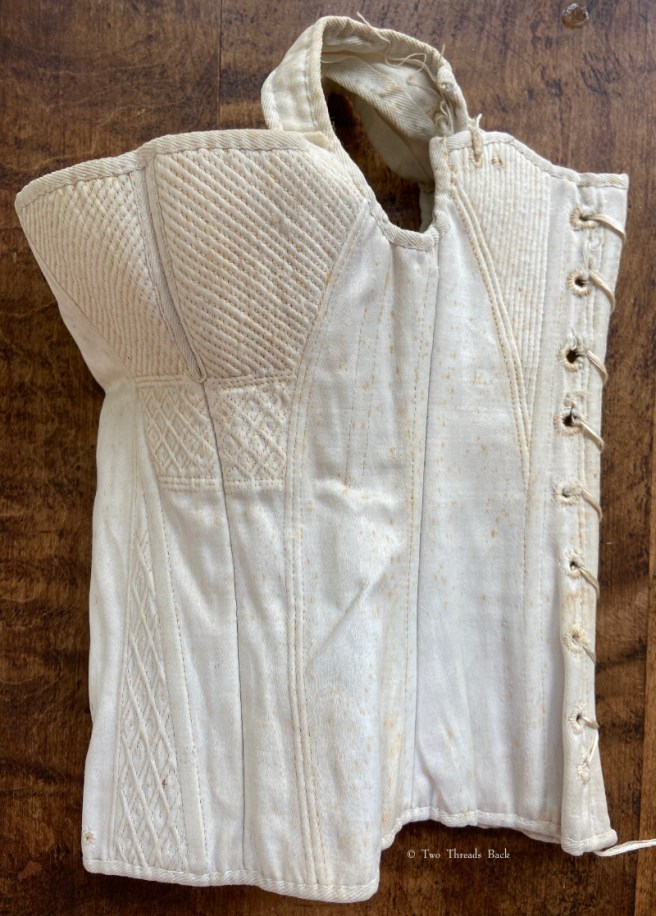
The side view shows how the pattern was designed for the well-endowed! It’s not as noticeable from the front.
It’s seven inches in length, 12 around the waist, made of two layers of cotton sateen, bound with twill tape, and of course, hand-stitched. The silk laces are in place as found, laced closed. It’s sewn with very fine silk thread which I believe was originally white, but has now yellowed a little more than the cotton fabric. I can see whalebone inside one of the boning channels where there is a slight separation at the end. I have no idea what the cording is, but the backstitches that hold it in place are worked about 20 per inch!
Click to enlarge for better view – their stitching wasn’t totally perfect, but a whole lot better than mine!
Compared to earlier 18th century stays that were heavy and heavily boned, or to later corsets that might contort and constrict the female torso, this style – excluding the busk – seems pretty comfy. That didn’t stop the lectures on tight-lacing, even during the early 19th century. The Poughkeepsie Journal opined in 1823:
I deem the corset of the present day to be the perfect engine of torture, and infinitely worse than the stays of days gone by. These last besure were injurious, but they left the resemblance of a female shape; the corset on the contrary presents the waist as regularly round and untapering as a white lead keg. The olden stays I remember were laced with a silken string of the size of the finest twine, but the corset requires a cord equalling the bow-string of a Kickapoo Chief.
What on earth is a white lead keg? Well, I checked. There was such a thing. Like a metal paint bucket today – just don’t use it to draw your well water! The author insists
no other animal could survive it. Take the honest ox, and inclose his sides with hoop poles, put an oaken plank beneath him and gird the whole with a bed cord and then demand of him labor. He would labor indeed but it would be for breath. Splinter and belay a pig in the same way and a whine might be aspirated, but it would be a whine of expiration.
Assuming your ox was honest, it would probably agree with the author. Unfortunately, the belayed pig wouldn’t have a chance! (It’s not often that 19th century prose make me LOL, but that last sentence succeeded.)
In the 1820s, Dr. Godman, a physician, anatomist, and naturalist who lived a remarkably full but too-short life (click here to follow a quick rabbit trail) denounced busks – lengths of flat wood, bone or steel inserted into a channel down the center front of a corset – as especially injurious:
Another instrument of torture is added in the form of a steel or hickory busk, which is pushed into its sheath in the already too tight corset, extending along the whole length of the breast bone… to keep the body from bending forward in the centre, and to prevent the dress and corset from ‘hooping up,’ as it is called.
The following scene occurred at a boarding-house in Philadelphia. The girl of the house … filled the tea-kettle, and brought it to the kitchen hearth, where she placed it on a bench. To place it over the fire required considerable stooping, and this, as it turned out, was impossible to her. Repeated and fruitless were her attempts, by a sort of crouching attitude, to accomplish her object; there was no one present to assist or to relieve her from the restraint which prevented stooping, and in despair she gave up, and stood by the kettle as if debating what she should do. The mistress came to inquire if the water was boiling, and found it not yet on the fire! – to her utter amazement, ‘the young lady’ confessed that she had her ‘long-busk’ on – that her ‘lacing,’ which was excessively tight, was in a ‘hard knot’ and that she ‘could not possibly stoop’ to put on the kettle!
He wasn’t without humor either:
Can anything on earth be more ungraceful than the gait, the walk of a female who is extremely corsetted? From the shoulders down, as stiffly inflexible as the parlour tongs, she can only advance by a sideling shuffle of the feet, which appear to get forward by stealth…
Here you can see the bottom of the busk pocket from the outside and the eyelet holes for a tape or cord to hold it in place.This is the bottom of the corset showing the inside of the busk pocket. I’ve used a broken ivory fan stick to show how it was inserted.You can see the top of the busk pocket has a curved row of stitches to keep the busk in place.One strap is tied with a tape, and the other with a narrow cord. I can imagine a little girl doing this for her doll.
Maybe I’ll never know what this little corset was made for. The workwomanship (assuming it was a female stitcher) is exquisite, which suggests a model, either to exhibit skill or make a sale. But a few signs indicate wear, which makes me think it adorned a doll. Maybe its history included it all: made as a specimen of skill, served as a model or sample, and then retired to spend its later years on a later doll. Of ‘corset’ doesn’t really matter, whatever its past, it’s still a work of art!
Maybe you’ve heard of “l’esprit d’escalier” or “staircase wit.” I hadn’t until recently, even though I’ve suffered from it all my life. It describes that maddening moment when you come up with the perfect, brilliant reply – after it’s too late to be useful. Well, finding the perfect image just a little too late can happen in blogging, too!
It’s been a year since I wrote the last post about sewing aprons. I’d wanted an example to study and to illustrate the post, but in decades of searching and collecting I’d never come across one. Wouldn’t you know, it was only two weeks later that I actually found a real surviving one! It’s obviously not an early nineteenth century apron like I’d really love to find, and I can’t be positive it was used for sewing, but it fits the all the descriptions to a T.
A closer look at the button, the featherstitching, the direction of the hems on the sides, and the “seamed” band.
It’s a charming white dimity with pink featherstitching and a waistband that buttons. Late 1800s, early 1900s perhaps? It looks like it could have been made in school, rather than at home. I say that because the stitches seem to be textbook-style hand sewing: precise (if not dainty) hemming, seaming, setting-in, and buttons, combined in a class-projecty sort of way. And a couple of tiny ink spots near the bottom!
Seeing an example close up did answer the hemming question for me: did they fold the side hems face up or face down before turning up the bottom for the pockets? Or did they do a little snip on the edge so that each hem could be folded to the back, the way I did for the doll’s apron? Answer: face up. For this one, anyway. The nice deep pockets are then seamed together so that the folded hems are inside.
I hope the maker was happy with her little apron. I suspect she treasured it since it’s survived all these years. Maybe it proved useful for holding her sewing things while she was climbing stairs – and she had the wit to appreciate it!