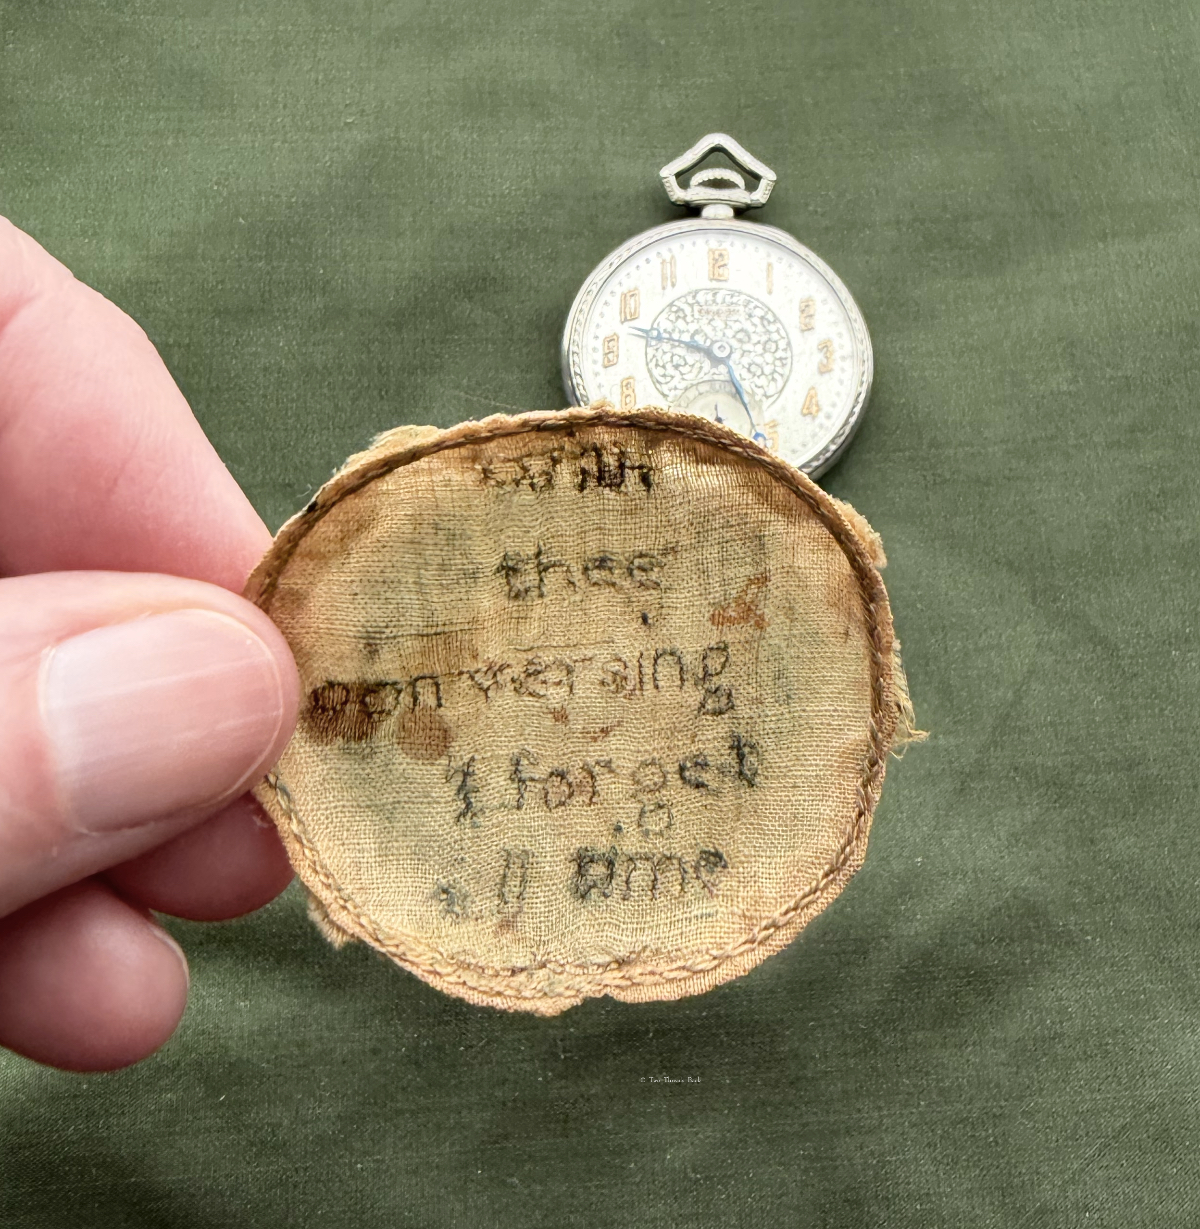
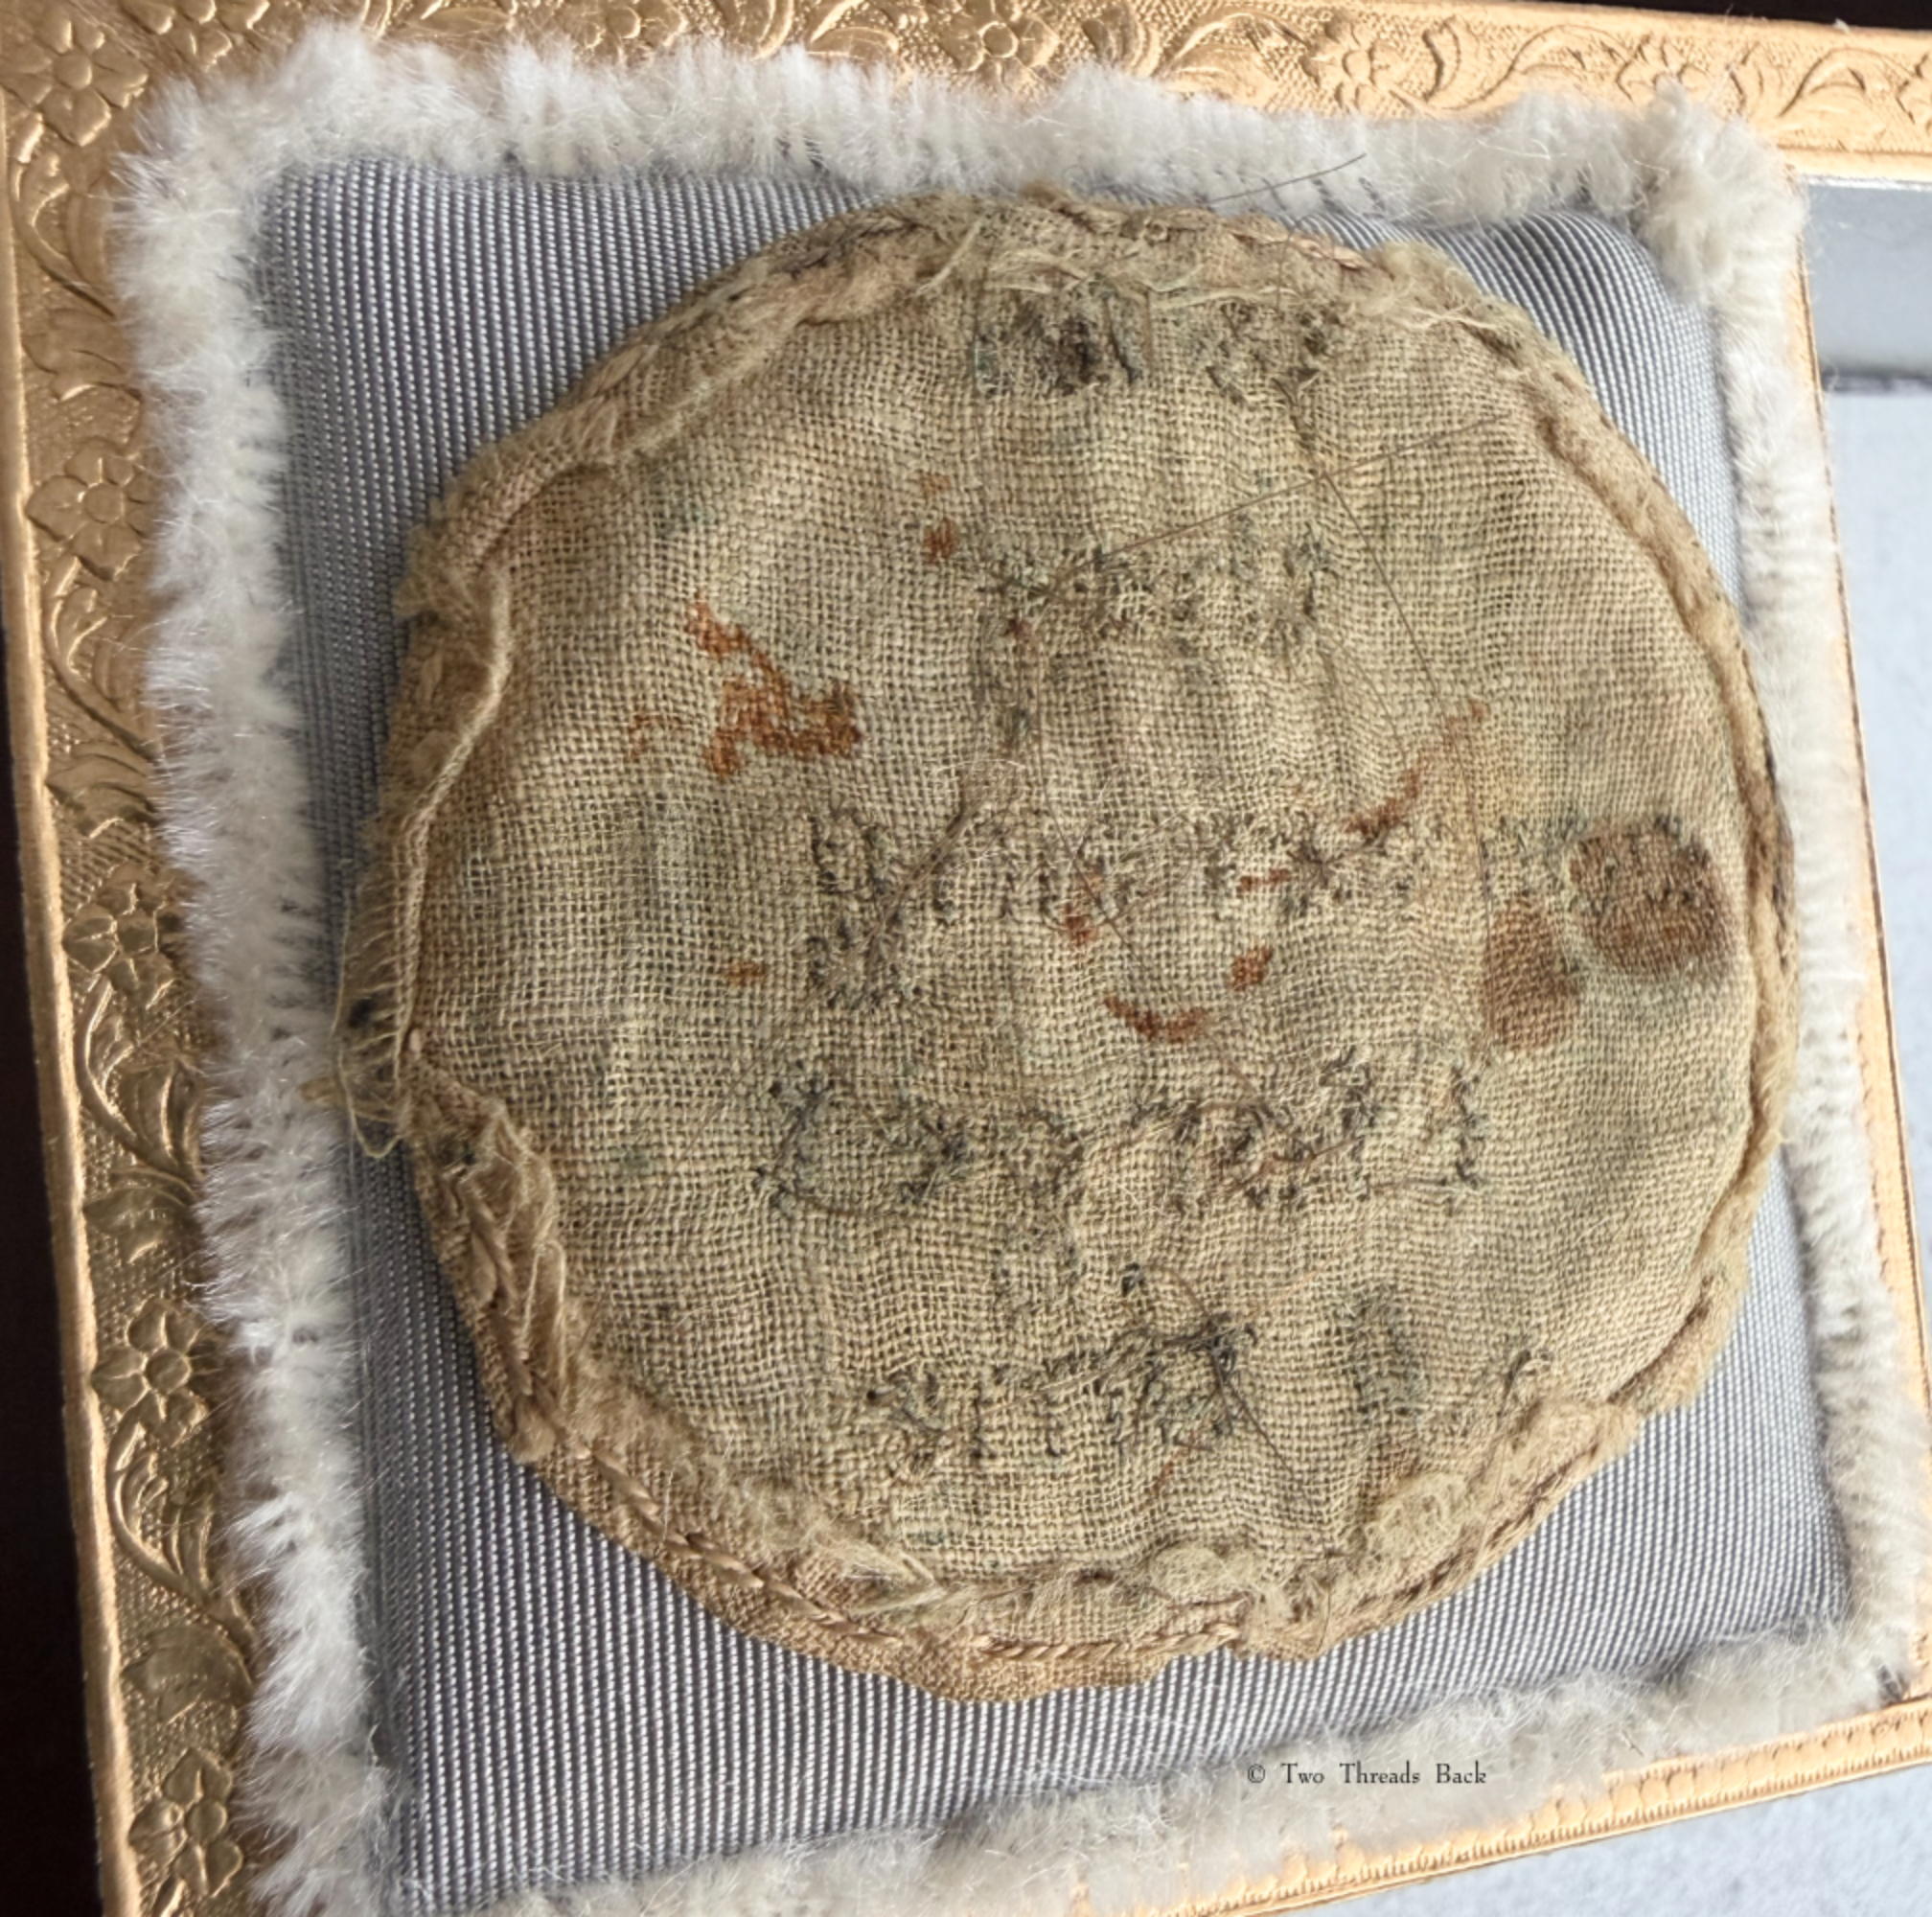
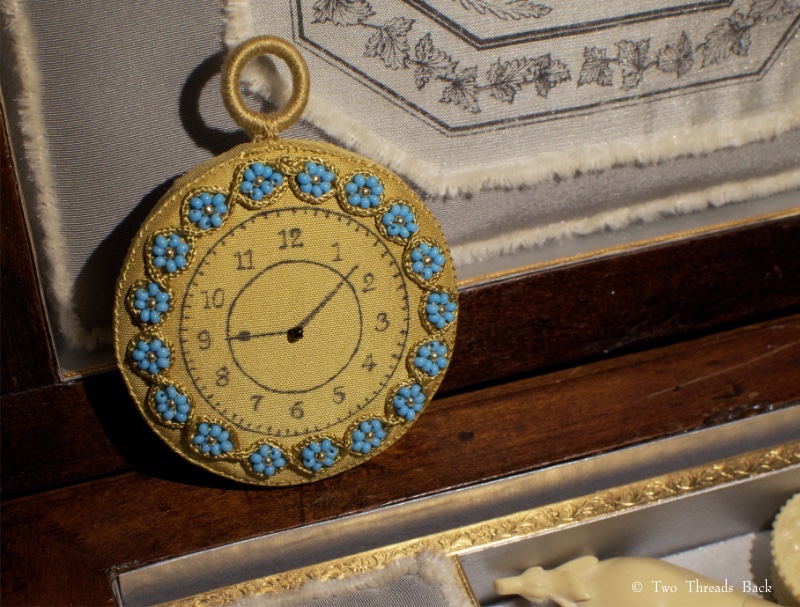
Plain sewing often taxed the eyesight and dexterity of a seamstress and many of the examples I’ve shown used mind-bogglingly small stitches. They certainly boggled mine, anyway! Such microscopic work wasn’t limited to practical garments and household linen; it could also be used to make a sentimental token for someone special. The “watchpaper” above (which is obviously not paper) is an example.
A watch was quite a luxury until the 18th century, but by the end of that era they were more common, although still greatly valued. It was customary to protect the delicate workings inside with little circles of paper that could be printed with a variety of pretty or amusing things such as portraits of famous people, landmarks, poetry, or even advertising for the maker. And of course, they gave ladies the perfect opportunity for artistic expression. Now highly collectible, some papers were painted, or perhaps inscribed with elegant calligraphy while others were… drumroll… made to show off needlework!
Watchpapers could be embroidered, made of lace, or use simple stitches such as cross-stitch (marking) to convey affection or good wishes. I’m not sure what kind has been used to make the one above since it’s so small and time has taken a toll. What I find most touching is that the maker who stitched
“With thee conversing I forget all time”
has woven the silk thread with her (?) his (?) hair for the embroidery! If you are a bit ambivalent about the “hairwork” or preserved locks found in old jewelry or albums, I understand. But I think the eeriness is part of its appeal, a personal touch through time that makes the past real.
I like the idea of making one of these myself. It would be utterly useless since I haven’t got a watch for it. It would create eyestrain to the point of a headache. But it would only require scraps of material and a little bit of time – my kind of project!
PS You’ll find more on the history of these tiny treasures online, and lots of pretty ones to see (Pinterest or auction sites) if they catch your fancy. PPS This one will be available on my Etsy site soon, as I continue uncollecting!
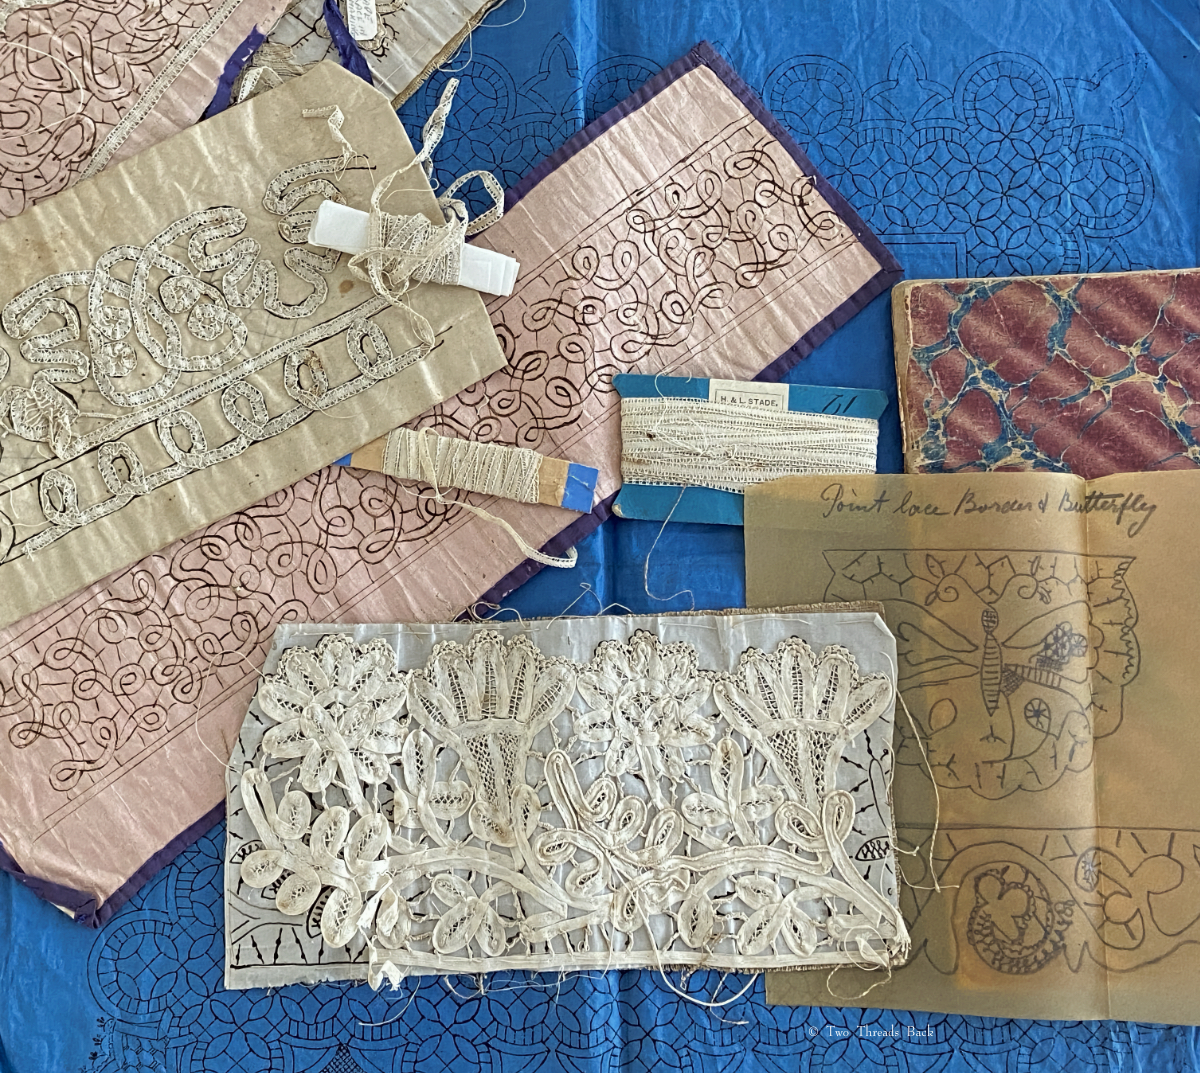
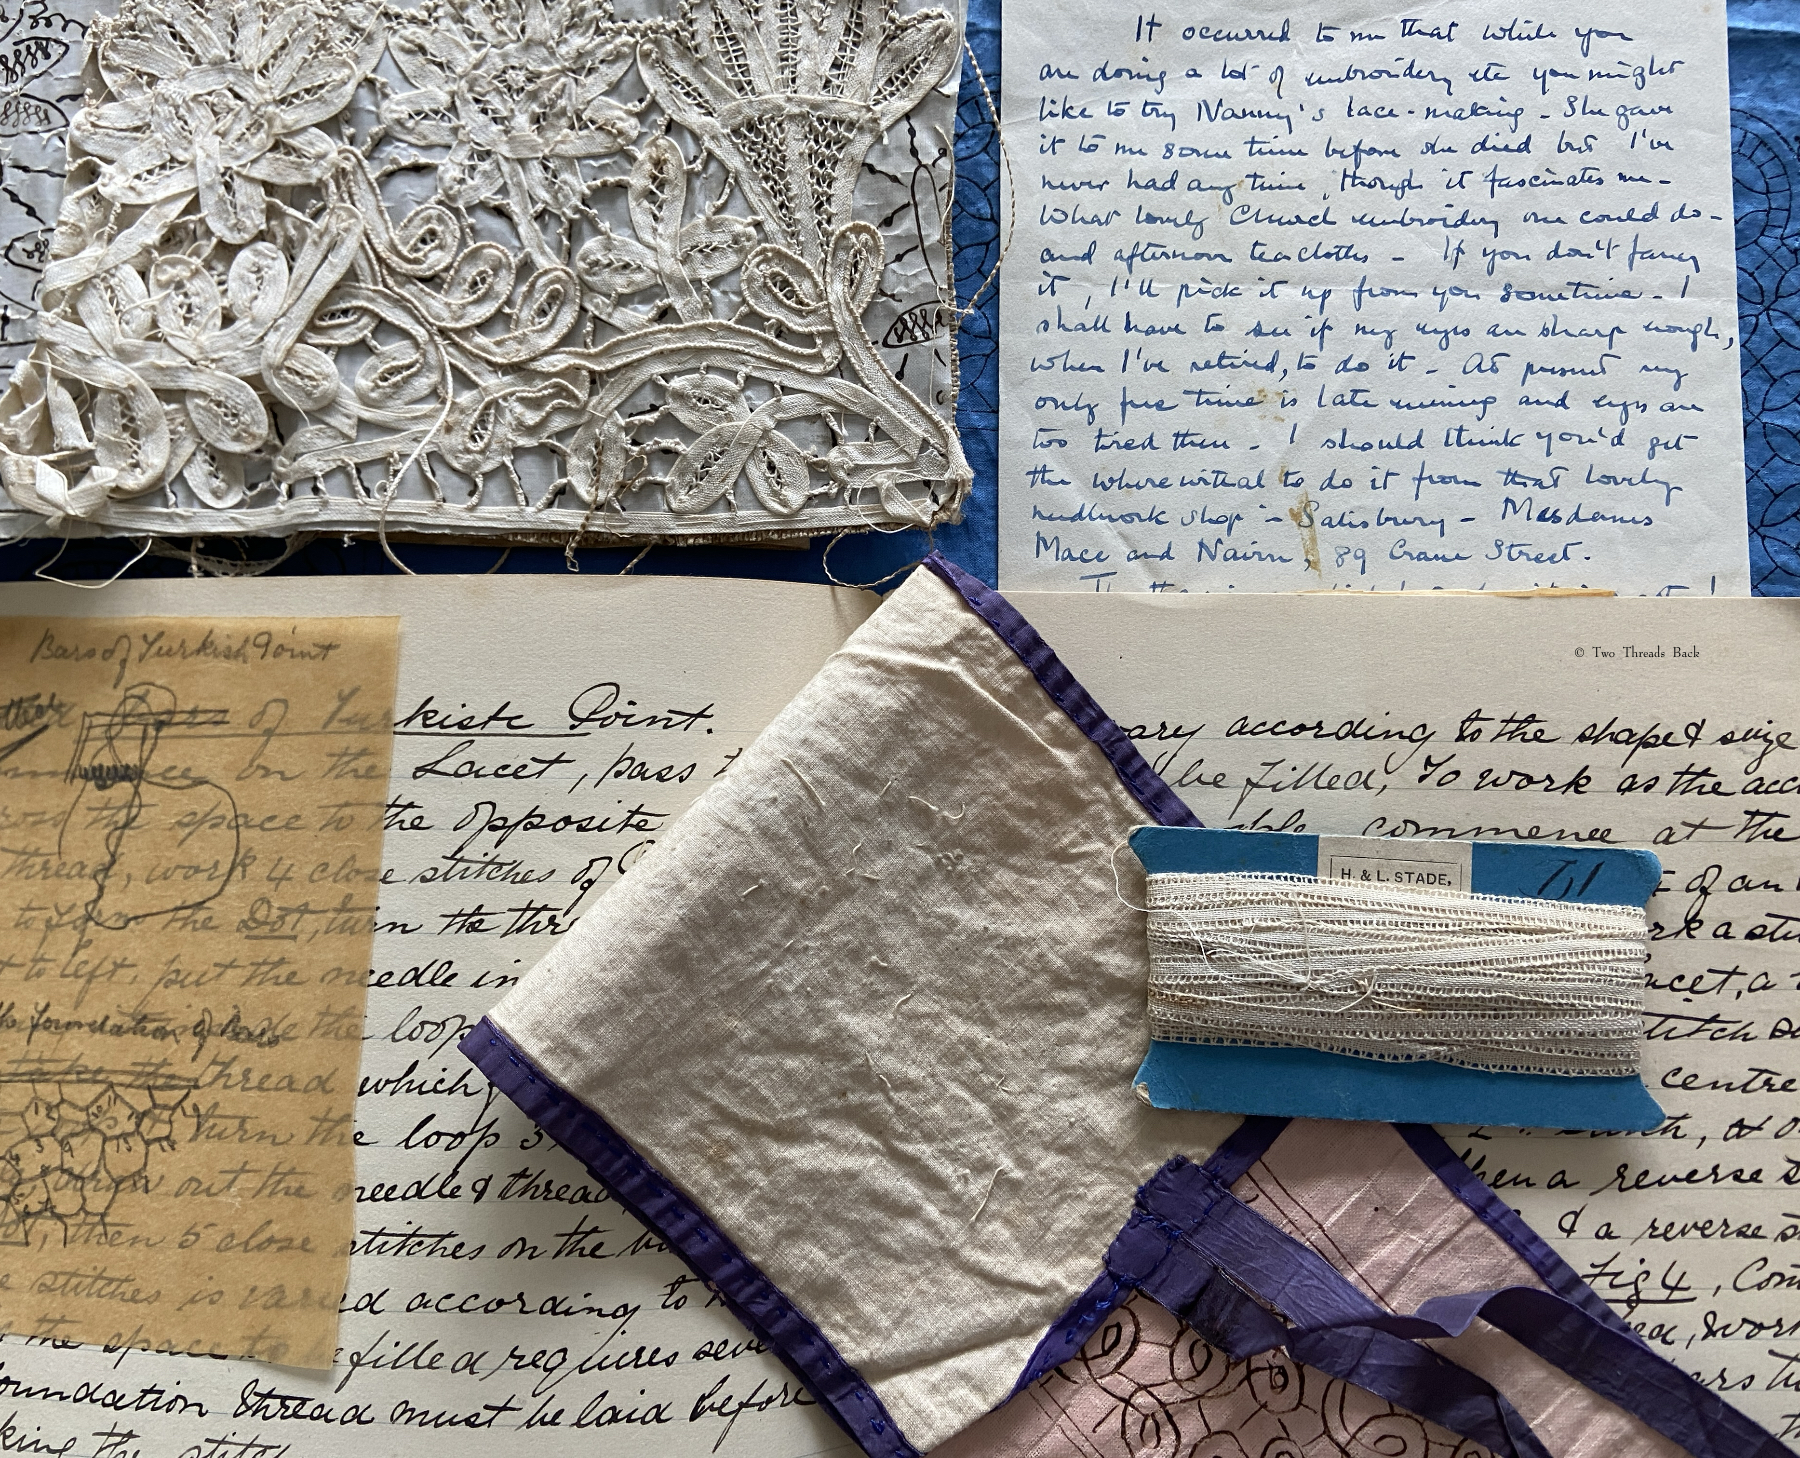
Lace is about as far as you can get from plain sewing, but this little collection is so sweet it deserves a bit of attention. “Point Lace, The Royal Point Lace Instructor,” by Mlle. Riego de la Branchardiere was published in 1869, and provided ladies who had crafty fingers, and some free time, with all they needed to make their own tape lace.
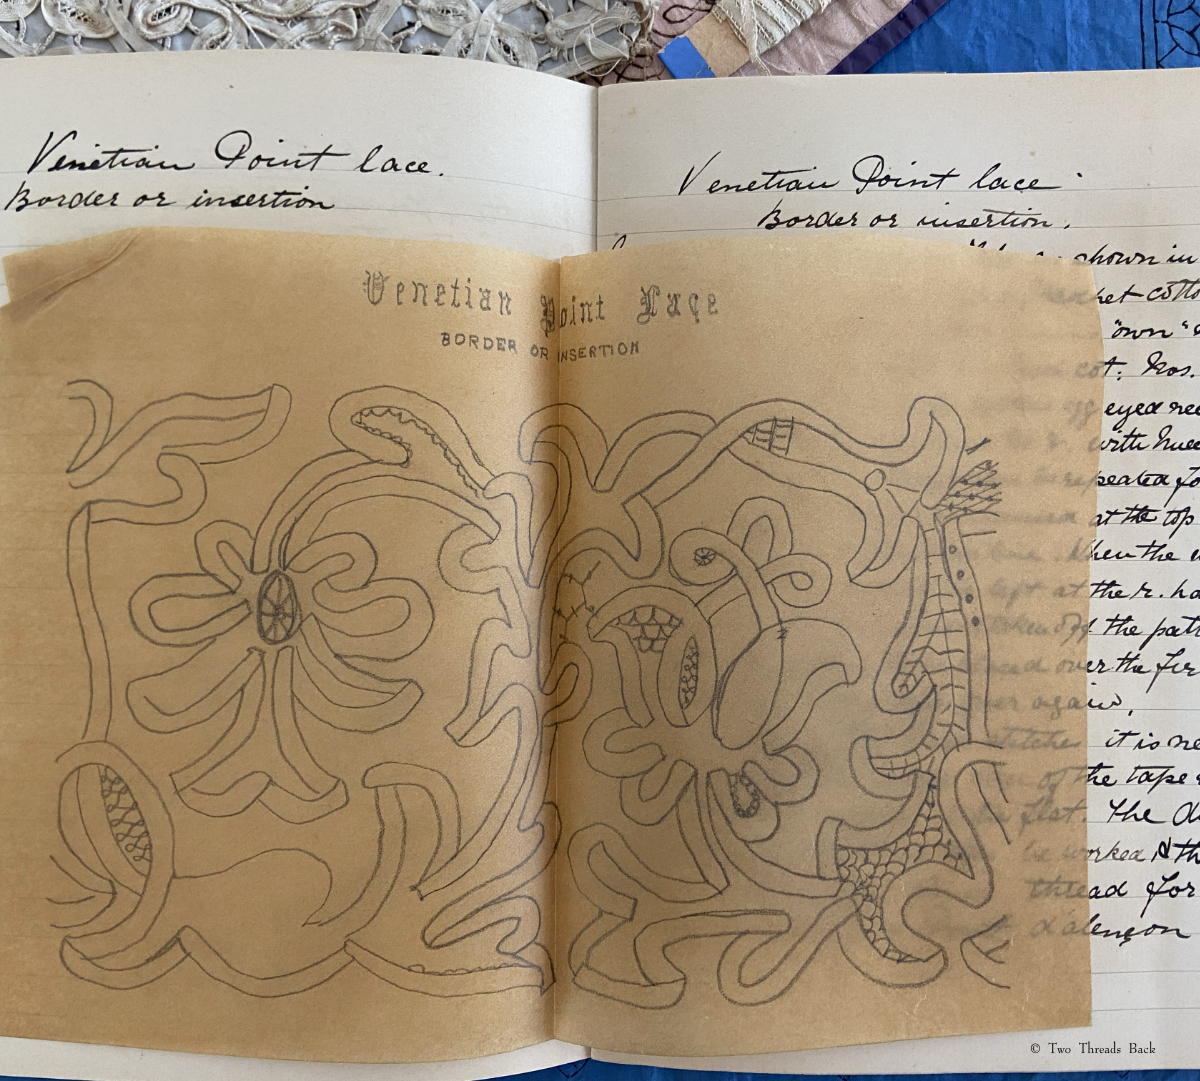
This handwritten version of Mlle. Riego’s book belonged to a woman born only a couple of years after the original was published. “Nanny” was a widow who worked as a children’s nurse for a family in Devon, England in the early 1900s. In 1901, she made a copy of the published book in a notebook of her own, and meticulously traced the patterns and illustrations onto tissue paper.
A large tissue pattern for a border or insertion of Venetian Point Lace.
In a 1960s letter, a previous owner of the lace work recommended a needlework supplier, Mesdames Mace and Nairn, that may still be supplying embroiderers today!
The collection comprises samples of unfinished work tacked to two layers of ground fabric. There’s one with a heavy canvas backing with a lighter cotton front, and two strips that are puzzling. They have a muslin back and pink glazed cotton front that has the lace pattern inked on it. What makes them unusual is that they’re constructed like old-fashioned sewing roll-ups (kits), bound with purple silk ribbon. You can see where they’ve had the tapes tacked to the pattern and then clipped off in places. Were they used for teaching? For reference? They’d be easy to roll up neatly and carry in a work box or bag! Or maybe they just allowed Nanny to work on a length of lace at a time, untack it, and then do another, while the “roll-up” kept the fabrics together and prevented raveling?
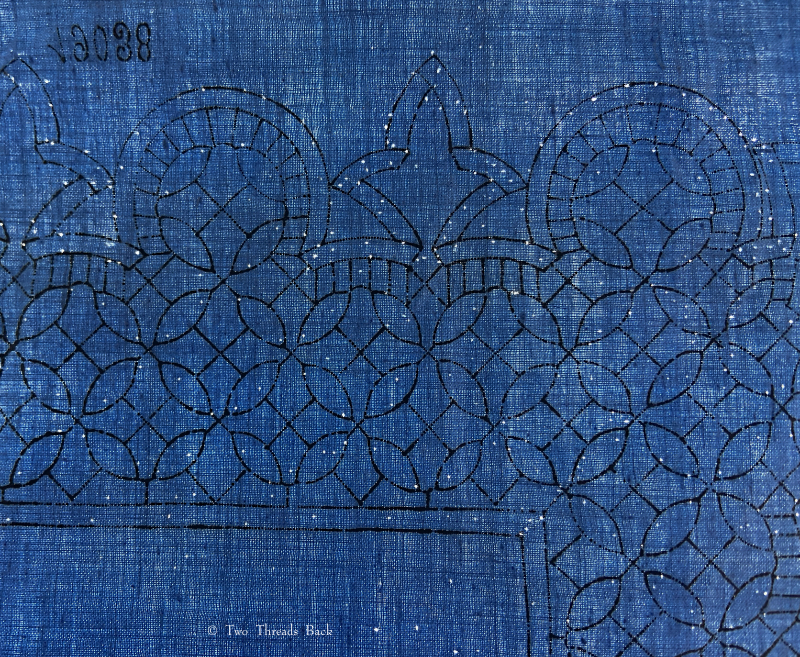
A deep blue pattern with bright points of light shining through the old tacking marks – like a starry night!
The largest piece is made of blue glazed cotton which appears to be stamped with a pattern, probably purchased from a shop. It has a pattern number (reversed) and a crown logo. It’s obviously been used. I wonder if the finished project is still tucked in a drawer somewhere or in a stack of old linens in an antique shop.
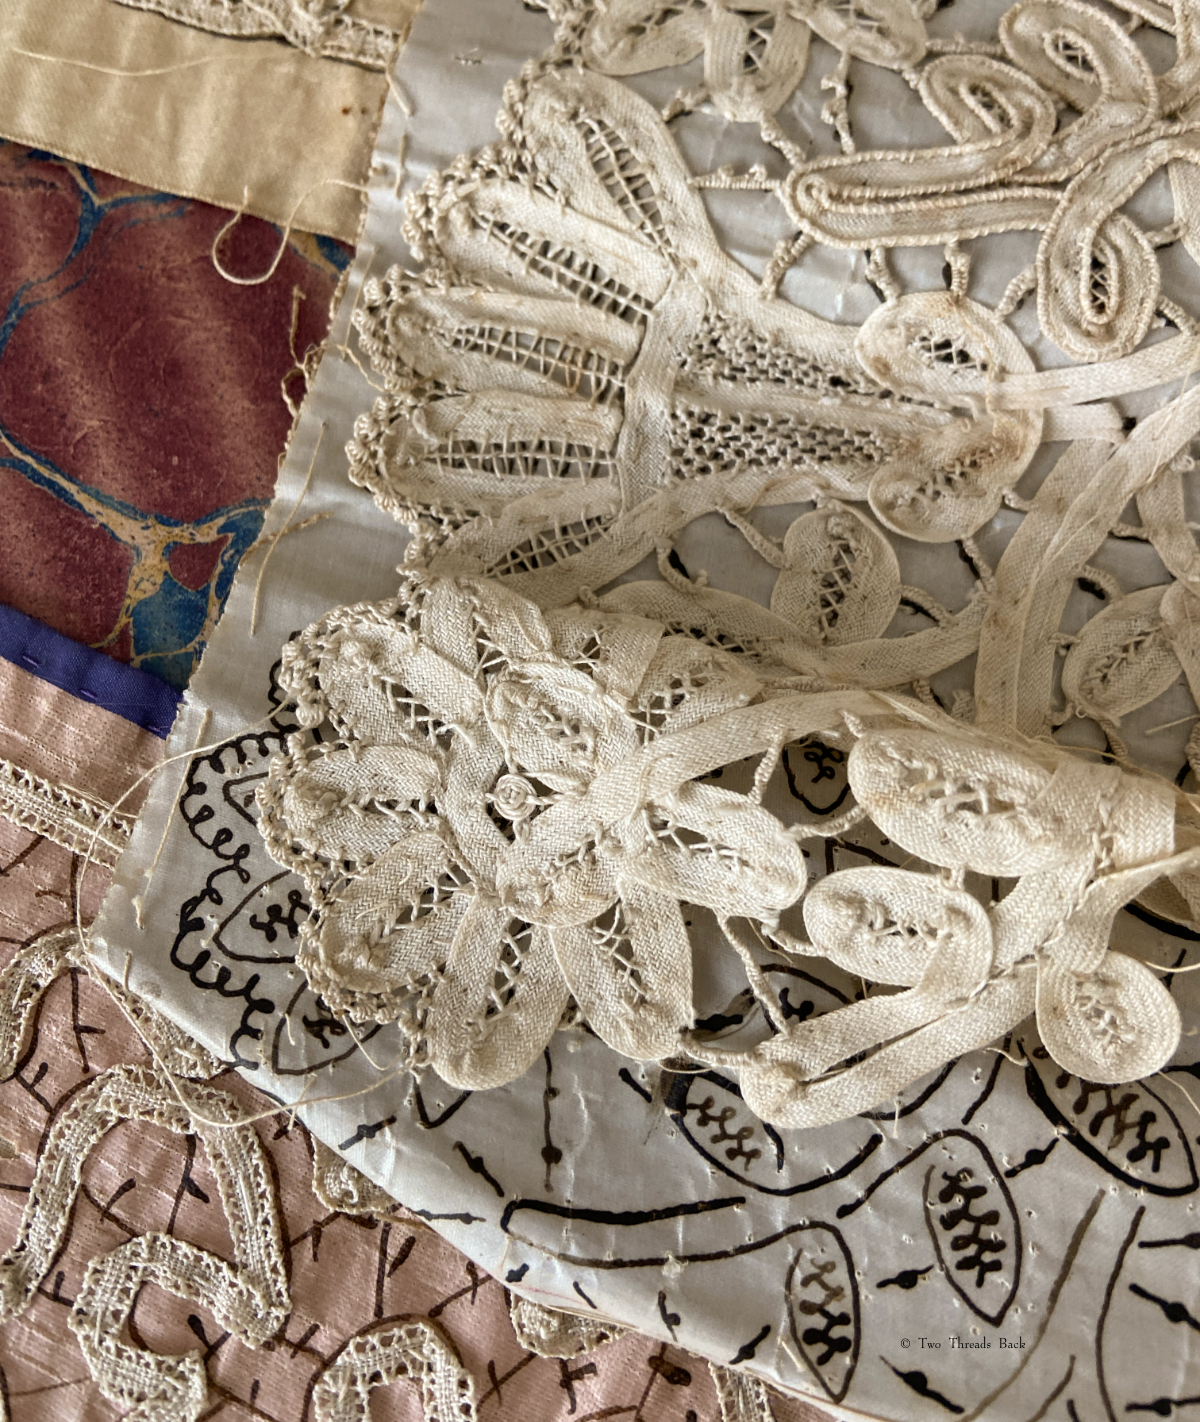
A closeup of the fine work that she did. Apparently the instructions gave her no problems at all!
This last photo shows how pretty the lace is when finished and cut from the backing. It would have made lovely trimming. Some clues about Nanny and her life survived with the collection, showing the path it traveled over a century. The stories are as much a treasure as the relics!
P.S. This collection (along with other “old” things) is ready for a new home, I will be listing it soon! Check my Etsy shop as I downsize, a little at a time!
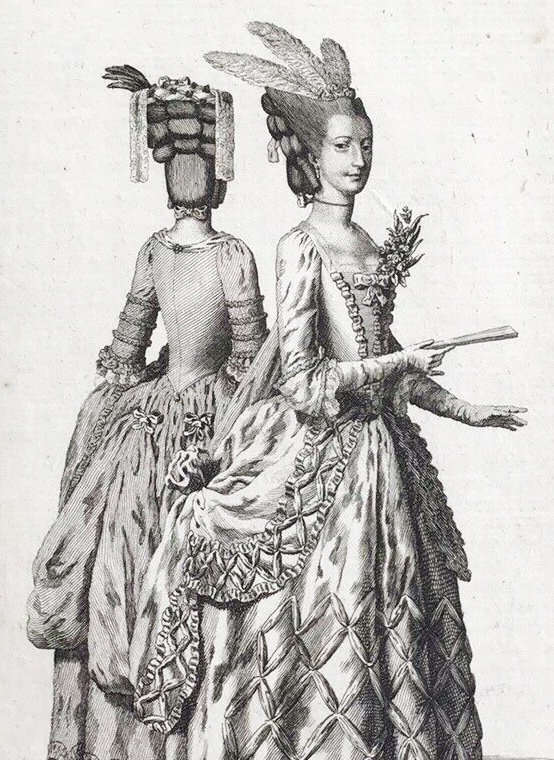
I know what lappets are, costumely speaking, and with regard to women’s millinery. They’re those long, lacy, streamer things that hang down from a headdress. The fanciest ones were made of fine lace and could be terribly expensive. They were popular in the 18th century but seemed to fade by 1800 when the classical look was in vogue, and then regained favor, at least with “mature” ladies, in the middle to late 19th century. Early ones were usually found in pairs, or occasionally joined slightly shaped in the middle, while 19th century ones could be . . . more creative.
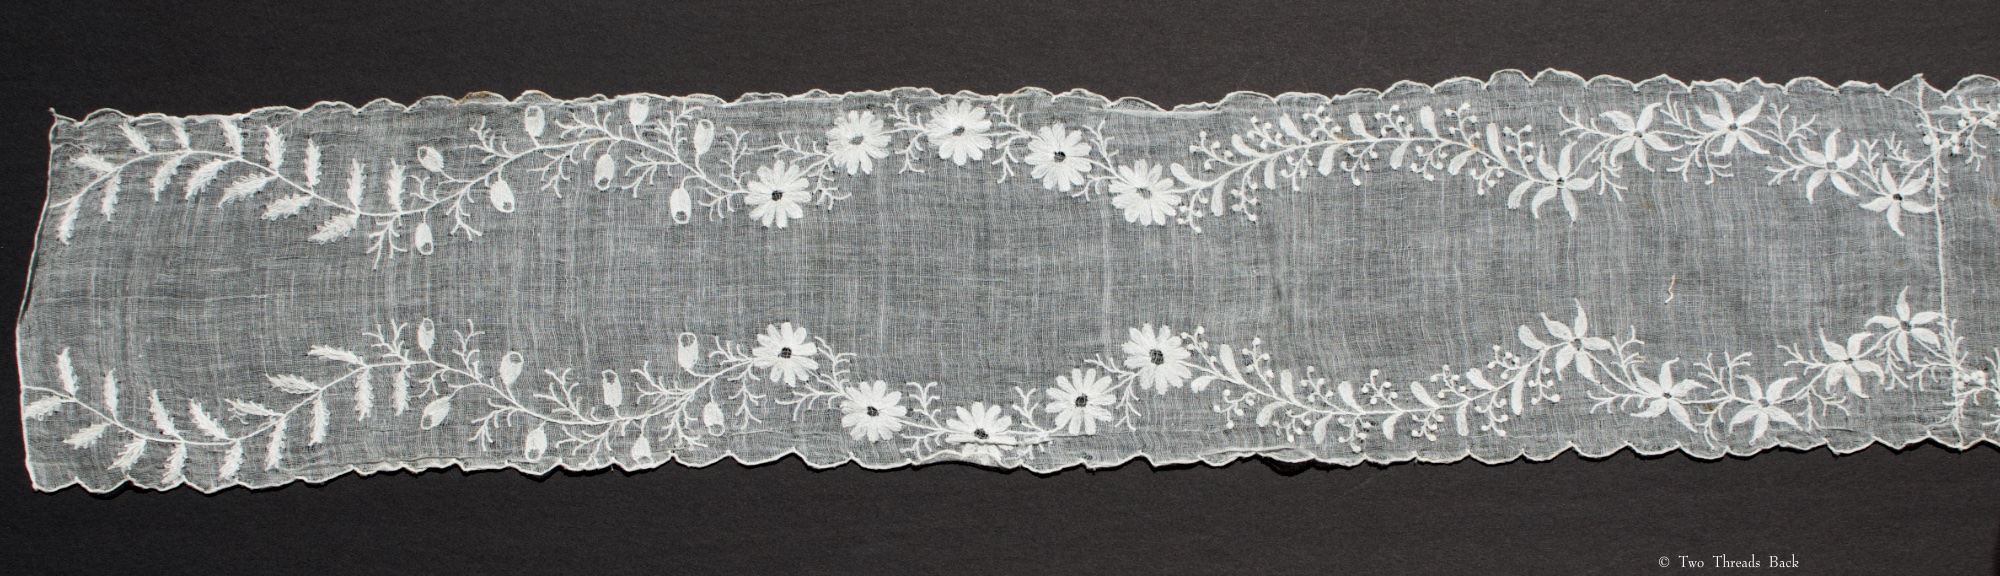
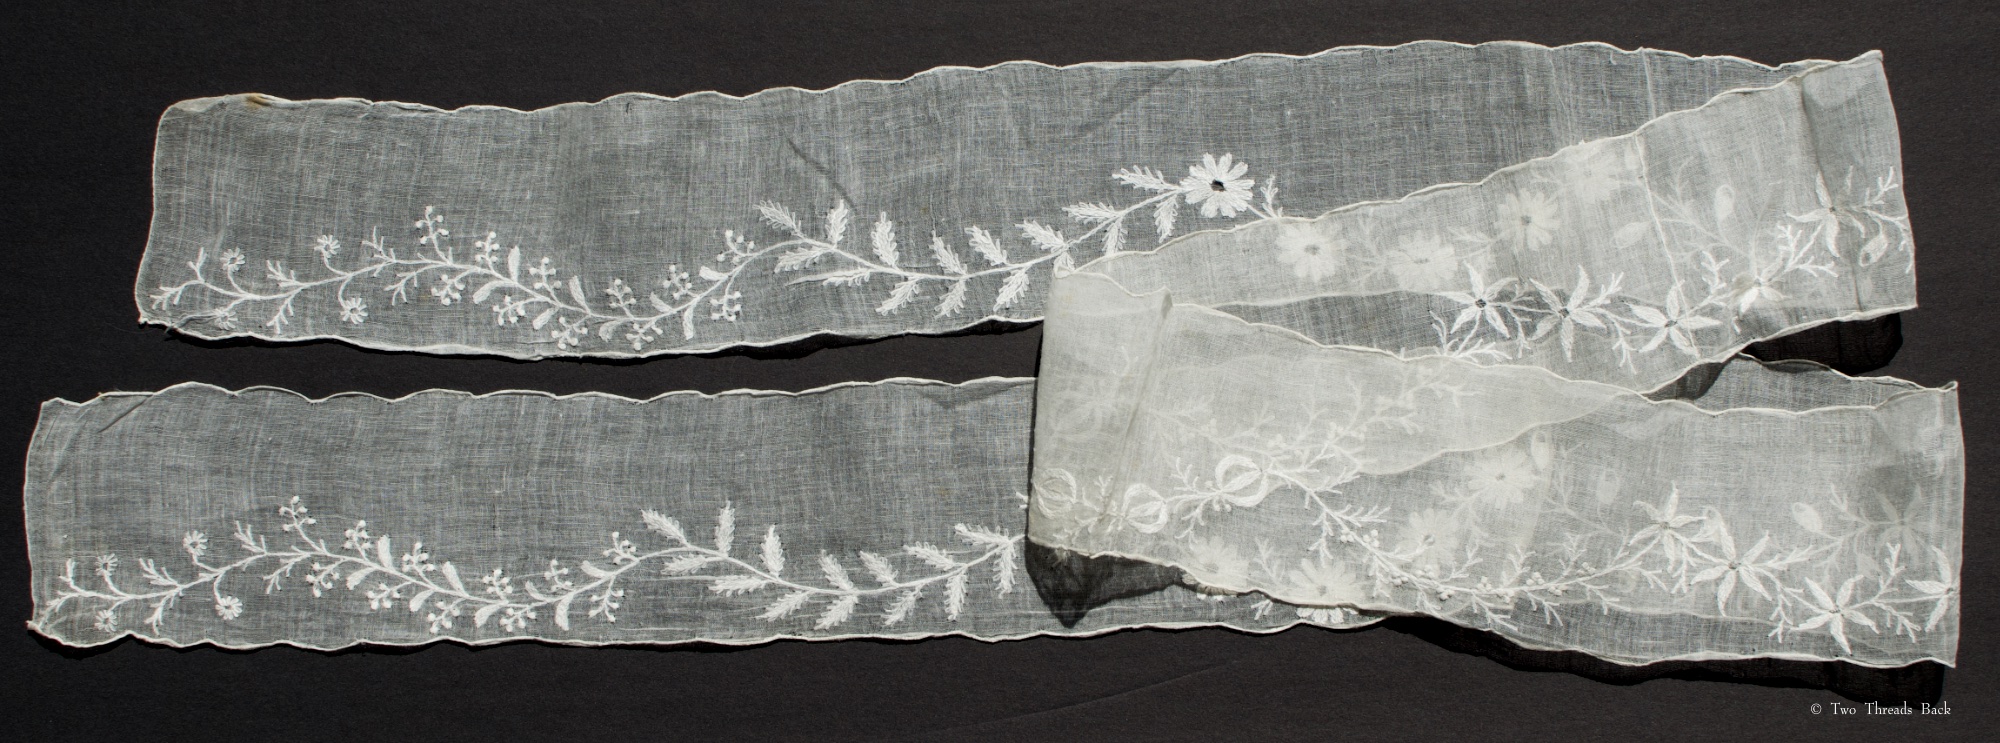
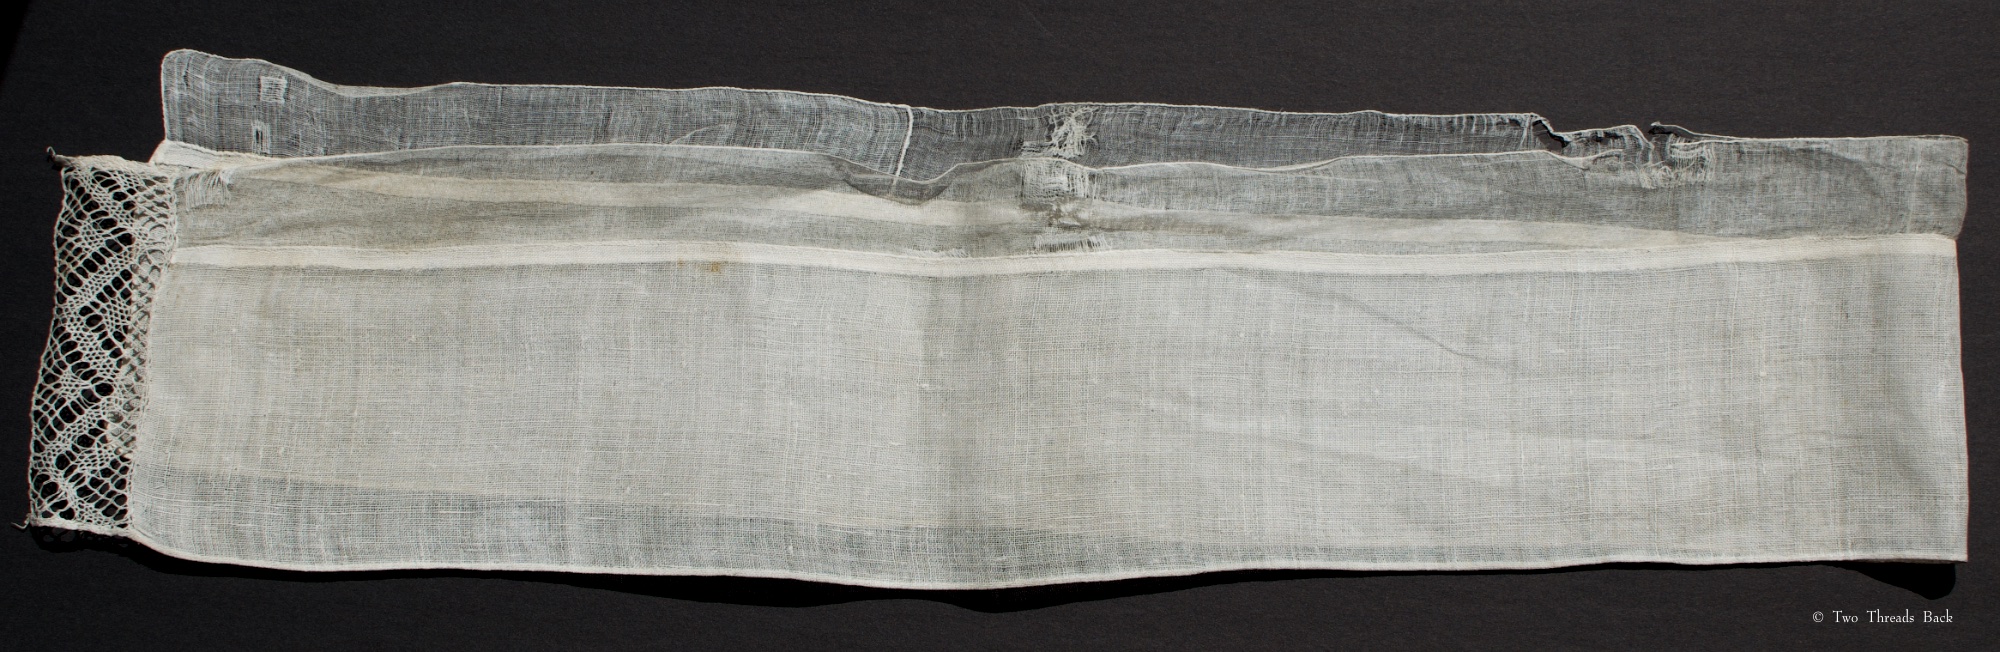
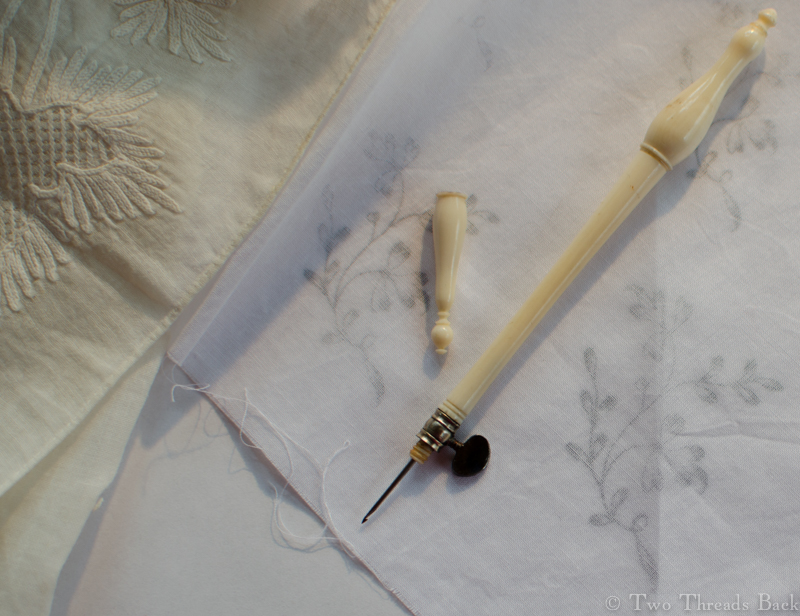
But what have I got here? Two different long strips of fine white muslin, neatly (but probably not professionally) embroidered with whitework. Are they one-piece lappets, or something else?
They appear to date to the late 1700s or early 1800s, judging by the materials and floral patterns. One is 58″ x 4″ and the other is 63″ x 3.” The design on the wider one is mirrored on both edges, while the other is worked along one edge only. All edges are scalloped, and there’s a join on both at 20 inches (not the middle) from one end which the embroidery carries right across. Found together + like patterns + like materials = same maker? The design was embroidered to fit, which indicates they weren’t cut from another garment. They seem too fragile for a sash and too narrow for a scarf.
So how in the world would you wear them? It seems like draping across the top of your head would be a bit awkward. I’d feel about as graceful wearing a length of toilet paper.
The most fabulous book on accessories of this era is Heather Toomer’s Embroidered with White, and I searched it for clues. It has beautiful photos of lappets. In pairs. With dense embroidery. Sigh. In her book on the next time period (just as brilliant), lappets appear as extensions of other accessories, such as fichus and pelerines. So I’m still wondering what these were for. Help!
The fabric is joined about 20″ from one end (not centered) on both pieces.
The darning is finer than the embroidery!
While on the subject of long narrow textiles, I’ll present my next puzzle: tuckers. I’m wandering into dangerous territory when discoursing on 18th century costume, since I know so little. However, I had no trouble finding period references to tuckers. Their wearing location on female anatomy guaranteed attention, one way or another.
Tuckers, as defined in 18th century dictionaries:
TUCKER, tuk’-ur. f. A small piece of linen that shades the breasts of women.
-A Slip of Linen or Lace, pinned along the Top of Women’s Stays -A border of linen or lace on the bosom of a shift -A fine piece of lace, cambrick, &c. pinned or sewed round the neck of a woman’s shift, gown -A shred of linen &c., about the neck of a woman’s shift -A slip of fine linnen, run in a small kind of ruffle, around the uppermost verge of the women’s stays -A strip or ornament of linen worn by women at the uppermost verge of the stays
Then we have Garsault’s 1771 L’art de la lingère, where I’m up to my tucker in speculation:
Tour de gorge en mousseline festonnée. Il se fait d’une aune de long sur un seizieme de large. Painfully translated: Scalloped muslin tucker. It is made one [≈yard] long by one sixteenth wide. A 1788 French-English dictionary defines “tour de gorge” as “tucker,” and “tour de dentelle” as a lace tucker.
This post is already too long to include Joseph Addison’s slightly naughty essay on the tucker – although if you’re curious, you can find one of many reprints here.
There’s no lack of period illustrations of tuckers, but it’s the logistics that have me baffled. Sure, you can tuck a straight band of fabric around the top of your stays – but then all but a few inches in front is hidden under a gown. You can tuck a straight length around the neckline of your gown – but then you have to negotiate the curves, and my mystery pieces seem awfully wide to do it without looking rumpled.
A Lady’s Maid Soaping Linen c.1765-82 Henry Robert Morland 1716-1797 CC-BY-NC-ND 3.0 I don’t presume to know if she wearing a “separate” tucker, or if that’s trimming on her shift. Or neither. But it’s a good illustration of the trickiness of turning corners!
A Laundry Maid Ironing c.1765-82 Henry Robert Morland 1716-1797 CC-BY-NC-ND 3.0 Her frill seems to be a little fuller.
Many paintings show gathered ruffles at the neckline, whether lace or embroidery, although the Lady’s Maid Soaping doesn’t look very frilly. Of course you could always adorn your own tucker, if you were good with a needle.
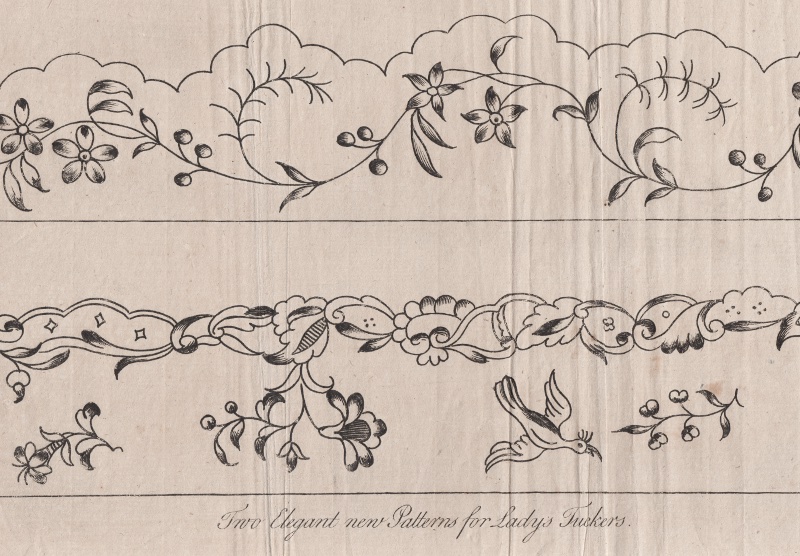
A pretty pattern from 1772.
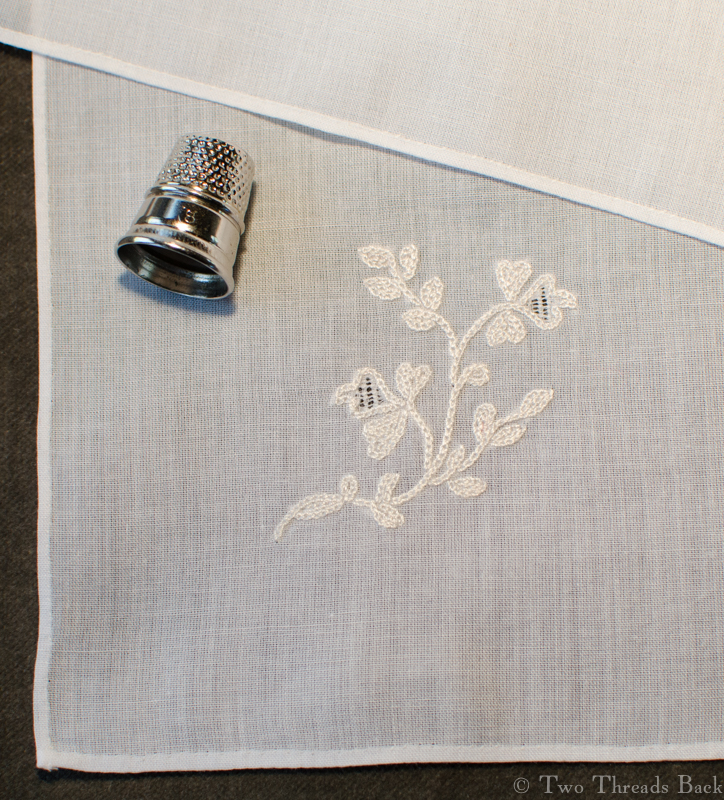
Now here are the four long strips of linen that perplex me, ornamented along one edge, all owned by a woman who lived from 1760-1805, in France. They measure a bit over 40″ long and the linen is @3.5″ wide. If they’re not tuckers, what the heck are they and how did she wear them? Maybe they were part of a headdress. Folk costume. Dresser scarf. Tourniquet with feminine flair.
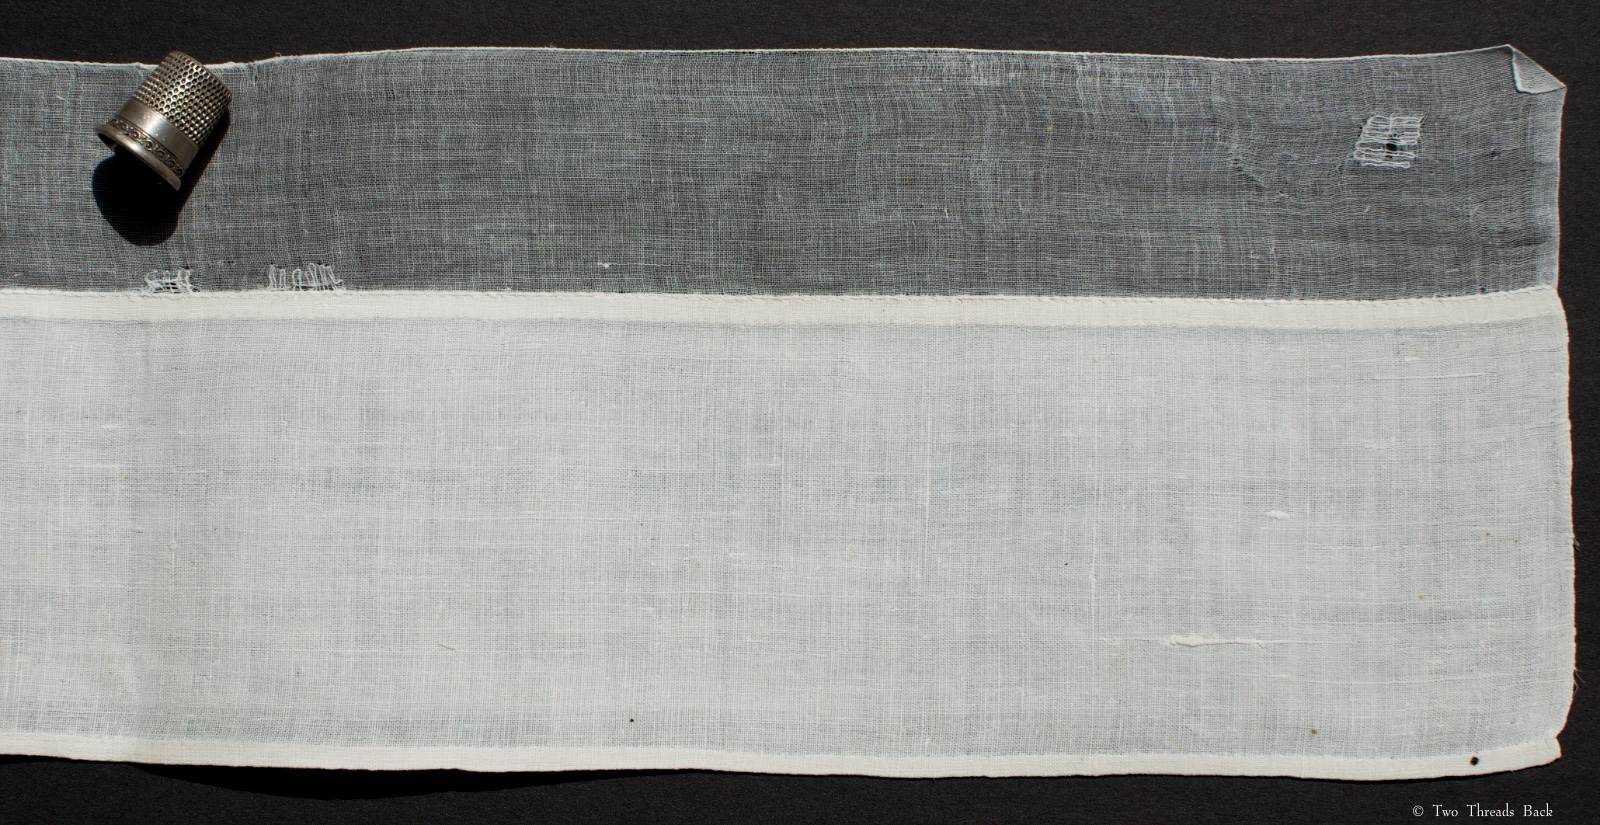
A closeup of the careful mending. The darns are as fine as the other plain sewing.
There’s a bit of lace on one end only, and a cambric border on one edge. You can see there’s also a good bit of wear.
This one is in better shape, has lace along the edge, no trim on the ends. And her “marked” monogram.
A beautifully simple one, marked with both initials, although the cambric trim on this one didn’t fare so well.
I’ve called these pieces lappets and tuckers, but I truly don’t know. Research didn’t settle anything for me this time, so any help is welcome. Maybe someday in the future our descendants will ask the same questions about our garments. I know I’ve shopped for workout clothes and been just as confounded – these strappy scraps of spandex go how?!
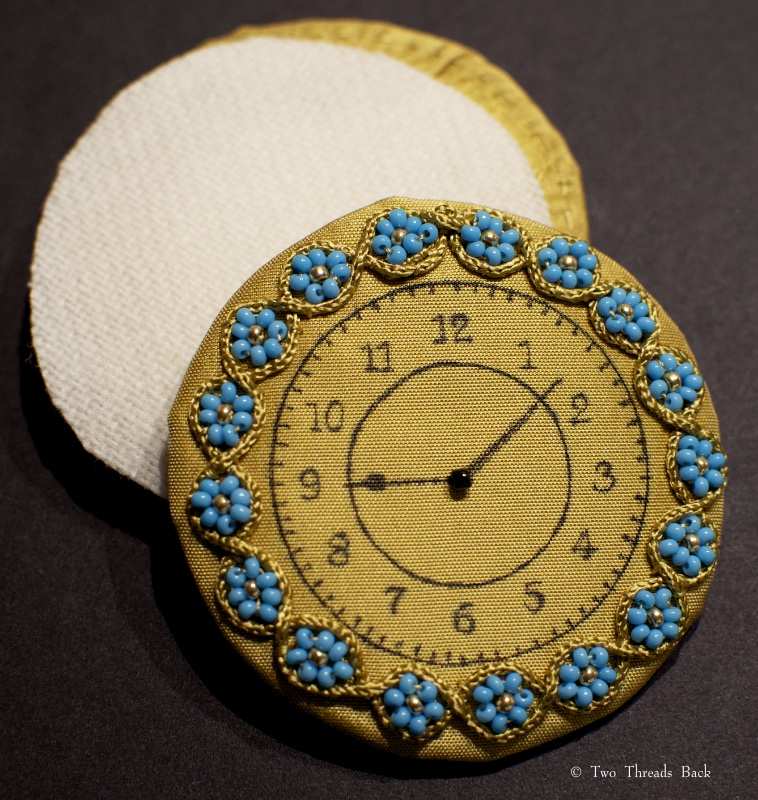
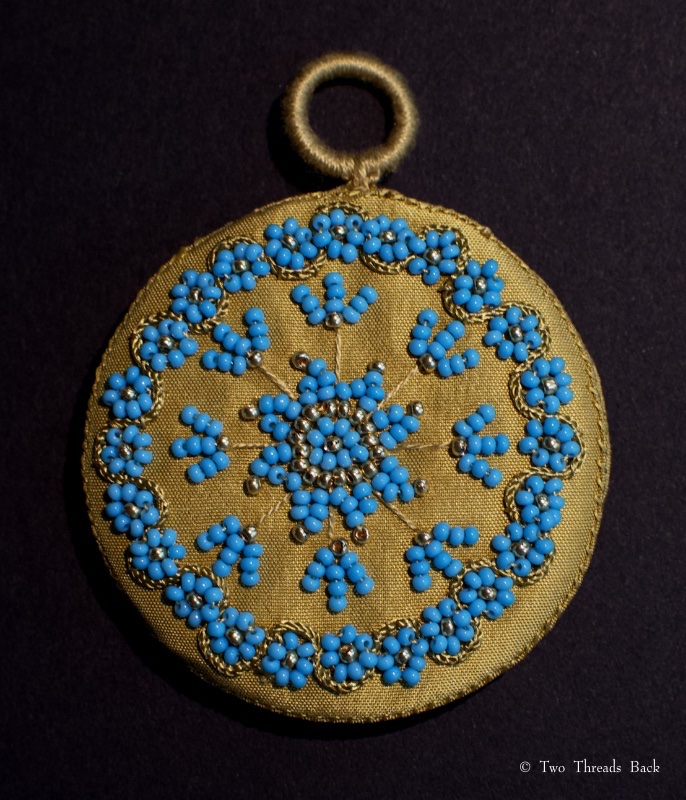
Tiny pin cushions have a special charm, particularly the disk shape, with pins inserted around the perimeter. I always considered it an impractical design though, for sewing. Then one day I came across Mrs. Child’s comment in The Girl’s Own Book (1833) and my dim light bulb clicked on:
What are called “bachelor’s pin-cushions” are made very thin so that gentlemen can carry them in their pockets…. Two round pieces of paste-board are covered with silk, and neatly sewed together, with one or two thin pieces of flannel between them. Of course only one circle of pins can be put in.
Well, of course! They were meant to be portable and keep pins securely tucked away, likely for use in one’s toilette, and not necessarily handy for needlework.
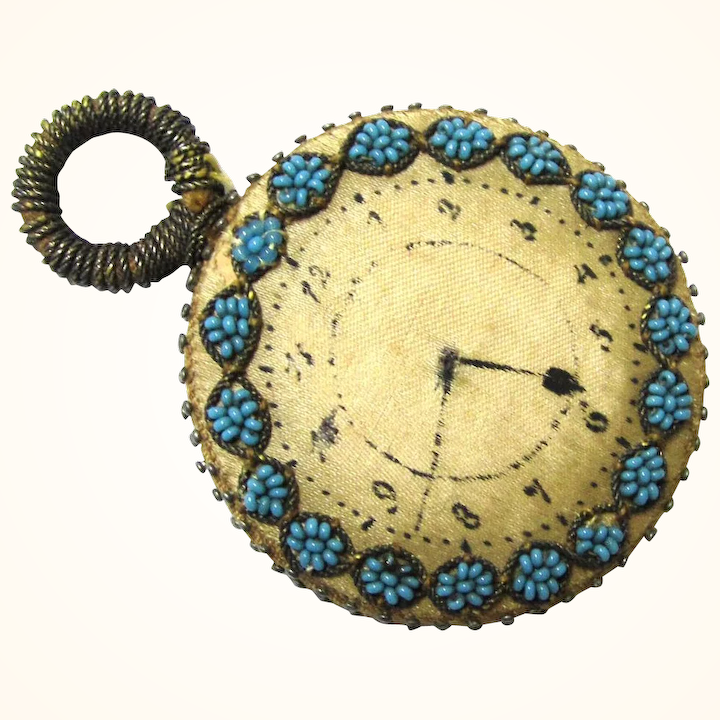
Pin cushion in the shape of a watch, courtesy of Julie Hollick.
Maybe I fixated on this design because it’s extremely pretty, or maybe because it’s unusual to find that many of the same homemade craft surviving. However, according to a knowledgeable source, this particular one is not uncommon. Even a rare mutation – pink beaded! – has been sighted.
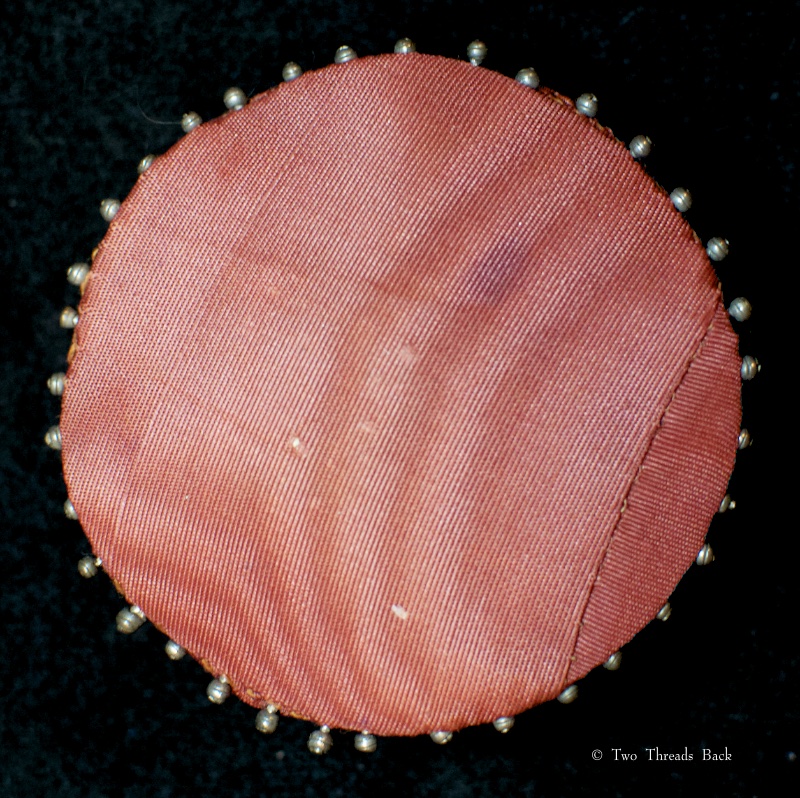
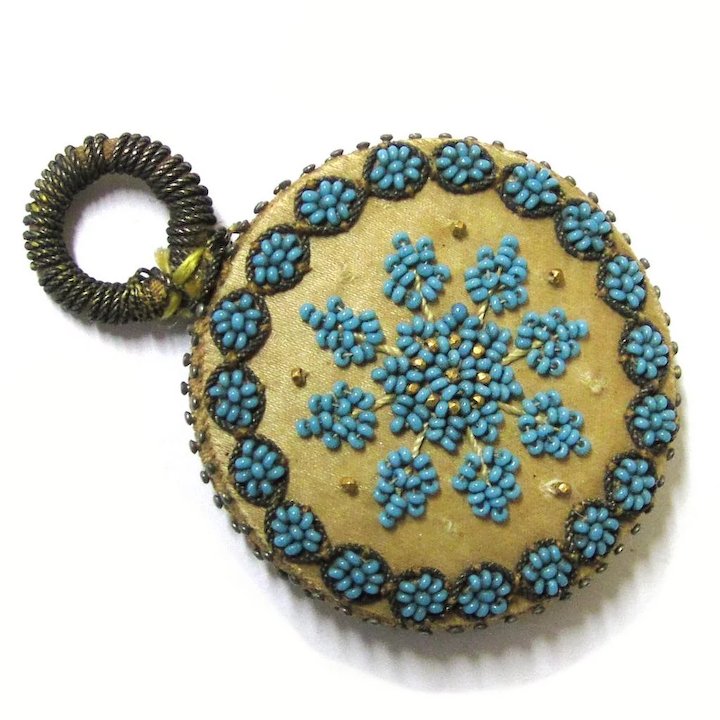
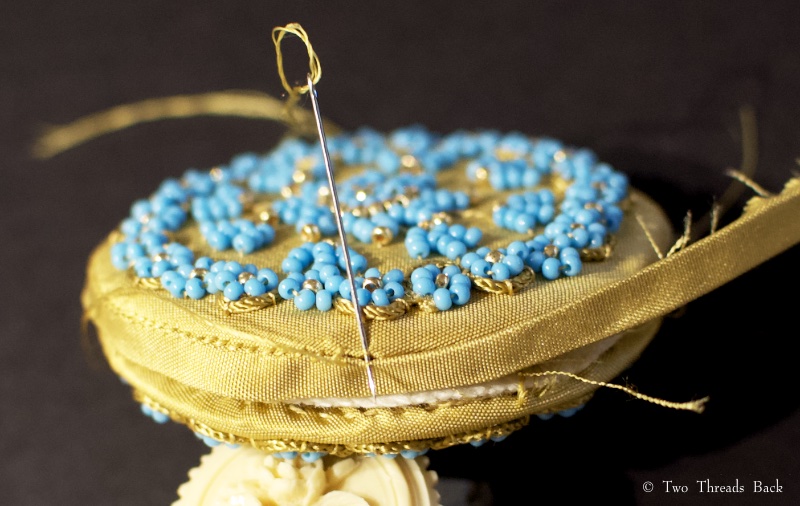
Elegant antique watch pin cushion, with a beautiful bead pattern on the reverse, courtesy of Genevieve Cummins.
Hmm. Were they made by a single crafty lady? Several crafty sisters? A craft class? Who knows. But I did feel like there was probably a pattern that they all followed; the resemblance was quite striking. So I did what any good researcher does these days and hit Googlebooks.
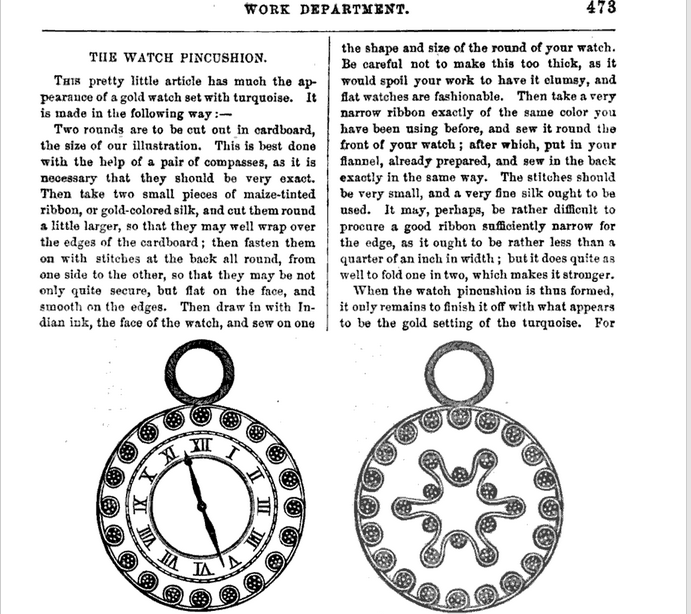
A project offered to the readers of Godey’s Lady’s Book in 1863.
Aha! It looked like Godey’s Lady’s Book could have been the source. But wait. As you know if you read the history of this sewing machine ad (or maybe you knew it anyway), if it was published once, it was quite likely “borrowed” by – or from – someone else, too.
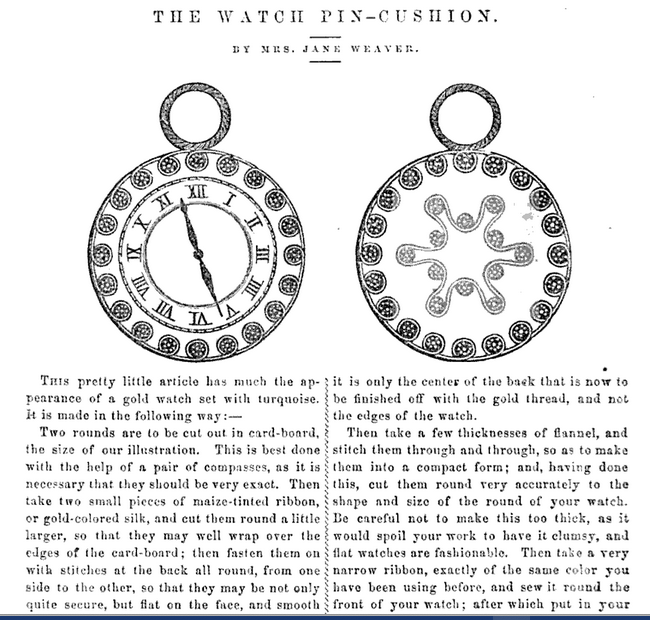
From Peterson’s Magazine, 1862
Sure enough, it seems that Mrs. Jane Weaver of Peterson’s Magazine provided the same pattern the year before! Yep, word for word. Did Sarah borrow from Jane? Or did they both copy another pattern?
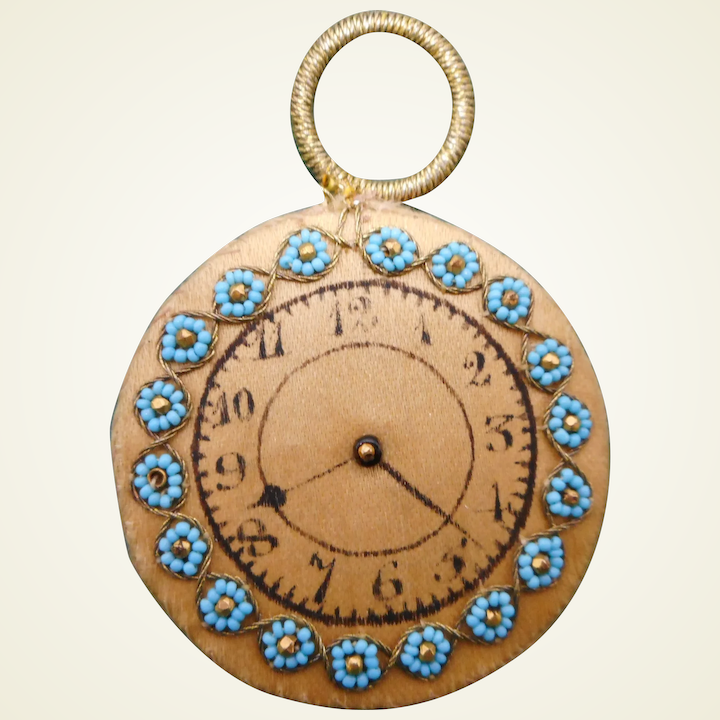
Even though I’d found American patterns for the pin cushions, it was unlikely that they were the source for the antique ones. Notice the numbers? Roman vs. Arabic numerals. The antique pin cushions I saw had Arabic; the published American patterns used Roman.
Perhaps they thought a little change would deflect any accusation of plagiarism. With almost everything in print copied by somebody,somewhere, who would even notice? The surviving examples were English – I think – so perhaps the original pattern was also.
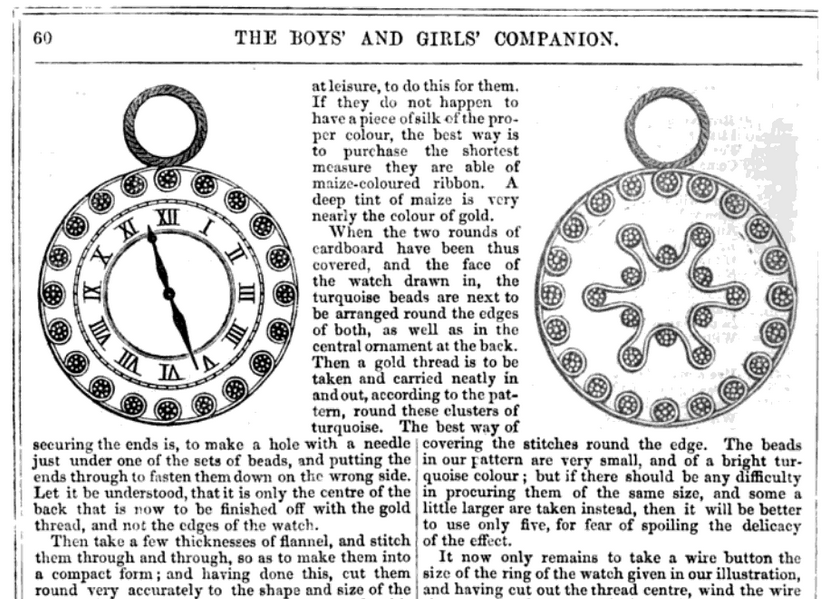
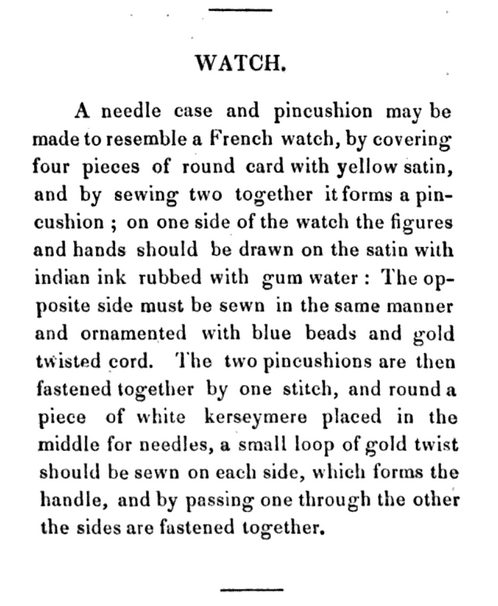
Back to Googlebooks for an English source. And indeed, I located another pattern published earlier, in England. The Boys’ and Girls’ Companion featured the watch pin cushion, this time credited to Madame Eugenie, in 1857. And that’s where I met a dead end.
Madame Eugenie? I haven’t been able to locate a needlework author by that name, so maybe it was a pseudonym. There were quite a few frantically creative women trying to survive by publishing needlework books and magazines during those years, so she may remain anonymous.
The preceding text reads “As the figures ought to be very neatly put in, some young ladies may like to ask an elder brother, or even a papa at leisure…” Right.
“Maize” colored silk, turquoise & gold beads, and experimental trim.
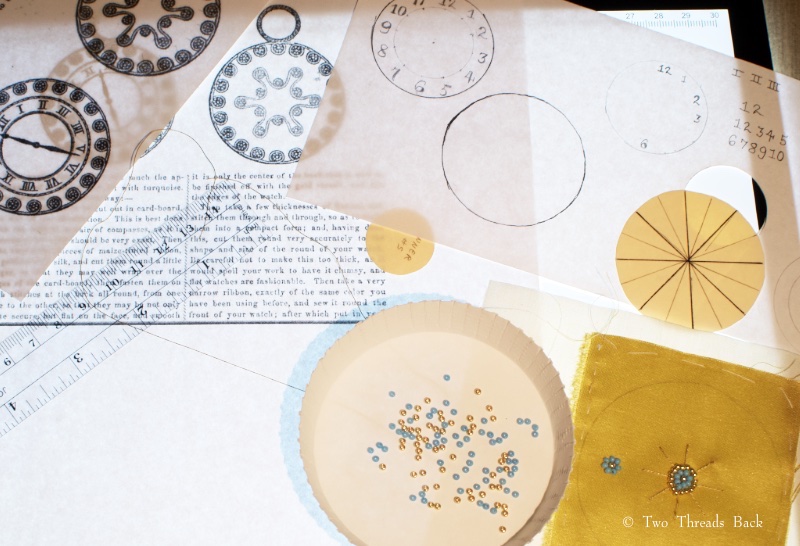
For now anyway, the pattern for the antique “watches” with numbers and star design remains unidentified. Well then, back to creating my own (economy) version. Since I couldn’t find materials exactly like the originals, I had to do some contriving.
Silk satin > silk taffeta
India ink and pen > Micron 005 pen
Tiny gold and turquoise beads > the smallest Hobby Lobby carried
Card-board > cardboard (yay!)
Wool flannel > wool flannel (yay again!)
Compasses for drawing circles > washers from my husband’s toolbox
Gold cord > embroidery floss + threads pulled from the fabric + upholstery braid unwound
Silk ribbon > a strip of fabric
Work in progress.
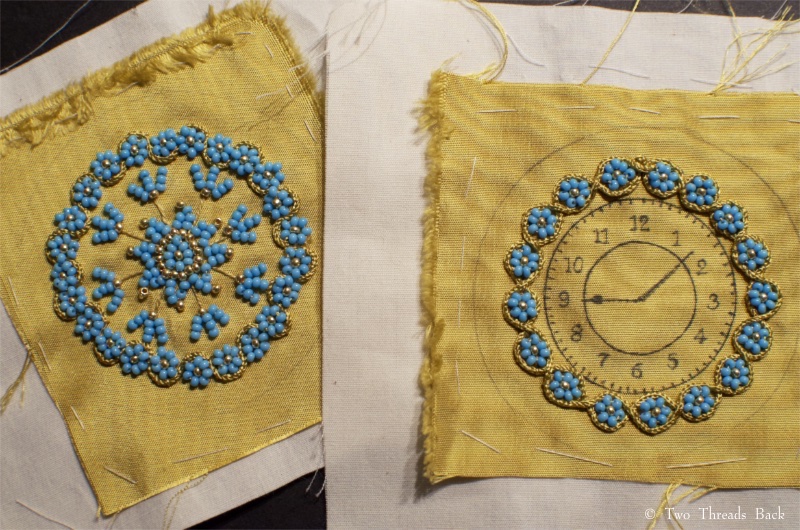
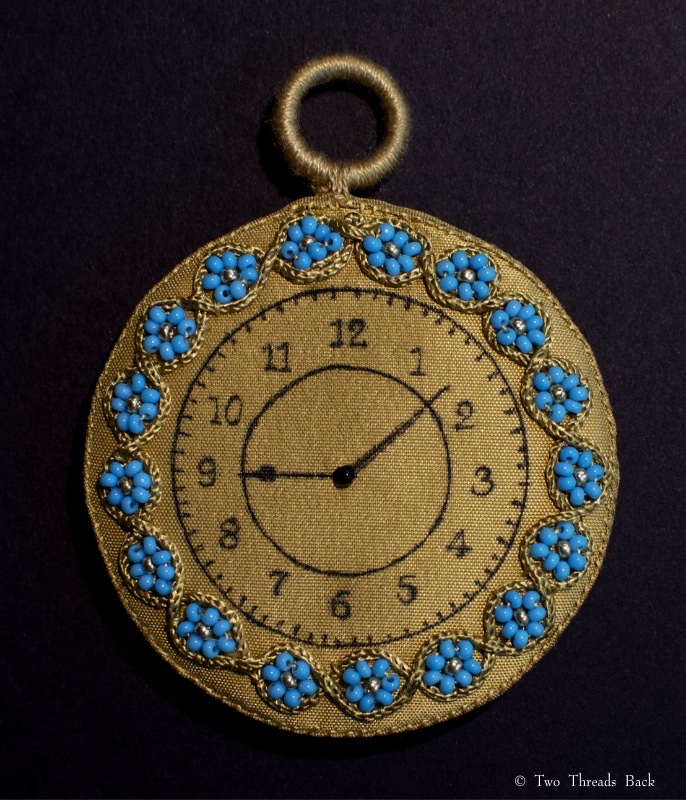
Front and back all finished but for the single black bead.
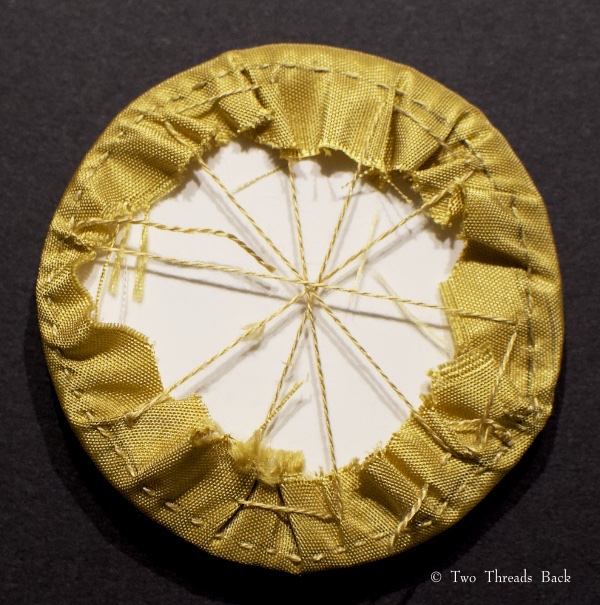
“Fastened on with stitches at the back all round, from one side to the other”
A “few thicknesses of flannel” sandwiched between, as instructed.
I did have silk ribbon. But it was so thin there’s noooo way it could have worked!
As per usual, the whole project turned out to be an excruciating exercise in “making things up as you go along.” What I learned:
Compromise when it comes to materials.
Make a pattern first. MAKE A PATTERN FIRST.
Line the silk.
Practice writing on paper. Then on fabric. Then give up and use a font on the computer and trace it.
Press gathers flat.
Use tinier stitches than seem necessary.
Beads unpick faster than expected.
The result will be bigger than expected.
Beads roll over no matter how carefully anchored. It’s their nature.
Did I mention make a pattern FIRST?
It was actually a lot of fun doing everything but the pen work since I’m not good with handwriting, and I couldn’t “ask an older brother or a papa.” Even unpicking beads (when they didn’t fit because I didn’t draw a pattern FIRST) was rather enjoyable; hearing the tiny taps when they fell off and hit the tray was ridiculously entertaining.
And just about the time I was finishing the little ring on the top, I chanced upon an even earlier pattern – and I wasn’t even looking for it!
The Wreath, or Ornamental Artist, by A Lady, 1835.
Sadly, there were no pictures. And it was for the needle-book/pin cushion version. But it gives me hope that another pattern is out there, just waiting to be discovered. I’ll keep a watch.
You have to admire the genius of early dressmakers and needleworkers. Trims were expensive in either time or money in the 19th century, and the feminine impulse to embellish even underclothing meant that a lady needed quite a few yards of lace, crochet or tatting. Or… tape.
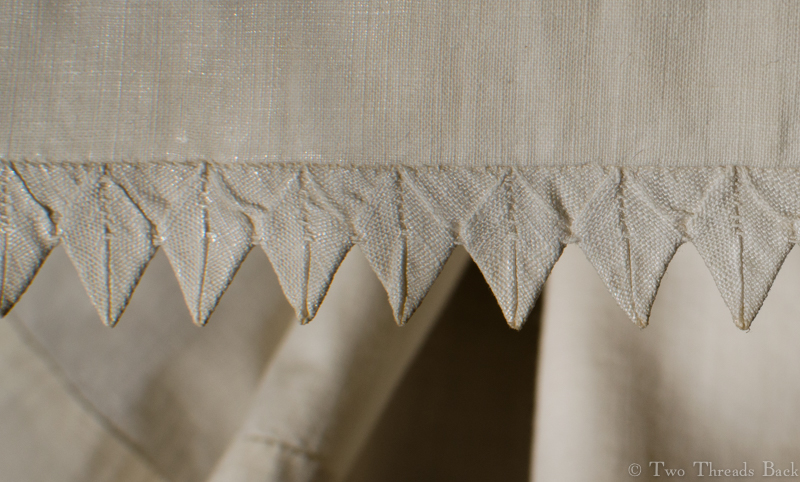
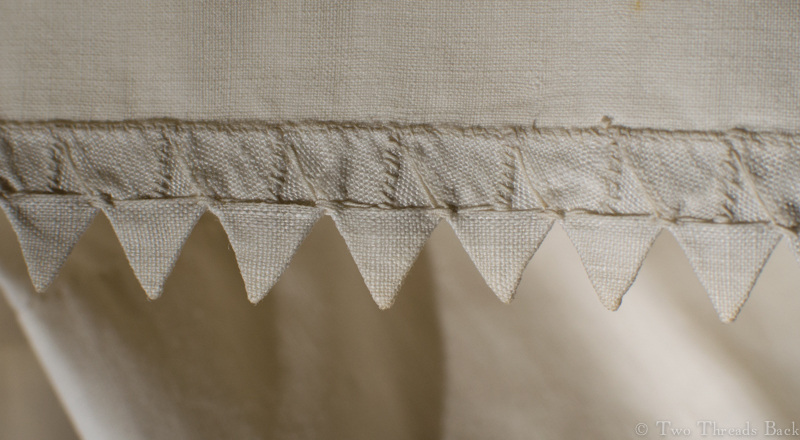
Years ago I found a beautifully preserved petticoat, c1860, with a meticulously “pointed” edging on the hem – all 144 inches of it. I always meant to figure out how it was done and perhaps even make some myself. So when I came across an illustrated article with directions for “Tape-work Edging” I decided to tackle this embellishment.
Very quickly made, she says? For four days I struggled to come to terms with a strip of paper and a vandyke point. I left little piles of crumpled scraps on every table in the house. Pointless, you say? Belaboring the point? Had I missed the point? (Awful puns and I’m worse in person.) Perhaps. But I was sure it could work because I could see the finished result! It got to the point where I was almost ready to unstitch the petticoat’s trim to see how it was done. The point of no return, as it were.
A view of the back of the vandyke, or pointed, edging on the petticoat. This trim, like the petticoat itself, was done completely by hand and not finished with a line of machine stitching.
And that’s where I figured it out. No, I didn’t disfigure a relic. I took a straight pin and explored the folds under a bright light.
If you knit, crochet, or are otherwise gifted at following turns (Origami?), this next part will not be of interest since you have no trouble with Mrs. Weaver’s directions. But just in case there’s another soul out there who wants some extra help, here are photos!
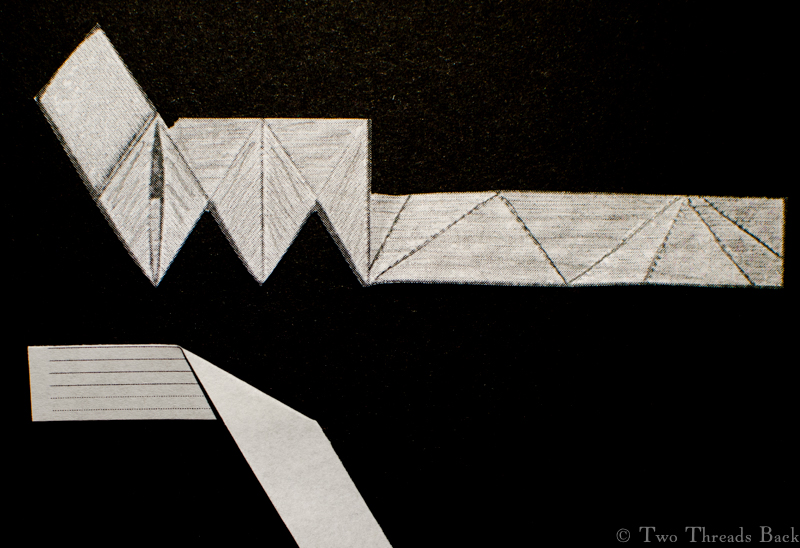
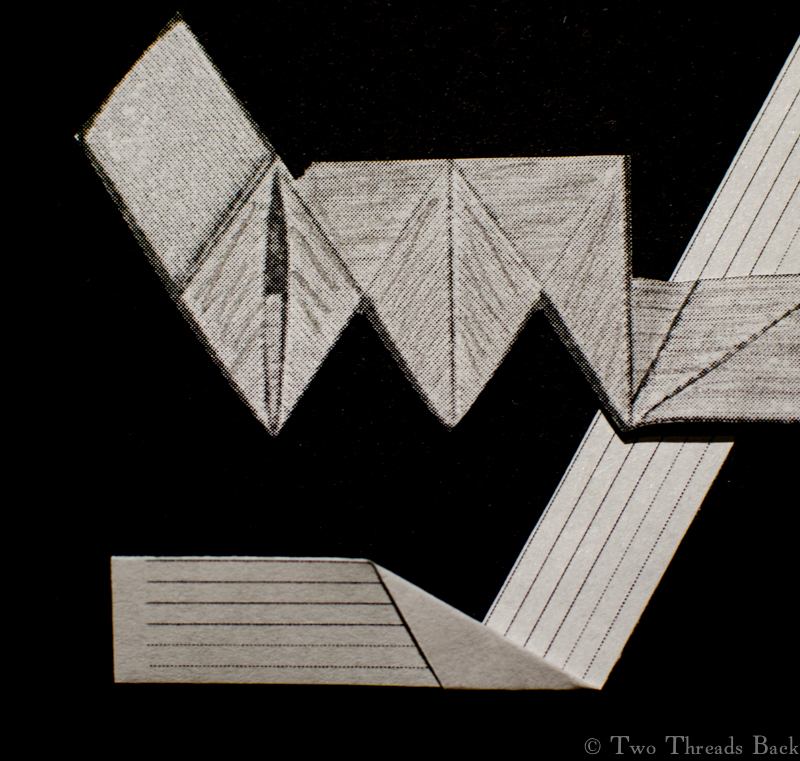
I printed and cut out Mrs. Weaver’s pattern, and below it is my 1/2 inch strip of lined paper with the first fold made.
I made a second fold, with the left (beginning) end of my paper tape still in a horizontal position.
Same 2 folds, but I repositioned the end of my tape to match the pattern. And behold! It looked like the left side of the first point!
The next folds were trickier; I twisted the tape into a cone shape, and then flattened it to make the right half of the point.
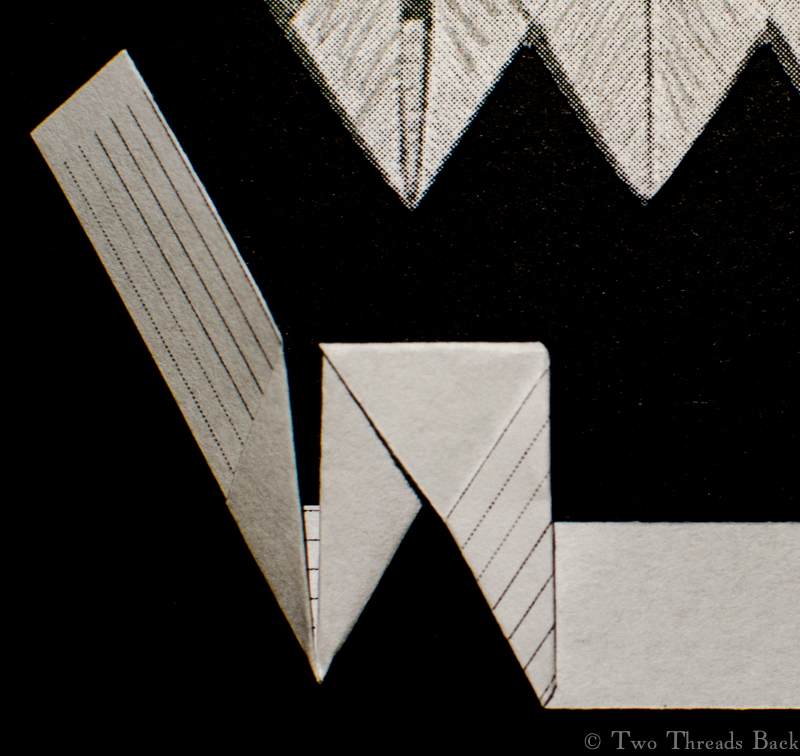
To begin the second point, I folded the tape toward the front.
Then I wrapped the tape around itself, and brought it out horizontally; the left half of the second point was done.
Again I twisted the tape into a cone and then flattened it to make the right half of the second point.
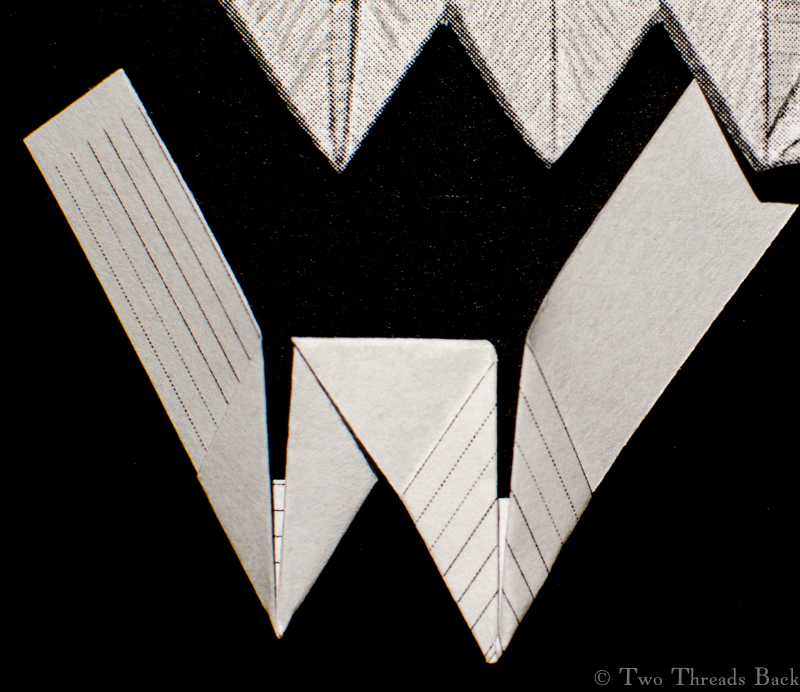
To begin the third point, I folded the tape toward the back. The beginning of each point alternates; one folded to the front, the next one folded to the back.
Here again I wrapped the tape around itself, bringing the long working length out horizontally.
Then I twisted and flattened a cone to complete the right side of the point. Third point done.
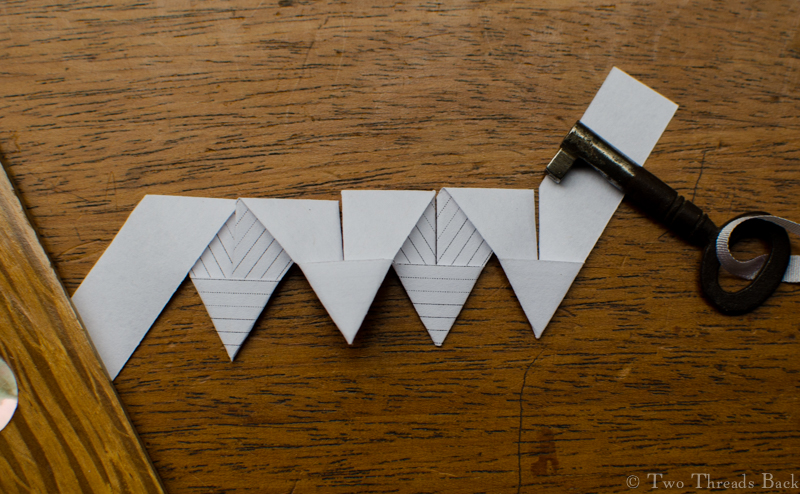
A view from the back, three and a half points.
As for what kind of tape Mrs. Weaver recommended, it was “Chinese tape No. 4.” I can’t help with the size, but I did find this on Chinese tape:
“…tape three-eighths of an inch wide, of that kind which, at some shops, is called “twilled tape,” “India tape,” “Chinese tape;” but it is of the kind that will not curl or get hard in the washing, and is rather coarse-looking than otherwise.”
That’s according to Godey’s, 1861, although it was repeated in other periodicals for the next 15 years. This tape must have been fairly inexpensive, because it takes a lot of it to make even a few inches.
These weren’t the only references to points and clothing (circa 1860s) that I’ve read recently.Fear in North Carolina: The Civil War Journals and Letters of the Henry Family is a fascinating look at daily life in the southern Appalachians during the war years. In it, Cornelia Henry mentions pointing several times, although I don’t know if she’s referring to the same technique.
“I have been sewing on a chemise for Zona today, it is pointed.” “I finished my pointed chemise about 3 o’clock this evening.” “I sewed some on my pantlets, pointed and tucked one.” “I sewed some on my pointed night cap.” “I cut out myself a chemise this morning, going to trim it with pointed tape trimming, some Dora gave me last summer.”
Of course there are many other ways to make pointed trim, and I’m hoping to write about one that I’ve seen on a Regency era dress. However, I was determined to figure out this particular tape version for myself, and the satisfaction of victory was worth the frustration. I’ve got a suspicion that somewhere, in a book or on the internet, is a brilliant explanation that would have saved me much anguish. If you know where to find it, please be kind and don’t point it out?
Four points completed.
Four points from the back side, underside, inside, wrong side…
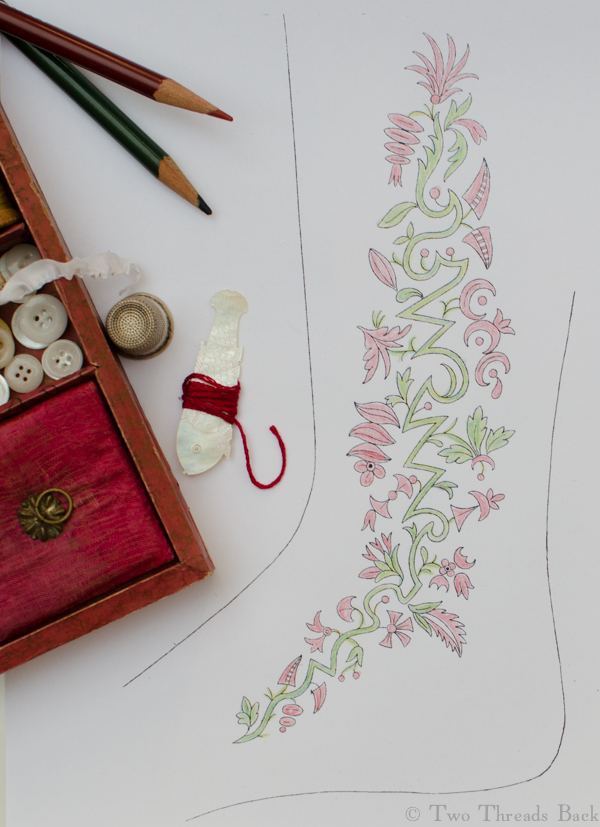
Lost somewhere between Lizzy Bennet’s spencers and Scarlett O’Hara’s hoops, the Romantic Era is woefully unappreciated. Maybe it’s because fashionable women resembled over-frosted cupcakes wearing hats like Rose Bowl parade floats. But oh my goodness. All that delicious feminine extravagance! This pattern from a French fashion magazine is typical for its time, and I thought I’d share it for Christmas.
After scanning and cleaning, I tried to add some holiday red and green to my copy for a photo. Unfortunately, the red looks pink. New color pencils are on my wish list!
Want to print a pattern to tuck in your workbox? If you’d like a free (meaning all you have to do is ask) actual-size pdf of this one, just email me. I’ll send it to you. Merry Christmas!
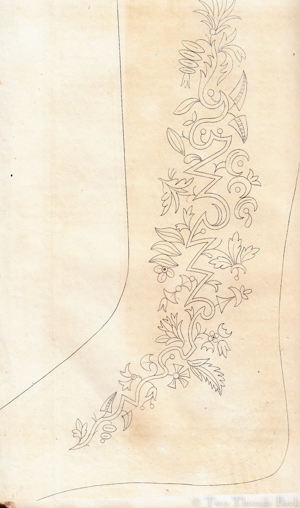
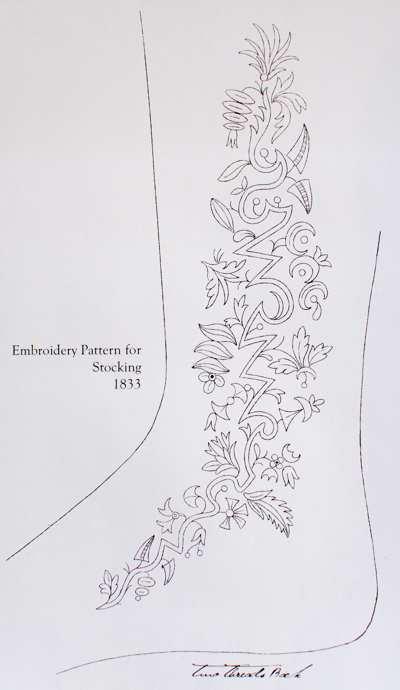
An 1833 pattern for embroidery – clocking for your stocking! m@twothreadsback.com
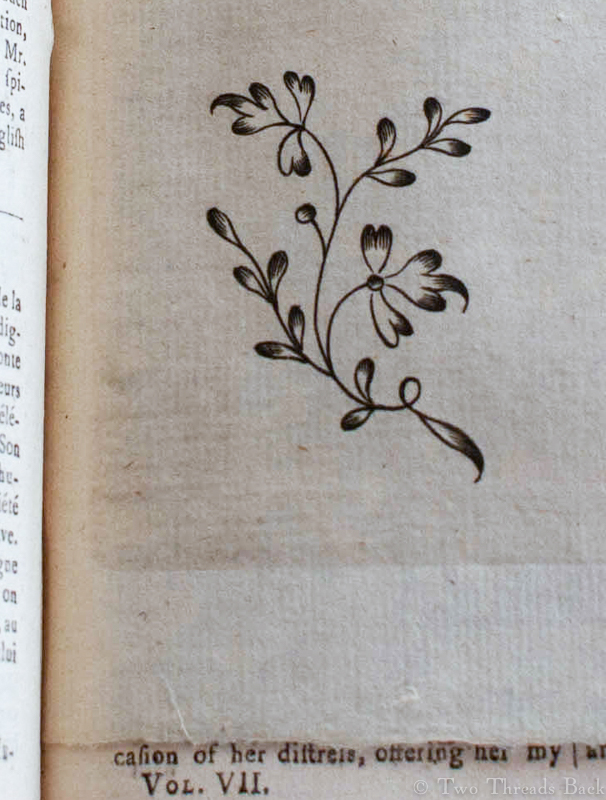
And in this corner we have the challenger: an 18th century pattern of a floral sprig from the Lady’s Magazine, 1776!
When I read about the Great Lady’s Magazine Stitch Off a few weeks ago, I knew it was something I wanted to do. Firstly, because I love early women’s magazines; secondly, because of the Jane Austen connection; and finally, because I could suit my project to my skill level – dabbler seems fitting.
A two-inch flower on a plain muslin pocket handkerchief, worked in a simple chainstitch with some wonderful Au Ver à Soie, would be just right. And perhaps some historical touches to set the mood.
I had visions of myself sitting at my worktable to pounce the pattern, then deftly working the little sprig with an elderly tambour hook. That might occupy me for an hour or two, then I’d pop it in the mail to the Chawton House Library “Emma at 200” exhibit. How hard could it be?
Here’s my fantasy, what I wanted to happen. Note the 18th century embroidery I was looking at for inspiration – carefully folded so the damaged areas don’t spoil the effect.
Well, Fantasy was introduced to Reality fairly soon. I realized that the pouncing powder I’ve had (unopened) for 20 years required a little more research and practice to use than I wanted for such a small project. What’s so bad about using a disappearing marking pen after all?
Here’s the reality, modern day all the way. Notice anything glaringly wrong here?
So next came the tambour hook I’d been dying to try. It seems there’s more to using one than just picking it up and poking it in and out. Not to mention that the ancient point had a tendency to shred a few threads along the way. What’s wrong with using a needle?
Ok, I started with the needle and made it about halfway before I thought: ick! No two chainstitches were alike. I picked it out and decided to try a sort of running/darning stitch, also common on period pieces. Bleh. It looked worse than the first attempt, so I picked all that out and decided it would have to be chainstitch after all.
Well, I did better on the third try. But when I was almost done, I felt something didn’t look right. Maybe you spotted it already? I had put the muslin back in the hoop underside up. And there it would remain. Six hours into this two-inch project, I was not doing it over.
The hemming went better than the embroidery. I didn’t really mind that one side had a wider hem than the other three. But the flower centers looked a little plain. I thought I’d try some microscopic drawn thread work. Isn’t it amazing how fearless ignorance can be?
You can barely see the drawnwork in the flower centers. At least I hope you can barely see it!
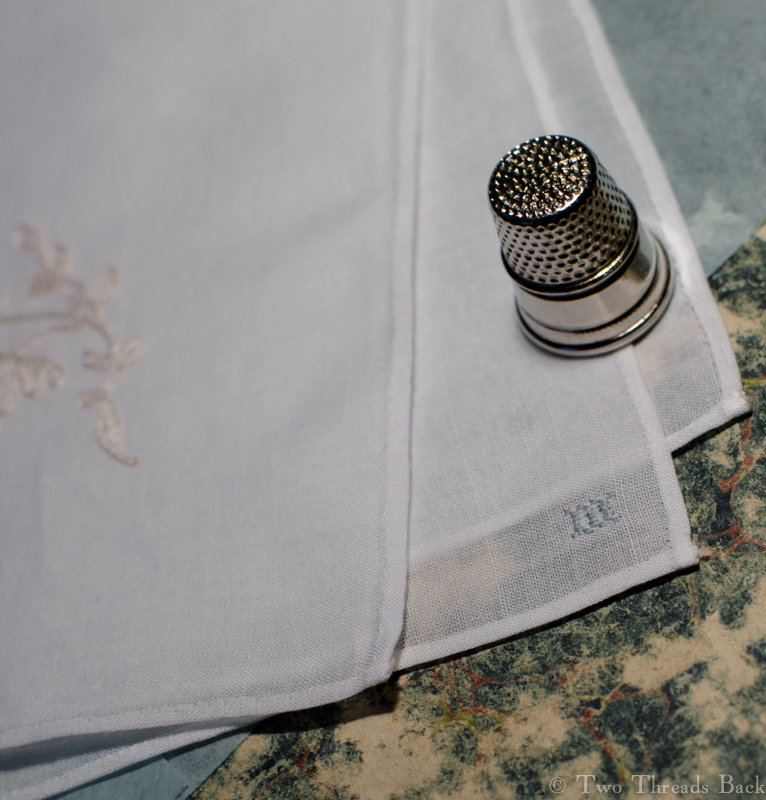
Another six hours later I was done. Then I remembered my calling. Plain needlework! I could not send this handkerchief out into the world without marking it. A silk monogram was beyond my ability, and turkey red thread would be out of place on this mouchoir de poche. So I used blue cotton (I’ve seen real examples) and started on my initials in the opposite corner.
A mono-(in the most literal sense)-gram letter “M” worked in cotton from a period pattern. Most early marking charts I’ve seen had letters seven X’s tall.
It hurt. Not just squinting to see the threads, but to realize I’d placed the “M” too close to the corner to add my other initial. It kind of looks like I meant it to be that way, so I won’t tell anyone.
P.S. Check out the Stitch Off Facebook page too, you’ll see some gorgeous examples of embroidery by people who really know how. In color, no less! Maybe you’ll be inspired to participate?
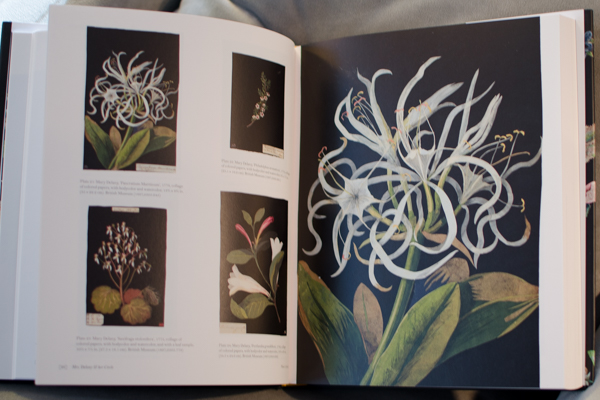
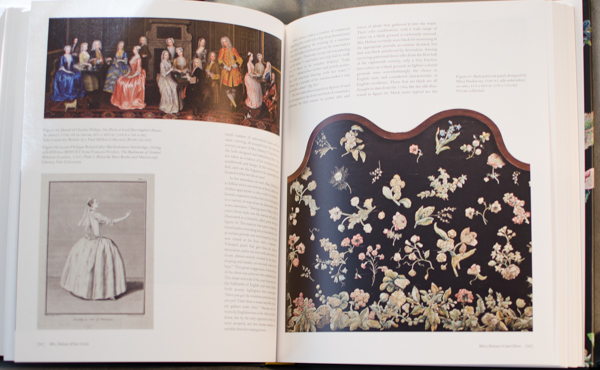
Mrs. Delany & Her Circle, edited by Mark Laird and Alicia Weisberg-Roberts.
How have I missed this for so long? It’s been reviewed elsewhere – when it was new – but I just can’t resist sharing, even belatedly, whenever I find a gorgeous book.
Published in 2009 to accompany an exhibition at the Yale Center for British Art, it was my Christmas present last month and all I want to do is rave about how brilliant, beautiful, and beguiling Mrs. Delaney & Her Circle is. And not just the book, I think Mrs. Delany herself must have been an astonishing woman.
She can’t be considered a polymath, or even an opsimath (don’t you love that one?), but in an 18th century upper-class lady’s world of art, learning, and taste, it seems like she dabbled in it all – at least, all my favorites! From craftwork to costume, needlework to natural philosophy, her interests included everything beautiful.
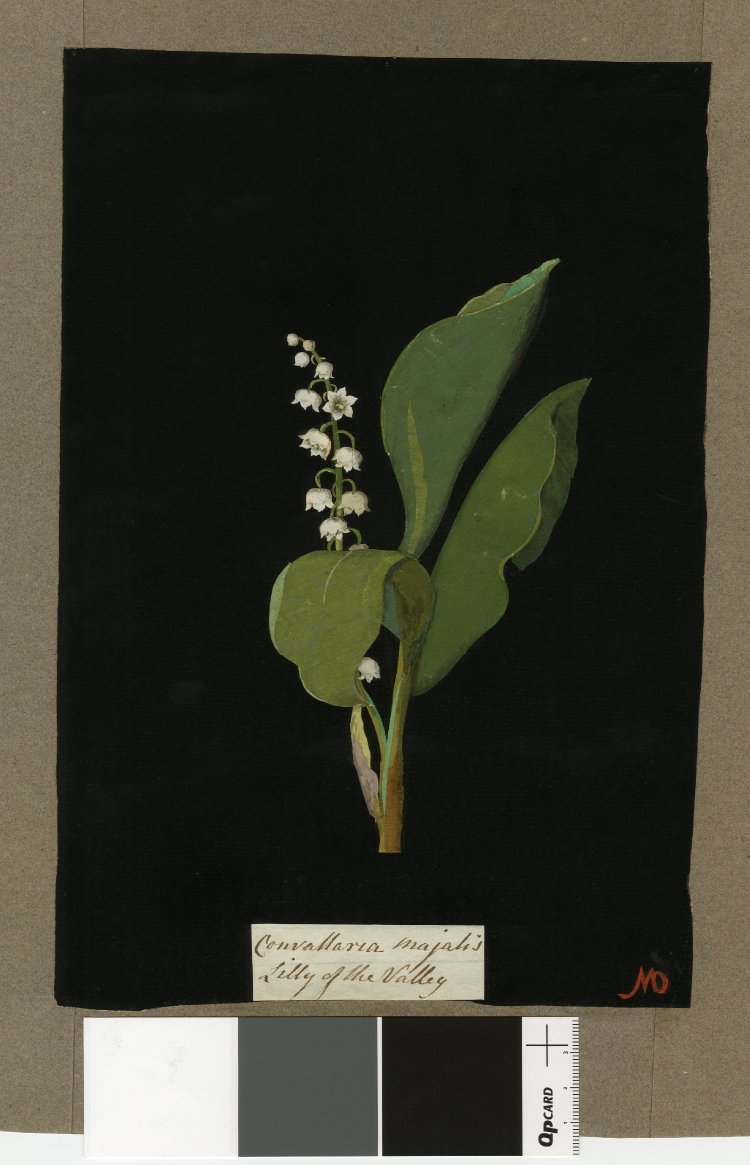
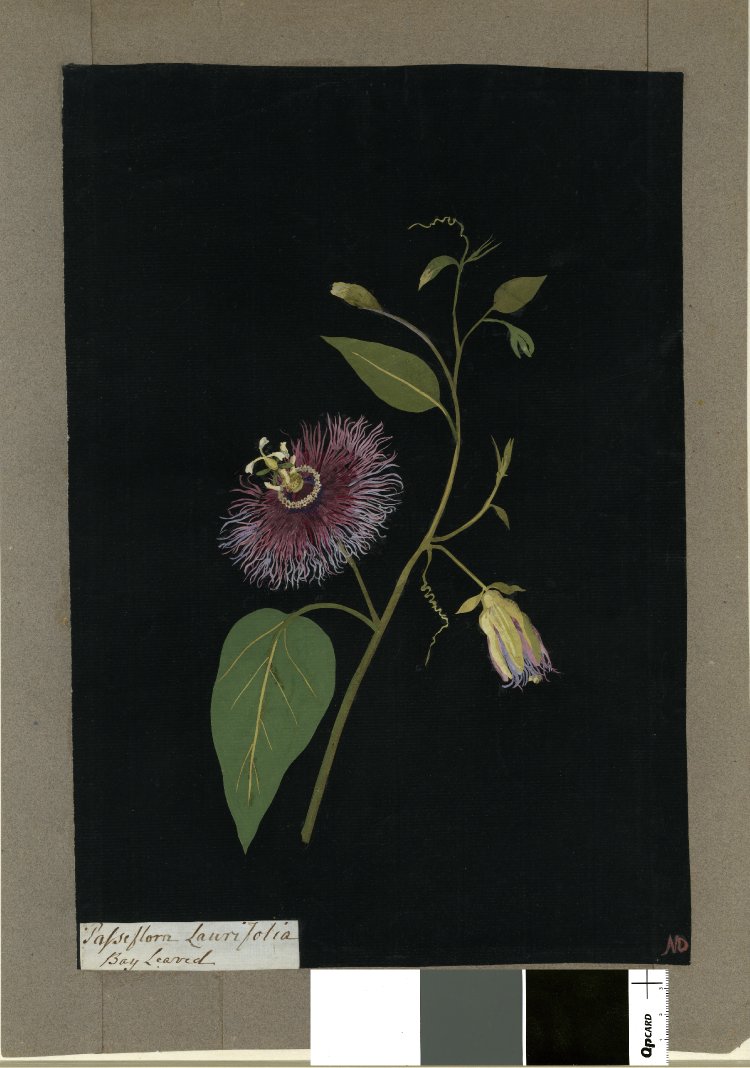
The image on the front cover and first words of the jacket blurb were enough to get my attention. “At the age of seventy-two, Mary Delany, née Mary Granville (1700-1788), embarked upon a series of nearly a thousand botanical collages” – what, she only started her paper flowers at that age? I can still hope?
Indeed, the book is packed with illustrations of her stunning “mosaicks” of botanical beauty. There is a wealth of information on her floral collages. From an experiment in reproducing them, to an explanation of period paper-making techniques, the text answers all questions that come to mind.
But that’s not all. She had many more interests which are covered in detail in the 12 essays, all written by experts in their fields. She was a member of the Bluestocking circle and lived a rich life in a fascinating era, counting as friends some of the most notable figures in art, science, society.
Oh, did I mention The Dress? Mary Delany lavished her black satin court dress with the most exquisite, scrumptious, dazzlingly beautiful floral embroidery I’ve ever seen. There’s a whole essay devoted to it. Other illustrations include workboxes, tools, patterns, fashion plates, cartoons, etchings, prints, shells and shell art…. In all, enough to keep me fascinated for a long time.
The bad news is that the book is out of print. The good news is that the museum bookstore has (or had before Christmas) copies in stock. Whether you find it in a library, or track down this treasure for your own, I think you’ll fall in love. Opsimathematically, I did!