Dressing dolls in a rich or showy manner, is among the earliest and most effective means of forming in little ones a taste for a similar style of dress in themselves or others. The toy baby or lady is arrayed in fine colors, gossamer fabrics, or rich silks, and loaded with all the trimmings and ornaments which fashion permits. This gaudy or splendid object is admired by everybody, and every part of the dress commented on by the wondering owner, in terms of enthusiasm, worthy of Victoria’s bridal paraphernalia. Who can wonder that the little girl receives the impression that the style of dress which calls forth such rapture is exceedingly beautiful, and all–important?
Give children dolls dressed in accordance with the taste which you would wish to form in them, and a style which you would like to have them imitate. And never allow a doll’s dress to be commented upon as though it were a matter of any importance, except in reference to tidiness.
A true taste and correct principles in regard to dress may be formed in young children under proper management. –The Mother’s Journal, 1843
Well, thank heaven my mother didn’t follow that advice! I loved every bit of glitter, color, sequins, or lace that I played with, wore, or admired from a distance. It certainly didn’t affect my dress taste as adult. Maybe it would have been better if it had, since now I’m more likely to ask “do I have to wear shoes?” when I’m invited anywhere!
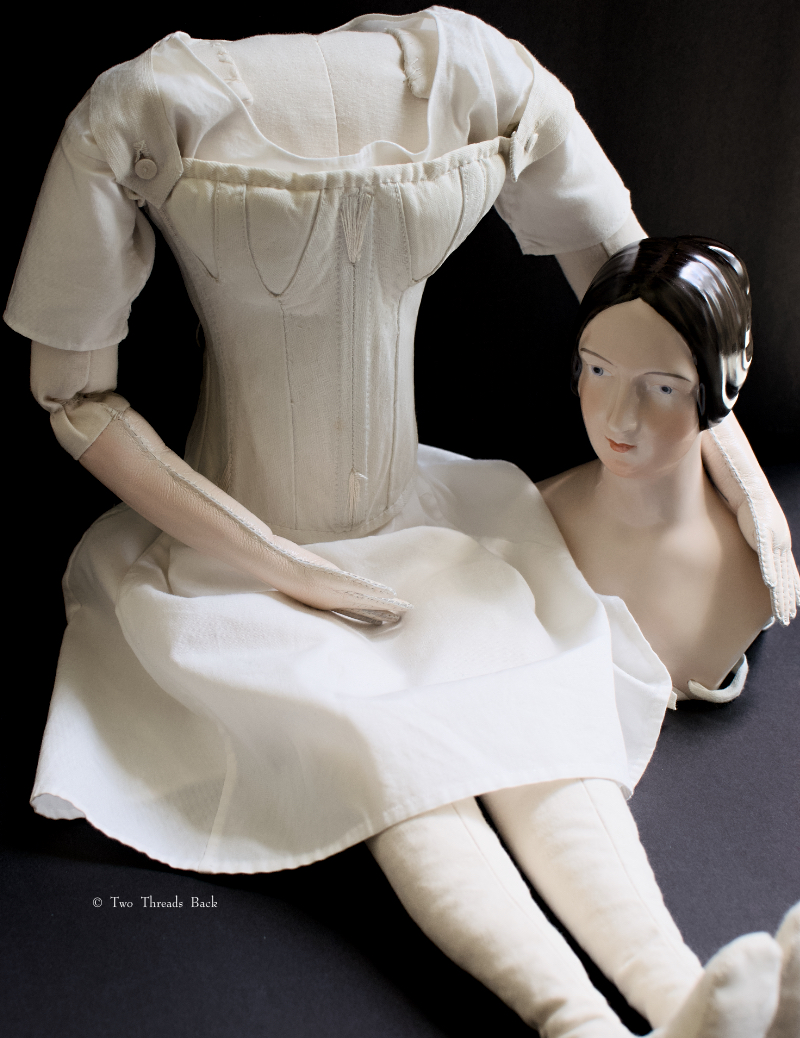
I still love extravagant doll clothes. In fact, this project didn’t start with a doll, it started with a doll corset. I bought it because it was hand sewn (and a bargain) even though 1– I didn’t have a doll to wear it, and 2– it was the wrong period for the Romantic and Gothic styles I wanted to sew. No problem, I thought, just make a doll body to fit it. And then find a doll head to fit the body and the fashions!
So what if I’d never made one before? So what if I knew (still know) nothing about 1830s-40s dolls? But just like making Pharaby, “faint heart never won fair lady,” let’s have some fun! So here’s a look at what turned out to be years of fun.
I made the body with 2 layers of fabric so the sawdust wouldn’t leak through. It’s dyed with tea to match the complexion of the head which was reproduced by Royal Copenhagen in the 1970s from the original molds. Warning: if you make skinny ankles out of muslin and sawdust they will flop. Solution: orthopedic surgery with wooden dowels. That wasn’t fun for either of us, although termites might have enjoyed it.
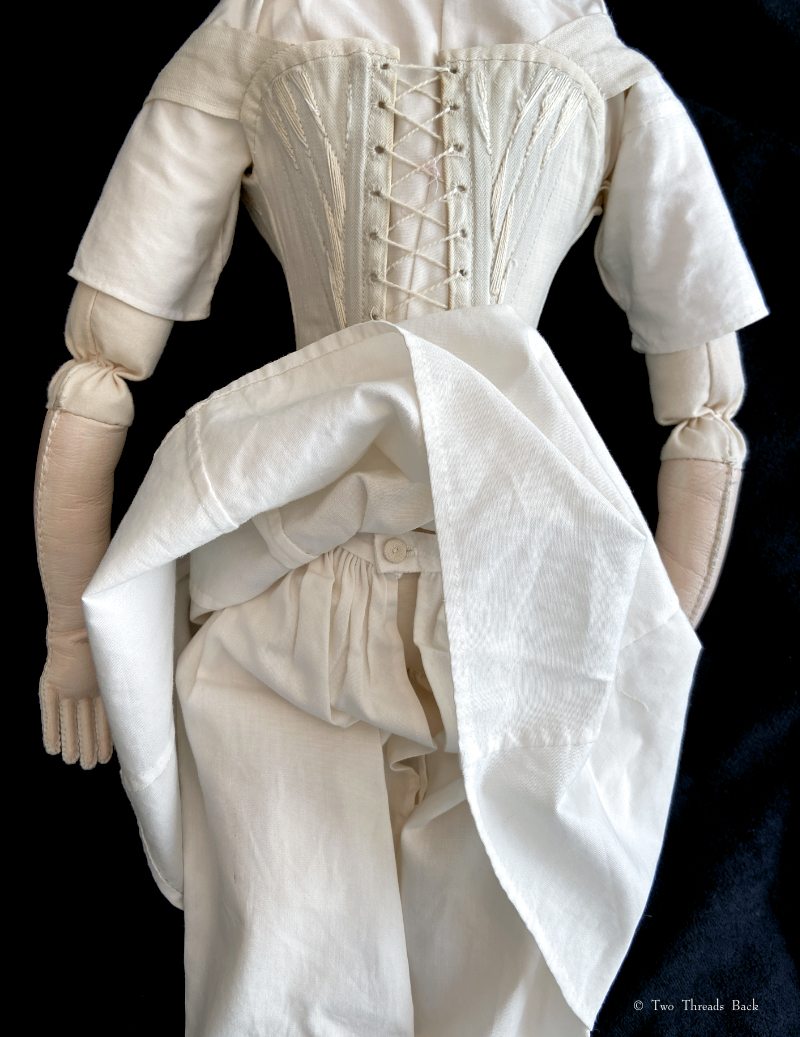
The arms were custom made of leather by a doll-making pro (it’s why they look so good) and then colored by me to match her complexion (it’s why the color doesn’t). Her chemise is pretty standard, similar to my other dolls’, which are gores, gussets, and rectangles pieced together. Her drawers are “open” style and they close with antique linen buttons – also used on the straps I added to her corset. You can see the outline of the whalebone busk down the corset’s center.
She also got plain tucked and corded petticoats. The corded one needs some alteration because I didn’t like how the cords showed through the muslin. Which is why it didn’t make the photo shoot.
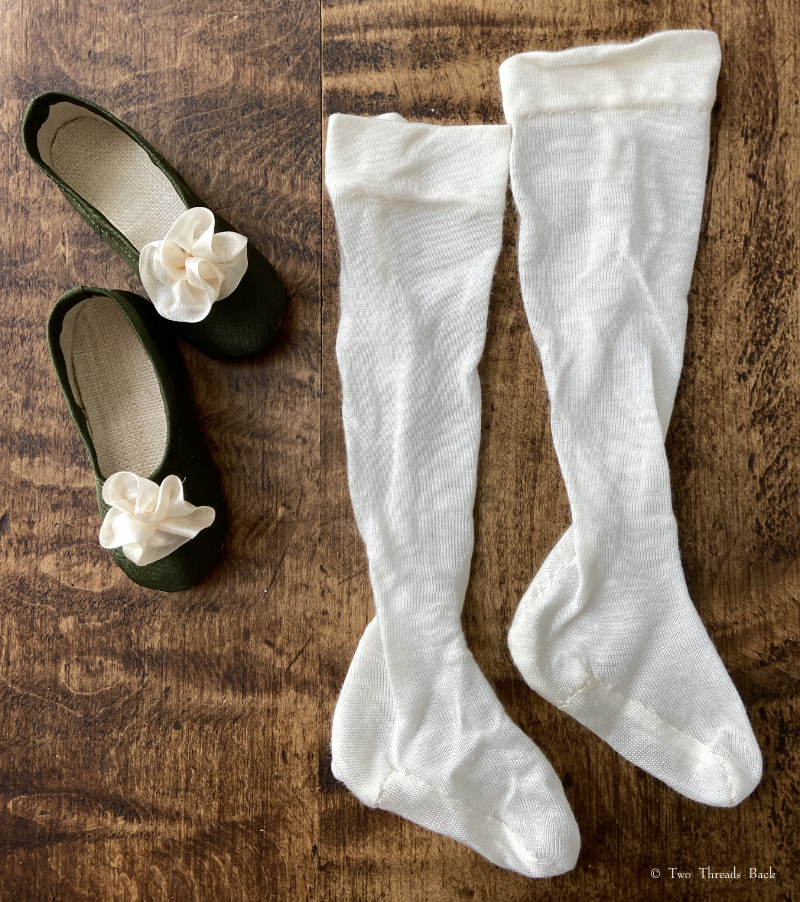
Her green silk shoes weren’t as hard to make as Pharaby’s because she has (dare I say it?) not-dainty-feet.
The shoes were lined with glazed linen which was excruciatingly difficult to do.The silk knit stockings were custom made by a pro. I knew there was no way on earth I could make them myself to fit the awkward combination of skinny ankles and not-dainty-feet.
We had to have sleeve supports! Those ginormous gigot sleeves that were so fashionable couldn’t stand on their own. Ladies of the era contrived a way to save sleeves from collapsing by wearing supports resembling little pillows or cages. If you’re already wearing a dozen undergarments, a couple more can’t hurt. I stuffed them with wool instead of down. The sawdust was messy enough. Me with feathers? Unthinkable.
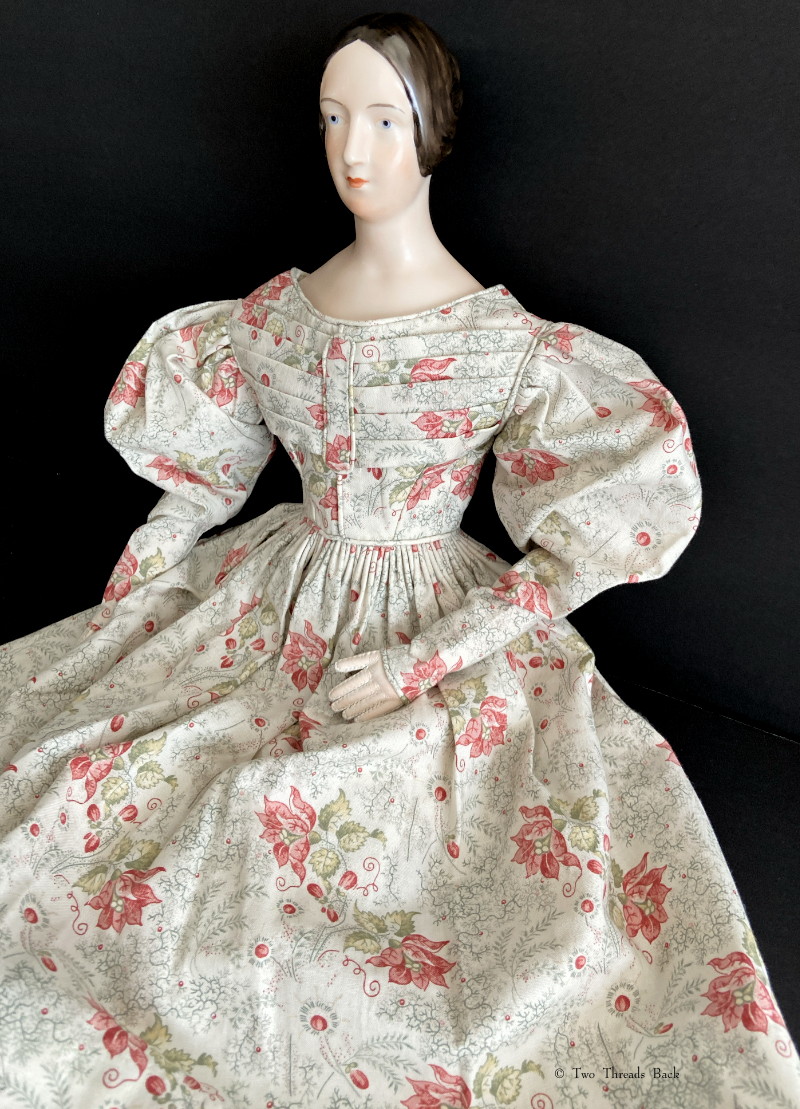
This was the first dress I made. I love the historical cotton prints available for quilting, but bemoan the weight. It won’t shape and drape like period calico did, and that’s especially evident in doll clothes.
The bodice is lined with vintage glazed linen and the waist is covered with vintage tape. I’ve forgotten how many tries it took to get the skirt gauging (gathering) to fit. Suffice it to say more than one.
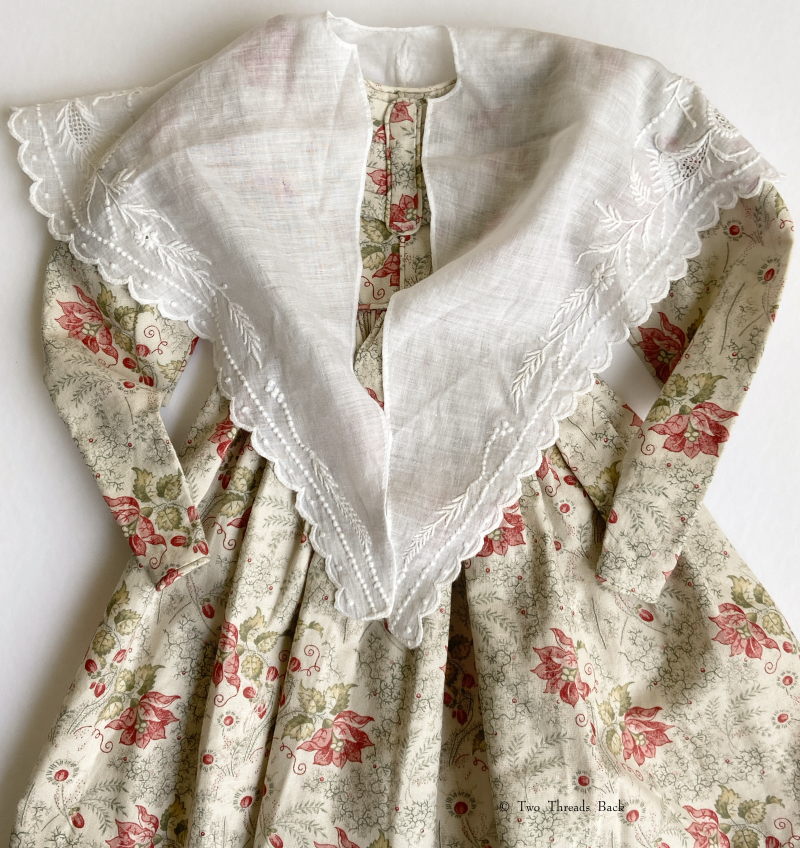
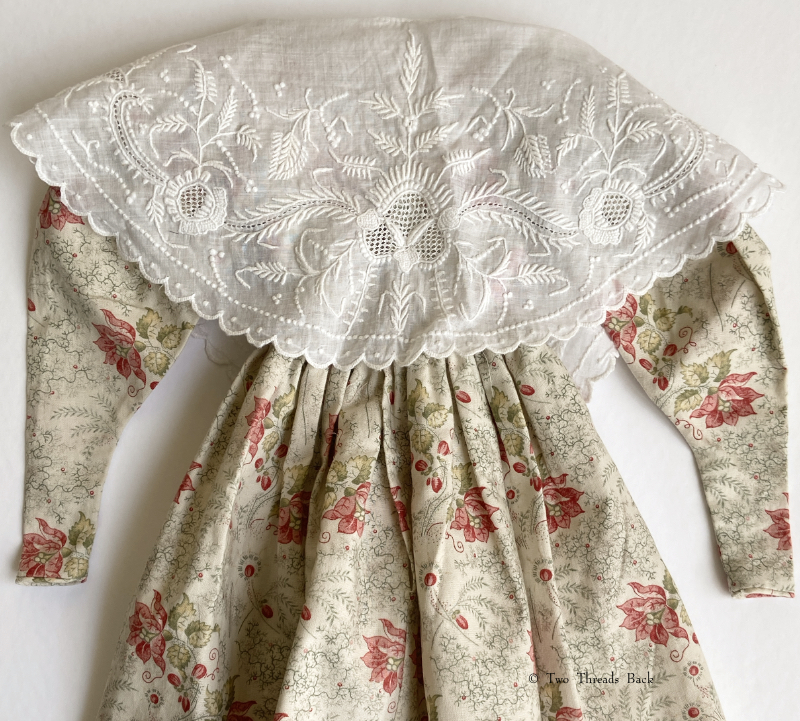
Of course every lady needed a pelerine or fichu or canezou or whatever name this ethereal embroidered kerchief was called. This one is refashioned from a rescued/repurposed vintage bit of whitework.
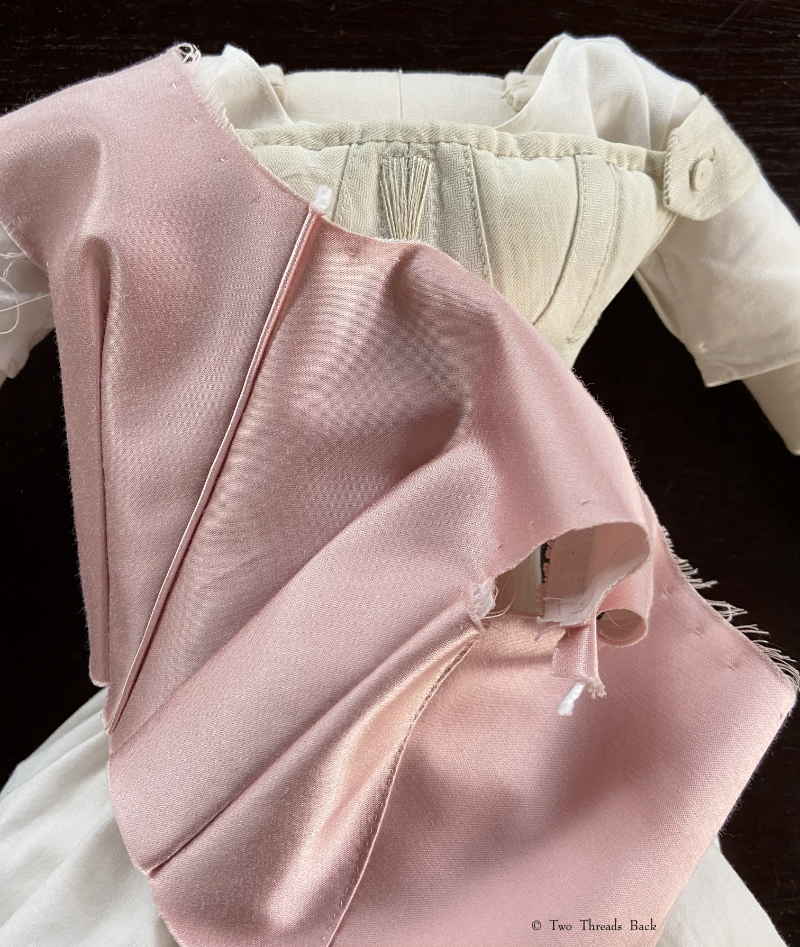
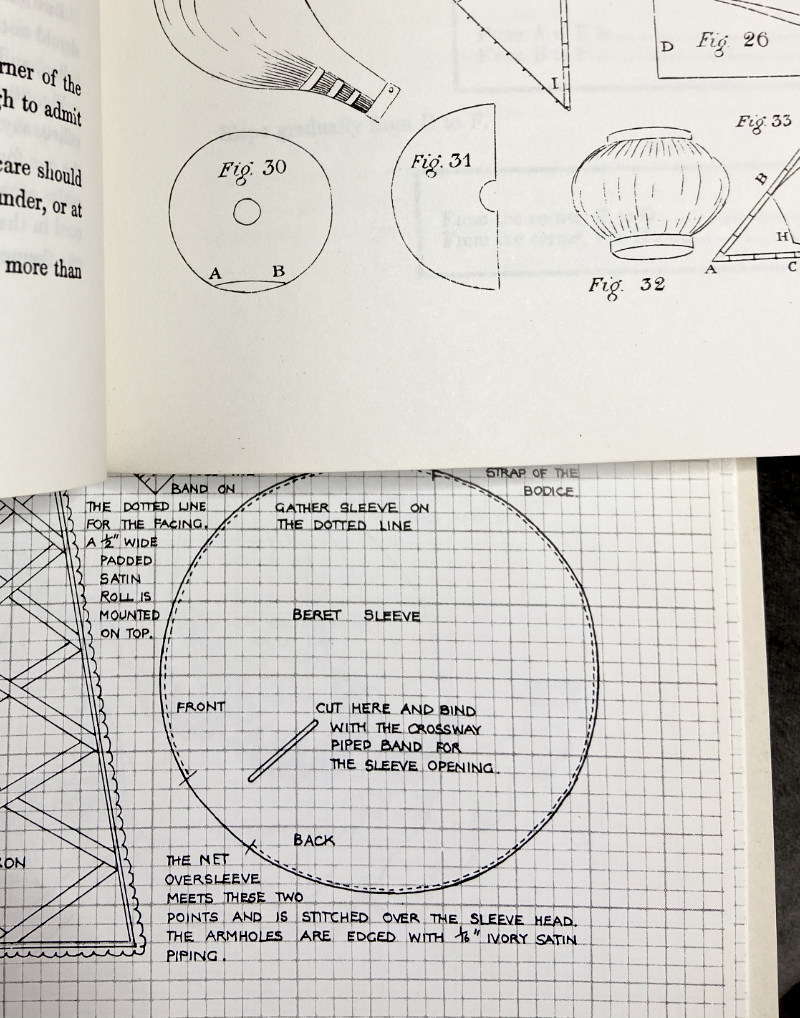
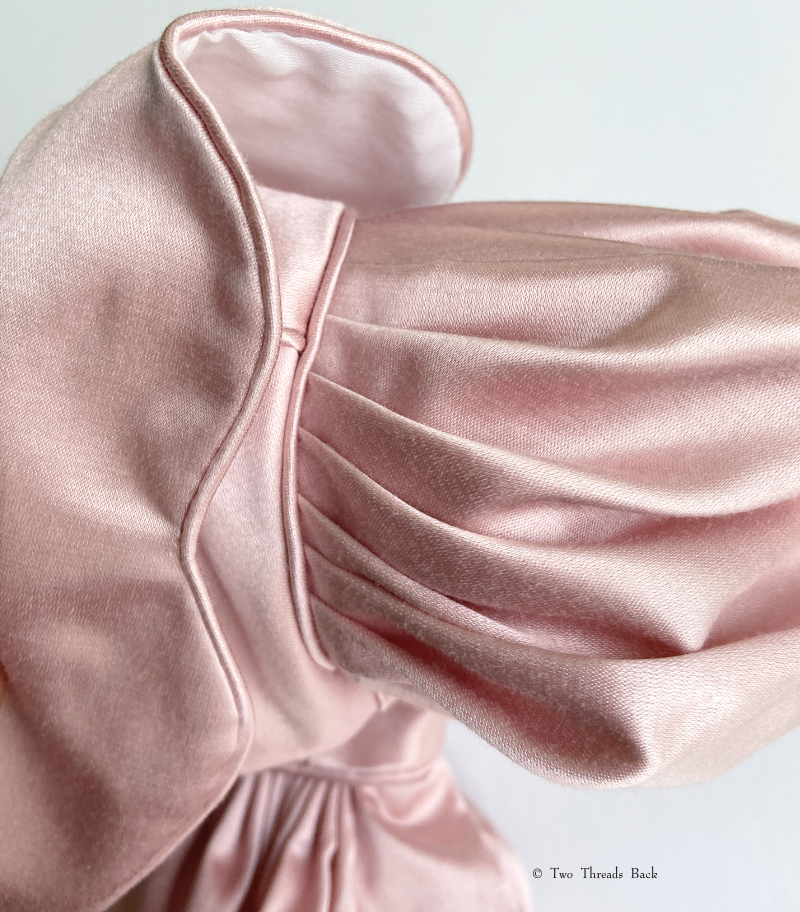
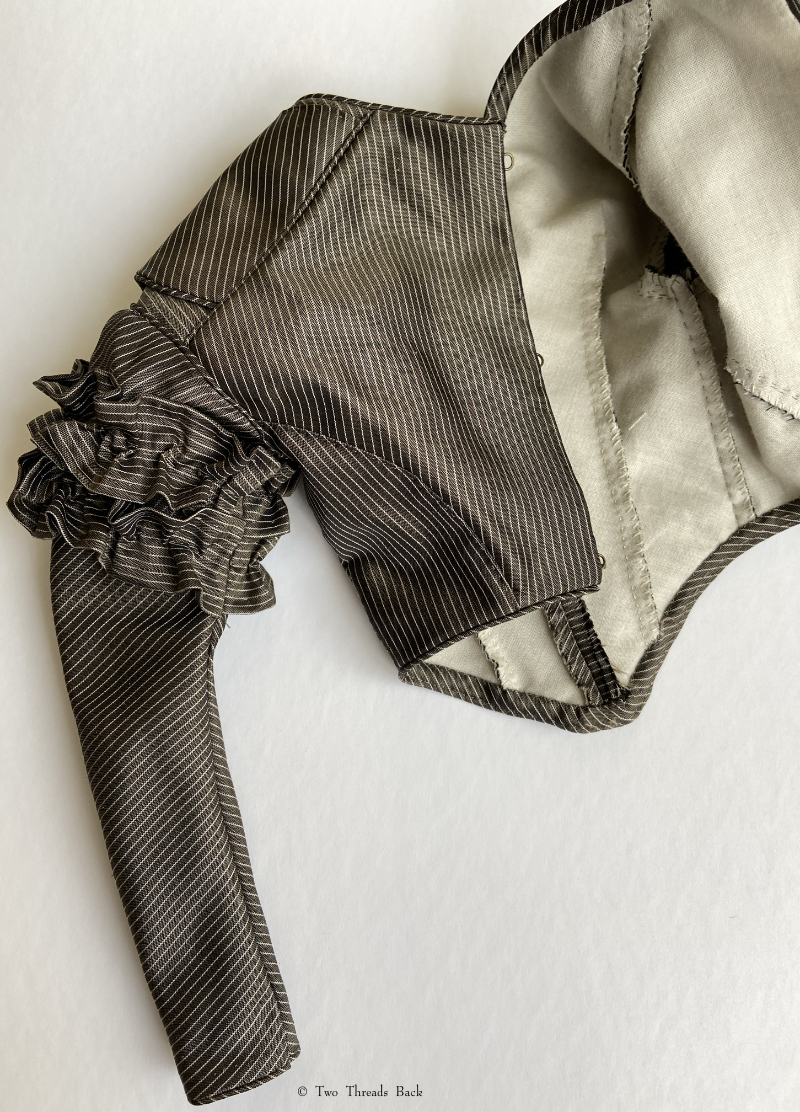
The next dress was an adventure in pattern making; I was aiming for an early ’30s ballgown that would work with sheer oversleeves and I had pink silk satin that was begging me to use it. The scalloped collar (see the first image) was an ordeal – making it fit and lie properly on the shoulders and then meet like it should in the back – arrghh!
However, that was nothing compared to figuring out the sleeves. Workwoman’s Guide and Patterns of Fashion to the rescue.
Unfortunately, with sleeves, you have to make two. And here’s the kicker – they have to match – as mirror images! It looks like the back of the silk is a different color here, but that’s just the lighting.
Sleeve attached. WITH piping! You’ll notice, however, that there are no photos showing both sleeves together. See caption above.
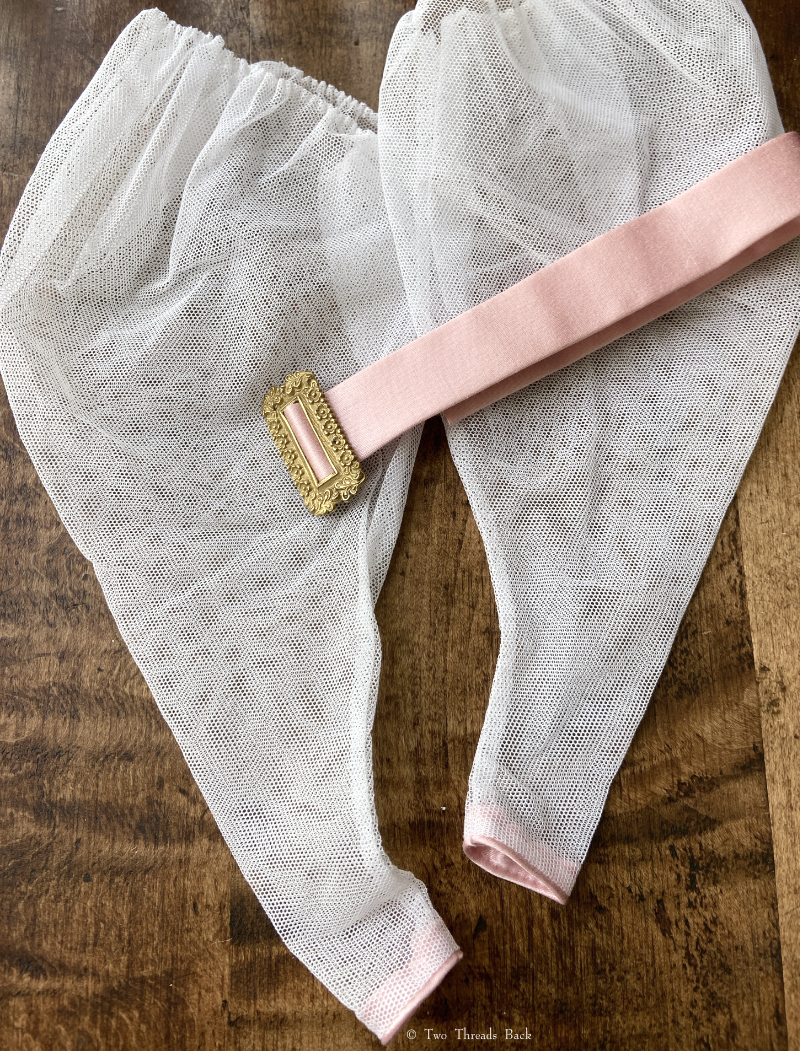
My favorite part! The oversleeves. Until I started searching for examples to go by, I had no idea they were such “a thing.” But the internet is full of portraits of women wearing them. The buckle was a lucky find on Etsy. Vertical rectangular buckles were also very much “a thing.” (Hint: I have one listed there myself right now!)
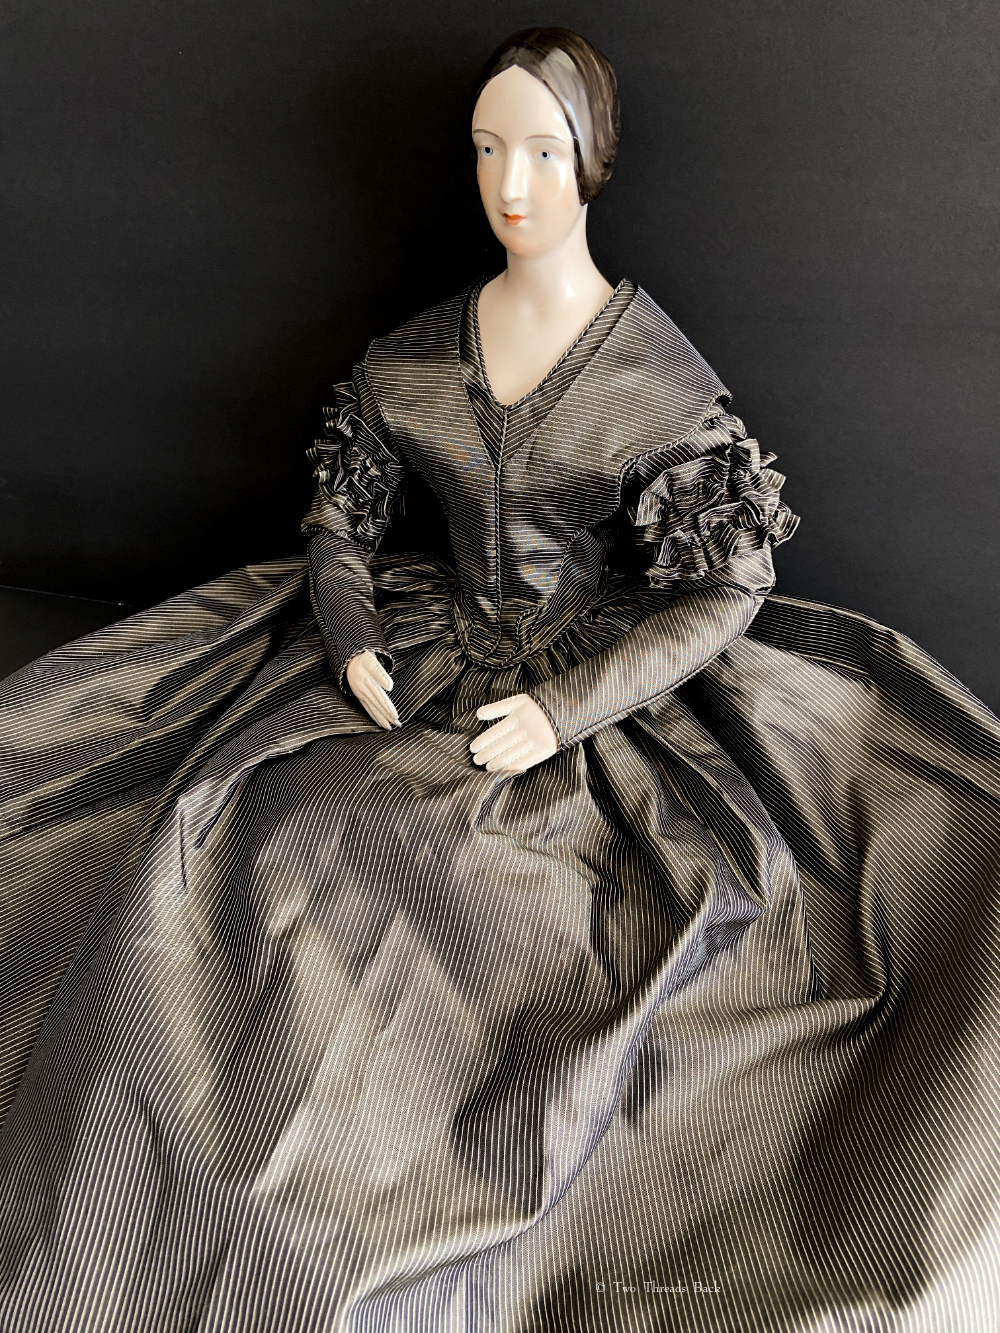
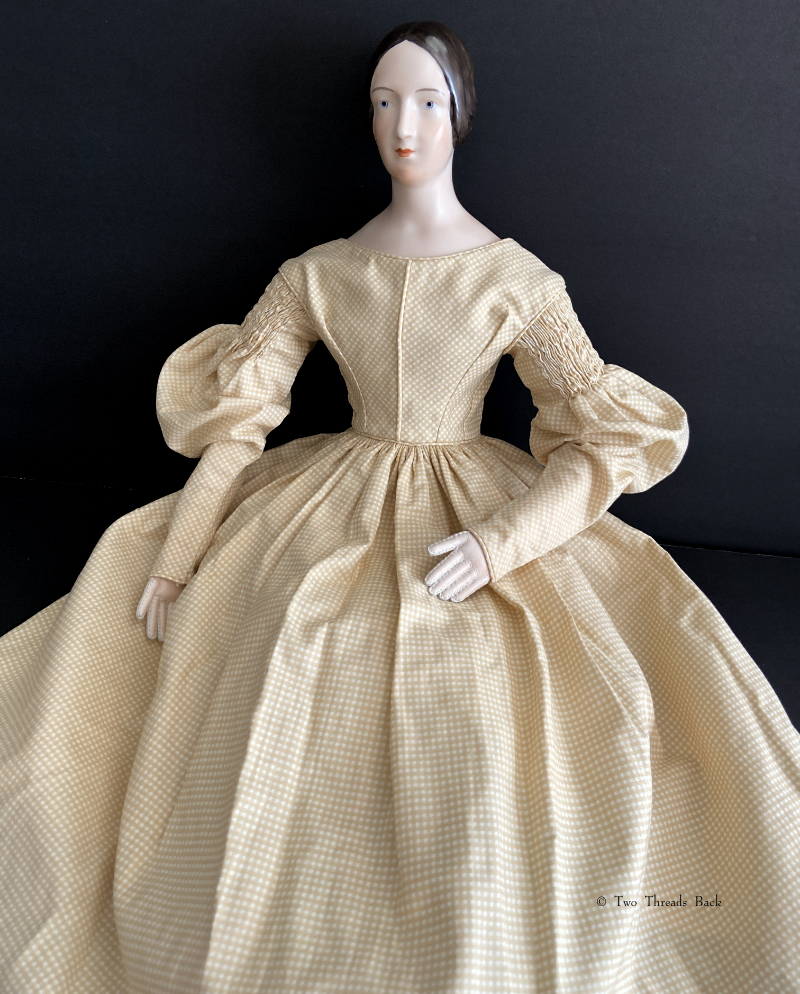
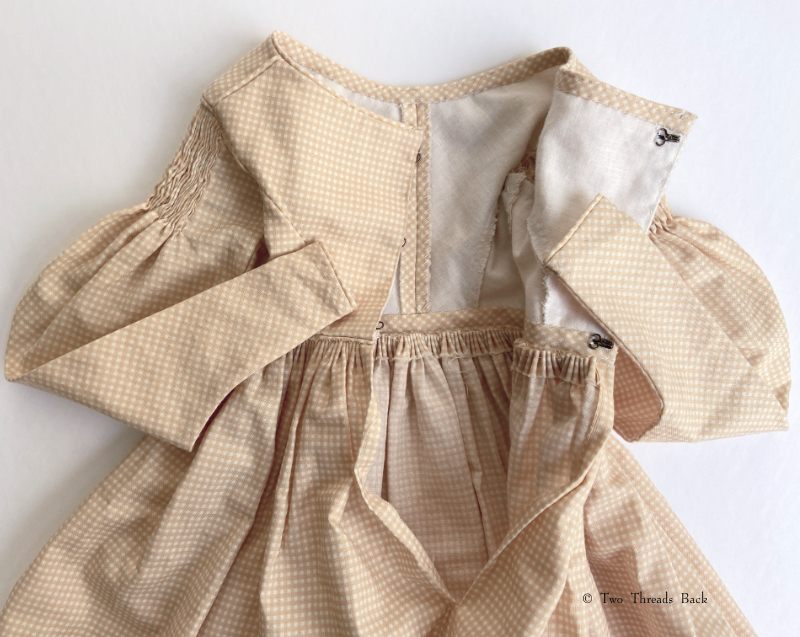
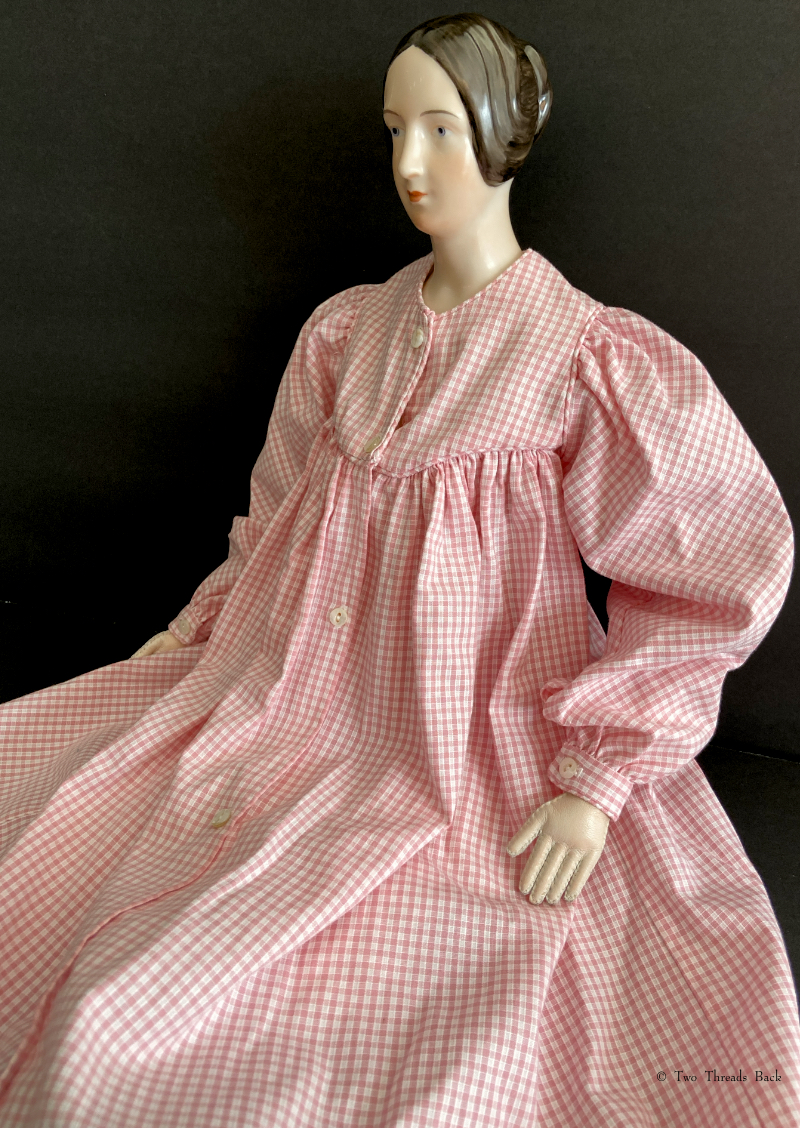
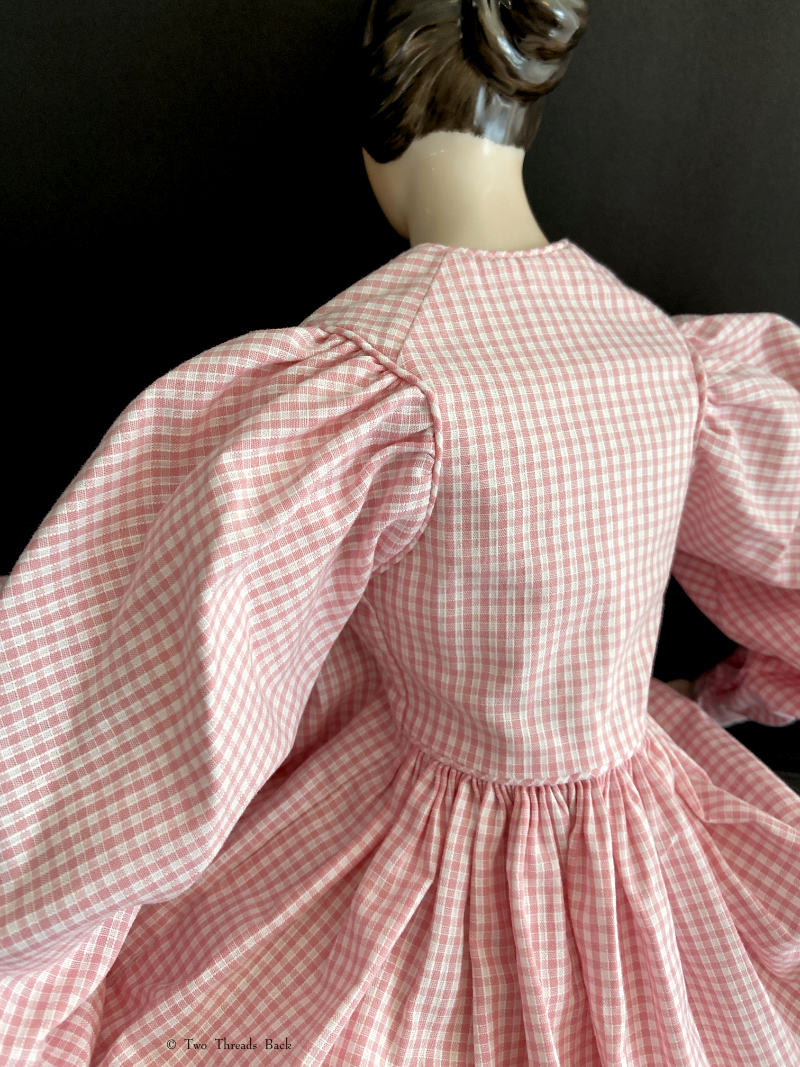
Moving towards 1840s here, with tighter sleeves and long pointy waists, as my lady became a young matron and wanted a more dignified style. And guess what? Scarlett wasn’t the only one who could make a gown out of curtains! I bought this silk years ago for windows. It was the perfect weight for a doll dress. You might say we “just saw it in the window and couldn’t resist!”
Let’s see… what went wrong during construction? First I tried to use some vintage glazed lining that wasn’t up to the job. Too many needle holes and it cracked. Started over. Then realized I’d cut the bodice in a totally modern way. Started over. Then made yards of sleeve trimming which I trashed because it looked awful on the sleeves. Started over.
After all that, the skirt was too easy. Except that I hemmed it first for convenience, then left the wrong edge open for the waistband. Started over. Maybe there’s no such thing as too easy?
This gown was a pleasure to sew because the cotton was so thin, like original calicos and ginghams. The sleeves were cut like the floral dress, then gauged (gathered) to fit close to the arm.
A tippet! Can’t have an 1830s wardrobe without at least one!
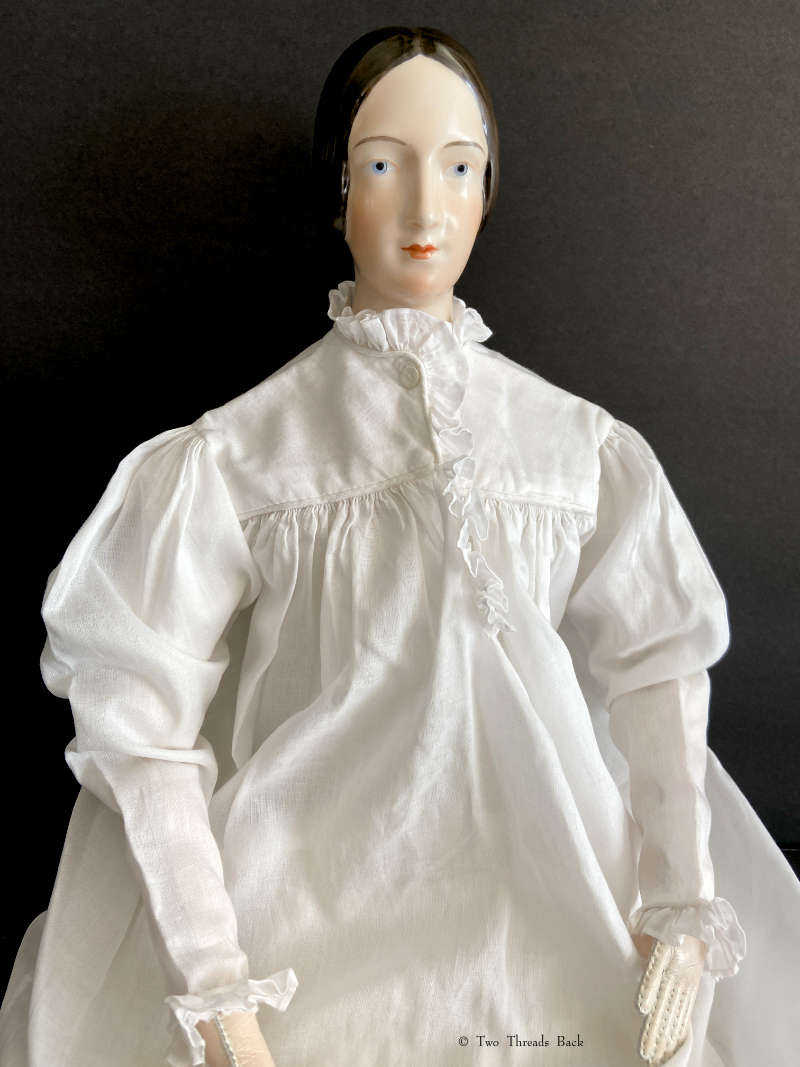
My lady needed a nightdress and I had an unfinished project that was doomed to remain that way. So I used parts of it for her gown. I shouldn’t say what’s inauthentic about it, but I will: the hem shouldn’t have tucks, but it does.
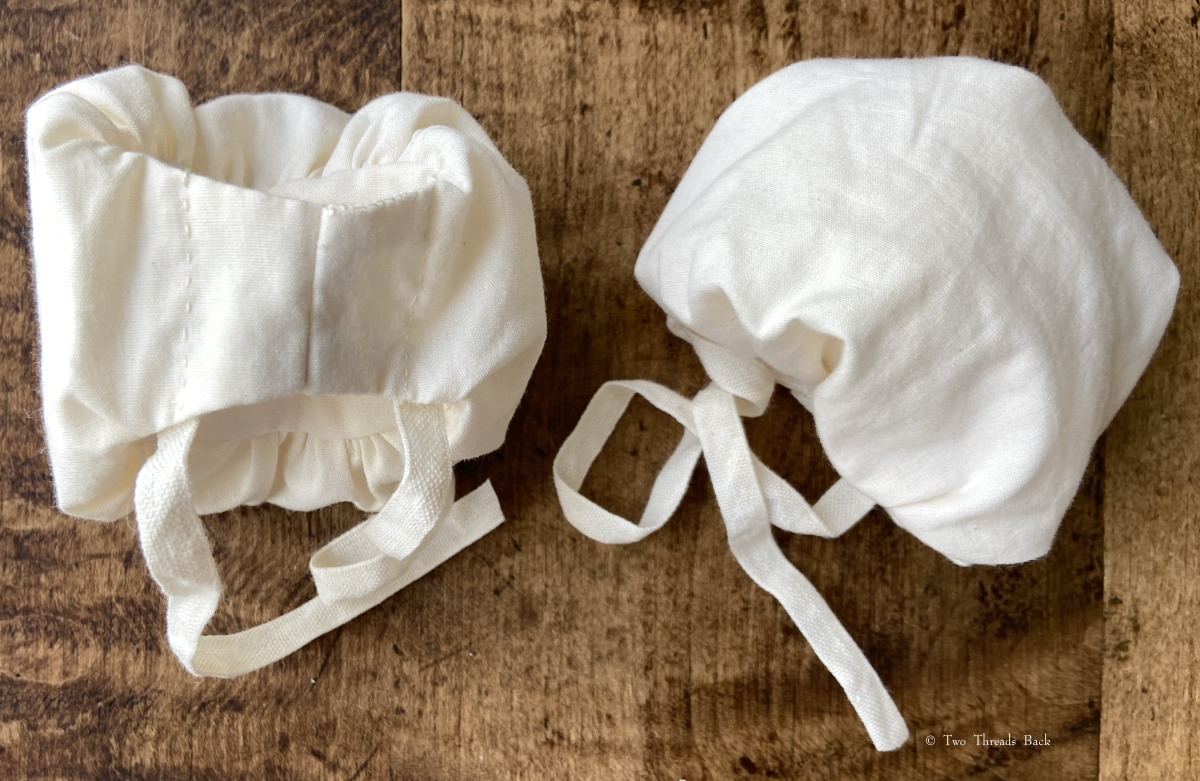
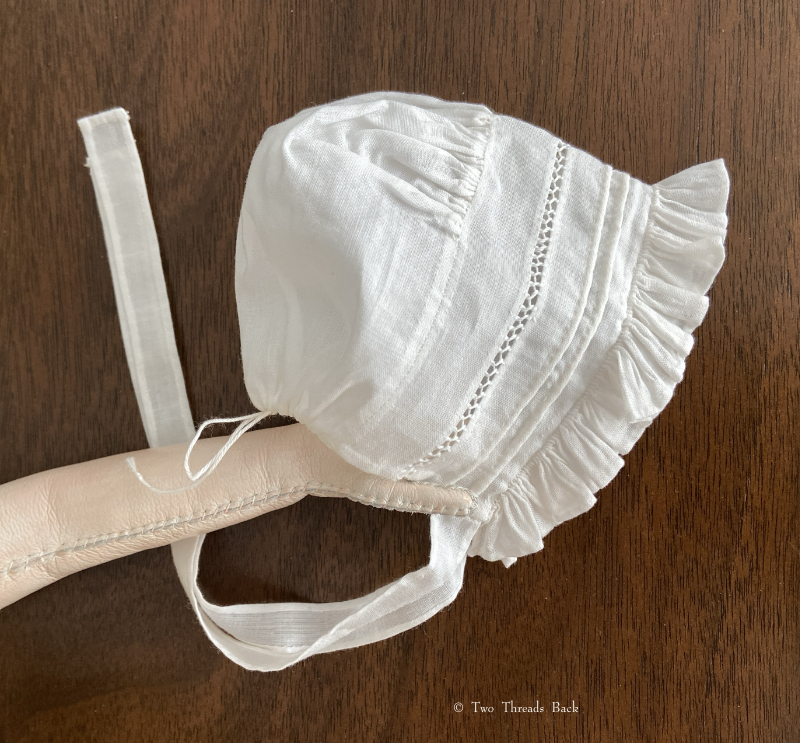
To compensate for taking liberties with the nightgown, I went the extra mile for her night cap and actually sewed the strings (ties) like originals were done, instead of using ribbons. The hems are tinier than they look in the photo, and my vision is now a little worse.
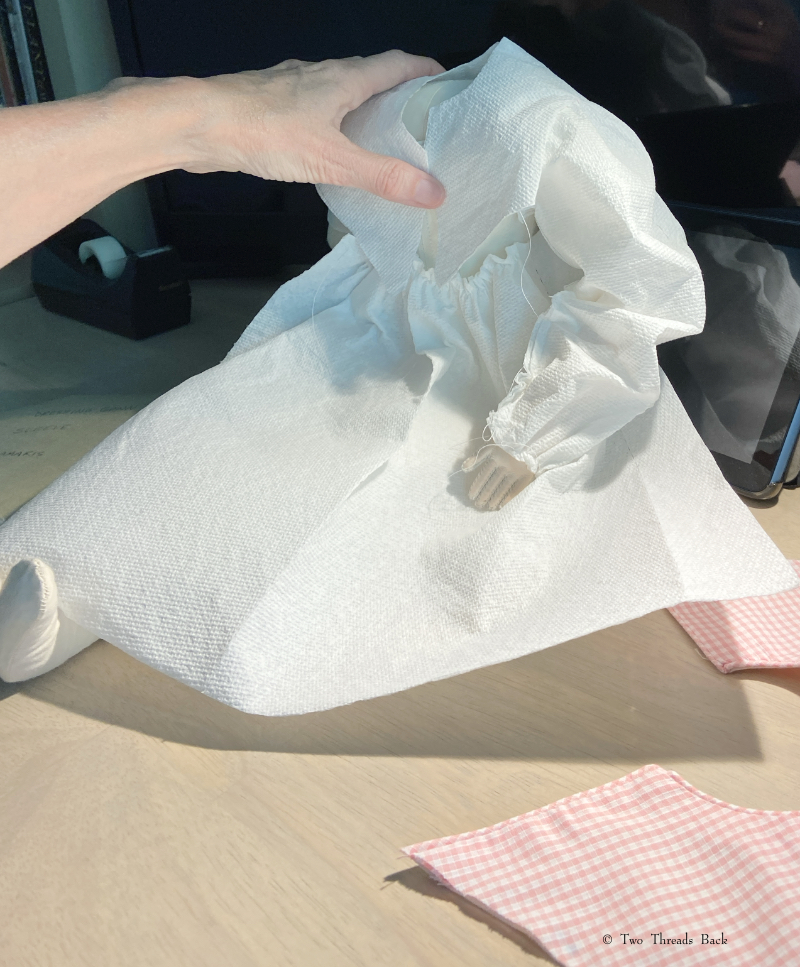
I’ve never watched a horror movie, ever. But making this dressing gown felt like I was living one. I had only a few online images to go by (e.g. Augusta Auctions here). Figuring out how to make the lining fitted in the back and tie around the front and the yoke attach to the front skirt and the sleeves fit it all… I was within an inch of setting fire to days of tortured work. So I put it away for a long time, then got it back out and fought it till I won. NEVER AGAIN. (Photo of me using my patented paper towel pattern method.)
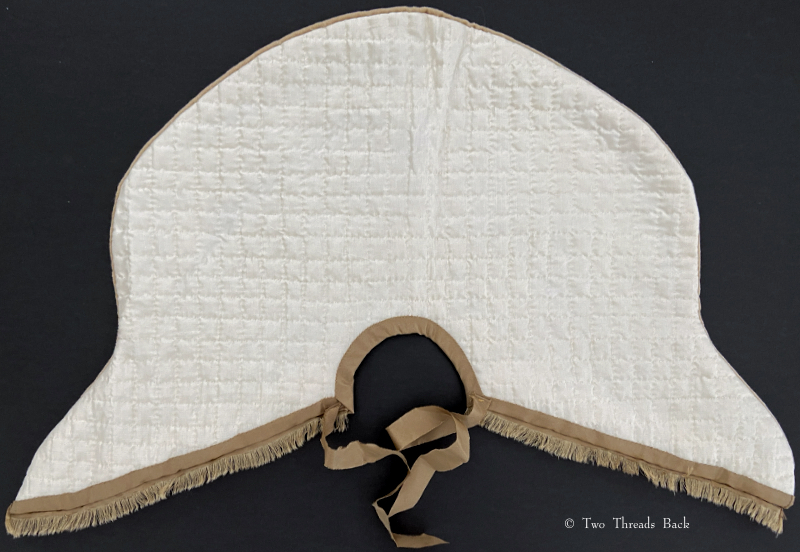
Last of all, a cloak for cold weather. It’s made of a dull gold cotton velveteen, lined with ivory silk which is quilted with wool batting. It’s edged with silk ribbon unraveled into fringe and a curly silk trim.
The quilting took ages and I had to stitch it flat on a table to keep it straight. Some of the lines are crooked anyway.
I really should add another gown or two to her wardrobe, perhaps some more accessories and a bonnet. She’s also missing something else important, and I can’t seem to find the perfect fit. She needs a name! Suggestions welcome – if they show a True Taste. We won’t worry about Correct Principles.
I feel your pain! But I love everything you have shown us (and I am sure I also love the things you haven’t). The cartridge pleats! The piping! The plain sewing and the fancy!
The only similar project I worked on went thankfully (she and I were both thankful) to the gentleman who carved the 18th century style doll for his wife.
I wonder if your lady could be Parthenope (Florence Nightengale’s sister). There is a lovely portrait of the two of them painted in 1836…
!!! Parthenope!!! I’ve never heard that name but I love it. Ok, it’s at the top of the list now. And I remember the carved doll and how much care you took to make that wish come true. ♥️ Thank you for the compliments. The magic of photography lets me get away with a lot, but I did put a lot of work into the clothes and overall I’m pleased.
So lovely. I volunteer in a historic state park. Our main period is the mid-19th century, but I’ve also looked at clothing in the 1830s and 1840s. What a wonderful job you did in making miniature copies of clothing from that period. Thank you so much for sharing. Patt Seitas
Oh, I envy your volunteer job! That must be so much fun. Thank you for your kind words. My enthusiasm was waning near the end, but I’m hoping it will eventually return. Sometimes all it takes is picture of a beautiful gown to get inspiration again!


I feel your pain! But I love everything you have shown us (and I am sure I also love the things you haven’t). The cartridge pleats! The piping! The plain sewing and the fancy!
The only similar project I worked on went thankfully (she and I were both thankful) to the gentleman who carved the 18th century style doll for his wife.
I wonder if your lady could be Parthenope (Florence Nightengale’s sister). There is a lovely portrait of the two of them painted in 1836…
LikeLike
!!! Parthenope!!! I’ve never heard that name but I love it. Ok, it’s at the top of the list now. And I remember the carved doll and how much care you took to make that wish come true. ♥️ Thank you for the compliments. The magic of photography lets me get away with a lot, but I did put a lot of work into the clothes and overall I’m pleased.
LikeLiked by 1 person
Parthenope and Pharaby sounded like a good combination to me!
LikeLiked by 1 person
So lovely. I volunteer in a historic state park. Our main period is the mid-19th century, but I’ve also looked at clothing in the 1830s and 1840s. What a wonderful job you did in making miniature copies of clothing from that period. Thank you so much for sharing. Patt Seitas
LikeLike
Oh, I envy your volunteer job! That must be so much fun. Thank you for your kind words. My enthusiasm was waning near the end, but I’m hoping it will eventually return. Sometimes all it takes is picture of a beautiful gown to get inspiration again!
LikeLike
You have created a beautiful wardrobe! Love it!
LikeLike
Thank you! It was a labor of love and obstinance!
LikeLike
Wonderful! I love everything about the doll and the 19th century wardrobe is exquisite!!
My vote fot the name goes to Parthenopy. Sounds very 1830’s and seems very appropriate. Well done Kjerstin for having thought of it 🙂
LikeLike
Thank you! And I love the name, too!
LikeLike