Maybe you’ve heard of “l’esprit d’escalier” or “staircase wit.” I hadn’t until recently, even though I’ve suffered from it all my life. It describes that maddening moment when you come up with the perfect, brilliant reply – after it’s too late to be useful. Well, finding the perfect image just a little too late can happen in blogging, too!
It’s been a year since I wrote the last post about sewing aprons. I’d wanted an example to study and to illustrate the post, but in decades of searching and collecting I’d never come across one. Wouldn’t you know, it was only two weeks later that I actually found a real surviving one! It’s obviously not an early nineteenth century apron like I’d really love to find, and I can’t be positive it was used for sewing, but it fits the all the descriptions to a T.
A closer look at the button, the featherstitching, the direction of the hems on the sides, and the “seamed” band.
It’s a charming white dimity with pink featherstitching and a waistband that buttons. Late 1800s, early 1900s perhaps? It looks like it could have been made in school, rather than at home. I say that because the stitches seem to be textbook-style hand sewing: precise (if not dainty) hemming, seaming, setting-in, and buttons, combined in a class-projecty sort of way. And a couple of tiny ink spots near the bottom!
Seeing an example close up did answer the hemming question for me: did they fold the side hems face up or face down before turning up the bottom for the pockets? Or did they do a little snip on the edge so that each hem could be folded to the back, the way I did for the doll’s apron? Answer: face up. For this one, anyway. The nice deep pockets are then seamed together so that the folded hems are inside.
I hope the maker was happy with her little apron. I suspect she treasured it since it’s survived all these years. Maybe it proved useful for holding her sewing things while she was climbing stairs – and she had the wit to appreciate it!
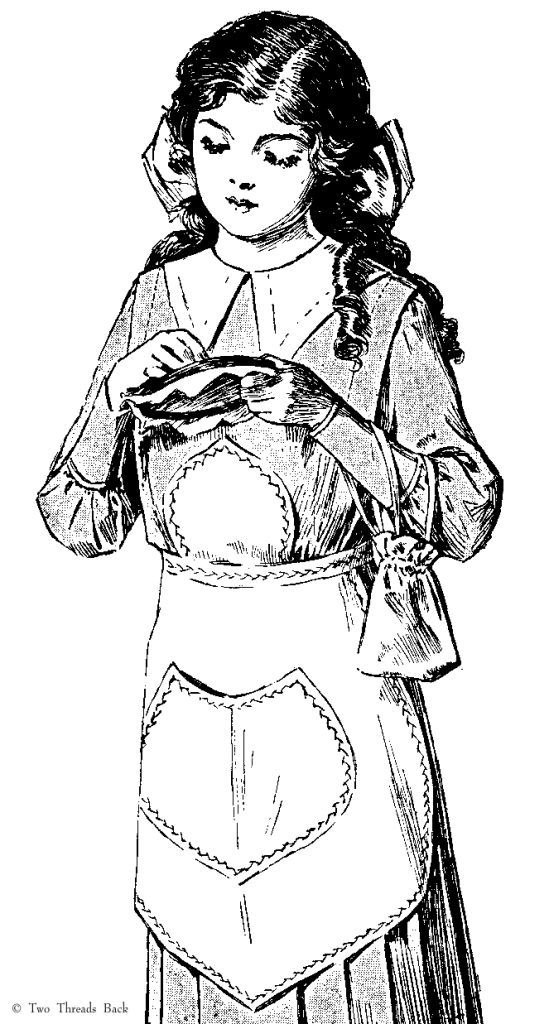
I don’t remember where I first came across the term “lap-bag.” It was used in the infuriatingly casual way that long-dead authors have of assuming we know what they’re talking about, and I didn’t give it much thought. But when I recently came across the illustration below, c.1860, my reaction was – in the words of my 4-year-old grandson – “what is the heck of that?”
Of course I pursued the elusive lap-bag, only to discover it wasn’t so peculiar after all. It has a respectable history, especially if you consider it’s only a variation on a very useful, very humble, and very common garment. I think this young emigrant to Australia summed it up perfectly in 1850:
The ladies gave me a nice piece of print to make a lap-bag, which will be very handy on board ship, as it ties round the waist, and has little pockets to hold one’s thimble and scissors.
It’s simply a type of pocketed apron that was used for keeping sewing items handy, something especially helpful for girls’ sewing classes. The pinafore was another variation, recommended as early as the 1810s for plain needlework lessons, both in England and America.
Each girl should be provided with a pin-afore, or slip … taken in at the conclusion of school time…. The pin-afores are marked 1, 2, 3, &c. up to the number of girls that the desk contains: the number of the desk is also marked upon them, thus – 5/3, which would signify that the pin-afore belongs to the 5th girl in the third desk.
In 1858, when Alice Neal penned her reminiscences of Eliza Leslie for Godey’s Lady’s Book, she remembered her own school days.
As long ago as sewing was made a special branch of female education – and we leave our readers to infer the date [she was born in 1828] – the Wednesday afternoons at the school which I attended in Boston were enlivened by reading aloud. The circle of little people, with their pink and blue chintz “lap-bags,” a style of sewing receptacle entirely unique, stitched away on their sheets and patchwork, while the older girls read in turn.
A children’s story from 1871 tells how “The girls all had to be provided with lap-bags, worn like aprons, with the ends brought up and stitched together. These were to keep the work from getting soiled, and hold the thimble, cotton, needles, scissors, etc.” School inventories included lap-bags, and one teacher explained,
These little lap-bags,” remarked the teacher, are the very first articles I teach the children in the Primary class to make; and they use them through all the grades until they graduate from the cutting department. Each bag is labelled, and at the close of the sewing hour the work is neatly rolled up, put inside, then collected in these large baskets.
Some later sources called them sewing aprons, but these matched the description as being aprons “made of extra length to allow the turning up of a quarter yard or so for a pocket.” After reading all about these receptacles, I decided to attempt my own. It’s quicker and cheaper to make things in miniature, so doll size it would be!
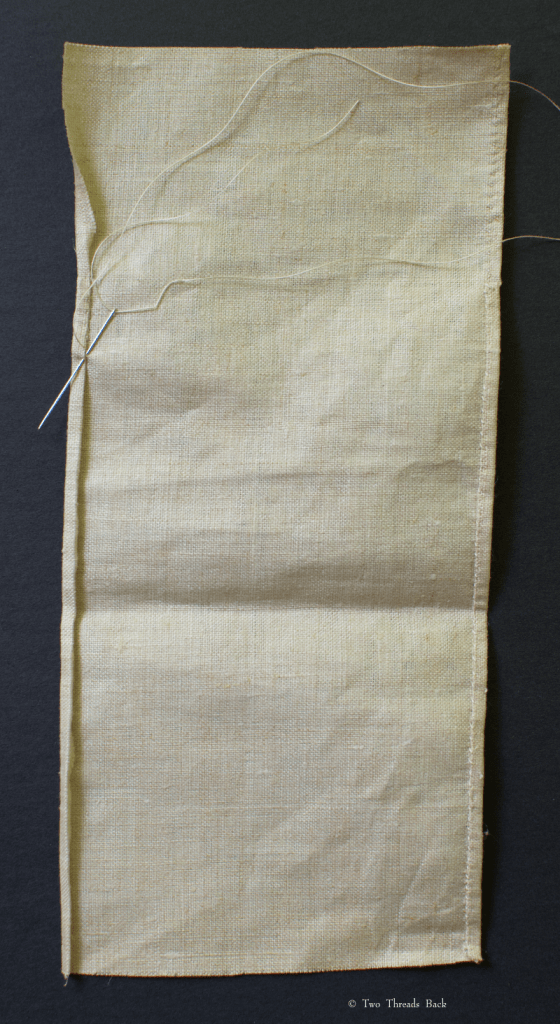
But what to use? I found references to brown holland (unbleached linen), calico prints, Scotch gingham (a better quality gingham), and pink and blue chintz. My obsession with charity sewing schools inclined me toward the brown holland, since that was the utility fabric they suggested. I just happily happened to have a bit of it with the original glaze (a glossy sizing) remaining, so the next step was to make sense of the directions that accompanied the illustration. Simple. For most people.
A pattern to scale. Yes, including the gusset.
Oops. I had actually started hemming one side before it dawned on me that either the pocket or the apron would be hemmed the wrong side out. Snip and flip to the rescue!
Time to insert the gusset. Yes, the pattern was to scale. Apparently the finished gusset had a growing spell.
Next came the marking. As much as I wanted to follow advice and place the numbers where they’d show when the work was folded, I couldn’t make it work. But my doll will still take her place as the “fifth girl in the third row.”
I also made the “pincushion of white calico with a cover of coloured print to which the tape is sewn, so that the pincushion being taken out, the cover may be washed with the bag.” In theory.
A lap-bag ready for work.
Trust writers of the era to impart moral virtue into anything that would hold it. I don’t mind, at least not when they’re praising hand sewing.
If it is best to train the child along aesthetic lines in any phase of art, then let him be trained to appreciate and prefer a piece of true art in needle-work, even plain sewing, over a wholesale manufactured article which may be bought at cheap rates.
Let me illustrate by a school girl’s sewing apron, neatly though plainly made, hand-sewed by herself, and appreciated because she wove into its very stitches her own power and love of doing a thing for herself, and, too, having done it the best she could, over a very elaborate one selected from a whole boxful in a store marked “your choice for 10c.”
As aesthetic development and culture help to make a person a better person, so sewing can be made to help a girl to become a better girl and a more powerful and valuable woman to society.
Why not turn up your nose at that 10¢ store-bought apron, make your own, and become a powerful woman! You’ll be glad you did.
Gertrude. “My dear Jessie, what on earth is that Bicycle Suit for?”
Jessie. “Why, to wear, of course.”
Gertrude. “But you haven’t got a Bicycle!”
Jessie. “No: but I’ve got a Sewing Machine!”
Reading old magazines. Really old. It’s what happens when you’ve been stuck at home too long.
VIRTUE UNREWARDED
Melissa Melinda McCann
Projected a laudable plan
To reform woman’s dress
On a standard no less
Than the models affected by man.
She invented remarkable ways
Of belaying her garments, and praise
Was distinctly her due,
For the neighbours she threw
Into constant and breathless amaze.
Unmindful how some might deride,
She determined her skirt to divide;
No change was too radical—
Transient—nomadical—
Each idea new should be tried.
All draping she wholly abhorred—
Her vials of wrath she outpoured
Upon tailors and dress-makers
Calling them mess-makers,
Banded in fiendish accord.
Point de Venise was as bad—
Never a trimming she had;
For her no chimerical,
Cheap, millinerical, Passementerical fad.
And so she elected to go
Unadorned from her crown to her toe;
A strong common sensible—
Quite indefensible
Funny old feminine crow!
These were the thanks that she got;
From naughty newspapers, hot shot;
From her friends, levity—
Hints of longevity—
Tragical, quite, was it not?
To have to sew your own punishment! Although I suppose to some people sewing is punishment.
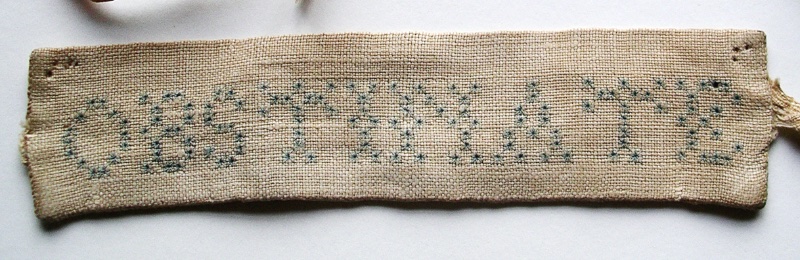
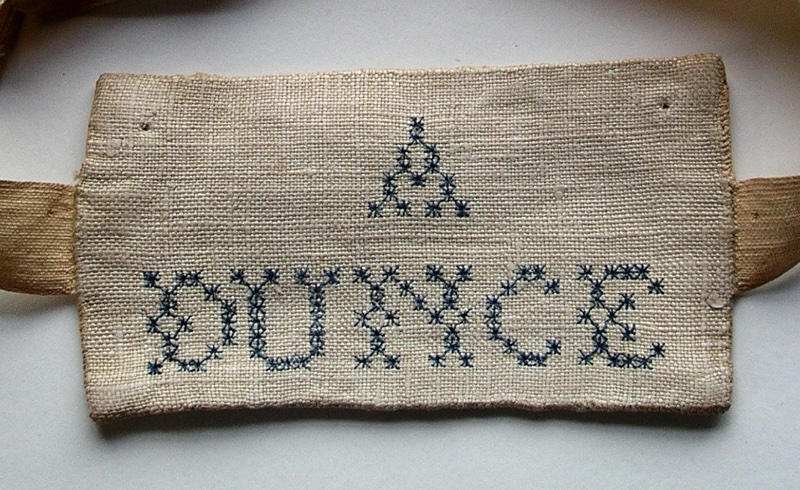
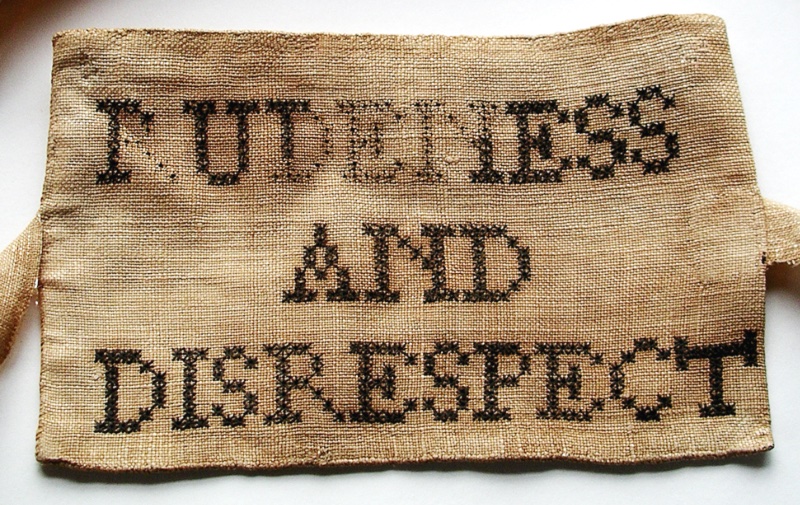
Above is my attempt at making a 19th century punishment badge. These were meant to be worn around the head of a schoolchild who was guilty of the named crime, probably made by another pupil. I copied the lettering exactly and have to confess I was torn between the pathos and humor. Inattention?
Mea culpa. Courtesy Christ’s Hospital
Public humiliation as a form of discipline is as old as history, but it takes on a particular poignancy when you think of little children wearing a label proclaiming their crime, for all their small world to see.
Remember Jane Eyre?
On reaching the bedroom, we heard the voice of Miss Scatcherd: she was examining drawers; she had just pulled out Helen Burns’s, and when we entered Helen was greeted with a sharp reprimand, and told that to-morrow she should have half-a-dozen of untidily folded articles pinned to her shoulder.
“My things were indeed in shameful disorder,” murmured Helen to me, in a low voice: “I intended to have arranged them, but I forgot.”
Next morning, Miss Scatcherd wrote in conspicuous characters on a piece of pasteboard the word “Slattern,” and bound it like a phylactery round Helen’s large, mild, intelligent, and benign-looking forehead. She wore it till evening, patient, unresentful, regarding it as a deserved punishment. The moment Miss Scatcherd withdrew after afternoon school, I ran to Helen, tore it off, and thrust it into the fire: the fury of which she was incapable had been burning in my soul all day, and tears, hot and large, had continually been scalding my cheek; for the spectacle of her sad resignation gave me an intolerable pain at the heart.
Helen wore a paper sign, but it seems some children were made to spell out the crimes by stitching their own badges. The next excerpt is from The Sunday School Teacher’s Magazine and Journal of Education, 1855. The author recalled attending a free school as a small girl. It was taught by Miss Middleton, a lady of independent means who had devoted her life, rather ineffectually it seems, to good works.
Our governess considered it needful to govern by at least a mixture of severity with kindness. Her modes of punishment were various. A rather formidable one was binding a label with a specific crime marked upon it around the forehead, and placing the culprit on a form as an object for the deliberate gaze of the whole school. Most likely these expressive tokens of guilt were originally manufactured by the children’s own hands, and remind one of a murderer erecting his own gibbet.
Once a long row of delinquents was ranged on a form, who had committed some kind of treason during our mistress’s absence; and absent she frequently was from her post. We had then a scholar who was notorious for her unconquerable love of fun… She being amongst the mounted ones, contrived to overbalance the form, and bring all to the ground, producing a scene which very naturally excited the mirth of all who beheld it, and turned our punishment into a frolic.
That must have been a sight! I wonder if they were all wearing their labels when they tumbled to the floor? The author goes on to describe what happened when she was falsely accused of tearing a pinafore and made to “wear her crime.”
Photo Courtesy Christ’s Hospital
But the question with my governess was, ” Who rent [tore] the pinafore?” Somebody must have; though having been perpetrated in the dark, it was probably rather difficult to determine the author. Now I was one of the least, and therefore as likely to be guilty as any one. I suppose by this reasoning Ann brought her mind to the conviction that I was the guilty party, and she unhesitatingly accused me of the crime. I very naturally denied the charge. But I was compelled to wear the most detestable of all the bandages, and mount the form with the word LIAR branded on my brow. Can I ever forget that moment? No! the scar of that wound will not be effaced by time, however long a space be allotted me; and though I have long ceased to bear malice, the memory of this painful circumstance will be for ever connected with the name of Ann W. Surely nothing chafes the soul of a child so much as an unjust accusation, and unmerited punishment. – Maidstone. Christiana Elizabeth.
If you’ve read the Plain Needlework page on this blog, you know about Joseph Lancaster’s contribution to needlework education. However, some of his early comments on class discipline are rather hard to take – at least for modern sensibilities, even when allowing for the times in which he wrote. He also used labels to shame children who offended. From his 1807 manual,
When a boy is disobedient to his parents, profane in his language, or has committed any offence against morality, or is remarkable for slovenliness, it is usual for him to be dressed up with labels, describing his offence, and a tin or paper Crown on his head. In that manner he walks round the school, two boys preceding him, and proclaiming his fault; varying the proclamation according to the different offences.
And another reference,
Labels of Disgrace. When boys are in habits of talking, or being idle in school time, it is common in the free schools under my direction, as variety in punishment, to make an offender stand up and suck his fingers, with the label ‘Idle’ or ‘noisy’ or ‘suck-finger baby.”
Courtesy Christ’s Hospital
These methods were mild compared to others he recommended. Although to be fair, I can’t imagine the task of managing – much less teaching – a single class of over a hundred unruly street children.
What sort of offenses warranted this fate? Thanks to generous help from Christ’s Hospital, Horsham, we can see some of the unacceptable behaviors marked on bands from their museum collection.
“Punishments for moral offences, which consist in branding the offender as a thief, a liar, or some other odious appellation, by making him wear a label with any such inscription round his neck, should be indignantly repudiated by the teacher,” -1872 Handbook on the Teaching and Management of Elementary Schools. Photo Courtesy Christ’s Hospital
1866 Report, “There are, it seems, teachers in Boston who do not make much use of the rod, but resort to other modes of punishment which are quite as objectionable, such as shutting up children in closets — though absolutely forbidden, plastering up their mouths — unusual if not cruel, decorating their heads with the dunce’s cap, or placing upon them some badge of disgrace.” Photo Courtesy Christ’s Hospital
Note how the ties are attached differently in this one. Perhaps it was meant to be worn around the neck. A Sunday School Guide from 1806 states, “The standing on a stool, or form, in a corner, for a certain time, and in some cases with a label hung round their neck, specifying why they stand there… may be tried before the extremity of expulsion be used.” Photo Courtesy Christ’s Hospital
From The Christian Observer, 1805: “If the child asks pardon and behaves properly, she is soon restored to her place; if not, she passes to the form entitled Disobedience; and for immoral offences they are sent to the form of Disgrace, with a label, declaring the offence, fastened to them.” Photo Courtesy Christ’s Hospital
This one is hemmed rather than backed, and has what is likely the class or form marked on the side. Photo Courtesy Christ’s Hospital
I’m probably guilty of all, but the one that caught my attention was INATTENTIOn. That had my name written all over it (ha) so that’s the one I wanted to make. Although from respect – and exhaustion – I left out ‘DURING PRAYERS.’
The bands reminded me of the tiny sewing samples made for needlework lessons, illustrating plain sewing techniques.
Tiny marking sampler from teaching manual, 1833.
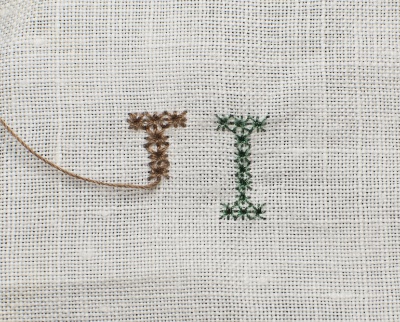
The first one needed was marking. Cross-stitch is the basic marking stitch, but these are marked with “oylet” or “eye-let-hole” stitch, which is
quite a fancy stitch, and rarely employed. The oylet holes are formed by working in small stitches round each square, about four stitches in the four corners, and four intermediate stitches between, are necessary to form each oylet hole. -Workwoman’s Guide, 1838
or as directed here, in 1853:
Eye-let-hole Marking is done by making a stitch across two threads from the centre as a fixed point, above, below, on each side, and at each of the four angles.
Well OK, no problem, I could do that. Or so I thought until I tried it on a scrap of old linen. Enter 5 diopter magnification with 60 little LEDs, and voila! Of course my eyes were crossed and my head tilted sideways for a week.
I hadn’t even done the first letter before I realized that the stitches that resembled little stars on the original looked like lumpy knots on mine. Even worse at reading distance than in the close-up photo. Hint: use the right thread. Finer silk worked much better. I also learned that it takes twice as long to unpick an “oy-let” as it does to stitch it!
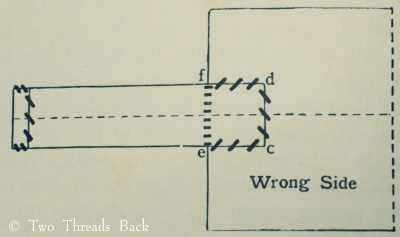
Finishing the badge was a little easier. I folded the linen back onto itself, and then “seamed” the other three sides. Seaming (also called sewing, oversewing, overhanding in the 19th century) is my favorite stitch to do, and you can see a beautiful example of it around the edges of this tiny specimen from 1820.
The label needed ties, too. I’m amazed that nineteenth century classes even included a “proper” way to do something as simple as sewing on ties or tapes. In the illustration below, the tape has the raw end tucked under and three sides are hemmed to the fabric. Then the tape is folded back against the fabric and the fourth edge is seamed to the fabric. Neat, sturdy, and strong as super glue. Well, theirs were anyway.
I don’t have a purpose for the band I made; I’m not even sure why I felt compelled to make one. Perhaps it was just a way to almost touch the past. It would be a shame to lose its lessons.
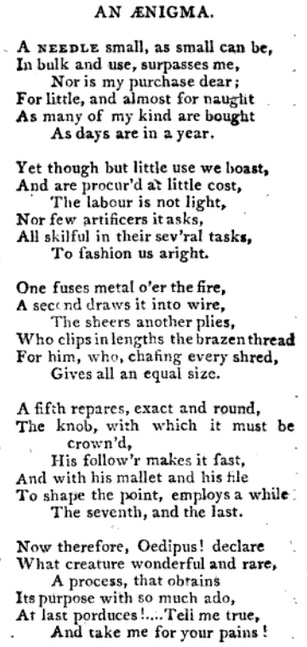
If you have a nose for rabbit trails, even the simplest search can make you lose your way – if not your head! I was trying to pinpoint a date for the common use of machine-made pins, but ended up following the trail from factories to inventories to short stories. The stories were the most fun, and I thought I’d share this (edited for length!) one.
THE HISTORY OF A PIN. (The Portland Transcript, 1863)
BY EDWARD P. WILSON.
“Est natura hominum novitalis avida.” [People crave new stuff.]
While walking down the street other day, something bright, embedded in the dirt between the bricks, attracted my attention; and stooping I extracted from the sand an old headless pin. It was not one of the family of pins with which we are now familiar – pins never lose their heads now a days – but one of the old style, whose head was originally formed of fine coiled brass wire; but now it was headless, crooked, rusty and worn: one of those sort of pins which in my school-boy days we were wont to call “old maids’ pins,” and which every single lady felt in duty bound, on the penalty of endless celibacy, to throw over her left shoulder.
As I sat in my arm-chair after dinner enjoying my cigar, I drew it leisurely from the lapel of my coat – a bachelor’s invariable pin cushion – and examined it more minutely. What would I give to hear the history of this old pin!
As I continued to smoke, the pin seemed to grow strangely bright, as seen through the incense which curled around me; and then it seemed to increase in size until it resembled some old, sallow man, whose back was bent by the cares and sorrows of three-score years, who stood twinkling at me through the smoky vapor; and at length I became so accustomed to regard it as human, that I was not surprised when it addressed me as follows:
“Many years have passed away since I was young and bright. I remember the day, when by a clip of a huge pair of shears, I first received a distinctive existence. Pins were worth something in those days, and were not turned out upon the world by machinery, as they are now in Connecticut, at the rate of ten tons per week. We were all made elaborately by hand, going through fourteen different processes in our construction. It was in the old Greenwich Prison, New York, where the first pins were made on this continent. We were all nicely arranged by hand in our papers, like files of soldiers. Fortunately for me, I occupied the position of captain in the first row of my paper, and stood the best chance of being soonest called into the active duties of life. After being duly packed, we were removed to a little store on Broadway, near Castle Garden. I well remember the looks of my first master. He was a little wizen-faced man, who kept a small variety store in those days.
Many long months I laid upon his dark shelves, fearing that I should spend my days in rest and inaction. But at length my days of imprisonment were over. One day a young woman came into my master’s store and made several small purchases of ribbon and edging, and just as she had started to go out, she turned back and asked for a paper of pins. How I thrilled with joy as my master placed the paper in which I had been so long imprisoned in her hand.
My young mistress took me to her home on one of the short streets in the vicinity of the East River. I had scarcely entered the house, which was a neat tenement of the Dutch style, before I became convinced that preparations were being made for some great event in the household. Judge of my surprise when I ascertained by the gossip of the servants that it was the marriage of my young mistress.
All day the household was in commotion, in baking, dusting, and arranging for the happy occasion; and when in the evening my mistress came to her room where I had been lying upon her dressing table, to put on her wedding dress, I was made happy by being called into service. Having otherwise completed her attire, which was elaborate for those days, although it might provoke the mirth of the fashionable belle of the present day, she took from her drawer a beautiful silk zone or belt, which she clasped around her waist, and fastened it with me.
As she stood before her glass to adjust her dress before making her appearance in the drawing room below, I could not help feeling a silent pride in her beauty. I had not thought her pretty when I had first seen her, but as she stood there, I could not but pronounce her beautiful. When the guests had all retired, and my master and mistress were left alone, I listened, as I stuck in a pin-cushion upon her dressing-table, to all their plans of life and happiness.
It was indeed a bright and beautiful scheme; but I am sorry to say that I lived to see many of their pretty plans fade away, and smiles give place to tears. I remained in this family nearly twenty years, occupying various places in the attire of the different members of the family; sometimes idly dropped upon the floor, and then again picked up to fasten some article of clothing.
When at length there were little ones around the hearth, I fastened their tiny garments, and sometimes, unwillingly, scratched their little chubby bodies [!!!], causing many a kick and scream, which were attributed either to colic or anger, according to the disposition of the person who had them in keeping.
One day as their eldest daughter was out shopping, I fell noiselessly from the bosom of her dress, where I had been carelessly stuck, upon the sidewalk of Broadway. It may be thought that a pin is incapable of feeling, but I felt the deepest regret when by this unlucky accident, I was severed from this family in whose service I had spent so many days; and I could not but feel a silent resentment against my mistress for fastening me so carelessly, as I had been a faithful and uncomplaining servant of hers from the very day of her birth.
I remained many weary days lying upon the sidewalk unseen, although thousands of people walked over me daily; and I sadly feared that I should be trodden into the dirt, and thus remain entombed the remainder of my days. But my fears proved groundless.
One day, after I had almost given up hope of being discovered, a little, short, dried up old man came along with his eyes upon the sidewalk, as though in search of pins, and deliberately picked me up and placed me in the lapel of his rusty coat.
I soon discovered that my new master was an old bachelor, of most eccentric manners and mode of living, who lodged in an attic on the Bowery. Once I heard him say mournfully, that he should not have been there alone, aimless in life, if it had not been for her, from which I inferred that some unhappy attachment in early life had made him misanthropic.
I remained in his service many years, sometimes fastening ugly rents in his garments; and at length he removed to Boston, where he naturally enough became more morose than ever. [!!!]
One day as he was walking upon the Common, he attempted to fasten his collar, which had an ugly habit of creeping up over his ears, when he pricked his finger with me, and threw me spitefully upon the ground, where I remained about one week.
One day a little girl on her way to school, came along and picked me up, repeating to herself the childish couplet—
‘Tis a sin to steal a pin But ‘tis a greater to steal a tater
and took me to her home where I remained several years, being used principally to fasten the clothing of her doll.
One day in summer, her brother was sent off on a vacation to a little town in the State of Maine, and I was brought into requisition to fasten his collar. I remained in his service but a few weeks, but this was the most trying period of my life. Sometimes I soared to enormous heights in the tail of his kite, sometimes I was used to pierce flies and other innocent insects, and at length he used me to fish for minnows in a beautiful bay which indents the town where he was stopping.
There I received that ugly bend which you see in my back, being bent to resemble a fish-hook. After he had thus cruelly treated me, my young master threw me carelessly upon the beach, with a piece of cotton thread which he had used as a fishing line, tied around my throat. Here I lay in the sun many long days, and as the place was not frequented, I well-nigh despaired of ever attracting the attention of any living being. But I was not doomed to spend the remainder of my days in inactivity.
One moonlight night in autumn, a lady and gentleman came upon the beach to court the cool breeze, engaged in earnest conversation, over the sand where I was lying. The lady was young and pretty, and dressed in weeds which betokened widowhood. Her drapery was long and flowing, and at length as she passed over me, I, being bent, caught in some point-lace on her skirt, and was taken along with her. Her companion was a large, well-formed man, whom she called Judge Jones.
They walked together a long time, arm in arm, but at length the Judge, very much to my surprise, withdrew his arm, and placed it around the widow’s waist, who very properly remonstrated against such a proceeding; but I observed that she made no effort to remove it, although she stated very emphatically that it should not remain there. Just then the couple approached a large rock embedded in the sand, and the widow complaining of being fatigued, they sat down there to rest.
Here the Judge not only retained his arm in the position which was so offensive to his companion, but even ventured to kiss her, an impropriety which I cannot but condemn, although I must confess that I have been an unwilling spectator to many such a scene.
At this moment his companion grew very indignant, shedding tears and declaring that she was certain that the Judge meant to offend her, which imputation he very warmly denied, although I observed that he repeated the offense.
At this, my mistress grew still more indignant, and dropping her head upon her companion’s shoulder, emphatically demanded the meaning of such conduct. Here the Judge drew her still more closely to him, and said in a subdued and tremulous voice, “My dear madame I have long wished for an opportunity to tell you that — ”
Here the writer’s head fell heavily upon an adjoining table, and gathering himself up he found that his cigar had gone out, and that he himself had been idly napping, with the old rusty pin between his fingers.
It has ever since been a question of great interest to him, what it really was that the Judge was going to tell to his companion, and how the old pin lost its head—and finally came to be lying in the streets of Cambridge, but he has vainly striven to solve them, as the old pin has ever since maintained a most unbroken silence.
Should these facts ever come to the knowledge of the writer, however, they will be duly chronicled in the columns of the Transcript.
What an original idea: a story written by a pin! Well … not exactly. See this snippet from an 1835 English composition manual on suggested topics.
“A list of subjects for Themes, simple and complex, Essays, Descriptions, Narrations, &c.”
As for pinning down a date for the common use of machine-made pins, there is good information out there – if you want to stick to the subject and not wander around. Here is a good place to start for a more serious approach.
John Howe’s patented pin making machine. Smithsonian Institution, NMAH-JN2015-5114, Jaclyn Nash
So when might I have found machine-made pins in a sewing basket or on a dressing table? It seems that by the late 1830s technology and economics combined to phase out skilled labor in favor of automation. Pins were no longer likely to lose their heads. And if I could just stay focused, I might not either. But where’s the fun in that?
Posthumous Cowper, from “The Literary Magazine, and American Register,” 1803
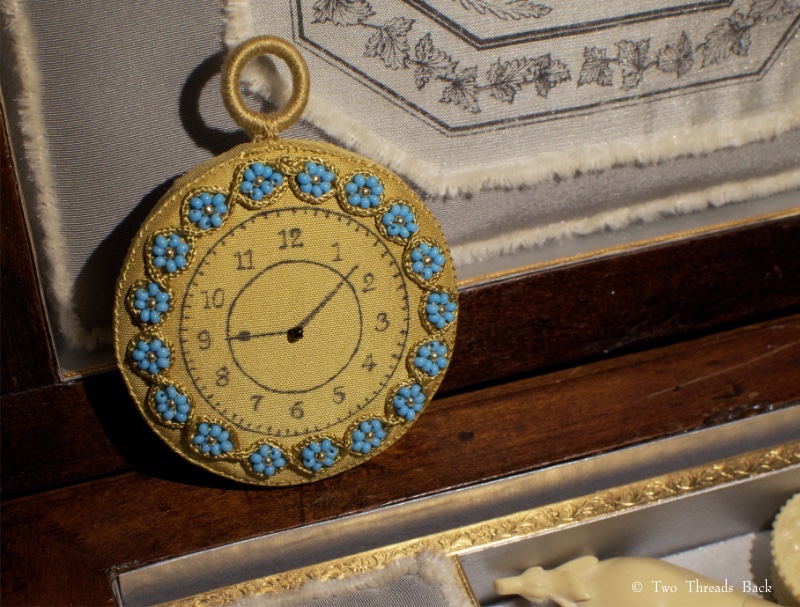
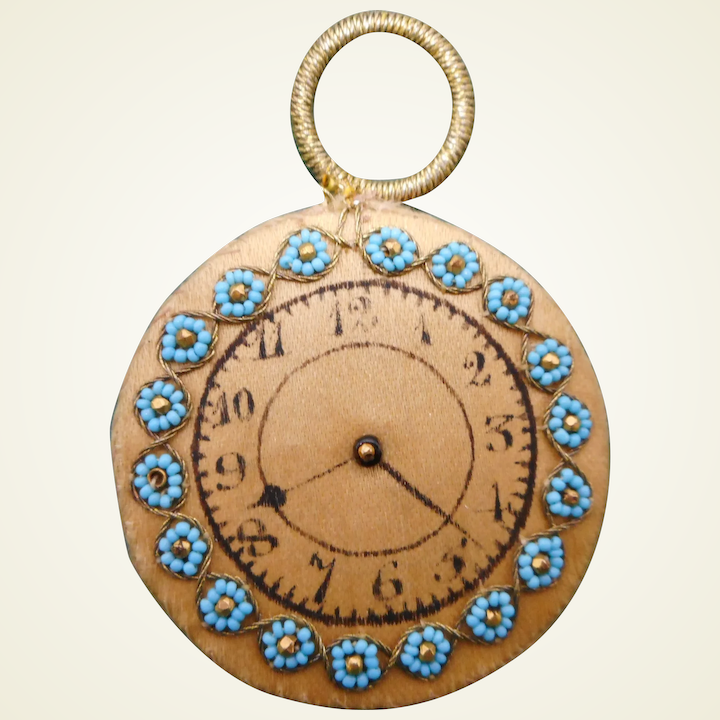
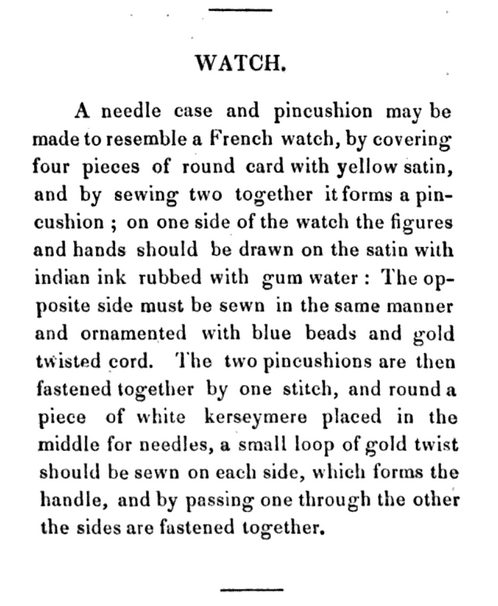
Tiny pin cushions have a special charm, particularly the disk shape, with pins inserted around the perimeter. I always considered it an impractical design though, for sewing. Then one day I came across Mrs. Child’s comment in The Girl’s Own Book (1833) and my dim light bulb clicked on:
What are called “bachelor’s pin-cushions” are made very thin so that gentlemen can carry them in their pockets…. Two round pieces of paste-board are covered with silk, and neatly sewed together, with one or two thin pieces of flannel between them. Of course only one circle of pins can be put in.
Well, of course! They were meant to be portable and keep pins securely tucked away, likely for use in one’s toilette, and not necessarily handy for needlework.
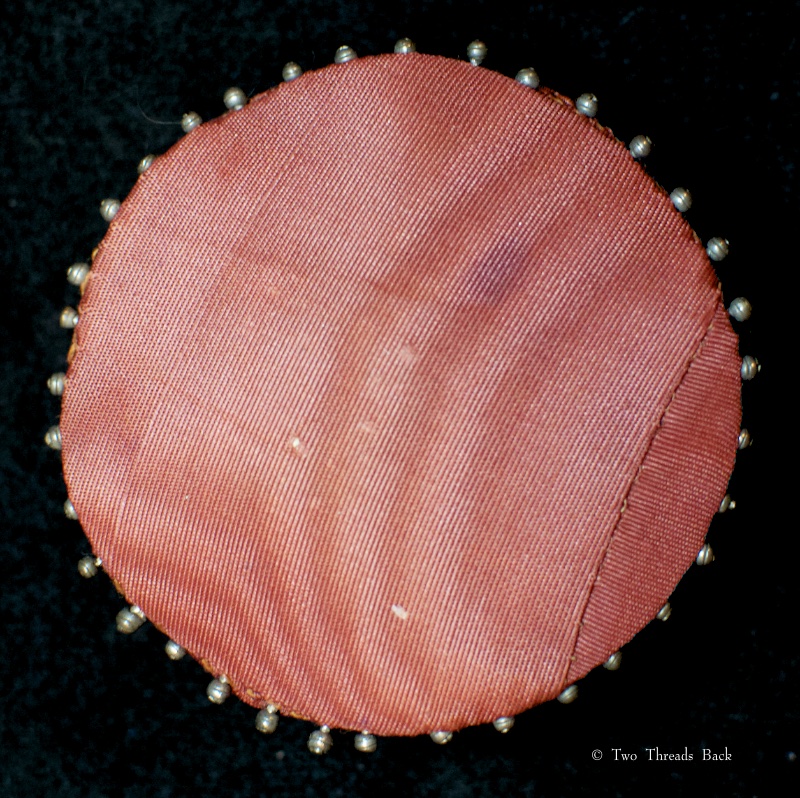
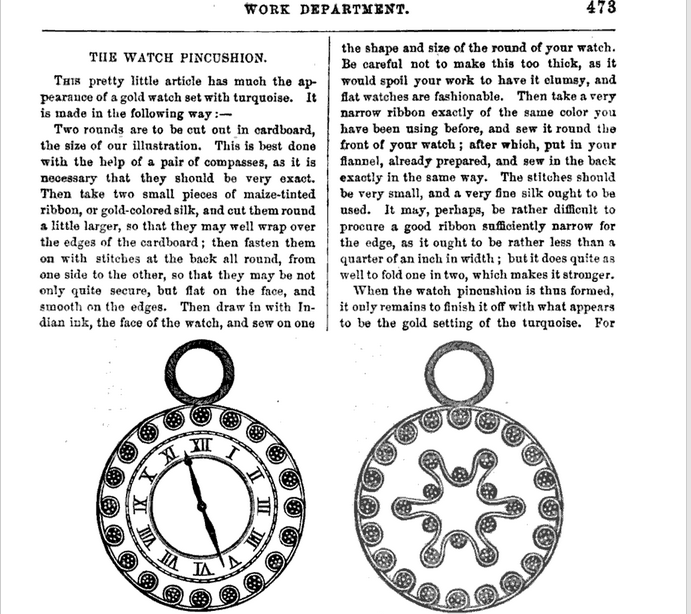
Pin cushion in the shape of a watch, courtesy of Julie Hollick.
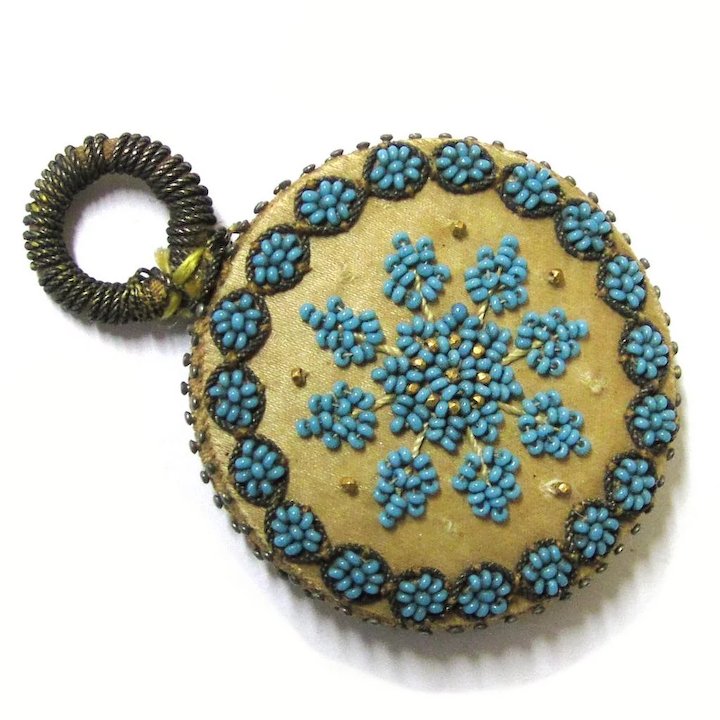
Maybe I fixated on this design because it’s extremely pretty, or maybe because it’s unusual to find that many of the same homemade craft surviving. However, according to a knowledgeable source, this particular one is not uncommon. Even a rare mutation – pink beaded! – has been sighted.
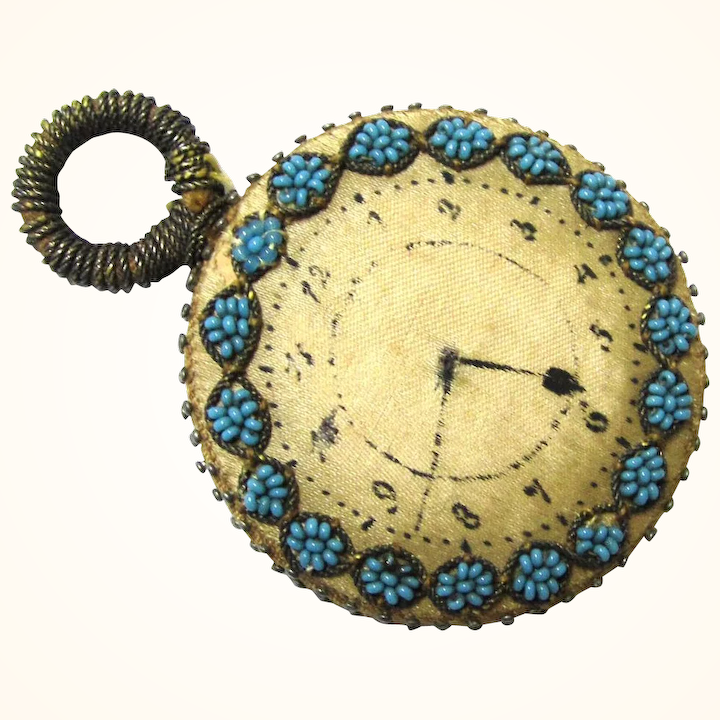
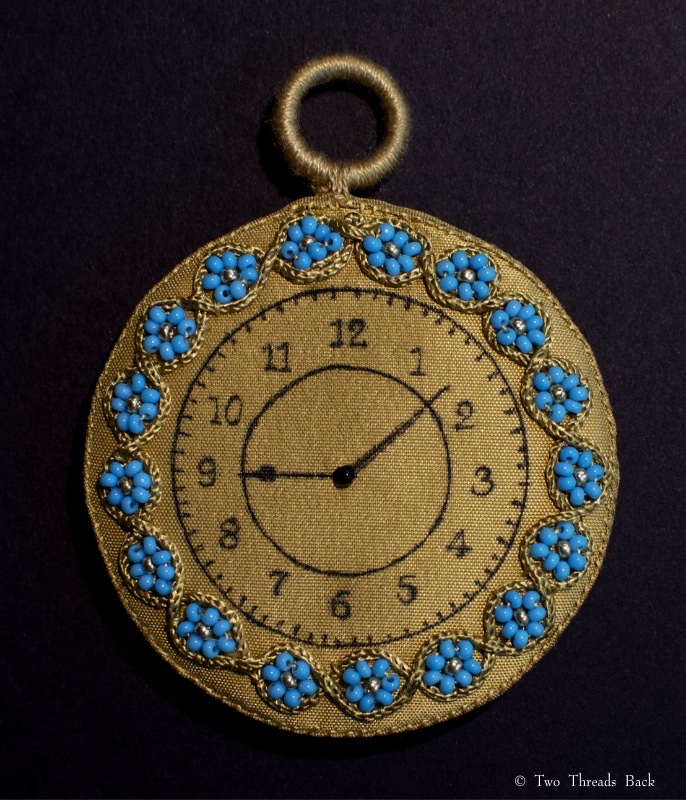
Elegant antique watch pin cushion, with a beautiful bead pattern on the reverse, courtesy of Genevieve Cummins.
Hmm. Were they made by a single crafty lady? Several crafty sisters? A craft class? Who knows. But I did feel like there was probably a pattern that they all followed; the resemblance was quite striking. So I did what any good researcher does these days and hit Googlebooks.
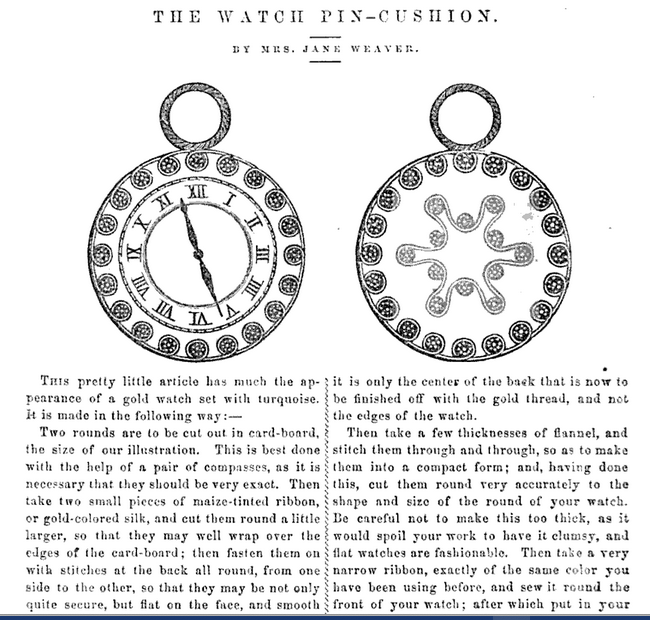
A project offered to the readers of Godey’s Lady’s Book in 1863.
Aha! It looked like Godey’s Lady’s Book could have been the source. But wait. As you know if you read the history of this sewing machine ad (or maybe you knew it anyway), if it was published once, it was quite likely “borrowed” by – or from – someone else, too.
From Peterson’s Magazine, 1862
Sure enough, it seems that Mrs. Jane Weaver of Peterson’s Magazine provided the same pattern the year before! Yep, word for word. Did Sarah borrow from Jane? Or did they both copy another pattern?
Even though I’d found American patterns for the pin cushions, it was unlikely that they were the source for the antique ones. Notice the numbers? Roman vs. Arabic numerals. The antique pin cushions I saw had Arabic; the published American patterns used Roman.
Perhaps they thought a little change would deflect any accusation of plagiarism. With almost everything in print copied by somebody,somewhere, who would even notice? The surviving examples were English – I think – so perhaps the original pattern was also.
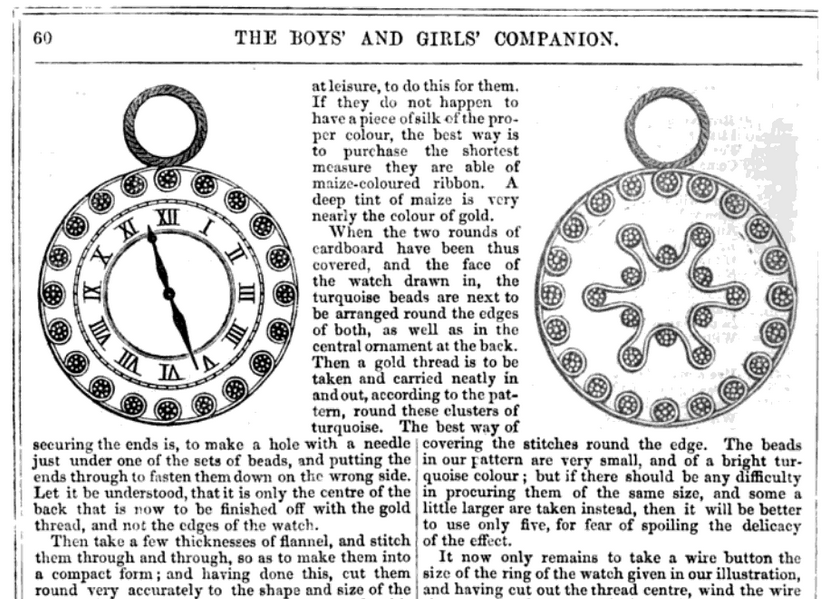
Back to Googlebooks for an English source. And indeed, I located another pattern published earlier, in England. The Boys’ and Girls’ Companion featured the watch pin cushion, this time credited to Madame Eugenie, in 1857. And that’s where I met a dead end.
Madame Eugenie? I haven’t been able to locate a needlework author by that name, so maybe it was a pseudonym. There were quite a few frantically creative women trying to survive by publishing needlework books and magazines during those years, so she may remain anonymous.
The preceding text reads “As the figures ought to be very neatly put in, some young ladies may like to ask an elder brother, or even a papa at leisure…” Right.
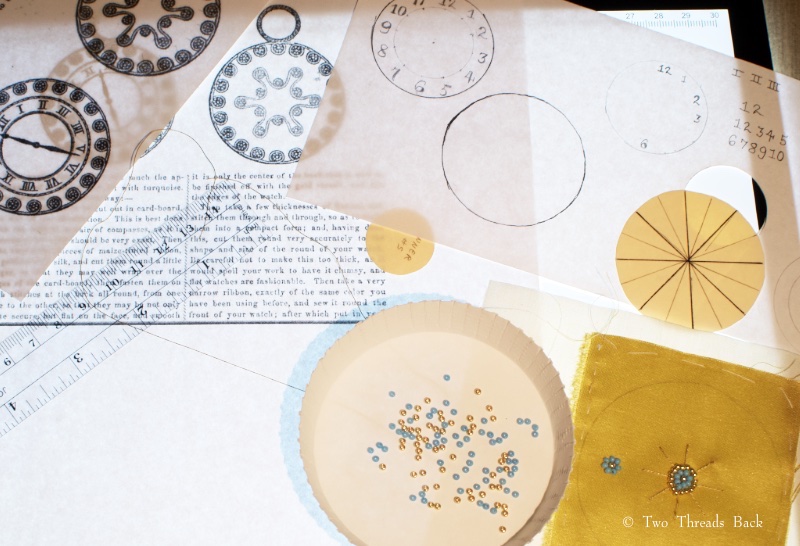
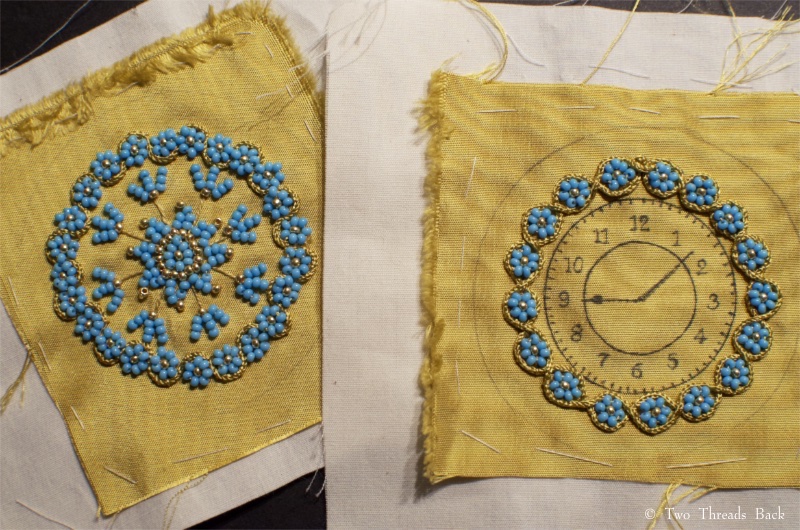
“Maize” colored silk, turquoise & gold beads, and experimental trim.
For now anyway, the pattern for the antique “watches” with numbers and star design remains unidentified. Well then, back to creating my own (economy) version. Since I couldn’t find materials exactly like the originals, I had to do some contriving.
Silk satin > silk taffeta
India ink and pen > Micron 005 pen
Tiny gold and turquoise beads > the smallest Hobby Lobby carried
Card-board > cardboard (yay!)
Wool flannel > wool flannel (yay again!)
Compasses for drawing circles > washers from my husband’s toolbox
Gold cord > embroidery floss + threads pulled from the fabric + upholstery braid unwound
Silk ribbon > a strip of fabric
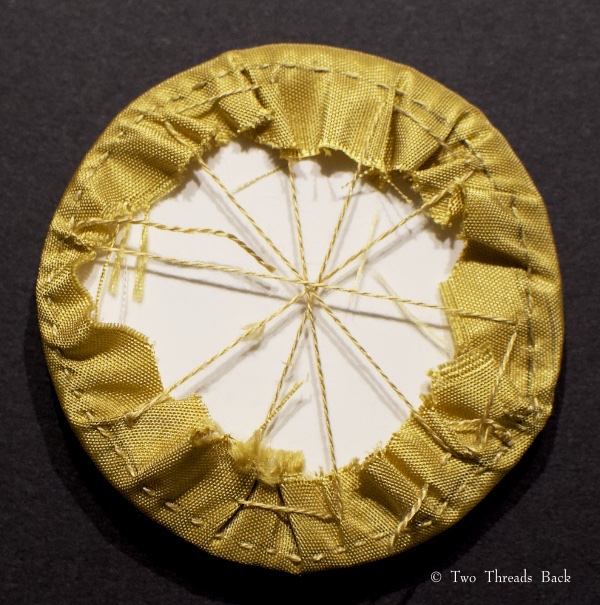
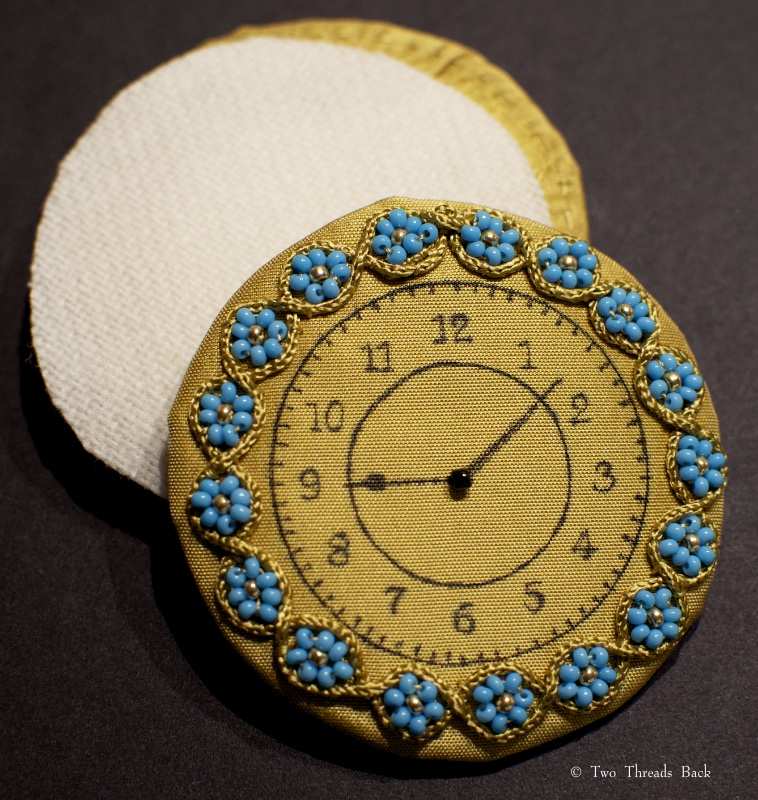
Work in progress.
Front and back all finished but for the single black bead.
“Fastened on with stitches at the back all round, from one side to the other”
A “few thicknesses of flannel” sandwiched between, as instructed.
I did have silk ribbon. But it was so thin there’s noooo way it could have worked!
As per usual, the whole project turned out to be an excruciating exercise in “making things up as you go along.” What I learned:
Compromise when it comes to materials.
Make a pattern first. MAKE A PATTERN FIRST.
Line the silk.
Practice writing on paper. Then on fabric. Then give up and use a font on the computer and trace it.
Press gathers flat.
Use tinier stitches than seem necessary.
Beads unpick faster than expected.
The result will be bigger than expected.
Beads roll over no matter how carefully anchored. It’s their nature.
Did I mention make a pattern FIRST?
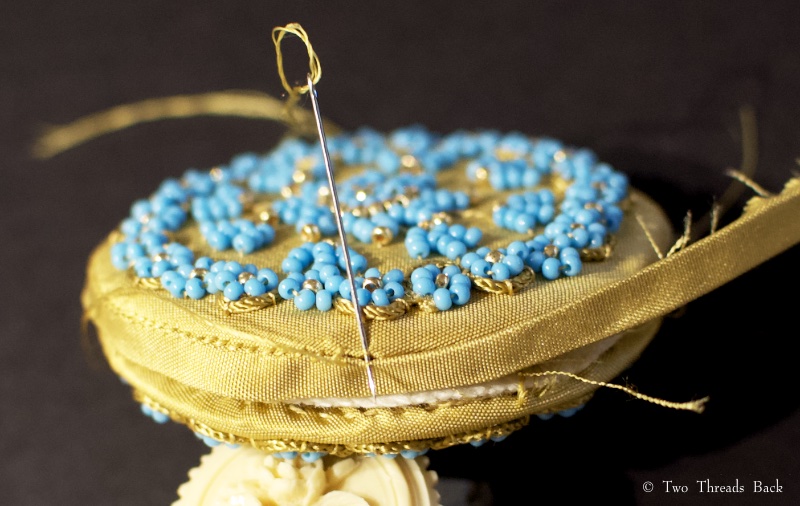
It was actually a lot of fun doing everything but the pen work since I’m not good with handwriting, and I couldn’t “ask an older brother or a papa.” Even unpicking beads (when they didn’t fit because I didn’t draw a pattern FIRST) was rather enjoyable; hearing the tiny taps when they fell off and hit the tray was ridiculously entertaining.
And just about the time I was finishing the little ring on the top, I chanced upon an even earlier pattern – and I wasn’t even looking for it!
The Wreath, or Ornamental Artist, by A Lady, 1835.
Sadly, there were no pictures. And it was for the needle-book/pin cushion version. But it gives me hope that another pattern is out there, just waiting to be discovered. I’ll keep a watch.
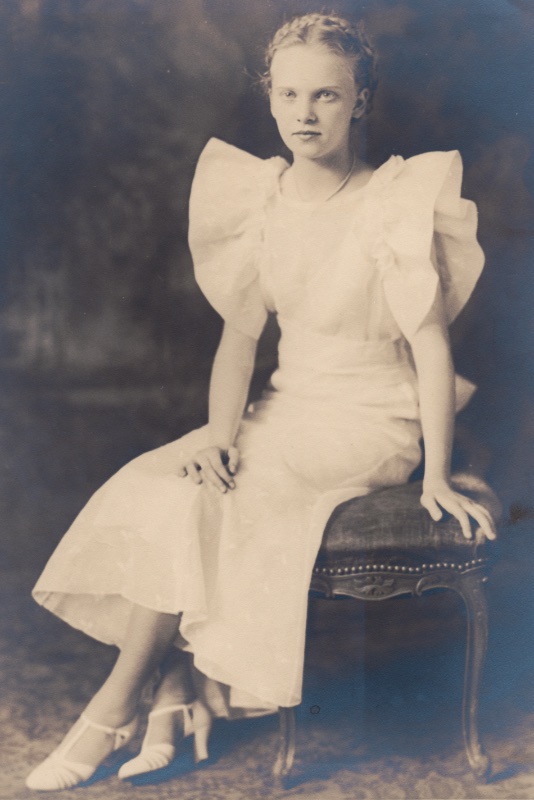
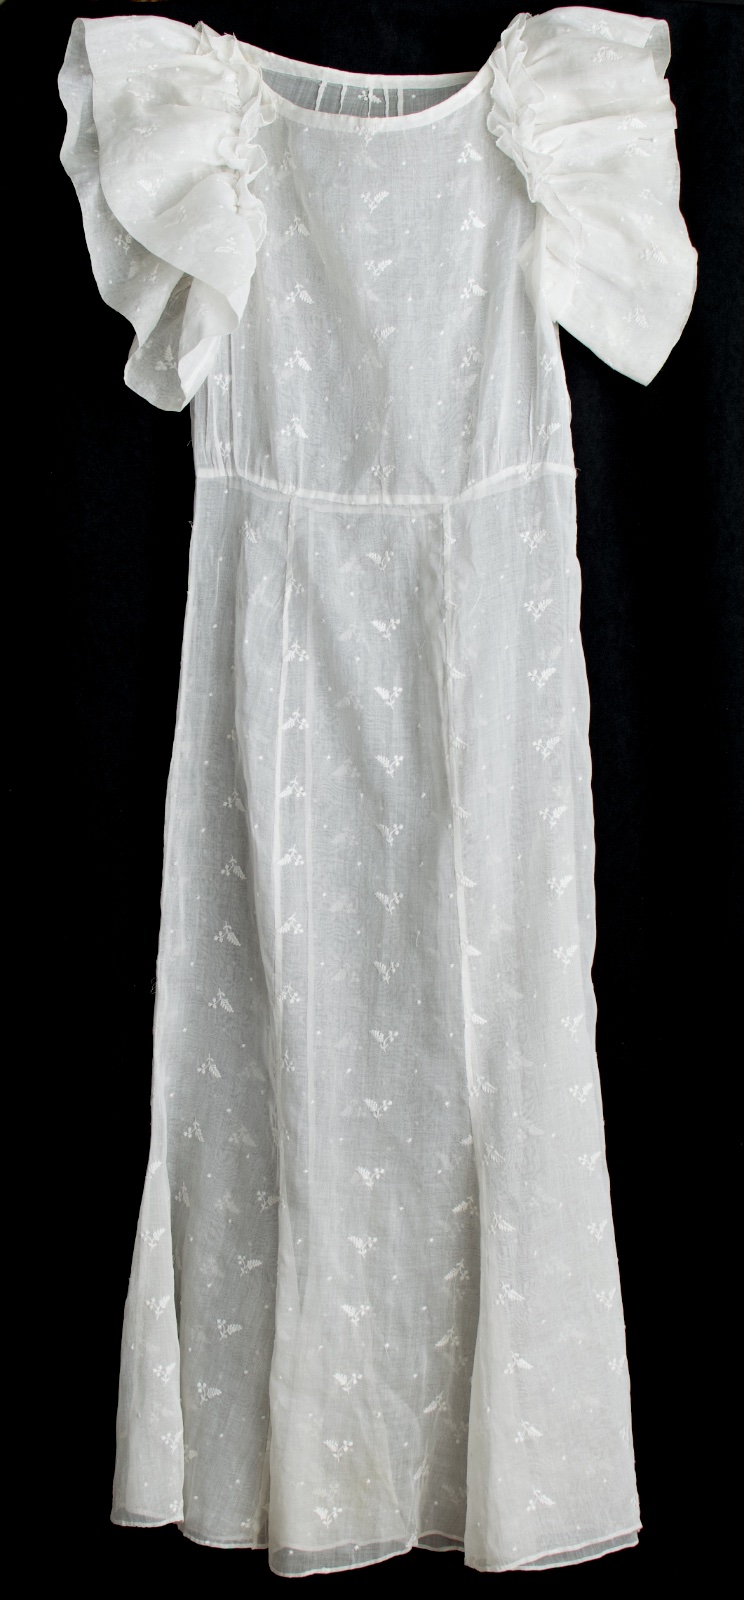
Anna’s graduation photograph, 1934. Isn’t she lovely?
It’s a delight to follow the evolution of hand sewing instruction from its earliest days up to more modern times – at least if you consider the 1930s modern!
Thanks to a friend who wanted to share her mother’s dress, I’ve had another chance to peek into a Domestic Economy class, this time in Brooklyn, New York, in 1934. The teacher was Miss Gimbel, and she must have been a wonderful sewing teacher – she was certainly very good at understanding what kind of project would please a girl of 13. Fluffy ruffles in dainty white, in a lesson she could wear to her graduation!
The dress needed a little TLC before it could show off. Although in excellent condition for its age, a bath was in order.
A good soak works wonders.
I’ve laundered a lot of cotton and linen over the years, and was hopeful that Anna’s dress could be restored. It was made of embroidered organdy and (of course) had been starched. Starch does not age well, in case you haven’t noticed! But a few days of soaking and a lot of water changes, and the frilly frock was refreshed.
Restored to glory!
Once again I was surprised to see how simple it could be to sew a garment by hand. I’m so accustomed to modern clothing with all the double-stitched and felled seams, finished inside and out, that anything else is startling. I’ve got sportswear so heavily reinforced that the stitches could stand alone if all the fabric were to melt away!
But not here. Anna used very simple basting, running, hemming, and gathering on plain and French seams. The ruffle edge was overcast.
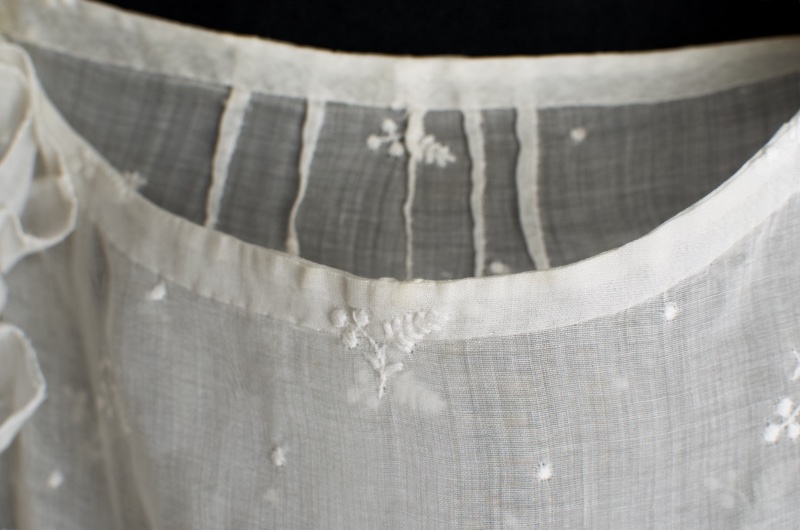
You can see the neatly turned hem, and where she took greater pains with the collar binding than the much longer narrow hem, which I’ve folded up to show.
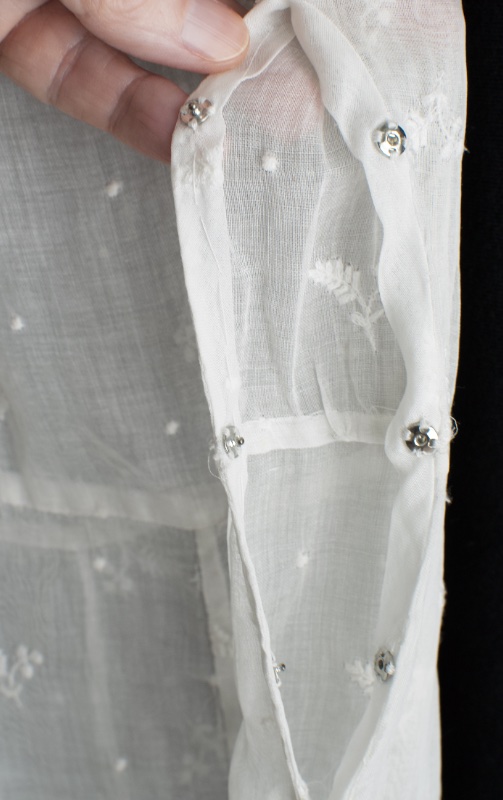
The armholes have a self-fabric binding, and the dress closes on one side with snaps. The basting thread is still present, perhaps serving to hold the placket in place.
Weekly sewing lessons from the first through the eighth grade were part of a public school education for Anna. Her work was neat and elegant, a skill to be proud of. I think she learned well and wore her reward for a very special occasion!
It seems like even hobbies go through seasons, and mine has certainly been in a slow one. However, there’s nothing like a new book to start things stirring again.
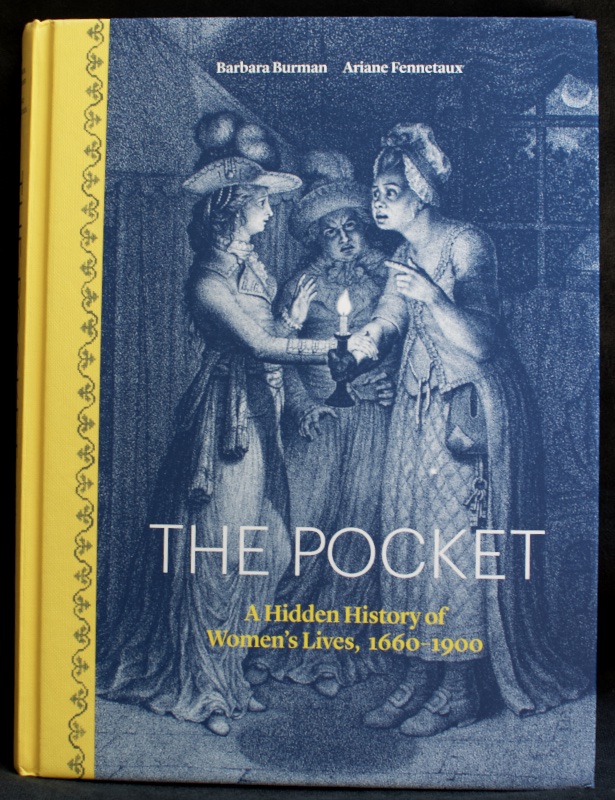
Ever since seeing the online Pockets of History exhibit, I’ve been wishing for a book with more on the subject. So of course I was delighted when I learned about this one! The Pocket – A Hidden History of Women’s Lives, 1660-1900, by Barbara Burman and Ariane Fennetaux, was published in May by Yale University Press. I’ve just started to explore it. How could I resist? It touches on all my favorite subjects, not only textiles, costume, and needlework, but fascinating little bits of material culture and stories (sadly too brief) associated with them.
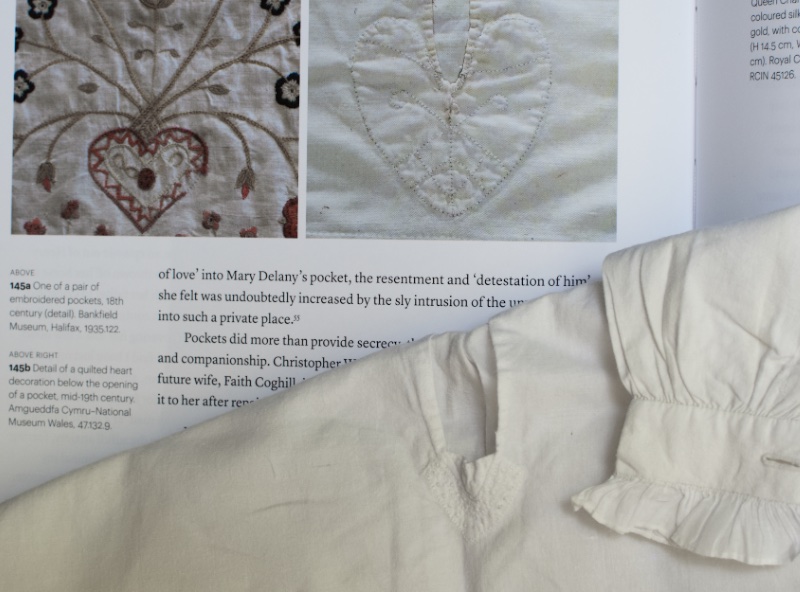
Who knew that a pocket could have a “heart-bit” too? But it makes good sense because the stitching was a decorative way to reinforce an opening.
The book offers a great close-up of a heart-bit on a pocket, which looks much like the one on this muslin child’s gown, circa early nineteenth century.
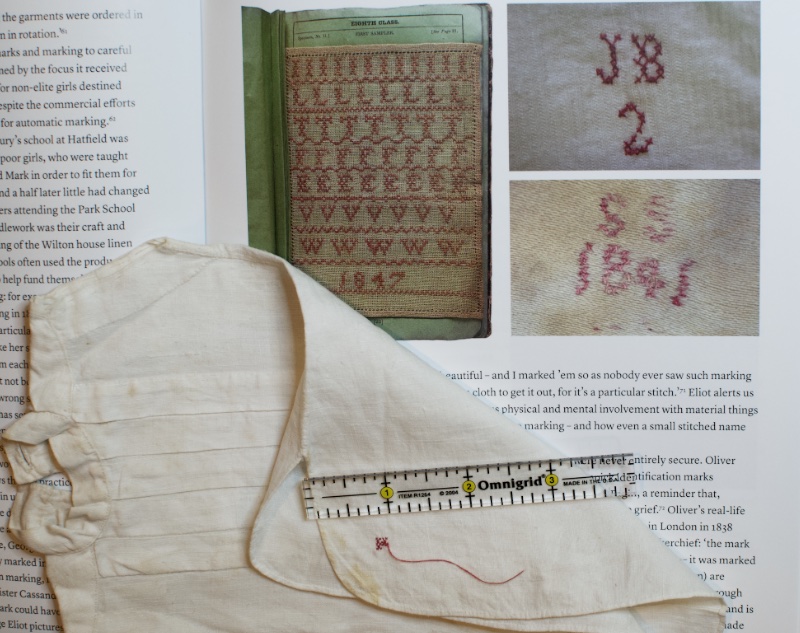
There’s also discussion of marking and learning to mark, and the importance to women of claiming ownership. The Pocket even touches on needlework education, which thrills my plain sewing pedagogical heart no end!
Pockets show the same style of marking as other plain sewing items, like this schoolgirl’s practice marking piece (c1850) with an unfinished “H.” The ruler shows how small the marking could be.
The book is full of beautiful photos that reveal the diversity of pockets. I even got a patchwork fix, thanks to these made with colorful prints. Other illustrations include period art, engravings, advertising, and some splendid close-ups of the textiles and embroidery. And wonder of wonders: doll pockets!
A section of paper piecing (you might recognize a few from the Flower Patch posts) laid across some of the gorgeous illustrations. I’m always hoping for a pattern match, yet always disappointed.
I think the most delightful part of the book is learning about the little treasures and scraps that were pocketed. Or wait – maybe it’s the stories? The authors’ research reveals fascinating bits of women’s lives, and the pocket contents added to their stories as well. The list is extensive: money, gloves, books, pencils, medicine, “characters” (an employment reference), food, jewelry, handkerchiefs, clothing, charms, combs, cosmetics, tickets, snuff boxes, cutlery, letters, and even pilfered goods. Hmm… barring the last mentioned (one would hope), it’s really the same as you might find in a handbag today. Ok, maybe not the snuffbox.
The only pocket I’ve made is a miniature one for Pharaby. I’ve never made a people-sized one. I rather like the idea of sewing a pocket for myself. No particular purpose, just fun. It would be a terrific way to practice plain sewing skills and experiment with some fancywork as well.
If you find these topics as fascinating too, I highly recommend The Pocket. It provides such a wealth of information that you won’t actually find yourself … out of pocket.
Too tempting! I gave in and created a collection for a pocket-to-be: scissors, thimble, whist counters, love poem, ribbon, pattern, love token (look closer, it’s really NOT Billy Bones’ black spot!) and a broken coral necklace awaiting repair. Still. Waiting.